


24
Image Vault
®
PRO Command
2.3
Playback Mode
Playback Mode is used to review recorded video, audio, and data. Use Playback Mode to confi gure the DVR’s recording process and all
other advanced features. Playback Mode on the DVR is almost identical to the remote playback software (PRO-Command Playback).
For complete information refer to the online help in your software.
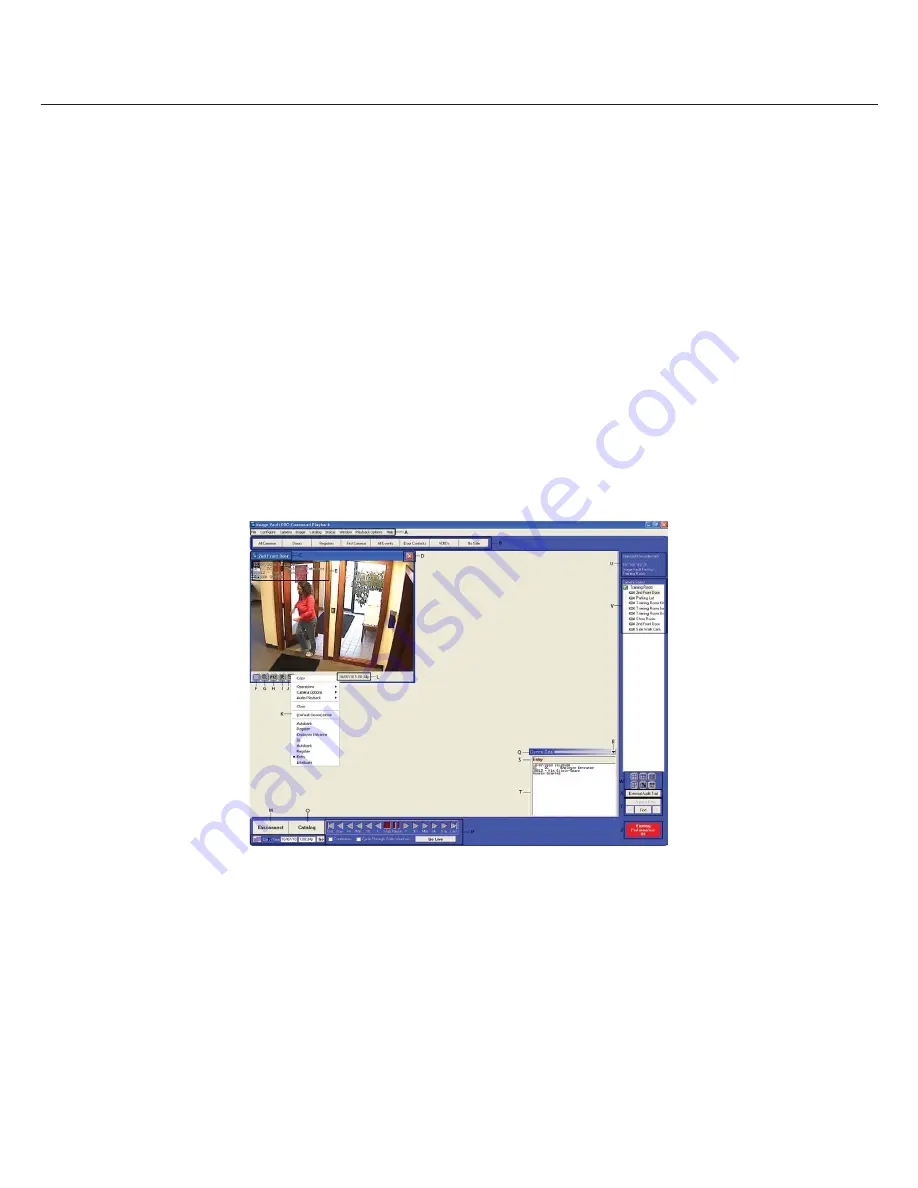
Playback Mode Description
Note: Various screen elements can change. These descriptions cover the basics.
Item A: Menu Bar. File, Confi gure, Camera, Image, Catalog, Status, Window, Playback Options and Help menus.
Item B: QuickView Action Buttons. User-defi ned optional short-cut buttons to pull up specifi c cameras or data.
Item C: Camera Name. Camera name is displayed above the camera image in the camera window (if window borders are enabled).
Item D: Close Icon. Click to close the camera window. If window borders are turned off , scroll over the upper right corner and the
close icon will appear automatically.
Item E: POS Data. POS data may be overlaid on camera windows. Text attributes are adjustable. Click and drag from one image to
another to synchronize.
Item F: Full Screen Icon. Click to make the camera window “Full Screen” (occupies full mat area). When zoomed to full screen, you
may want to enable “Use Smooth Zooming” for better screen display. Click the icon again to restore to the previous size.
Item G: Zoom Icon. To use digital zoom, click the Zoom icon. The pointer changes to a magnifying glass. Click and drag to select
the zoom area and the image will instantly zoom. This will show a Picture-in-Picture window so you may see the area
you are zoomed into on the full picture. You may jog, play or set full-screen zoomed images as if they were normal images.
While the Zoom feature is active you will not be able to drag-and-drop to sync images. When zoomed, you may want to en-
able “Use Smart Smooth Zooming” for better screen display.
Item H: PTZ Menu Icon. Click this icon to access A PTZ window for options to control a PTZ camera remotely.
Item I: Motion Search Icon. Click this icon to access motion search options.
Item J: Camera Menu. Click this icon to see the Camera Menu. (See “Item K”)
Item K: Camera Menu. Options include: resetting camera window to original size; display full screen, zoom, move PTZ, enable beeps,
smoothing zoomed images, various audio playback options, showing motion detection grids, closing the window, and setting
which data channel to display on or beside the image. (See “Item I”)
Item L: Time Stamp. The exact date and time of the recorded image is shown.
Item M: Close/Disconnect Button. Close Playback Mode (return to Live Mode). In remote playback software, this button is marked
“Disconnect” and it drops the connection. If connected to more than one DVR it will ask you choose a specifi c DVR or
“Disconnect
All”.
Item N: Date & Time Jump. Shows the time stamp of the selected image. To force the image to a specifi c time, enter the new date and
time and click the GO Button.
Item O: Catalog Button. Click to see the range of available video, general statistics, and the serial number of the DVR.


