background image

13    

Web Interface guide HTI-404

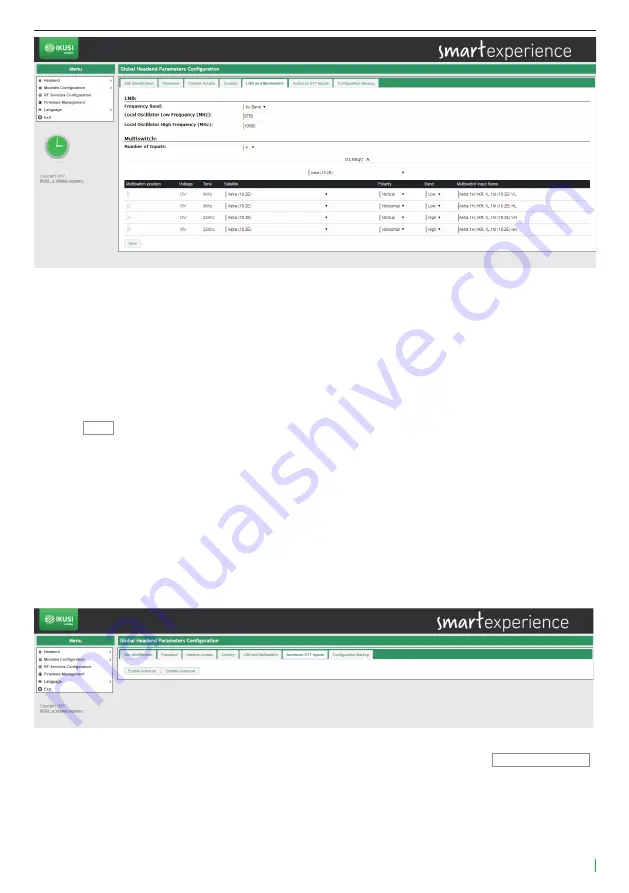
In the LNB area, set the parameters of the LNB that you are using (frequency band, local oscillator fre-
quency for low polarity and local oscillator frequency for high polarity).
In the Multiswitch area you can describe how is the Multiswitch that is being used. To do that, introduce the 
number of inputs of the multiswitch (in the case there isn’t multiswitch, select 0). For each of the inputs, 
defined by its position and grouped in fours, you must identify which polarity is (Vertical or Horizontal) and 
in which band is transmitted (Low or High). The headend proposes a name for that input as a combination 
of the satellite name, polarity and band. This name can be edited.
Push the 

Save 

 button to save the changes.

4.1.2.6 Autoscan DTT inputs

The Autoscan DTT Inputs tab allows to enable/disable automatic scanning of DTT inputs in case of a 
change in the frequency plan. 
Thus, if Autoscan is enabled, when a frequency change is done in a DTT signal that was tuned previously, 
the HTI will lose sync and will launch a scan of the inputs, in order to search the new frequency of the 
signal (identified with the same TS_ID and SID values). 
If the Autoscan is disabled, when a change in the frequency plan happens, the HTI must be reconfigured 
manually.

To enable the Autoscan of DTT inputs, push Enable Autoscan button. To disable it, push 

 Disable Autoscan


button. By default, the Autoscan is enabled.

Summary of Contents for HTI-404

Page 1: ...Web Interface guide HTI 404 REF 3864 ...

Page 2: ...2 Web Interface guide HTI 404 ...

Page 3: ...eset 11 4 1 2 General configuration 11 4 1 2 1 Site identification 11 4 1 2 2 Password 11 4 1 2 3 Internet access 12 4 1 2 4 Country 12 4 1 2 5 LNB and multiswitch 12 4 1 2 6 Autoscan DTT inputs 13 4 1 2 7 Configuration backup 14 4 1 3 Headend DVB network 14 4 1 3 1 Output network configuration 15 4 1 3 2 Modules in network 16 4 1 4 Installation report 16 4 2 Modules configuration 17 4 2 1 Inputs ...

Page 4: ...ing Do not open the unit There is a risk of electrostatic discharge Risk of damage to the unit This safety notice indicates a possible dangerous situation Not following these instructions may lead to the unit being damaged The unit must be appropriately ventilated Install the unit in a dust free location Do not place the unit in a location where the ventilation slots are covered or blocked Install...

Page 5: ...e centre Under the following conditions a layer of moisture can appear inside the device which can lead to mal functions if the device is moved from a cold to a warm area after a cold room is heated when this device is placed in a damp room The device should not be used in a very dusty or saline environment Dust or salt particles and other foreign objects may damage the device Do not expose the de...

Page 6: ...pc to the USB port of the master module located in the slot 2 of the base plate with a USB ethernet adapter NOTE It is recommended to use USB ethernet adapters based on AX88179 or AX88772 chipsets 3 COMMUNICATION WITH THE HEADEND HTI is configured through a web page generated by the own headend Use IKUSI HEADEND DISCOVERY application to access this web page without modifying manually the network c...

Page 7: ...e browser If you want to change it choose in icon the flag related with the desired language Enter the folowing data User Admin Password admin Push Submit button The main screen of the configuration interface will open from where you can configure the headend as described in the next section 4 WEB INTERFACE The web interface of the HTI allows to configure the headend as well as to show status info...

Page 8: ...ach module inserted in the base plate is displayed The master module always corresponds with the module inserted in slot 2 and it appears in white on black background The remaining modules appear on white background When selecting a specific module a window with status information and alarms in detail will open ...

Page 9: ... previously The unregiste red equipments are shown in yellow on white background By default no module except the one inserted in slot 2 master slot is registered To register a module that has been detected by the master module simply push Add button of that module The background color change to white indicating that the module has been properly registered Repeat the registration process with all m...

Page 10: ...ting from the previous headend with 3 HTIs all registered the HTI of slot 4 has been replaced with a new HTI A module with two possible configurations is displayed one in grey background corresponding to the previous module that was already registered in the headend and another one in yellow background corresponding to the configuration of the new module pending registration If you want to copy th...

Page 11: ...you understand the consequences of this action and you agree NOTE In the case of resetting the master module slave devices will be unegistered 4 1 2 General configuration This menu displays several tabs that allow to set global parameters of the headend To access this menu go to Headend General Configuration A window as the following one will open 4 1 2 1 Site identification Select the Site Identi...

Page 12: ...rovided by a DHCP server Otherwise unselect this option and manually enter the settings IP address Netmask Default gateway Primary DNS Server Secondary DNS Server Consult network manager to get those parameters Push Save button to save the changes 4 1 2 4 Country To set the local time and customize certain parameters related to the specific country regulations LCN NIT etc select the Country tab In...

Page 13: ...that input as a combination of the satellite name polarity and band This name can be edited Push the Save button to save the changes 4 1 2 6 Autoscan DTT inputs The Autoscan DTT Inputs tab allows to enable disable automatic scanning of DTT inputs in case of a change in the frequency plan Thus if Autoscan is enabled when a frequency change is done in a DTT signal that was tuned previously the HTI w...

Page 14: ...ion of the headend push the Download button To apply a configuration previously stored first choose the file pushing Select File to Apply button After that push Upload button A message will appear indicating configuration is being applied After some seconds the configuration will have been applied and the browser will redirect you to the Site identification screen 4 1 3 Headend DVB network This me...

Page 15: ...Original Network Identifier that will be signalled in the NIT table Auto Service List If you don t want to send the service_list_descriptor select Disabled In other case a service_list_descriptor with the information of the services broadcasted by the headend will be included in the NIT table NIT LCN Mode if youn don t want to send LCN select Disabled In other case select the LCN mode used by the ...

Page 16: ...elds with the desired values for that carrier and push Save button 4 1 4 Installation report Installation report option Headend Installation Report shows in a grouped way all the information of the headend In this report you can find Information about alarms in the case there are any Installation description Language data hour and country information Information about IP connectivity Configuration...

Page 17: ...such as standard frequency available space or number of services Information about the services that are processed by each module 4 2 Modules configuration This menu allows you to configure the inputs you want to receive and the carriers that you want to transmit 4 2 1 Inputs To configure the inputs you want to receive select Modules Configuration Inputs A window as the following one will open ...

Page 18: ...ure one of them select the icon associated with that input For each input you must configure if it is enabled or not and what is the reception standard DVB S S2 for satellite DVB T T2 for terrestrial or DVB C for cable The rest of parameters will depend on the selected standard in the following way ...

Page 19: ...plex to be received Advanced parameters it allows to show or hide the advanced parameters related to the reception of DVB T T2 They are the following Hierarchy in broadcasting with several hierarchies it allows to select the hierarchy of the signal to be received Autoscan it allows to enable or disable the automatic scan of the DTT inputs in case of a change in the frequency plan PLP ID choose the...

Page 20: ...isplayed This configuration is divided into two parts a global part associated with the module and another part associated with each of the carriers In the global configuration the output standard DVB T or DVB C and output attenuation using a scroll bar will be selected In the configuration associated with the output carriers the four outputs of each HTI are shown To confi gure one of them select ...

Page 21: ...output carrier to be generated Choose bet ween 1 4 1 8 1 16 and 1 32 Constellation it allows to select the constellation of each one subcarrier of the COFDM output carrier Choose between QPSK 16QAM and 64QAM Code Rate it allows to select the value of the convolutional code rate used as error protection Choose between 1 2 2 3 3 4 5 6 and 7 8 DVB C Frecuency MHz it allows to select the frequency val...

Page 22: ...nd in which output carrier they will be broadcasted In addition you can customize these services by changing their name blocking certain streams or editing their LCN value To access this menu select RF Services Configuration A window as the following one will open This window is composed of several tabs one for each slot of the headend plus one with the complete list of services broadcasted by the...

Page 23: ...and pushing icon A window as the following one will open In this window you can choose the output carrier to which the service will be added You can also choose between creating a new service or reusing the space and signaling of an existing one in the output In this example since there are still no services in the outputs we have chosen to create a new one Once the desired changes have been made ...

Page 24: ...dends also offer the option of presetting backup channels empty services that will allow to increase the lineup in the future without the need of launch a scan in the TVs To create an empty service push icon in the output where you want to create the backup channel A window as the following one will open ...

Page 25: ...ese backup services could be used in the future for conveying new contents without the need of rescanning the TVs In the same way HTI headends allow to replace the content of an existing services by another one without the need of rescanning the TVs of the facility To add content to an empty service or to replace the content of an existing service push icon associa ted with that service A window a...

Page 26: ...he example above HOPE CHANNEL HD service has been added in the TV HOTEL 1 empty service room and the content of 24H service has been replaced by STARPARADIES AT service Finally a service that is not currently being broadcasted can also be added to the channel lineup for example services that are only broadcasted at night To do this push iconon the output in which you want to broadcast this service...

Page 27: ...e will be assigned to the service and in what output will be broadcasted To save the changes push the Save button The added custom service will be highlighted on a pink background which will turn white as soon as the service is available at the input Besides adding services in this same tab you can perform the following actions ...

Page 28: ...mina ted becoming an empty service To remove a service from the output channel lineup Pushing icon the service will be completely eliminated from the output channel lineup To see the final result of the channel lineup select the Service Listing tab A window as the following one will be displayed This window shows a list with all the services generated by the headend In addition several global conf...

Page 29: ... decision of processing it or not MODULE it indicates in which module the service is being processed INPUT it indicates which input is receiving the service OUTPUT it indicates which output carrier is broadcasting the service Global options are edited by pushing icon and they are the following ones LCN OFFSET it is the value from which the headend proposes LCNs AUTO BLOCKED STREAM TYPES it indicat...

Page 30: ...e using UPLOAD A FIRMWARE UPDATE option After pushing the Install button the upgrade progress screen will open This screen shows an estimate of the time remaining to complete the update a progress bar indicating the progress of the update and information on what action is currently running At the conclusion of the upgrade a message will appear as follows Push the Go back home button The web interf...

Page 31: ...nded in at the corresponding point of collection for electric and electronic equipment By ensuring this product is disposed of correctly you will help prevent negative consequences for the environment and human health which could otherwise be caused by inappropriate waste handling of this product Recycling of materials helps preserve natural resources For more detailed information on the recycling...

Page 32: ...Paseo Miramón 170 20014 San Sebastián Gipuzkoa España Tel 34 943 44 89 44 Fax 34 943 44 88 20 television ikusi com www ikusi tv Web Interface guide HTI 404_en ...

Reviews: