background image

ENGLISH

  OPERATING THE MONITOR  25  

Adjustment Item

Problem / Option                                      Button to Press

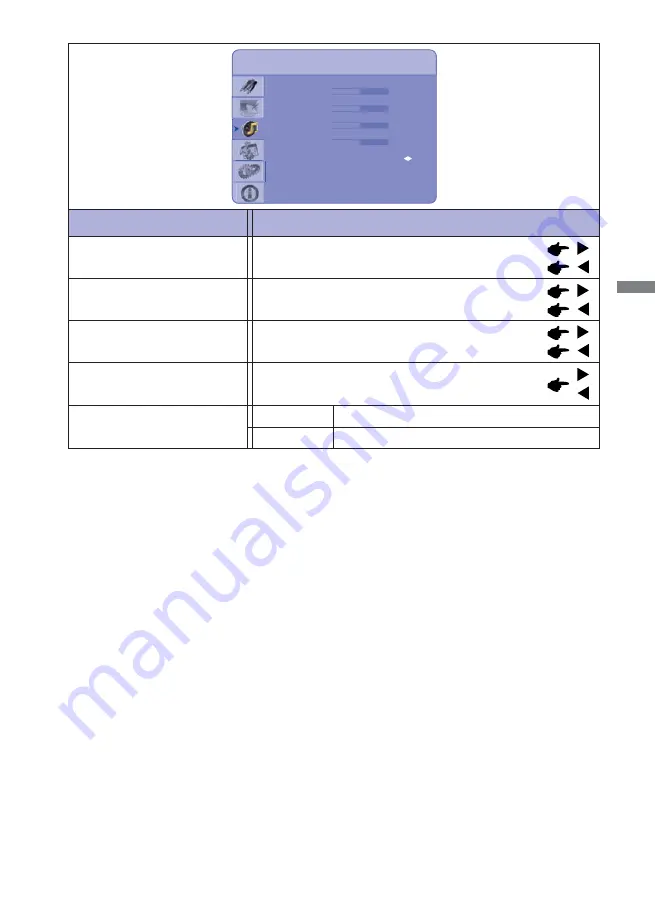
HDMI Audio Input

Volume

Bass

Treble

Balance

50

10

10

Audio Settings

10

HDMI

Audio Settings

Too soft 

Too loud

Volume

Bass

Too weak

Too strong

Treble

Too weak

Too strong

Balance

Adjust the volume balance of the speaker right 

and left.

HDMI Audio Input *

HDMI

PC

Select the HDMI input.

Select the PC input.

*  Suitable for HDMI input only.

Summary of Contents for ProLite L4260S

Page 1: ...sing the iiyama LCD monitor We recommend that you take a few minutes to read this comprehensive manual carefully before installing and switching on the monitor Please keep this manual in a safe place for your future reference USER MANUAL ...

Page 2: ...ENGLISH ...

Page 3: ...ng the address http www iiyama com You can access the Web page of different countries from there CE MARKING DECLARATION OF CONFORMITY This LCD monitor complies with the requirements of the EC Directive 2004 108 EC EMC Directive and 2006 95 EC Low Voltage Directive Warning This is a class A product In a domestic environment this product may cause radio interference in which case the user may be req...

Page 4: ...TS 5 CONTROLS AND CONNECTORS MONITOR 6 INSTALLATION 9 CONTROLS AND CONNECTORS REMOTE CONTROL 10 PREPARING THE REMOTE CONTROL 11 BASIC OPERATION 12 CONNECTING YOUR MONITOR 15 COMPUTER SETTING 17 OPERATING THE MONITOR 18 ADJUSTMENT MENU CONTENTS 20 SCREEN ADJUSTMENTS 31 POWER MANAGEMENT FEATURE 34 TROUBLE SHOOTING 35 RECYCLING INFORMATION 36 APPENDIX 37 SPECIFICATIONS ProLite T4260MTS 37 SPECIFICATI...

Page 5: ...se fire electric shock or damage INSTALL THE MONITOR ON A FLAT STABLE SURFACE The monitor may cause an injury if it falls or is dropped DO NOT USE THE MONITOR NEAR WATER Do not use where water may be splashed or spilt onto the monitor as it may cause fire or electric shock OPERATE UNDER THE SPECIFIED POWER SUPPLY Be sure to operate the monitor only with the specified power supply Use of an incorre...

Page 6: ...or any other soft material may also cause damage DISCONNECT THE CABLES WHEN YOU MOVE THE MONITOR When you move the monitor turn off the power switch unplug the monitor and be sure the signal cable is disconnected If you do not disconnect them it may cause fire or electric shock UNPLUG THE MONITOR If the monitor is not in use for a long period of time it is recommended that it is left unplugged to ...

Page 7: ...onitor may have to be periodically replaced For the warranty coverage on this component please check with local iiyama service center If you have to return your unit for service and the original packaging has been discarded please contact your dealer or iiyama service center for advice or replacement packaging WARNING If you drop any materials or liquids such as water into the monitor when cleanin...

Page 8: ...t supplied by iiyama 2 Accessory for ProLite T4260MTS Power Cable 1 D Sub Signal Cable HDMI Cable USB Cable 2 Remote Control Touch Pen 2 iiyama Logo Sticker Safety Guide Quick Start Guide BEFORE YOU OPERATE THE MONITOR CHECKING THE CONTENTS OF THE PACKAGE CAUTION FEATURES Supports Resolutions up to 1920 1080 High Contrast 4150 1 Typical with Touch panel Brightness 370cd m2 Typical with Touch panel...

Page 9: ...ve the top cushion and take the accessories bag and the Monitor out CAUTION Moving the monitor requires at least two people If not it may drop and could result in a serious injury When moving shipping the monitor please hold by the white handles Pull the handle SPECIAL NOTES ON ProLite T4260MTS Permanent damage can occur if Sharp Edged Pointed or Metal items are used to activate Touch This could i...

Page 10: ...Input Select Button Right Button Left Button Up Button Down Button MENU EXIT Menu Exit Button Front Power Indicator Green Normal Operation Orange Power Management If power off and select LED on via menu Front LED ON Off Power Off If power on and select LED on via menu Front LED OFF Remote Sensor Remote Sensor ...

Page 11: ...TE THE MONITOR 7 Left Side AC OUT AC Connector AC OUT AC IN AC Connector ON OFF Main Power Switch OFF ON MAIN POWER AC IN AC OUT 100 200V2A Right Side Touch USB Touch USB Touch USB Connector Available for ProLite T4260MTS only ...

Page 12: ... Component Video RCA G Y B Pb R Pr Component Video Connector Component Audio RCA L R Component Audio Connector S Video Mini Din 4pin S Video Connector Video RCA Video Connector Composite Audio RCA L R Composite Audio Connector RS232C In D SUB 9pin RS232C Connector RS485 In RJ 45 RS485 input Connector RS485 Out RJ 45 RS485 output Connector Handles Handles L R Composite Audio Video S Video L R Compo...

Page 13: ... monitor requires at least two people Before installing please make sure the wall is strong enough to hold the necessary weight of the display and the mount Using a screw longer than this may cause electric shock or damage because it may contact with the electrical parts inside the monitor Remove the screws M8x15 x4 from the back of the monitor if necessary and please use those Screw M8 x15 x4 ...

Page 14: ...on Down Button Left Button Right Button EXIT Closes the menu system INFO Provides source and resolution information PIP Turns the PIP feature ON and OFF S V Selects the S Video source SWAP Swaps the main source and sub source picture ENTER Selects highlighted menu choices SCALING Toggles between different aspect ratios Auto Native 4x3 16x9 16x10 Letter Box FREEZE Freezes the current source image M...

Page 15: ...n the direction of the arrow Align and insert two AAA batteries according to their plus and minus ports as indicated in the remote control Replace the battery cover in the direction of the arrow and snap it back into place Battery x 2 Not included NOTE Replace with new batteries when the Remote Control does not work close to the monitor Use AAA dry batteries Operate the Remote Control by pointing ...

Page 16: ... monitor NOTE Even when using the power management mode or turning OFF the Power Switch the monitor will consume a small amount of electricity Disconnect the Power Cable from the power supply whenever the monitor is not in use or during the night to avoid unnecessary power consumption Monitor Remote Control Display the adjustment menu page The menu page appears on the screen when you press the MEN...

Page 17: ...enu or setting or perform the adjustment by pressing the Button while the menu page is displayed on the screen Monitor Remote Control Move the cursor vertically Select adjustment by pressing the Button while the menu page is displayed on the screen Monitor Remote Control MENU MENU ...

Page 18: ...the Remote Control to adjust the volume of sound when the menu page is not displayed on the screen Remote Control Switch the input signal This is activated when you successively press the Source Button on the monitor or Input Signal Button on the Remote Control as follows Monitor Remote Control MENU MENU ...

Page 19: ...he computer The cable supplied with the monitor is for a standard 15 pin D Sub connector If a special cable is required please contact your local iiyama dealer or regional iiyama office For connection to Macintosh computers contact your local iiyama dealer or regional iiyama office for a suitable adaptor Make sure you tighten the finger screws at each end of the Signal Don t connect the RS 232C ca...

Page 20: ...pherals before connection to avoid electric shock or damage NOTE Refer to the user manual of peripherals at the same time Ensure you have the necessary cables as required L R Composite Audio Video S Video L R Component Audio Component Video SPDIF Out IR Extender PC Audio In VGA RS232C RS485 In RS485 Out Red Red Red White Yellow White Blue Green S Video ...

Page 21: ...wer saving function to off Signal Timing Change to the desired signal timing listed on page 40 COMPLIANT TIMING Windows 95 98 2000 Me XP Vista 7 Plug Play The iiyama LCD monitor complies with DDC2B of VESA standard The Plug Play function runs on Windows 95 98 2000 Me XP Vista 7 by connecting the monitor to DDC2B compliant computer with the Signal Cable supplied For installation on Windows 95 98 20...

Page 22: ...een Display disappears when the time set for the OSD Timeout has passed EXIT button can be used to return previous menu item Any changes are automatically saved in the memory when the On Screen Display disappears Turning off the power should be avoided while using the Menu Adjustments for Image Position Clock and Phase are saved for each signal timing Except for these adjustments all other adjustm...

Page 23: ... 19 OSD LOCK MODE LOCK Press ENTER ENTER EXIT EXIT ENTER and EXIT on the Remote Control in sequence and OSD will be locked UNLOCK Press ENTER ENTER EXIT EXIT ENTER and EXIT on the Remote Control in sequence and OSD will be Unlocked ...

Page 24: ...rol when the Menu is not displayed Contrast Press the CONTRAST Button Remote Control when the Menu is not displayed Direct Direct Scheme Brightness Contrast Sharpness Saturation Hue Backlight Colour Temperature Gamma User 50 50 12 100 Image Settings Scheme 2 User Vivid Cinema Game Sport Displays a picture on a screen set by Image Settings adjustments For displaying outdoor scenery images For movie...

Page 25: ...Green Offset Blue Offset 2 2 256 256 256 0 Image Settings 0 0 User Colour Temperature User 5000K 6500K 7500K 9300K Go to adjustment menu of Gain and Offset Greenish white Reddish white Yellowish white Bluish white Blue Gain To gain Blue Red Offset To offset Red Green Offset To offset Green Blue Offset To offset Blue Image Settings Colour Temperature Gamma Gamma Off 2 2 High contrast Normal ...

Page 26: ...display Displayed at the same magnification Select Source Display Settings Main On Off Select the signal input automatically Select the signal input manually HDMI1 Select the HDMI1 input HDMI2 Select the HDMI2 input VGA Select the VGA input Component Select the Component input S Video Select the S Video input Video Select the Video input When only one of the seven signal inputs is connected to the...

Page 27: ...s function to default Return Return to Menu Side by Side Main screen and sub screen are tiled You can move the sub screen display area to any one of the following 4 positions within the overall display Full Screen Pillar Box Letter Box Expansion display Portrait display Landscape display When select Side by Side in PIP Mode Auto Scan Select Source On Off Select the signal input automatically Selec...

Page 28: ...cture With this function you can display two different picture Main Screen Sub Screen Small Middle Large Main Screen Sub Screen Side by Side PIP Screen Table Main Sub HDMI1 HDMI2 VGA DVI Component S Video Video HDMI1 HDMI2 VGA DVI Component S Video Video ...

Page 29: ... Bass Treble Balance 50 10 10 Audio Settings 10 HDMI Audio Settings Too soft Too loud Volume Bass Too weak Too strong Treble Too weak Too strong Balance Adjust the volume balance of the speaker right and left HDMI Audio Input HDMI PC Select the HDMI input Select the PC input Suitable for HDMI input only ...

Page 30: ... location on the screen OSD Zoom NOTE OSD Zoom disabled when setting portrait of OSD Rotation English Deutsch English German Français French Russian Polski Polish Dutch Nederlands OSD Timeout You can set the OSD display duration time between 5 and 120 seconds Sleep Timer Set a period of time after which the monitor will switch to stand by mode automatically Off 15 30 60 90 120min Real Time Clock S...

Page 31: ...cator when you are bothered by the light NOTE Image Position 1 Too far to the left Phase 1 Emphasize flesh color more Emphasize flesh color more than Medium IRFM Baud Rate Set the baud rate when connecting the RS232C connector and the monitor 9600 19200 38400 115200 Too far to the right Too low Too high To correct flickering text or lines Clock 1 Too narrow Too wide On Off The power indicator is t...

Page 32: ...r LED Factory Reset VGA ADC Settings Off 115200 Off No 46 50 1 Off No No Yes Return to Menu Factory preset data is restored Advanced Settings VGA ADC Settings 4 Press Button 1 Only Analog input 2 For best results use the Auto Adjust in conjunction with the adjustment pattern See page 31 for SCREEN ADJUSTMENTS 3 Only COMP1 AV1 and s v input 4 Auto Adjustment and VGA ADC Settings disabled when PIP M...

Page 33: ...splayed on screen before ADC calibration begins i Image in the green boxes displayed on both side of the screen has to be white and black in order to run the calibration accurately the black and white image can be made using software such as Microsoft PowerPoint ii The white in the left green box has to be the brightest white iii The black in the right green box has to be the darkest black 2 After...

Page 34: ...ain Channel Information 1920x1080 60 0Hz System Status Resolution V0 20d VGA System Status System Status Displays information regarding the current input signal coming from the graphic card in your computer See your graphic card user guide for more information about changing the resolution and refresh NOTE ...

Page 35: ...al adjustments are required There are two ways to adjust the screen One way is automatic adjustment for Position Clocks and Phase The other way is performing each adjustment manually Perform the Auto Adjust first when the monitor is connected to a new computer or resolution is changed If the screen has a flicker or blur or the picture does not fit in the display area after performing the Auto Adju...

Page 36: ...cker during the Clock H V Position adjustment In case the picture frame is bigger or smaller than the data display area after the Clock adjustment repeat steps from C 2 Stretch the right side of the picture frame to the right edge of the display area by adjusting the Clock C Press the AUTO Button Auto Adjustment Remote Control D Adjust the image manually by following procedure below when the scree...

Page 37: ...the refresh rate of computer to low 60Hz and repeat steps from C again Adjust the H Position after the Phase adjustment if the horizontal position moves during the adjustment H Adjust the Brightness and Color to get the desired picture after you complete the Clock and Phase adjustments Put back your favorite wallpaper G Adjust the Phase to correct horizontal wavy noise flicker or blur in the zebra...

Page 38: ...er consumption to less than 1W The screen becomes dark From Power Management Mode the image reappears in several seconds when either the keyboard or the mouse are touched again The power management feature of this product complies with power saving requirement of VESA DPMS When activated it automatically reduces unnecessary power consumption of the monitor when your computer is not in use To use t...

Page 39: ...r The signal timing of the computer is within the specification of the monitor No sound The audio equipment computer etc is ON The Audio Cable is properly connected The Volume is turned up The Mute is OFF The audio output level of the audio equipment is within the specification of the monitor The sound is too loud or too quiet The audio output level of the audio equipment is within the specificati...

Page 40: ...ENGLISH 36 Recycling information For better environment protection please don t dispose your monitor Please visit our web site www iiyama com recycle for monitor recycling RECYCLING INFORMATION ...

Page 41: ...n Size 930 24mm W 523 26mm H 36 6 W 20 6 H Power Source 100 240VAC 50 60Hz 5A Environmental Considerations Approvals CB CE TÜV USB peripherals Audio equipment are not connected NOTE Brightness Contrast ratio 370cd m2 Typical with Touch panel 4150 1 Typical with Touch panel Analog 0 7Vp p Standard 75 Positive Digital DVI Digital Visual Interface Standard Rev 1 0 compliance Digital HDMI Input Video ...

Page 42: ...e Horizontal 176 degrees Vertical 176 degrees Typical Maximum Screen Size 930 24mm W 523 26mm H 36 6 W 20 6 H Power Source 100 240VAC 50 60Hz 5A Environmental Considerations Approvals CB CE TÜV Audio equipment are not connected NOTE Brightness Contrast ratio 450cd m2 Typical 6500 1 Typical Analog 0 7Vp p Standard 75 Positive Digital DVI Digital Visual Interface Standard Rev 1 0 compliance Digital ...

Page 43: ...LISH APPENDIX 39 DIMENSIONS 615 0mm 24 2 527 0mm 20 7 934 0mm 36 8 1022 0mm 40 2 992 5mm 39 1 A B 456 5mm 18 0 586 0mm 23 1 ProLite T4260MTS ProLite L4260S A B 61 0mm 2 4 124 5mm 4 9 72 0mm 2 8 135 5mm 5 3 ...

Page 44: ...4 157 500 SXGA 1400x1050 64 744 59 950 101 000 65 317 59 980 121 750 1440x900 55 469 59 901 88 750 55 935 59 880 106 500 WSXGA 1680x1050 64 674 59 883 119 000 65 290 59 954 146 250 UXGA 1600x1200 75 000 60 000 162 000 1920x1080 66 587 59 930 138 500 WUXGA 1920x1200 74 038 59 950 154 000 SDTV NTSC 15 734 29 970 13 500 480i 480i 480i PAL 15 625 25 000 13 500 576i 576i 576i EDTV 480p 31 500 60 000 27...

Reviews: