background image

Draco U-Switch 

Maintenance


51 

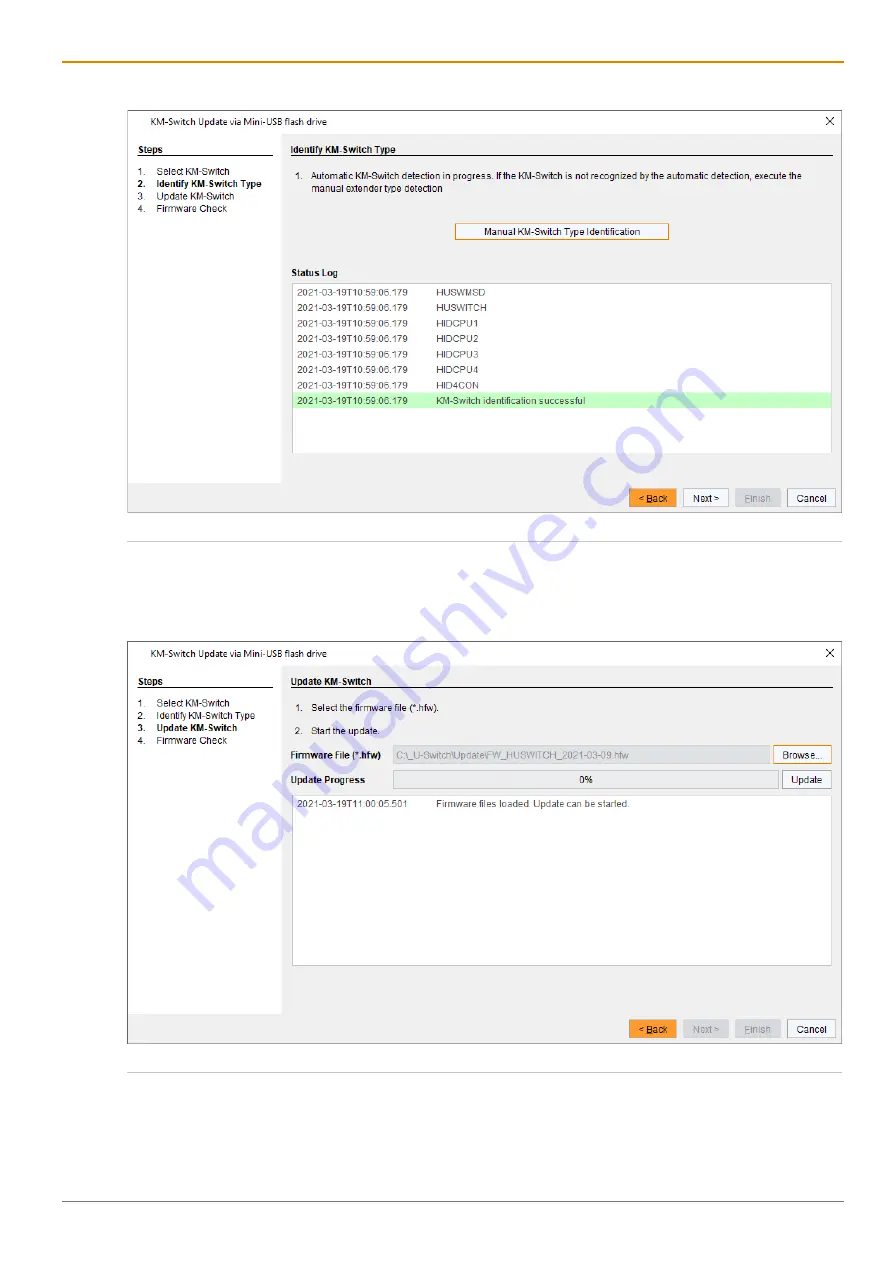
9.  Click 

Next >

 after successful identification. 


Fig. 41 

Management software 

Flash Update - Identify KM-Switch Type


10. Click 

Browse…

 to navigate to the location the update files are saved. 

11. Select the update files and click 

Select

 in the selection dialog. 

12. Click 

Update

 to start the update process. 


Fig. 42 

Management software 

Flash Update - Update KM-Switch


A green highlighted message will appear when the firmware update has been completed. 


Summary of Contents for B476-4U4T

Page 1: ...Document B476 4U4T_REV02 00_en Edition 2021 10 14 USER MANUAL Draco U Switch U Switch Module B476 4U4T ...

Page 2: ... chapter 0 page 67 The manufacturer reserves the right to change specifications functions or circuitry of the series described here without notice Information in this manual can be changed expanded or deleted without notice You can find the current version of the manual in the download area of our website For information about the firmware and software described in this user manual please refer to...

Page 3: ...7 3 9 5 4 Slot Chassis Draco vario 474 BODY4 17 3 9 6 4 Slot Chassis Draco vario 474 BODY4R 18 3 9 7 6 Slot Chassis Draco vario 474 BODY6R R1 18 3 9 8 6 Slot Chassis Draco vario 474 BODY6BP 19 3 9 9 6 Slot Chassis Draco vario 474 BODY6BPF 19 3 9 10 21 Slot Chassis Draco vario 474 BODY21 4U and 474 BODY21 4U 20 3 10 Device View U Switch Module B476 4U4T 21 3 11 Device Views Add on Module GPIO R474 ...

Page 4: ... Automatic Mode of Switching via Mouse 45 7 2 3 Deactivating and Reactivating unused or non connected Ports 45 7 3 Switching via External Switching Solution optional 45 7 4 Using a USB 2 0 Device 46 8 Summary of Keyboard Commands 47 8 1 Command Mode 47 8 1 1 Starting and Exiting the Command Mode 47 8 1 2 Changing Resetting and Deleting the Hot Key 47 8 2 Switching 48 8 2 1 Restricting the Automati...

Page 5: ...pply Voltage of the U Switch Module and Add on Modules 59 12 4 Environmental Conditions and Emissions 60 12 5 Dimensions 60 12 5 1 Dimensions of the Chassis 60 12 5 2 Dimension of the U Switch Module and Add on Modules 60 12 6 Weight 61 12 6 1 Weight of the Chassis 61 12 6 2 Weight of the U Switch Module and Add on Modules 61 12 7 MTBF 61 13 Technical Support 62 13 1 Support Checklist 62 13 2 Ship...

Page 6: ...similar name Software Version from Release date Tera Tool V 5 0 0 0 2021 07 20 1 2 Symbols for Warnings and Helpful Information The meaning of the symbols used for warnings and helpful information in this manual is described below WARNING WARNING indicates a hazardous situation which if not avoided could result in death or serious injury CAUTION CAUTION used with the safety alert symbol indicates ...

Page 7: ...re descriptions Spelling Description Bold print Description of terms that are used in the device firmware or the management software e g menus and buttons Bold print Bold print Management software selection of a menu item in the menu bar or the toolbar e g Extras Options Mouse button Description Left mouse button Primary mouse button default in most operating systems Right mouse button Secondary m...

Page 8: ...d chassis surface after a long period of operation When the chassis is fully equipped the surface of the chassis can become very warm after a long period of operation If the chassis surface is touched after a long period of operation this can cause skin burns Protective gloves must be worn to transport a fully equipped chassis after a long period of operation Ensure that there is sufficient distan...

Page 9: ...nsure that the ground connection is maintained from the outlet socket through to the power supply s AC power input Only connect the device to KVM devices using the interconnect cable not to other devices particularly not to telecommunications or network devices Disconnect the Device from the Circuit NOTICE The cable plugs on the device side can contain a lock In the event of a necessary quick and ...

Page 10: ...olution via push button or dry contact the U Switch can be used with the optional GPIO module R474 BGX which offers an interface to switch the USB HID signal and to indicate the switching status see chapter 12 1 4 page 57 NOTICE Interferences when the immunity limit values are exceeded If the limit values listed in EN55024 are exceeded by the customers environment reliable and fault free functioni...

Page 11: ...ion Examples 3 2 1 Direct Connection The U Switch is connected to sources using the cables supplied Keyboard and mouse are connected to the U Switch Fig 1 System overview Example direct source connection 1 Sources with connected monitors 2 U Switch 3 Keyboard mouse ...

Page 12: ... switching solution 1 Sources 2 U Switch 3 Keyboard mouse 4 External switching solution 3 2 3 Connection to a Draco KVM Matrix System with external Switching Solution The U Switch is connected to KVM extender CON Units using the cables supplied Keyboard and mouse are connected to the U Switch An external switching solution is connected to the optional GPIO module Fig 3 System overview Example U Sw...

Page 13: ... Chassis Chassis Power supply unit Type Slots Active backplane Current input Internal External Setup for redundant power supply voltage 474 BODY2BPF 2 Yes Interface side 1x 1x external 474 BODY6BP 6 Yes Rear view 2x 474 BODY6BPF 6 Yes Interface side 2x 474 BODY21 4U 21 Yes Rear view 1x 1x internal 474 BODY21 4UR 21 Yes Rear view 2x All external power supply units are separately certified to the re...

Page 14: ...SU for 474 BODY6R R1 474 PSU21 Spare PSU for 474 BODY21 4U slide in hot swap 474 BLND1 Blanking plate with IHSE Logo 1 slot for Draco vario chassis 474 6FAN Optional fan for Draco vario 2 slot and 6 slot chassis with backplane 260 5G International power supply unit 100 240VAC 5VDC 3A 260 5M International power supply unit 100 240VAC 5VDC 5A PC TYP E C13 020 Power cord IEC Schuko 90 Type E C13 2 0 ...

Page 15: ...74 BODY2 474 BODY2R 1x 5 V DC 3 A international power supply unit 1x country specific power cord 474 BODY4 474 BODY4R 1x 5 V DC 5 A international power supply unit 1x country specific power cord 474 BODY2N 474 BODY2BPF 474 BODY6R R1 1x IEC country specific power cord C13 2 0 m 474 BODY6BP 474 BODY6BPF 474 BODY21 4UR 2x IEC country specific power cord C13 2 0 m lockable 474 BODY21 4U 1x IEC country...

Page 16: ...sis see chapter 12 3 1 page 59 and chapter 12 3 2 page 59 The device status of a module is displayed via LED on the front side of following chassis 474 BODY2 474 BODY2R 474 BODY2N 474 BODY4 474 BODY4R and 474 BODY6R R1 3 9 1 2 Slot Chassis Draco vario 474 BODY2 Fig 4 Interface side chassis 474 BODY2 1 Slot 1 2 Slot 2 3 Power supply voltage DC 3 9 2 2 Slot Chassis Draco vario 474 BODY2R Fig 5 Inter...

Page 17: ...pply unit is not equipped with a fuse on its primary side The protection against excessive current draw has to be provided by the electrical installation of the building 3 9 4 2 Slot Chassis Draco vario 474 BODY2BPF Fig 7 Interface side chassis 474 BODY2BPF 1 Slot 1 2 Slot 2 3 Power supply voltage 2 DC 4 Power supply voltage 1 AC 3 9 5 4 Slot Chassis Draco vario 474 BODY4 Fig 8 Interface side chas...

Page 18: ...A modules inclusive connected periphery If the power supply voltage of the internal power supply unit fails the device s power supply voltage is secured via the 5 V external power supply unit If there is no redundant power supply voltage and the current is above 5 A the device is not supplied with sufficient power supply voltage and fails Note the maximum current draw of the chassis see from chapt...

Page 19: ... Slot 3 4 Slot 4 5 Slot 5 6 Slot 6 Fig 12 Rear view chassis 474 BODY6BP 1 Power supply voltage 1 AC 2 Power supply voltage 2 AC 3 Grounding 3 9 9 6 Slot Chassis Draco vario 474 BODY6BPF Fig 13 Interface side chassis 474 BODY6BPF 1 Slot 1 2 Slot 2 3 Slot 3 4 Slot 4 5 Slot 5 6 Slot 6 7 Power supply voltage 1 AC 8 Power supply voltage 2 AC ...

Page 20: ...to right The chassis 474 BODY21 4U is supplied with one power supply unit Pos 3 A second power supply unit can be optionally installed The chassis 474 BODY21 4UR is supplied with two power supply units Pos 2 and 3 Fig 15 Rear view chassis 474 BODY21 4U and 474 BODY21 4U 1 Power supply voltage 2 AC redundancy 2 Power supply unit 2 redundancy 3 Power supply unit 1 4 Power supply voltage 1 AC ...

Page 21: ...3 CPU 2 Output USB HID and USB 2 0 4 CPU 3 Output USB HID and USB 2 0 5 CPU 4 Output USB HID and USB 2 0 6 Input Output USB HID 7 Input Output USB 2 0 up to 480 Mbit s 3 11 Device Views Add on Module GPIO R474 BGX Console side CON module Fig 17 Interface side R474 BGX 1 Input GPIO D Sub 9 male socket for an external switching solution via push button or dry contact 1 2 3 4 1 5 6 7 ...

Page 22: ...able 2 Aus No power supply voltage available 3 12 2 Status LEDs 2 Slot Chassis Draco vario 474 BODY2R Fig 19 Interface side chassis 474 BODY2R Status LEDs 1 Status LED power supply voltage 1 2 Status LED power supply voltage 2 Status LEDs for Power Supply Voltage The following tables show the LED states colors for the power supply voltage see chapter 3 9 2 page 16 Pos LED Description 1 Green Redun...

Page 23: ... supply voltage 2 Status LEDs for Power Supply Voltage The following tables show the LED states colors for the power supply voltage see chapter 3 9 3 page 17 Pos LED Description 1 Green Redundant power supply voltage available 2 Green 1 Green No redundant power supply voltage available 2 Red 1 Red No redundant power supply voltage available 2 Green 1 Off No power supply voltage available 2 Off ...

Page 24: ...power supply voltage 2 Status LEDs for Power Supply Voltage The following tables show the LED states colors for the power supply voltage see chapter 3 9 4 page 17 Pos LED Description 1 Green Redundant power supply voltage available 2 Green 1 Green No redundant power supply voltage available 2 Red 1 Red No redundant power supply voltage available 2 Green 1 Off No power supply voltage available 2 Of...

Page 25: ... supply voltage available 3 12 6 Status LEDs 4 Slot Chassis Draco vario 474 BODY4R Fig 23 Interface side chassis 474 BODY4R Status LEDs 1 Status LED power supply voltage 1 2 Status LED power supply voltage 2 Status LEDs for Power Supply Voltage The following tables show the LED states colors for the power supply voltage see chapter 3 9 6 page 18 Pos LED Description 1 Green Redundant power supply v...

Page 26: ... power supply voltage 2 Status LEDs for Power Supply Voltage The following tables show the LED states colors for the power supply voltage see chapter 3 9 7 page 18 Pos LED Description 1 Green Redundant power supply voltage available 2 Green 1 Green No redundant power supply voltage available 2 Red 1 Red No redundant power supply voltage available 2 Green 1 Off No power supply voltage available 2 O...

Page 27: ...D power supply voltage 2 Status LEDs for Power Supply Voltage The following tables show the LED states colors for the power supply voltage see chapter 3 9 8 page 19 Pos LED Description 1 Green Redundant power supply voltage available 2 Green 1 Green No redundant power supply voltage available 2 Red 1 Red No redundant power supply voltage available 2 Green 1 Off No power supply voltage available 2 ...

Page 28: ...Status LEDs 1 Status LED power supply voltage 1 2 Status LED power supply voltage 2 Status LEDs for Power Supply Voltage The following tables show the LED states colors for the power supply voltage see chapter 3 9 9 page 19 Pos LED Description 1 Green Redundant power supply voltage available 2 Green 1 Green No redundant power supply voltage available 2 Red 1 Red No redundant power supply voltage a...

Page 29: ...Standard Power Supply Unit Pos LED Description 3 Green Power supply voltage available 4 Off 3 Green The input voltage of the power supply unit is too low The output voltage of the power supply unit too high Permissible power supply temperature exceeded 4 Red 3 Off No power supply voltage available 4 Off Status LEDs for Power Supply Voltage of the Redundant Power Supply Unit Pos LED Description 1 G...

Page 30: ... Fig 29 Interface side U Switch module B476 4U4T Status LED 1 Status LED for switching status Status LED for the Switching Status Pos LED Status Description 1 Status green 1x flashing Switched to CPU 1 2x flashing Switched to CPU 2 3x flashing Switched to CPU 3 4x flashing Switched to CPU 4 1 ...

Page 31: ...ment software Advanced configuration System update firmware update 4 1 Command Mode To start the command mode use a keyboard sequence Hot Key at the keyboard of a CON Unit plugged in the U Switch To exit the command mode press Esc NOTICE While in command mode the Caps Lock and Scroll Lock LEDs on the keyboard are flashing the USB HID devices are not operable mouse and keyboard functions are deacti...

Page 32: ...e KVM matrix e g 2x Left Shift and the U Switch e g 2x Right Shift Change the current Hot Key via Hot Key Code exemplary To change the current Hot Key to e g 2x Left Alt enter Hot Key c 5 Enter Set a freely selectable Hot Key exemplary To set a freely selectable Hot Key e g 2x Space enter Hot Key c 0 Space Enter Keyboard commands are fixed to the position of the keys on the keyboard Keyboard mappi...

Page 33: ...itch Access Options 33 4 2 Management Software The menu structure of the management software is subdivided into various sections Fig 30 Management software Menu structure 1 Menu bar top line 2 Toolbar second line ...

Page 34: ... 4 Connect the 5 V DC power supply unit to the U Switch 5 Power up the system When powering the U Switch a boot process will be enabled duration approx 30 s Only after completion of the boot process the U Switch can be used and keyboard and mouse will be enabled 5 1 2 Setting up the GPIO Interface optional The GPIO interface can be hot plugged The GPIO interface is configured via DIP switches In t...

Page 35: ...ent software without integrated Java Runtime the following requirements must be fulfilled Computer Software Network Requirements Recommendations Free memory RAM Recommended 512 MB Operating system Microsoft Windows 8 Windows 8 1 Windows 10 macOS macOS 10 14 Mojave or higher Intel platform Specification Java Installed Oracle Java Runtime Environment JRE 1 8 x or higher Strongly recommended Oracle J...

Page 36: ...uter Connect the Mini USB cable to the Mini USB port of the U Switch and the USB A port of the computer 5 2 3 Starting the Management Software Run the management software by a double click on the program icon on the desktop or the file in the directory Fig 32 Management software ...

Page 37: ...agement software KM Switch MSC Configuration Select KM Switch 7 Select the requested layout in the Arrangement selection box or select Free Layout for a flexible layout Select as follows Horizontal horizontal arrangement e g 4x1 Vertical vertical arrangement e g 1x4 Block block arrangement e g 2x2 Free Layout free arrangement The free arrangement allows a flexible positioning of the screens for di...

Page 38: ...into the appropriate size by using the selection points See examples for display sizing on the following page 10 If you use Dual Head sources click the Dual Head checkbox to activate the option An additional display appears in the Available Screens field Fig 34 Management software KM Switch MSC Configuration Multi Screen Control Configuration ...

Page 39: ...ation as it disappears from the previous display when it is moved over the border of a display Fig 36 Multi Screen Control Configuration Wrong display arrangement 11 Click Finish to confirm your configuration The configuration will be transferred to the U Switch and stored After storing the U Switch will be restarted 12 Remove the power cord from the U Switch 13 Remove the Mini USB cable from the ...

Page 40: ... needs to be restarted Firmware Requirements The following firmware is required as a minimum Firmware Version Release date HUSWMSD B01 07 2020 11 27 HUSWITCH F01 05 2020 12 16 Parameters The following parameter settings are available Parameters Functions ENAUSB20 1111 Activate all ports default ENAUSB20 1000 Activate the routing of port 1 ENAUSB20 1100 Activate the routing of port 1 and port 2 ENA...

Page 41: ...ig txt file 2 Open the Config txt file in a text editor 3 Ensure that CFG is written in the first line of the file 4 Add a line break directly behind CFG 5 Add the desired parameter in capitals in the line below CFG 6 Save the Config txt file 7 Manually power off the U Switch 8 Power on the U Switch The U Switch starts automatically with the respective setting for the USB 2 0 ports Fig 37 Example ...

Page 42: ... confirm At the same time the command mode is closed the switching operation will be performed and keyboard and mouse are connected to the specified source or display When using the numeric keypad for switching a confirmation of the switching operation by pressing Enter is not necessary The following keyboard commands are available for switching operations e g using the numeric keypad Keyboard com...

Page 43: ...to be activated before Mode Activate deactivate switching via mouse Keyboard command Mode 0 Deactivate switching via mouse Hot Key o x 0 Enter Mode 1 Activate horizontal mode Hot Key o x 1 Enter Mode 2 Activate vertical mode Hot Key o x 2 Enter Mode 3 Activate block mode Hot Key o x 3 Enter Mode 4 Activate free mode Hot Key o x 4 Enter Mode 4 can only be activated via keyboard commands if this mod...

Page 44: ...onfiguration Config txt in the management software Example 2 With e g mode 4 set in the Config txt the U Switch starts with a setting for a freely display arrangement and enabled mode for switching via mouse in freely configured displays To deactivate or reactivate the switching via mouse in freely configured displays proceed as follows Deactivate the switching via mouse by entering Hot Key o x 0 ...

Page 45: ...orts should be deactivated if switching via mouse is in use The U Switch remembers if a port is enabled or disabled in the following cases power cycle switch between modes 0 1 2 3 4 in any combinations The keyboard command to enable all ports works both when you are switched to an enabled port and when you are switched to a disabled port To deactivate ports proceed as follows 1 Switch to the port ...

Page 46: ...t with the U Switch The media control will just be routed through to the target computer To route the USB 2 0 device through to the desired target computer proceed as follows 1 Switch the USB HID control to the desired target computer 2 Wait until the target operating system has initiated the USB 2 0 device Note the settings for routing through the USB 2 0 ports see chapter 6 2 page 40 ...

Page 47: ...ng the Command Mode Keyboard command Function 2x Left Shift Start the command mode Hot Key factory setting Esc Exit the command mode 8 1 2 Changing Resetting and Deleting the Hot Key Keyboard Command Function Hot Key c new Hot Key code Enter Change the Hot Key according to the predefined Hot Key Code table Hot Key c 0 new Hot Key Enter Define a freely selectable Hot Key Right Shift Del within 5 s ...

Page 48: ...4x1 Hot Key o x 2 Enter Mode 2 Activate the vertical mode 1x4 Hot Key o x 3 Enter Mode 3 Activate the block mode 2x2 Hot Key o x 4 Enter Mode 4 Activate the free mode individual layout mouse in absolute mode 8 2 3 Switching the USB HID Control Keyboard command Switching function Hot Key Num0 Switch the USB HID control to the own display CON Unit with keyboard and mouse Hot Key Num1 Switch the USB ...

Page 49: ... to update the extender firmware via Mini USB service port Via management software see following chapter Via copy paste see chapter 9 2 2 page 53 If required the update files can be requested from the manufacturer s technical support Updating the firmware via copy paste is usually not necessary We recommend using the efficient flash update via management software and to manually copy paste if only...

Page 50: ...s 5 Connect the U Switch to your computer via Mini USB cable 6 Power up the U Switch 7 Click Search KM Switch 8 Select the KM Switch to be updated Fig 40 Management software Flash Update Select KM Switch The identification of the U Switch type automatically starts After successful identification the U Switch firmware is displayed in the message area ...

Page 51: ...tch Type 10 Click Browse to navigate to the location the update files are saved 11 Select the update files and click Select in the selection dialog 12 Click Update to start the update process Fig 42 Management software Flash Update Update KM Switch A green highlighted message will appear when the firmware update has been completed ...

Page 52: ...software Flash Update Update KM Switch Update completed A green highlighted message will appear after the firmware update has been completed 14 Click Next to verify the update Fig 44 Management software Flash Update Update KM Switch Update successful 15 Remove the power cord of the U Switch ...

Page 53: ...irmware updates Please check the release notes of the firmware package for dependencies between the U Switch firmware files If you got information from the manufacturer s technical support that an update of HUSWMSD and or HUSWITCH firmware files of a U Switch is required please follow the instructions in this chapter By updating the HUSWMSD firmware via copy paste the Config txt will be overwritte...

Page 54: ...firmware file and paste it to the U Switch flash drive 5 2 Wait until the copying process is complete The U Switch will be restarted after the copy process of the HUSWMSD pfw firmware file to the flash drive is completed 6 When instructed from the manufacturer s technical support to update the HUSWITCH firmware 6 1 Copy the HUSWITCH pfw firmware file and paste it to the U Switch flash drive 6 2 Wa...

Page 55: ...ry this firmware version is retained To reset the U Switch back to default settings proceed as follows 1 Connect the U Switch to any source using a Mini USB cable The U Switch opens a flash drive containing the Config txt file 2 Delete the Config txt file 3 Manually power off the U Switch 4 Power on the U Switch The U Switch restarts ...

Page 56: ...he keyboard are flashing Keyboard in command mode Press Esc to leave the command mode USB device without function No USB HID device Check the connection of the USB HID cable to the USB HID device Connect a USB HID device Contact dealer if necessary USB HID device is not supported Check the compatibility Contact your dealer if necessary ...

Page 57: ...oncurrently such as keyboard and mouse or keyboard and touch screen A hub is allowed but it does not increase the number of devices allowed To support other USB non HID devices such as scanners web cams or memory devices use the USB 2 0 interfaces 12 1 2 USB 2 0 transparent The U Switch with transparent USB 2 0 interface supports almost all types of USB 2 0 devices USB 2 0 data transfer is support...

Page 58: ... 3 Mini USB Type B Connector Pin Signal Color 1 5 V DC Red 2 D White 3 D Green 4 Not connected 5 GND Black 12 2 4 D Sub 9 GPIO Connector Pin Channel Control 1 1 OUT for LED 1 ground 2 1 IN from push button 1 3 5 V DC 4 2 OUT for LED 2 ground 5 2 IN from push button 2 6 3 OUT for LED 3 ground 7 3 IN from push button 3 8 4 OUT for LED 4 ground 9 4 IN from push button 4 12 2 5 Power Supply Voltage Co...

Page 59: ...6BPF 1 300 mA 100 V to 240 V 50 60 Hz 474 BODY21 4U 4 000 mA 2x 100 V to 240 V 50 60 Hz 12 3 2 Power Supply Voltage of the Chassis DC Product type Maximum current draw Maximum voltage DC 474 BODY2 3 000 mA 5 V 474 BODY2R 3 000 mA 5 V 474 BODY2N 5 000 mA 5 V 474 BODY2BPF 5 000 mA 5 V 474 BODY4 5 000 mA 5 V 474 BODY4R 5 000 mA 5 V 474 BODY6R R1 12 000 mA 5 V 12 3 3 Power Supply Voltage of the U Swit...

Page 60: ...x 5 8 x 1 7 267 x 216 x64 mm 10 5 x 8 5 x 2 5 474 BODY2N 221 x 147 x 41 mm 8 7 x 5 8 x 1 7 267 x 216 x64 mm 10 5 x 8 5 x 2 5 474 BODY4 474 BODY4R 293 x 147 x 41 mm 11 5 x 5 8 x 1 7 550 x 365 x 115 mm 21 7 x 14 4 x 4 5 474 BODY6R R1 442 x 147 x 41 mm 17 4 x 5 8 x 1 7 760 x 365 x 115 mm 29 9 x 14 4 x 4 5 474 BODY6BP 474 BODY6BPF 442 x 250 x 44 mm 17 4 x 9 8 x 1 7 550 x 372 x 155 mm 21 7 x 14 6 x 6 1...

Page 61: ... 5 lb 2 5 kg 5 5 lb 474 BODY2N 1 1 kg 2 4 lb 2 9 kg 6 4 lb 474 BODY4 474 BODY4R 0 9 kg 2 0 lb 3 4 kg 7 5 lb 474 BODY6R R1 1 9 kg 4 2 lb 5 1 kg 11 2 lb 474 BODY6BP 474 BODY6BPF 2 5 kg 5 5 lb 3 5 kg 7 7 lb 474 BODY21 4U 10 0 kg 22 1 lb 14 5 kg 32 0 lb 12 6 2 Weight of the U Switch Module and Add on Modules Chassis Weight B476 4U4T 107 g 0 24 lb R474 BGX 57 g 0 13 lb 12 7 MTBF Specific MTBF values me...

Page 62: ...aler if necessary Issue date of the existing manual Nature circumstances and duration of the problem Components included in the system such as graphic source CPU OS graphic card monitor USB HID USB 2 0 devices interconnect cable including manufacturer and model number Results from any testing you have done 13 2 Shipping Checklist 1 To return your device you need an RMA number Return Material Autho...

Page 63: ...ission regulations and ensure a suitably high level of immunity to electromagnetic disturbances All power supplies are certified to the relevant major international safety standards 14 2 Product Safety The product safety of the following devices is proven by the compliance to the listed standards Type Standards 474 BODY2BPF IEC 62368 1 2014 EN 62368 1 2014 A11 207 UL 62368 1 2014 CAN CSA C22 2 No ...

Page 64: ... of up to eight sources at one sink with only one connected mouse or keyboard The sink can consist of up to eight monitors or up to sixteen monitors when operating Dual Head Sources In a matrix system Multi Screen Control can be set up at multiple sinks MTBF Mean Time Between Failure MTBF is measured in power on hours and describes the system reliability POH Power on hours corresponds to the avera...

Page 65: ...Ds 23 Fig 21 Interface side chassis 474 BODY2BPF Status LEDs 24 Fig 22 Interface side chassis 474 BODY4 Status LEDs 25 Fig 23 Interface side chassis 474 BODY4R Status LEDs 25 Fig 24 Interface side chassis 474 BODY6R R1 Status LEDs 26 Fig 25 Interface side chassis 474 BODY6BP Status LEDs 27 Fig 26 Interface side chassis 474 BODY6BPF Status LEDs 28 Fig 27 Rear view chassis 474 BODY6BPF Status LEDs 2...

Page 66: ...U Switch 66 Fig 42 Management software Flash Update Update KM Switch 51 Fig 43 Management software Flash Update Update KM Switch Update completed 52 Fig 44 Management software Flash Update Update KM Switch Update successful 52 ...

Page 67: ...such as new functions changed configuration or operation Edition Date Chapter New functions changes REV02 00 2021 10 14 8 2 3 8 5 8 5 1 New changed chapters because of technical improvement or new features 8 4 9 New chapters 1 3 2 3 4 3 4 6 4 7 4 9 5 6 1 2 7 2 7 3 8 2 8 3 Chapter changed or extended REV01 00 2021 04 19 Initial user manual ...

Reviews: