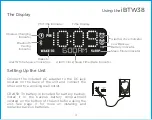
background image

5

Setting the Clock

1.  Press and hold the     

Time Set Button

 located on the back of the unit for 2 seconds until the 

clock display flashes and a beep sounds.

2.  Press the  

  or  

+

   Buttons

 to adjust the clock to the current time (hold for rapid setting). Make 

sure you set the correct AM/PM time. The PM indicator appears to the left of the display; there is 

no AM indicator. 

3.  To toggle the clock display between standard 12 hour time and 24 hour (“military”) time display, 

press the     

Alarm 

or 

     Alarm Button

 while the display is flashing during time setting.

4.  Press and release the     

Time Set Button

 to confirm the current time setting. The YEAR will 

flash on the display. Press the 

  or  

+


Buttons

 to set the correct year.

5.  Press and release the     

Time Set Button

 to confirm the current year setting. The Date will flash 

on the display. Press the 

  or  

+


Buttons

 to set the correct month and day(hold for rapid 

adjustment).

6.  Press and release the     

Time Set Button

 to confirm the current date setting. 2 beeps will 

sound to indicate time setting mode is complete. 

Setting and Using the Alarm

This unit features dual alarms which can be set to different times and alarm sources. Each is set in 

the same way. Instructions are given as “Alarm Button”; use     

Alarm Button

 or     

Alarm Button

 to 

set respective alarms.

 Note

: Each step must be completed while display is flashing or step will time-out with any changes 

saved.

1.  Press and hold the 

Alarm Button

 for 2 seconds until the alarm time display and alarm icon flash. 

A beep sounds.

2.  Press the  

  or  

+

   Buttons

 to adjust the alarm time to the desired time (hold for rapid setting).


Make sure you set the correct AM/PM alarm time. The AM/PM indicator appears to the right of 

the alarm time display. 

3.  Press the 

Alarm Button

 to confirm the alarm time setting. The wake-to schedule will flash. Press 

the 

  or  

+

   Buttons

 to set the desired alarm schedule.  7 Days (every day), 5 Days (week days 

only) or 2 Days (weekends only)

Using the 

iBTW38

Summary of Contents for iBTW38N

Page 1: ...iBTW38N instruction manual iBTW38 Eng IB Size 153mm x 120mm Printing color Black July 5 2019 P1 Questions Contact Customer Service at 1 800 288 2792 Dual Alarm Clock Stereo Speaker System with Qi Wire...

Page 2: ...t Please read it carefully and keep for future reference Place the unit on a level surface away from sources of direct sunlight or excessive heat Protect your furniture when placing your unit on a nat...

Page 3: ...iBTW38 2 Included iBTW38 system 100V 240V universal AC adapter power adapter iBTW38...

Page 4: ...th Pairing Button Voice Talk End Button Volume Up Volume Down Buttons Snooze Display Dimmer Button Microphone Alarm 1 Button Alarm 2 Button Sleep Button Power Button Play Pause Button DC Jack USB Char...

Page 5: ...ackup battery compartment located on the bottom of the unit before using the unit See page 11 for more on installing and replacing backup batteries 4 Alarm Active Indicator Alarm Clock Sleep Time Date...

Page 6: ...ay hold for rapid adjustment 6 Press and release the Time Set Button to confirm the current date setting 2 beeps will sound to indicate time setting mode is complete Setting and Using the Alarm This u...

Page 7: ...in wake to tones 1 4 5 Press the Alarm Button to confirm the alarm source The volume display will flash 6 Press the or Buttons to adjust the alarm volume Note that the alarm volume setting is stored s...

Page 8: ...ooze Display Dimmer Button to confirm Snooze setting 2 beeps will sound 4 While the alarm is sounding press and release the Snooze Display Dimmer Button to temporarily silence the alarm for the set du...

Page 9: ...and hold the Pairing Button on top of the iBTW38 for 2 seconds The iBTW38 will announce Pairing and the Bluetooth icon will flash on the display indicating the iBTW38 is in pairing mode 4 iHome iBTW3...

Page 10: ...the or Buttons to adjust the volume on the unit 6 When done listening press the Button to turn the unit off Using the Speakerphone feature NOTE The unit must be powered on and linked to a Bluetooth ph...

Page 11: ...properly Reposition device Slow blinking icon Device is charging properly Solid icon Device is charged some devices do not support this feature Note The wireless charging process generates heat that m...

Page 12: ...t 3 Remove exhausted battery Insert 1 CR2450 battery checking that the side is facing you Replace the compartment door Do not over tighten Note Make sure you dispose of battery properly see your local...

Page 13: ...tings Trouble pairing device computer with iBTW38 Bluetooth implementation varies depending on your device s hardware and operating system Please see our website for updates on pairing When you power...

Page 14: ...s or vents located on the product 8 Attachments Do not use attachments not recommended by the product manufacturer 9 Lightning and Power Surge Protection Unplug the unit from the wall socket and disco...

Page 15: ...fferent from that to which the receiver is connected Consult the dealer or an experienced radio TV technician for help CAN ICES 3 B NMB 3 B CAN RSS 216 CNR 216 IC Statement This device contains licenc...

Page 16: ...logies Inc All rights reserved Questions Visit www ihome com or call 1 800 288 2792 Toll Free iBTW38 190705 E Printed in China WARRANTY For product support information and warranty please visit www ih...

Reviews: