background image

Part 3 - Remote Setup

29

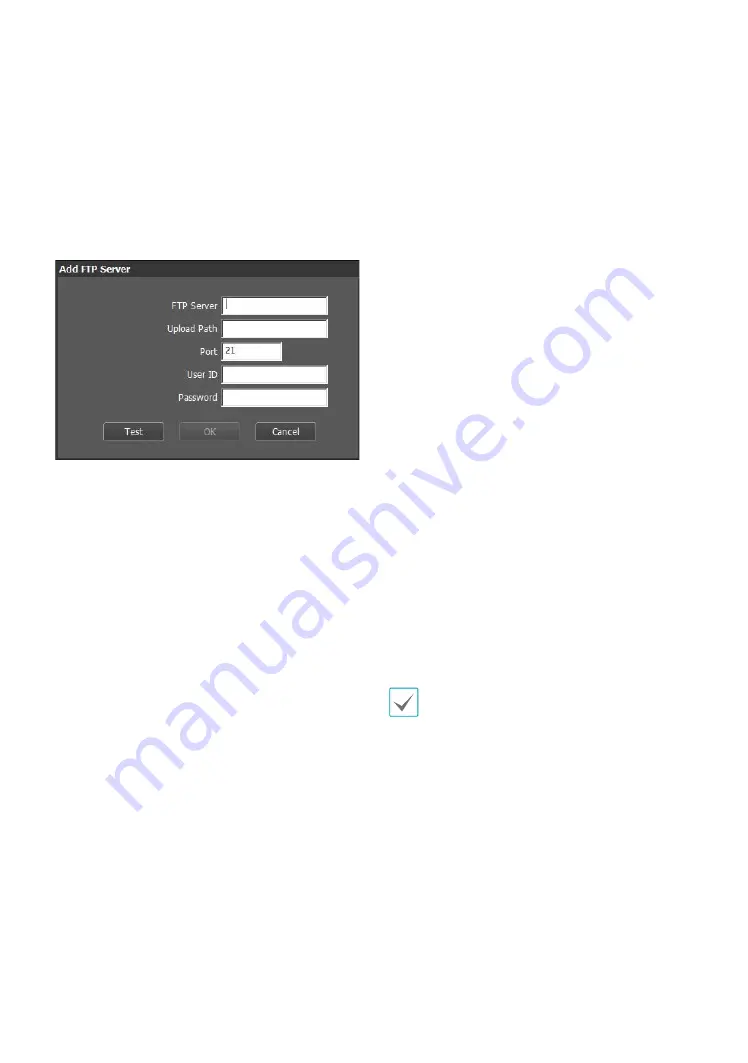
 • FTP Server: Click Add to register a new FTP server. 

Click Remove to remove a registered FTP server. 
When an event is detected, a .jpg image of the event 
detected image is uploaded to the Primary Server. 
If the upload to the Primary Server fails, the file will 
be uploaded to the Secondary Server. Upload to the 
Secondary Server will continue to be attempted until 
successful. Fill out the fields below and click Test to 
test the FTP server connection settings. Once the test 
is complete, click OK.

 - FTP Server: Enter the FTP server's IP address (or 

domain name).

 - Upload Path: Designate the file upload path.
 - Port: Enter the FTP server's port number.
 - User ID, Password: Enter the user ID and password 

needed for connecting to the FTP server.

 • Settings: Configure image and upload settings.

 - Upload Type: Choose an upload type. Select 

Always to upload images using the settings below, 
irrespective of event detection. Select Event to 
upload images using the settings below when an 
event is detected.

 - Upload Frequency: Activated only when Upload 

Type has been set to Always. Designate the upload 
speed. The specified number of images will be 
uploaded to the FTP server during the specified 
period of time.

 - Upload 1 image per: Activated only when Upload 

Type has been set to Event. Designate the upload 
speed. Select Upload for and specify a duration. 
Images will be uploaded for the specified duration 
at the specified upload speed. Select Upload while 
event status is active
 to upload images at the 
specified speed only while event status is active.

 - Resolution/Quality: Choose the resolution and 

quality of the images to upload to the FTP server. 
Range of resolution settings you can use here can 
vary depending on the resolution setting applied 
under Video > Streaming.

 - Base File Name: Enter a name for the files to be 

uploaded to the FTP server and then choose file 
identification options. Select Add Date/Time Suffix 
to add event detection date and time information 
to each image file. Select Add Sequence Number 
Suffix - max. Count
 to number the image files 
based on the order of event detection. Select 
Overwrite to overwrite the previous image with 
the new image. Event type is automatically added 
to the file names. 

 • When specifying the Upload Path or Base File 

Name, you cannot use special characters such as \, /, 
#, *, |, :, ", <, >, and ?.

 • The resolution of FTP upload image can change 

depending on the resolution setting applied under 
Video > Streaming.

 • Set speed settings for Upload Frequency and 

Upload 1 image per options in consideration of the 
FTP server's performance. FTP uploads can fail if the 
configured speed is higher than what the FTP server 
can handle.

Summary of Contents for DC-F Series

Page 1: ...Powered by DC F Series Operation Manual DC F1111 DC F1211 ...

Page 2: ...e information contained herein is subject to change without notice Revisions or new editions to this publication may be issued to incorporate such changes It is recommended that first time users of this network camera and individuals who are not familiar with its use seek technical assistance from their retailer regarding product installation and use If you need to disassemble the product for func...

Page 3: ...ne surges If thunder or lightning is common where the equipment is installed use a surge protection device 10 Overloading Do not overload network port and extension cords as this can result in the risk of fire or electric shock 11 Objects and Liquids Never push objects of any kind through openings of this equipment as they may touch dangerous voltage points or short out parts that could result in ...

Page 4: ...th other household wastes at the end of its working life To prevent possible harm to the environment or human health from uncontrolled waste disposal please separate this from other types of wastes and recycle it responsibly to promote the sustainable reuse of material resources Household users should contact either the retailer where they purchased this product or their local government office fo...

Page 5: ...10 Installation 10 Installation 10 Dimensions 11 Part 2 Camera Connection 12 With DirectIP NVR based Layout 12 With non DirectIP NVR based Layout 13 Part 3 Remote Setup 14 Camera Protocol 14 Remote Setup 14 Quick Setup 15 System 15 General 16 Date Time 17 User Group 17 Network 18 IP Address 18 FEN 18 Port QoS 19 Bandwidth Control 21 Security 21 IEEE 802 1X 22 ...

Page 6: ...cy Masking 27 Event Action 27 Email 27 Remote Callback 28 FTP Upload 28 Event 29 Motion Detection 29 Trip Zone 30 Tampering 31 System Event 32 Part 4 IDIS Web 33 Web Live Mode 34 Part 5 Appendix 36 Setup Menu Tree Remote Setup 36 Troubleshooting 37 Specifications 38 Index 40 4 5 ...

Page 7: ...t buffering and network delays for improved network recording reliability Remote monitoring via web browser or remote software Automatic web casting code HTML generation Up to 10 simultaneous remote monitoring connections IP filtering HTTPS SSL IEEE 802 1X and configurable user authority levels for greater security Network bandwidth limitation and MAT features for more efficient use of network ban...

Page 8: ...on purchasing the product check inside the box to make sure all the following accessories are included External appearances and colors of the accessories may vary depending on the model Network Camera Open Source Guide Quick Guide Screws ...

Page 9: ...default factory settings For more information refer to the Factory Reset Cable Ferrite Core It is provided for EMI electromagnetic interference suppression Network Port Connect a network cable with an RJ 45 connector to this port The camera is supplied with power over Ethernet cable by using a PoE switch For more information on PoE switch use refer to the switch manufacturer s operation manual You...

Page 10: ...ctory defaults after the reboot 5 Connect the dome cover to the camera body It s also possible to do a factory reset by pressing and releasing the reset button while the camera is turned on or using the IDIS Discovery program from a remote location A factory reset will reboot the system For more information on resetting the camera remotely refer to the IDIS Discovery operation manual Installation ...

Page 11: ...Part 1 Introduction 11 Dimensions 120mm 4 72 95mm 3 74 56 21mm 2 21 ...

Page 12: ...ut Remote Monitoring Network DirectIP NVR makes it easy to use cameras without extra network configurations Each camera can be controlled via the DirectIP NVR setup menu without any PC For detailed camera settings please see the camera setting pages of DirectIP NVR manual For users using the camera with DirectIP NVR connection do not need to consider contents after page 12 Part 2 Camera Connection...

Page 13: ...IS Solution Suite Compact Network Network Camera Control the camera over the network from software installed on a computer Ideal for using the camera over the network from a remote location The contents after page 13 are only for users using the camera with non DirectIP NVR connection or VMS connection such as IDIS Solution Suite Compact ...

Page 14: ...ing the camera over the network from a remote location Remote Setup 1 Launch the IDIS Discovery program and then from the main screen select a network camera whose protocol you wish to change 2 Click on the Setup icon and then select Setup Protocol Setup A Protocol Setup screen will appear Alternatively you can select Network Camera from the main screen and then right click to access the Protocol ...

Page 15: ...to change the corresponding settings Once you have changed the settings click OK to apply the settings and exit from the Remote Setup screen Quick Setup Quick Setup allows you to set up System Network Video and other basic settings needed for camera use System Change the camera s system information add users groups and or import export settings ...

Page 16: ...han Date Time to their factory defaults Select Include Network Setup to load default network settings as well For more information on network setup refer to the Network on page 18 Import Setup Open a setup file and apply its settings to the camera Click on the button and then select a setup file Select Include Network Setup to apply the file s network setup settings exc FEN For more information on...

Page 17: ...p Change remote camera control permission settings for users and user groups Add Group Add a new user group Designate a name for the group and then specify control authorities Add User Add a new user Designate a name for the user select which group to add the user to and then enter a connection password Edit Edit group authorities and or user passwords Select a group or user and then click on the ...

Page 18: ... address By using the DNS server you will be able to use domain names instead of IP addresses when configuring the FEN time or SMTP server If the camera is connected to the network via DHCP select the From DHCP option to retrieve the DNS server s IP address from the DHCP server automatically The updated address will be displayed upon the subsequent connection Contact your network administrator for...

Page 19: ...he entered name s availability In addition you will be prompted with an error message if you do not enter a FEN name or enter a name already registered to the FEN Server If the FEN name contains the and or symbol it might not be able to connect to the camera from the IDIS Web program The FEN Server operated by IDIS is a service to its clients and may go offline without notice for server update pur...

Page 20: ...ehind a firewall you must open the ports All ports if using UDP protocol and RTSP ports if using TCP protocol This feature may not be supported by al media player In addition video display on certain media players may not be smooth depending on the network status video streaming compression method used and or the resolution setting Connection methods are as follows Via PC Launch the media player s...

Page 21: ...of IP addresses you wish to add Remove Remove All Remove individual or all IP addresses from Allow List or Deny List SSL Select this option to enable SSL Secure Sockets Layer Enabling this option applies SSL protocol protection on data transmitted out However programs and systems that do not support SSL will not be able to connect to the camera If this option has been changed Remote Setup will ter...

Page 22: ...ntication server and AP must support IEEE 802 1X authentication in order for the IEEE 802 1X network connection authentication feature to function properly Video Configure Camera Streaming Webcasting MAT and Privacy Masking options Camera Image Sensor Configure Image Sensor settings Mirroring Select Horizontal Reverse or Vertical Reverse to flip the image horizontally or vertically Pivot Select a ...

Page 23: ...ditions It does not cause overall image blurring which might occur when using noise filter but it may cause afterimage lag DC F1111 only B W Mode When in the black and white mode images are displayed in black and white and are clearer in low light conditions Off On Disables or enables the black and white mode Auto Disables or enables the black and white mode automatically based on the conditions w...

Page 24: ...e flickering Matching the frequencies can reduce flickering NTSC 60Hz PAL 50Hz Slow Shutter Activate Slow Shutter The electronic shutter s speed will decrease to the specified level under low lighting conditions to allow more light in and therefore produce brighter images Shutter Speed Control Adjust Shutter Speed This option is available only when Anti Flicker and Slow Shutter are both set to Off...

Page 25: ...15 1280x720 30 1280x720 15 Compression Choose the streaming compression method Resolution Choose a resolution setting for video streaming The resolution varies depending on the camera model The current stream resolution cannot be higher than the higher stream resolution Quality Choose a quality setting for video streaming Bitrate Control Choose a bitrate control mode for H 264 compression CBR Fixe...

Page 26: ...Current Resolution Displays the resolution of the designated streaming area Video Output Display whether the BNC video output works or not The BNC video output may not work depending on the Streaming settings DC F1211 only If multiple users are connected to the camera the increase in bandwidth use can lower the frame rate Webcasting Use the webcasting service to view live images from the camera on...

Page 27: ... next motion detection Once motion is detected again the frame rate designated under Streaming is restored immediately MAT Motion Adaptive Transmission is a feature that lowers the frame rate when motion is not detected to reduce the load on the network and save on storage space Based on the specified sensitivity setting no movement will be assumed if there is no change between two consecutive ima...

Page 28: ...password if user authentication is required by the SMTP server Sender Recipient s Enter the sender and recipients addresses Up to 10 The addresses must be properly formatted and include the symbol Remote Callback Select Remote Callback to send callback messages to a remote system Not supported from the IDIS Web program The camera must be registered to the remote system in order to use the Remote C...

Page 29: ...e per Activated only when Upload Type has been set to Event Designate the upload speed Select Upload for and specify a duration Images will be uploaded for the specified duration at the specified upload speed Select Upload while event status is active to upload images at the specified speed only while event status is active Resolution Quality Choose the resolution and quality of the images to uplo...

Page 30: ...Select unselect multiple motion detection blocks All Select unselect all motion detection blocks Motion Ignoring Interval With Motion Ignoring Interval configured no event log or notification is generated for motions detected during a period of time following a motion detection event Daytime Specify when daytime starts and ends All other times will be assumed as nighttime Event Action Select a mot...

Page 31: ...in and Out for movement occurring from inside the trip zone out Motion Ignoring Interval With Motion Ignoring Interval configured no event log or notification is generated for motions detected during a period of time following a motion detection event Daytime Specify when daytime starts and ends All other times will be assumed as nighttime Event Action Select a trip zone event alert action Send Em...

Page 32: ...a jpg image of the event detected to the email Remote Callback Select this option to send a message to a remote system and then select which system to send the message to Not supported from the IDIS Web program The camera must be registered to the remote system in order to use the Remote Callback feature FTP Upload Select this option if you wish to upload images to the FTP server Event Action sett...

Page 33: ...he FEN feature you can enter the FEN name registered to the FEN server instead of the camera IP address after selecting the USE FEN option If the Use HTTPS option has been selected during IDIS Web port number setup enter https instead of http If prompted with a security certificate warning select Continue to this website not recommended If the IDIS Web login page fails to load configure Internet E...

Page 34: ...sion rate can prevent the screen from being displayed or updated In this case we recommend that you disable the computer s auto tuning function Open the command prompt as an administrator Start Accessories Command Prompt Right Click and then select Run as administrator Type in netsh int tcp set global autotuninglevel disable and then press Enter Restart the computer to apply the change To enable a...

Page 35: ...splay the pop up menu Change Camera Title Used to change the camera s name Renaming the camera in Web Live mode does not affect the camera s name on the remote system If no name is entered for the camera the name used at the remote locale is shown on the screen Aspect Ratio Change the aspect ratio of the video displayed on the screen Fit to Screen Fit the video to the size of the camera screen Fit...

Page 36: ... FTP Upload System Event Camera IP Address General System Motion Detection Email Streaming FEN Date Time Network Trip zone Remote Callback Webcasting Port QoS User Group Video MAT Bandwidth Control Privacy Masking Security IEEE 802 1X Part 5 Appendix Setup Menu Tree Remote Setup ...

Page 37: ... overly bright light source adjust the camera s position angle accordingly Video color appears incorrect Check the white balance settings If using the Auto option it may take some time for the white balance to be adjusted Images are blinking If the camera is pointed at the sun or a fluorescent lamp adjust the camera s angle away Lost the admin ID and password and unable to connect to a network cam...

Page 38: ...DC F1211 1 2 7 CMOS Minimum Subject Lux DC F1111 When the B W mode is disabled 0 26 Lux F 2 0 When the B W mode is enabled 0 23 Lux F 2 0 When the B W mode is enabled and shutter speed is 1 7 5s 0 03 Lux F 2 0 DC F1211 When the B W mode is disabled 0 69 Lux F 2 0 When the B W mode is enabled 0 59 Lux F 2 0 When the B W mode is enabled and shutter speed is 1 7 5s 0 11 Lux F 2 0 Scanning Method Prog...

Page 39: ...aternary I O Video Out 1 Composite 1 Vp p Network Connection 10 100 Mbps Ethernet Use these ports for previewing video and not monitoring video Connector Video Out BNC Ethernet Port RJ 45 Use these ports for previewing video and not monitoring video General External Dimensions W x H x D 3 74 x 2 21 x 4 72 95mm x 56 21mm x 120mm Packaging Dimensions W x H x D 7 64 x 4 45 x 5 87 194mm x 113mm x 149m...

Page 40: ...me 17 DSCP 19 F FEN Name 18 FEN Server 18 Frame Rate 25 I IDIS Web Port 19 IPFiltering 21 M MAT 27 N Network Bandwidth Limit 21 O ONVIF Protocol 16 Q Quality 25 R Record Port 19 Resolution 25 RTSP Port 19 S SSL 21 T Time Sync 17 U Use FEN 18 Use HTTPS 19 User Group 17 Use UPnP 20 W Watch Port 19 Ver 1 1 ...

Page 41: ......

Page 42: ...IDIS Co Ltd For more information please visit at www idisglobal com ...

Reviews: