background image


TPD/VPD Series – Programming Guide v.1.0.6                       


Page 35


Copyright@ 2020 ICP DAS CO., LTD. All Rights Reserved.    E-mail: [email protected]


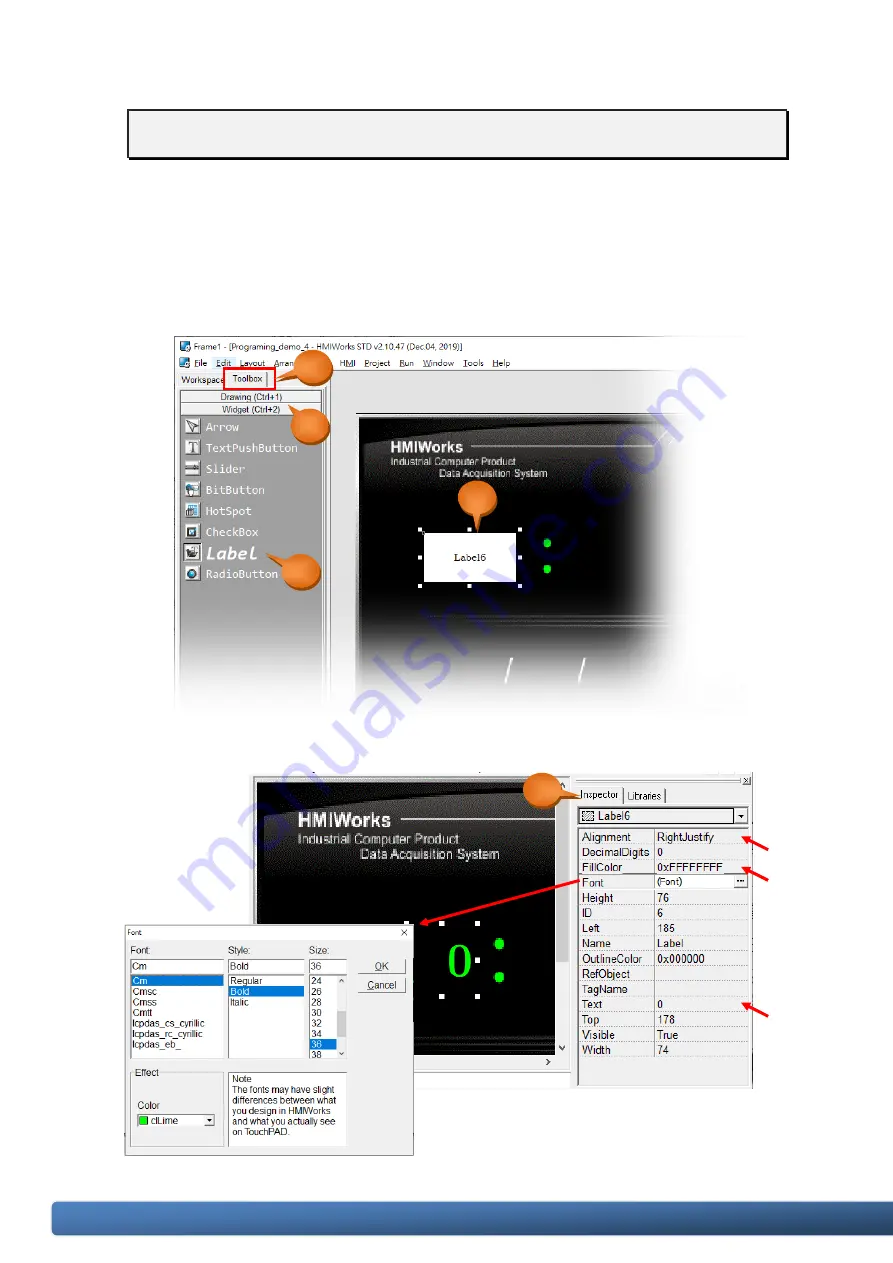
Step 3:    Create a “Label” (text display).   

a.


Switch to the “Toolbox” tab, as shown in the picture below. 

b.


Click the “Widget (Ctrl+2)” heading to unfold the “Toolbox” panel. 

c.


Select the “Label” icon, then move your mouse to the design area. You will notice that 

the cursor becomes a “+”. 

d.


In the design area, click and drag the mouse to draw a rectangle.     


e.


Click  the  “Alignment”,  the  “FillColor”,  the  “Font”  and  the  “Text”  field  to  change  the 

style from the Property Inspector, as shown in the picture below. 


a. 

b. 

c. 

d. 

e. 

Summary of Contents for TPD Series

Page 1: ...O LTD All Rights Reserved E mail service icpdas com TouchPAD TPD VPD Series HMI Devices Programming Guide Version 1 0 6 June 2020 Usage information for TPD 2 8 inch series TPD 4 3 inch series TPD 7 0...

Page 2: ...the right to change this manual at any time without notice The information furnished by ICP DAS is believed to be accurate and reliable However no responsibility is assumed by ICP DAS for its use nor...

Page 3: ...ons are downloaded through RS 485 12 Applications are downloaded through Ethernet 14 Applications are downloaded through USB 17 Chapter 3 Demo Programs 21 Chapter 3 21 3 1 Using the standard C languag...

Page 4: ...eries Programming Guide v 1 0 6 Page 4 Copyright 2020 ICP DAS CO LTD All Rights Reserved E mail service icpdas com Appendix A Downloading Information 74 Appendix B Creating Your Own GUI 75 Revision Hi...

Page 5: ...ount outlet The TouchPAD series can also be seamlessly integrated with rich I O modules and provides a beautiful flexible and customized screen display In short the TouchPAD series is the best choice...

Page 6: ...interested in learning more about the hardware specifications for the various TouchPAD models please refer to our website http www icpdas com en product guide Panel__Products TouchPAD TPD__Series TPD...

Page 7: ...oftware on your PC To download the latest version visit the website at http www icpdas com en download show php num 944 nation US kind1 model kw HMIWORKS 2 1 Install the HMIWorks Software Step 1 Doubl...

Page 8: ...ights Reserved E mail service icpdas com Default directory Step 3 Double click the execution file i e HMIWorks_STD_vXXX_Update_XX exe to update the HMIWorks software This manual uses V2 10 46 Step 4 F...

Page 9: ...served E mail service icpdas com 2 2 Create a New Project Step 1 After the HMIWorks software has been successfully installed execute the software HMIWorks_Standard exe from the installed folder Defaul...

Page 10: ...ct Select the HMI display orientation d Select the programming type e b c Step 3 Select the TouchPAD model name a enter a project name b and it s the location where the project should be saved c then...

Page 11: ...11 Copyright 2020 ICP DAS CO LTD All Rights Reserved E mail service icpdas com 2 3 HMIWorks Working Environment Toolbox HMI Design area Function Menu Result section output errors Status bar Workspace...

Page 12: ...nnect the TouchPAD model and the computer using the RS 485 converter For example The ICPDAS product I 7520 RS 232 RS 485 Converter or I 7561 USB RS 485 Converter RS 485 Data Data I 7561 USB RS 485 Con...

Page 13: ...al Device dialog box Select the COM Port that connects the TouchPAD Step 4 In the HMIWorks application click the Run Render Compile Download F9 item from the Run menu or press F9 After completing the...

Page 14: ...ill display the project Applications are downloaded through Ethernet Applicable Model TPD 283 U H TPD 283 U M1 M2 M3 TPD 433 H EU TPD 433F H TPD 433F M2 TPD 703 64 VPD 133 N H VPD 143 N H VPD 173N 64...

Page 15: ...ate mode and then reboot the TouchPAD model Step 3 Select the Set up Device TouchPAD item from the Run menu to open the Setup Ethernet Device dialog box Select the DHCP and Ethernet options and then c...

Page 16: ...orrect MAC address and then click the OK button NOTE If the TouchPAD can t be found please power off the TouchPAD model first then adjust the Rotary Switch to 1 Ethernet Force Update mode and try to s...

Page 17: ...7 Wait until the Build and Download are completed 100 the screen of the TouchPAD will display the project NOTE If you use the 1 Ethernet Force Update mode to download please adjust the Rotary Switch...

Page 18: ...om VDC 10 30 VDC And Ground PC Frame Ground Earth Power supply DP 665 24V TPD 280U H USB Step 1 Connect the TouchPAD model to the Host PC using a CA USB10 cable Step 2 Adjust the Rotary Switch to 9 US...

Page 19: ...TouchPAD item from the Run menu to open the Setup Ethernet Device dialog box Select the DHCP and USB options and then click the OK button to confirm setting NOTE If your network doesn t have access t...

Page 20: ...HMIWorks application click the Run Render Compile Download F9 item from the Run menu or press F9 The program will now be compiled Step 5 Wait until the Build and Download are completed 100 Adjust the...

Page 21: ...gn the demo 3 1 Using the standard C language 3 1 1 Demo 1 Beep Timer Counter Demo 1 is programmed using the C language and implements a single button that will beep when clicked on and will increase...

Page 22: ...fold the Toolbox panel c Select the BitButton icon then move your mouse to the design area You will notice that the cursor becomes a d In the design area click and drag the mouse to draw a rectangle S...

Page 23: ...e1 design area You will notice that the cursor becomes a c Click in the design area to create a Timer icon d In the same manner as that described in the Step 3 create another Label as illustrated in t...

Page 24: ...de from the picture below In this demo each click of the button will add 1 to the counter and beep once until it reaches 100 and will then reset to 0 before beginning to accumulate again c When finish...

Page 25: ...e Label component Font Sets the font for the text in the display box Height Sets the height of the display box ID A unique ID number to identify different entities of the same type in the design Left...

Page 26: ...as com Step 8 Configure the properties of the Timer component a Select the Timer6 component in the design area as shown in the picture below b Set the Interval property in the Properties Inspector are...

Page 27: ...by 1 each time the button is clicked until it reaches 100 and will then reset to 0 before beginning to accumulate again c When finished click OK to store Step 10 Build and Download the demo to the Tou...

Page 28: ...e This demo combine the CheckBox and ObjectList to implement the effect of image changes and the CheckBox will be change by the value of the Slider Step 1 Create a new TPD 703 64 project based on the...

Page 29: ...con and then move your mouse to the design area You will notice that the cursor becomes a d In the design area click and drag the mouse to draw a rectangle Step 3 Create an ObjectList Object List a Sw...

Page 30: ...k in the drop down menu c Double click the Digit0 hwd to Digit9 hwd in order the list will be created on right block d Click OK button to complete the list of pictures Step 5 Connect the ObjectList an...

Page 31: ...anel c Select the Slider icon and then move your mouse to the design area You will notice that the cursor becomes a d In the design area click and drag the mouse to draw a rectangle Step 7 Adjust the...

Page 32: ...e of Slider6 Both the text in the Slider6 and the corresponding picture will be changed at the same time c When finished click OK to store Step 9 Build and Download the demo to the TouchPAD model Plea...

Page 33: ...n RTC And this demo shows how to add the background which is designed by user Step 1 Create a new TPD 703 64 project based on the C language refer to Section 2 2 for more details NOTE Demo 3 use the b...

Page 34: ...en the dialog box b Click the Select Files button and choice the picture i e the background c After choosing the picture the dialog box will show the path of related file and that means the importatio...

Page 35: ...e picture below b Click the Widget Ctrl 2 heading to unfold the Toolbox panel c Select the Label icon then move your mouse to the design area You will notice that the cursor becomes a d In the design...

Page 36: ...to create others Label Step 5 Create a Timer a As shown in the picture below click the System Ctrl 3 heading to unfold the Toolbox panel b Select the Timer icon then move your mouse to the Frame1 desi...

Page 37: ...the value of the RTC and display them in corresponding Label c When finished click OK to store int yy mm dd hh nn ss static char str1 5 str2 5 str3 5 str4 5 str5 5 str6 5 void Timer12OnExecute tWidget...

Page 38: ...rogramming Guide v 1 0 6 Page 38 Copyright 2020 ICP DAS CO LTD All Rights Reserved E mail service icpdas com Step 7 Build and Download the demo to the TouchPAD model Please refer 2 4 Downloading Metho...

Page 39: ...the DO of the M 7055 model and the TPD also update the DI status of the M 7055 model at any time on its screen Please connect the DI0 pin and the DO0 pin of the M 7055 model Please refer the manual of...

Page 40: ...the CheckBox icon and then move your mouse to the design area You will notice that the cursor becomes a d In the design area click and drag the mouse to draw a rectangle Step 3 Create an ObjectList O...

Page 41: ...he Light M in the drop down menu c Double click the LMB0 hwd and then double click the LMB1 hwd the list will be created on right block d Click OK button to complete the list of pictures Step 5 Connec...

Page 42: ...2 to Step 5 to create a button which designed to control the DO0 Step 7 Create a Timer a As shown in the picture below click the System Ctrl 3 heading to unfold the Toolbox panel b Select the Timer i...

Page 43: ...Click the button at OnCreate field to open the programming window c Edit the code in the programming window using the C language Users can copy the code from the picture below d When finished click OK...

Page 44: ...n at OnDestroy field to open the programming window f Edit the code in the programming window using the C language Users can copy the code from the picture below g When finished click OK to store HAND...

Page 45: ...n copy the code from the picture below c When finished click OK to store HANDLE h char ReadDI_value 8 int NetID 1 int addr 0 int ch_count 8 void Frame12OnCreate h uart_Open COM1 9600 N 8 1 void Frame1...

Page 46: ...he TouchPAD model Please refer 2 4 Downloading Methods for TouchPAD HANDLE h char ReadDI_value 1 int NetID 1 int addr 0 int ch_count 8 char DO_value 1 void Frame12OnCreate h uart_Open COM1 9600 N 8 1...

Page 47: ...r and implements a single button that will beep when clicked on and will increase the counter by one The counter will reset to zero when it reaches to ten Step 1 Create a new TPD 703 64 project based...

Page 48: ...fold the Toolbox panel c Select the BitButton icon then move your mouse to the design area You will notice that the cursor becomes a d In the design area click and drag the mouse to draw a rectangle S...

Page 49: ...own in the picture below right click the Virtual in the Workspace to create the tags b Enter the name of the tag in the Edit variable window Here we use beep_tag for the first tag and count for the se...

Page 50: ...in the design area b Click the Text field in the Properties Inspector panel and enter the string Click Me c Click the Font field to change the font to a suitable style size and color d Click on the T...

Page 51: ...or the text in the display box Height Sets the height of the display box ID A unique ID number to identify different entities of the same type in the design Left Sets the X coordinate of the top left...

Page 52: ...utton or F2 key on the keyboard to create a new rung c Move the cursor the highlighted rectangle to the first contact symbol and then press F7 to add a new function block to the right of it d Double c...

Page 53: ...it the function Beep of the category system g Double click on the contact symbol to select variable beep_tag h Similarly double click on the neighborhood of the input parameter in as below figure to s...

Page 54: ...one c Double click on the first function block to set its function to GE greater than or equal to of the category default d Double click on the second function block to set its function to Assign of...

Page 55: ...dder scan That is TouchPAD executes each rung of the ladder serially from the first rung to the last and after finishing the last rung it waits until the scan time interval is up the scan time interva...

Page 56: ...e result using the DecimalDigits in the Property Inspector The detail is below Suppose we want to calculate the result of 50 divided by 7 and the precision requires the third decimal place the fourth...

Page 57: ...All Rights Reserved E mail service icpdas com Step 2 Create a Label and adjust its DecimalDigits property to 3 Step 3 Create two Virtual Tags i e A and B which have the default value 50 and 7 respect...

Page 58: ...S CO LTD All Rights Reserved E mail service icpdas com Step 4 Use the Ladder Designer to program the logic Step 5 Let the TagName of Label to select the Divide tag Step 6 Build and Download the demo t...

Page 59: ...n RTC And this demo shows how to add the background which is designed by user Step 1 Create a new TPD 703 64 project based on the Ladder Designer refer to Section 2 2 for more details NOTE Demo 3 use...

Page 60: ...en the dialog box b Click the Select Files button and choice the picture i e the background c After choosing the picture the dialog box will show the path of related file and that means the importatio...

Page 61: ...e picture below b Click the Widget Ctrl 2 heading to unfold the Toolbox panel c Select the Label icon then move your mouse to the design area You will notice that the cursor becomes a d In the design...

Page 62: ...the Virtual in the Workspace to create the tags b Enter the name of the tag in the Edit variable window Here we use Hour c Finally we can see that the tag created in the Workspace d Click the Label6 a...

Page 63: ...erved E mail service icpdas com Step 5 Repeat the step 3 and step 4 to create others Label and the corresponding Virtual Tag Step 6 Use the Ladder Designer to program the logic a Click the menu HMI La...

Page 64: ...to set the function to it Here we set it the function Get_Date_Time of the category system d Double click on the neighborhood of the input parameter year as below figure e Select variable Year to stor...

Page 65: ...v 1 0 6 Page 65 Copyright 2020 ICP DAS CO LTD All Rights Reserved E mail service icpdas com Step 7 Save and Close the Ladder Step 8 Build and Download the demo to the TouchPAD model Please refer 2 4...

Page 66: ...e TPD also update the DI status of the M 7055 model at any time on its screen Please connect the DI pin and the DO pin of the M 7055 model i e DI0 connects to DO0 DI1 connects to DO1 DI2 connects to D...

Page 67: ...e Workspace tab and select the New Connection option to set up the connection b For this demo Select the COM1 interface and set the Baud Rate the Data Bit the Parity and the Stop Bit to be the same as...

Page 68: ...bus RTU Master from the TouchPAD is dropdown menu c Select M 7000 from the Device Series dropdown menu and then select the created SER_1 from the Connection dropdown menu d Click the Select button to...

Page 69: ...c GUI you want to use b Select and drag the corresponding I O tag from the left hand side into the frame c Repeat the steps above to drag DI0 7 and DO0 7 into the HMI frame Step 5 Set up the communica...

Page 70: ...ld the Toolbox panel c Select the Label icon then move your mouse to the design area You will notice that the cursor becomes a d In the design area click and drag the mouse to draw a rectangle Step 7...

Page 71: ...TagName property in the Inspector and there shows a little button Click on the button e Select the tag you want Here we select the tag DI_total f Finally we can see the tag we just choose Step 8 Use...

Page 72: ...the function to it Here we set it the function Pack of the category user_define d Double click on the neighborhood of the input parameters bits_1 to bits_16 and adding the corresponding Device Tag as...

Page 73: ...tags Modbus This demo makes TouchPAD as a Modbus TCP RTU Master Slave device in the C programming language Other The more project example PassWord Create a virtual password button the user needs to e...

Page 74: ...load software development_tool hmiworks document manual HMIWorks_Software_User_Manual_en pdf Products Website Datasheets http www icpdas com en product guide Panel__Products TouchPAD TPD__Series FAQ h...

Page 75: ...he toolbox to select the entire image or press Ctrl A on the keyboard and then choose the copy option from the Edit menu or press Ctrl C on the keyboard to copy the picture b Select the Paste option f...

Page 76: ...ision Date Description 1 0 5 Apr 2012 Initial issue 1 0 6 Jun 2020 Update the screenshot of HMIWorks v2 10 46 Modify the content to the universal version Divide the demos of the C language and Ladder...

Reviews: