background image

20

7

DSC OPERATION

New2001


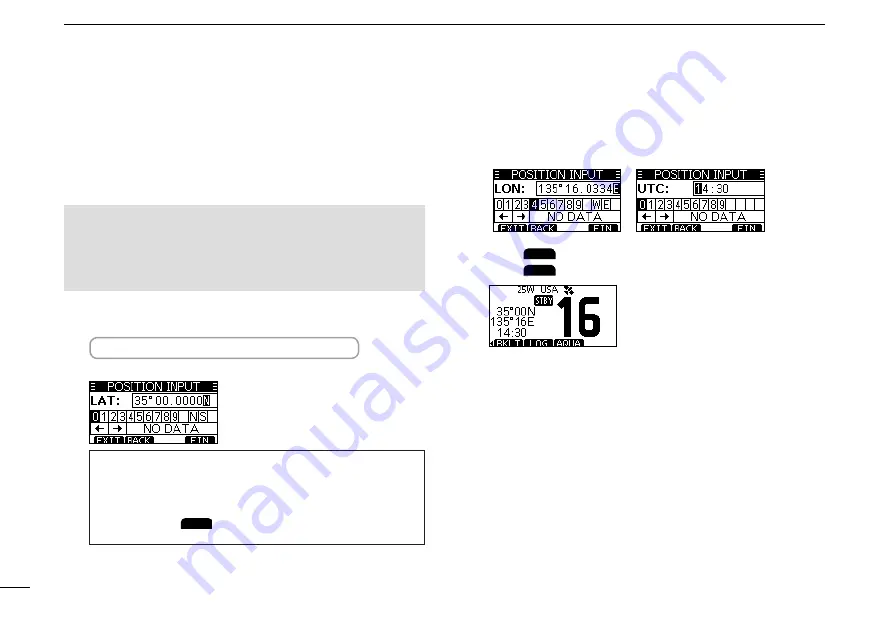
Entering the position and time

ADistresscallshouldincludethevessel’sposition,dateand

time.IfnoGPSdataisreceived,manuallyentertheposition

andUniversalTimeCoordinated(UTC)time.

NOTE: 

 •

ThemanualentryisdisabledwhilevalidGPSdatais

received.

 • The manually entered position and time is valid only for 

23.5 hours, or until turning OFF the transceiver.

1.  Display the “POSITION INPUT” screen.

  [MENU] > DSC Settings > 

Position Input

2.  Enter the latitude.

TIP:

 •

Selectanumberoracompassdirectionusing[▲]/[▼]/[◄]/

[►].

 •

Select“←”or“→,”orrotate[DIAL]tomovethecursor.

 • Push [ENT] or 

FIN


to save the selected number.


3.  Enter the longitude and the UTC time.


L

See the TIP in step 2 to enter.


4.  Push 

FIN

 to set the entered position and time.

5.  Push 

EXIT

 to return to the standby screen.


L

 The entered position and time are displayed on the 

operating screen.

Summary of Contents for IC-M330

Page 1: ...VHF MARINE TRANSCEIVERS iM330 iM330E iM330G iM330GE INSTRUCTION MANUAL INSTRUCTION MANUAL ...

Page 2: ...not responsible for the destruction damage to or performance of any Icom or non Icom equipment if the malfunction is because of Force majeure including but not limited to fires earthquakes storms floods lightning other natural disasters disturbances riots war or radioactive contamination The use of Icom transceivers with any equipment that is not manufactured or approved by Icom FEATURES z z Easy ...

Page 3: ...stress and assistance required 6 Give any other information which might facilitate the rescue Or transmit your Distress call using Digital Selective Calling DSC on Channel 70 USING DIGITAL SELECTIVE CALLING Ch 70 DISTRESS CALL PROCEDURE 1 While lifting up the key cover hold down DISTRESS for 3 seconds until you hear 3 short beeps and then one long beep 2 Wait for an acknowledgment on Channel 70 fr...

Page 4: ...t transmit with radio and antenna when persons are within the MPE radius of the antenna unless such persons such as driver or radio operator are shielded from antenna field by a grounded metallic barrier The MPE Radius is the minimum distance from the antenna axis that person should maintain in order to avoid RF exposure higher than the allowable MPE level set by FCC FAILURE TO OBSERVE THESE LIMIT...

Page 5: ... de l antenne lorsque des personnes se trouvent à l intérieur du rayon d exposition maximale admissible de cette antenne à moins que ces personnes comme le conducteur ou l opérateur radio ne soient protégées du champ de l antenne par un écran métallique relié à la masse Le rayon d exposition maximale admissible équivaut à la distance minimale que cette personne doit maintenir entre elle et l axe d...

Page 6: ...ority to operate this transceiver under FCC regulations INFORMATION FCC Cet équipement a été testé et reconnu conforme aux limites fixées pour un appareil numérique de classe A conformément au point 15 de la réglementation FCC Ces limites sont définies de façon à fournir une protection raisonnable contre le brouillage préjudiciable lorsque cet appareil est utilisé dans un environnement commercial ...

Page 7: ...To comply with FCC regulations this sticker must be affixed in such a location as to be readily seen from the operating controls of the radio as in the diagram below Make sure the chosen location is clean and dry before applying the sticker EXAMPLE WARNING WARNING STICKER ...

Page 8: ... or where it could cause bodily injury CAUTION DO NOT install the transceiver and or microphone less than 1 meter from the vessel s magnetic navigation compass CAUTION DO NOT place or leave the transceiver in areas with temperatures below 20 C 60 C 4ºF 140ºF or in areas subject to direct sunlight such as a dashboard CAUTION DO NOT use harsh solvents such as Benzine or alcohol to clean the transcei...

Page 9: ... la VHF et le microphone à au moins 1 m du compas de route du navire NE PAS utiliser ou placer l émetteur récepteur dans des zones où la temperature est inférieure à 20 ou supérieure à 60 ou dans des zones soumises au rayonnement solaire direct telles le tableau de bord NE PAS nettoyer l appareil avec des solvants agressifs tels que benzène ou alcool susceptibles d endommager les surfaces exposées...

Page 10: ...of this equipment should be made in such a manner as to respect the EC recommended electromagnetic field exposure limits 1999 519 EC The maximum RF power available from this device is 25 watts The antenna should be installed as high as possible for maximum efficiency and the installation height should be at least 1 76 meters above any accessible position In the case where an antenna cannot be inst...

Page 11: ...r push or Enter Push ENT ENT or DIAL Go to the next tree level Push ENT ENT DIAL or Go back to the previous tree level Push CLR BACK or Cancel Push CLR Exit Push MENU or EXIT IMPORTANT i FEATURES i EXPLICIT DEFINITIONS i IN CASE OF EMERGENCY ii RADIO OPERATION WARNING iii AVERTISSEMENT POUR LES OPÉRATEURS RADIO iv FCC INFORMATION v INFORMATION FCC v NOTE vi PRECAUTIONS vii PRÉCAUTIONS viii RECOMME...

Page 12: ...on 17 7 DSC OPERATION 18 DSC address ID 18 Entering the position and time 20 Sending DSC calls Distress 21 Sending DSC calls other 24 Receiving DSC calls Distress 32 Receiving DSC calls other 33 DSC Log 38 Multiple task mode 40 DSC Settings 42 Making an Individual call using an AIS transponder 45 8 MENU SCREEN 47 Using the Menu screen 47 Menu items description 49 9 CONNECTIONS AND MAINTENANCE 53 C...

Page 13: ...ncy for a Ship Radiotelephone license application This government issued license states the call sign which is your craft s identification for radio purposes 2 OPERATOR S LICENSE A Restricted Radiotelephone Operator Permit is the license most often held by small vessel radio operators when a radio is not required for safety purposes The Restricted Radiotelephone Operator Permit must be posted or k...

Page 14: ...to display or close the Menu screen 7 POWER VOLUME SQUELCH SWITCH PWR VOL SQL Also described as DIAL in this manual z z Hold down for 1 second to turn the transceiver ON or OFF z z Rotate or push once to display the volume level setting screen then rotate to adjust the volume level p 11 z z Push twice to display the squelch level setting screen then rotate to adjust the squelch level p 11 z z On t...

Page 15: ...hen the channel is changed while receiving or transmitting a signal 5 GPS ICON Displayed when valid GPS position data is received Blinks while no position data is received 6 MAIL ICON p 38 Displayed when there is an unread DSC message Blinks until one of the called messages is read 7 CHANNEL SWITCH ICON p 42 Displayed when the CH Auto SW is set to Ignore after 10 sec or Manual 8 LOCAL INDICATOR Di...

Page 16: ...NO POS NO TIME is displayed if no GPS data has been received and then a warning message is displayed for 2 minutes after turning ON the transceiver blinks if no GPS data is received for 30 seconds after receiving valid GPS data and then and a warning message are displayed after 10 minutes A warning message is displayed if no GPS data is received for 4 hours after receiving valid GPS data Manually ...

Page 17: ... adjust the brightness of the display and keys backlight to between 1 and 7 or OFF LOG LOG p 38 Push to display the received call log or distress message log D D Software key functions Distress Call DISTRESS p 22 Push to display the Distress screen to select the nature of distress then to make a call L L DTRS is displayed in the Multiple task mode For only the USA version NEVER MAKE A DISTRESS CAL...

Page 18: ...direction or manually resume a scan p 51 e TRANSMIT POWER KEY HI LO z z Push to set the power level to high or low L L Some channels are set to only low power z z While holding down this key turn ON the transceiver to turn the Microphone Lock function ON or OFF p 13 r CHANNEL 16 CALL CHANNEL KEY 16 C p 9 z z Push to select Channel 16 z z Hold down for 1 second to select the Call channel The CALL i...

Page 19: ... operating screen This initial code entry can be done only once After entering it can be changed only by your dealer or distributor If your MMSI code has already been entered doing the steps below is not necessary 1 Hold down DIAL to turn ON the transceiver Three short beeps sound and Push ENT to Register your MMSI is displayed 2 Push ENT to start entering the MMSI code The MMSI Input screen is di...

Page 20: ...splayed 2 Push or or rotate DIAL to select ATIS ID Input then push ENT to start entering The ATIS ID Input screen is displayed 3 Enter your ATIS ID 4 Repeat step 3 to enter all 10 digits 5 Push FIN to set the entered ID The Confirmation screen is displayed 6 Enter your ATIS ID again to confirm 7 Push FIN to set the entered ID When your ATIS ID is successfully entered the screen displays ATIS ID Su...

Page 21: ...turn to the previously selected channel push or to display CHAN or CH WX then push the software key below CHAN or CH WX D D Call channel Each Channel Group has separate leisure use Call channels The Call channel is scanned during Tri watch The Call channels can be selected and used to store your most often used channels in each Channel Group for quick recall L L See page 12 for details on setting ...

Page 22: ...reen is displayed 4 Push or rotate DIAL to select a Channel Group and then push ENT L L Push EXIT to exit the Menu screen L L The selected Channel Group s icon is displayed on the operating screen D D Weather channels and Weather Alert The USA and Australian version transceivers have 10 preset Weather channels The transceivers are capable of monitoring broadcasts from the National Oceanographic an...

Page 23: ...nnel icon Adjusting the volume level z z Rotate DIAL to adjust the audio volume level L L If no key is pushed for 5 seconds the screen automatically closes Adjusting the squelch level Squelch enables the audio to be heard only while receiving a signal that is stronger than the set level A higher level blocks weak signals so that you can receive only stronger signals A lower level enables you to he...

Page 24: ...L screen MENU Radio Settings Call Channel 2 Push or rotate DIAL to select the channel 3 Push ENT to set the selected channel as the Call channel L L Push EXIT to exit the Menu screen Adjusting the backlight or the display contrast 1 Display the BACKLIGHT or CONTRAST screen MENU Configuration Backlight MENU Configuration Display Contrast 2 Push or rotate DIAL to adjust then push ENT to set L L Push...

Page 25: ...ting CAUTION Transmitting without an antenna may damage the transceiver 1 Push or to select the channel to call on The channel number and name are briefly displayed Only when CH Close up is ON L L You cannot transmit on Channel 70 L L is displayed while receiving a signal L L You can also select the channel with or on the microphone Only when FAV on MIC is OFF 2 Hold down PTT on the microphone to ...

Page 26: ...to scroll Push ENT to enter the selected character Select or or rotate DIAL to move the cursor Push EXIT to cancel editing 5 Push FIN to save the edited name and return to the operating screen AquaQuake Water Draining function Water in the speaker grill may muffle the sound coming from the speaker The AquaQuake Water Draining function removes water from the speaker grill by vibrating the speaker c...

Page 27: ...s through all Favorite channels while also monitoring Channel 16 When a signal is received On Channel 16 The scan pauses until the signal disappears On a channel other than Channel 16 The scan becomes Dualwatch until the signal disappears For USA and Australian versions When the Weather Alert function is ON the previously selected Weather channel is also scanned CH 01 CH 02 WX CH 05 CH 04 CH 03 No...

Page 28: ...often used channels by setting them as Favorite channels You can set Favorite channels in each Channel Group 1 Select a Channel Group p 10 2 Push or to select the channel you want to set as a Favorite channel 3 Push or to display 4 Push The selected channel is set as a Favorite channel and is displayed L L To cancel the setting push again TIP You can set all channels as Favorite channels clear all...

Page 29: ... on another channel Monitors Channel 16 and Channel 9 for the Call channel while receiving on another channel Dualwatch Tri watch Operation 1 Select Dualwatch or Tri watch in Radio Settings on the Menu screen 2 Push or to select a channel 3 Push or to display DW Dualwatch or TW Tri watch 4 Push DW or TW Dualwatch or Tri watch starts is displayed for Dualwatch and is displayed for Tri watch L L Bee...

Page 30: ... a number using and Push ENT to set the selected number Select or or rotate DIAL to move the cursor NOTE The first digit is fixed as 0 for a Group ID The first two digits are fixed as 0 for any coast station ID 4 Push FIN to start entering the name TIP Push to use characters and select ABC to use numbers and letters Select characters or space using Select or to scroll Push ENT to enter the selecte...

Page 31: ...ge 4 After entering push FIN to save and return to the previous screen The entered name is displayed NOTE The first digit is fixed as 0 for a Group ID The first two digits are fixed as 0 for any coast station ID D D Deleting an entered ID Example Deleting an Individual ID ICOM 2 1 Display the INDIVIDUAL ID screen MENU DSC Settings Individual ID 2 Push or to select ICOM 2 3 Push DEL Are You Sure is...

Page 32: ...lid only for 23 5 hours or until turning OFF the transceiver 1 Display the POSITION INPUT screen MENU DSC Settings Position Input 2 Enter the latitude TIP Select a number or a compass direction using Select or or rotate DIAL to move the cursor Push ENT or FIN to save the selected number 3 Enter the longitude and the UTC time L L See the TIP in step 2 to enter 4 Push FIN to set the entered position...

Page 33: ...ng beep sound The backlight blinks 3 After sending wait for an Acknowledgement call Waiting for ACK is displayed L L The Distress call is automatically sent every 3 5 to 4 5 minutes until an Acknowledgement is received or a Distress Cancel call is sent 4 When you receive an Acknowledgement an alarm sounds Push ALARM OFF to turn OFF the alarm Channel 16 is automatically selected 5 Hold down PTT and...

Page 34: ...e Entering the position and time on page 20 for details 4 While lifting up the key cover hold down DISTRESS the red button for 3 seconds until you hear 3 short countdown beeps and a long beep sound The backlight blinks 5 After sending wait for an Acknowledgement call Waiting for ACK is displayed L L The Distress call is automatically sent every 3 5 to 4 5 minutes until an Acknowledgement is receiv...

Page 35: ...e wording of the cancellation by pushing 4 After communicating push FINISH The screen to the right is displayed 5 Push STBY to finish the Distress Cancel call Returns to the operating screen D D Distress call software key description While waiting for an Acknowledgement CANCEL Cancels the Distress call and enables you to send a Cancel call See the right column RESEND Enables you to resend the Dist...

Page 36: ...al Call is displayed and then Waiting for ACK is displayed L L If Channel 70 is busy the transceiver stands by until the channel becomes clear 9 When you receive an Acknowledgement Able to comply An alarm sounds The screen to the right is displayed 10 Push ALARM OFF to turn OFF the alarm The channel assigned in step 7 is automatically selected L L If the called station cannot use the channel that ...

Page 37: ...ceived an Individual call p 33 send an Acknowledgement to the calling station When you send an Acknowledgement select Able to Comply Propose New CH or Unable to Comply 1 While an Individual call is being received push ALARM OFF to turn OFF the alarm The received call s information is displayed 2 Push ACPT The Acknowledgement category screen is displayed L L If you want to send an Acknowledgement A...

Page 38: ...ment type ABLE Able to Comply Sends an Acknowledgement call without any changes UNABLE Unable to Comply Sends an Acknowledgement call but cannot communicate NEW CH Propose New CH Ables to communicate but proposes another channel Specify the channel by pushing or Example Channel 69 4 Push CALL to send the Acknowledgement call ...

Page 39: ...s displayed 3 Select All Ships and then push ENT The All Ships call is selected and returns to the OTHER DSC screen 4 Select Category and then push ENT The CATEGORY screen is displayed 5 Select a category of the call and the push ENT The category is set and returns to the OTHER DSC screen 6 Select Channel and then push ENT 7 Select the channel to assign and then push ENT L L The assigned channels ...

Page 40: ...p and then push ENT The Group call is selected and returns to the OTHER DSC screen 4 Select Address and then push ENT The ADDRESS screen is displayed 5 Select the group to send a Group call to and the push ENT L L You can also select Manual Input to manually enter the target group 6 Select Channel and then push ENT 7 Select the channel to assign and then push ENT L L The assigned channels are pres...

Page 41: ...nu screen 2 Select Test and then push ENT The Test call is selected and returns to the OTHER DSC screen 3 Select Address and then push ENT The ADDRESS screen is displayed 4 Select a station to send the Test call to L L You can also select Manual Input to manually enter the calling station 5 Push CALL to send the Test call Transmitting Test Call is displayed L L If Channel 70 is busy the transceive...

Page 42: ... You can send a Position Request call or Polling request call to a station depending on the presetting Example Sending a Position Request call 5 Push STBY A confirmation screen is displayed 6 Push OK to return to the operating screen 1 Push OTHER DSC The OTHER DSC screen is displayed L L You can also display the OTHER DSC screen by selecting the Other DSC item on the Menu screen 2 Select Type and ...

Page 43: ... you can manually enter the position and time in Position item on this screen See Entering the position and time on page 20 for details 4 Push CALL to send the Position Reply call 6 Push CALL to send the Position Request call Transmitting Position Request is displayed and then the assigned channel is automatically selected L L If Channel 70 is busy the transceiver stands by until the channel becom...

Page 44: ... CH Auto SW item is set to Manual p 42 Pauses the countdown until the assigned channel is automatically selected Select RESUME to resume the countdown The call is saved in the DSC Log ACPT Accept Accepts the call Channel 16 is automatically selected Monitor Channel 16 as a coast station may require assistance After Channel 16 is selected you can select your next operation by pushing the software k...

Page 45: ...l you display the call message ACPT Accept Accepts the call The assigned channel is automatically selected The call is saved in the DSC Log The received call s information is displayed Push the software key to select the Acknowledgement option ABLE Able to comply Sends an Individual Acknowledgement call right away The assigned channel is automatically selected After sending RESEND to resend The ca...

Page 46: ...eturns to the operating screen The call is saved in the DSC Log blinks continuously until you display the call message PAUSE Pause L L PAUSE is not displayed if the CH Auto SW item is set to Manual p 42 Pauses the countdown until the assigned channel is automatically selected Select RESUME to resume the countdown The call is saved in the DSC Log ACPT Accept Accepts the call The assigned channel is...

Page 47: ...ayed 1 Push ALARM OFF to turn OFF the alarm L L The traffic channel that is assigned by the caller is automatically selected after 10 seconds by default 2 Push the software key below your next operation IGN Ignore Ignores the call and returns to the operating screen The call is saved in the DSC Log blinks continuously until you display the call message PAUSE Pause L L PAUSE is not displayed if the...

Page 48: ...all is saved in the DSC Log UNABLE Unable to Comply Sends the Acknowledgement Unable to Comply Displays the Acknowledgement information and then returns to the operating screen by pushing EXIT The call is saved in the DSC Log ACPT Accept Accepts the call Displays the received call s information The call is saved in the DSC Log Push ABLE or UNABLE then push CALL to send the Position Reply call p 31...

Page 49: ...DSC Log ACPT Accept Accepts the call Displays the received call s information The call is saved in the DSC Log Push ACK and then push CALL to send a Test Acknowledgement call p 30 Push RESEND to resend NOTE If the Auto ACK function is set to Auto the Test Acknowledgement call is automatically sent to the calling station when the call is received p 42 When a Test call is received The alarm sounds f...

Page 50: ...Received DSC Log The transceiver saves up to 30 received Distress call messages and 50 received Others call messages in your DSC Log On the operating screen is displayed when there is an unread call message The icon blinks when there is a new received call message 1 Display the DSC Log screen Menu DSC Log 2 Push or to select Received Call Log and then push ENT The RCVD CALL LOG screen is displayed...

Page 51: ...T The TX CALL LOG screen is displayed 3 Push or to scroll through the log 4 Push ENT to display the sent call s information EXIT Returns to the operating screen BACK Returns to the previous screen DEL Deletes the selected call log L L The confirmation screen is displayed before deleting MMSI Saves the MMSI as an Individual ID EXIT Returns to the operating screen BACK Returns to the previous screen...

Page 52: ...erating screen NOTE The Task mode has a Time out Timer TOT function After a certain period of time has passed without any operation on a task the transceiver automatically exits the Task mode and returns to the operating screen When a Time out Timer activates an alarm sounds and a count down message is displayed for 10 seconds D D Holding a DSC task In the Multiple task mode you can hold or activa...

Page 53: ...BY Holds the task and returns to the operating screen INFO Displays the task information DEL Finishes the selected task HOLD Holds the selected task ACTIVE Activates the selected task D D Activating the held DSC task 1 Push TASK to display the task list The task list is displayed 2 Push or to select the task that you want to activate 3 Push ACTIVE to activate the task The activated task informatio...

Page 54: ...anual Manually sends an Acknowledgement call Polling ACK Default Auto Auto Automatically sends an Acknowledgement call Manual Manually sends an Acknowledgement call Test ACK Default Auto Auto Automatically sends an Acknowledgement call Manual Manually sends an Acknowledgement call CH Auto SW Default Accept Select whether or not to automatically switch to channel 16 or the specified channel or sele...

Page 55: ...ived Routine Default On An alarm sounds when a Routine DSC call is received Warning Default On An alarm sounds when No MMSI code is entered The position data has not been received for 2 minutes after turning ON the transceiver The received position data has not been updated for 10 minutes The received position data has not been updated for 4 hours The manually entered position data has not been up...

Page 56: ...el Push ENT to start the Self Test L L When the sending and receiving DSC signals match OK is displayed Procedure Default Single For only the USA version You can select the type of task for the transceiver depending on the presetting Single Handles only 1 task at the same time Multiple Handles up to 7 tasks at the same time DSC Settings Continued ...

Page 57: ...g the transponder 2 Push DSC to display the Voice channel selection screen and then push Y Z to select a Voice channel Voice channels are already preset into the transponder in the recommended order When a coast station is selected in step 1 a Voice channel will be specified by the coast station therefore you cannot change the channel The transponder will display Voice Channel is specified by the ...

Page 58: ...omply is received push ALARM OFF to turn OFF the alarm and then select the Intership channel specified in step 2 A different Intership channel will be selected if the station you called cannot use the channel To reply push PTT and speak at a normal voice level If entered you can check the MMSI code or the name of the AIS target on the display z z If the Acknowledgement Unable to comply is received...

Page 59: ...sh or rotate DIAL to select Configuration and then push ENT The CONFIGURATION screen is displayed L L Holding down or sequentially scrolls up or down through the Menu screen 3 Push or rotate DIAL to select Key Beep then push ENT The KEY BEEP screen is displayed 4 Push or rotate DIAL to select Off then push ENT L L Off is set and the transceiver returns to the previous screen TIP L L To exit the Me...

Page 60: ...2 UTC Offset p 49 Display Contrast p 12 Inactivity Timer p 49 Key Beep p 49 GPS p 50 Key Assignment p 49 DSC Log Item Reference Item Reference Received Call Log p 38 Transmitted Call Log p 39 Radio Settings Item Reference Item Reference Scan Type p 50 WX Alert p 51 Scan Timer p 50 FAV Settings p 51 Dual Tri watch p 50 FAV On MIC p 51 Channel Group p 51 CH Display p 52 Call Channel p 51 CH Close up...

Page 61: ...nctions and their order may differ depending on the transceiver version or presetting Set Default Sets the software key function order as default L L The default setting may differ depending on the transceiver version or presetting UTC Offset Default 00 00 Set the offset time between Universal Time Coordinated UTC and your local time to between 14 00 and 14 00 in 1 minute steps Inactivity Timer Th...

Page 62: ...ettings Scan Type Default The transceiver has 2 scan types Select Normal Scan and Priority Scan Normal Scan Scans all Favorite channels in the selected channel group Priority Scan Sequentially scans all Favorite channels while monitoring Channel 16 L L The default setting differs depending on the transceiver version Scan Timer Default Off You can use the Scan Timer to pause or to resume after 5 se...

Page 63: ...an alert On with Scan The preset Weather channels are sequentially checked while scanning On The previously selected last used Weather channel is checked while scanning Off The Weather Alert tone is not detected FAV Settings You can set all channels as Favorite channels clear all settings or reset to default By default some channels are preset The Favorite channels differ depending on the transcei...

Page 64: ...L L This setting may not be usable depending on the transceiver version or presetting CH Close up You can select whether or not to display the channel name when changing the operating channel On The channel number and the channel name are briefly displayed when changing the channel Off The channel name is not displayed on the screen D D Radio Info Displays your transceiver s MMSI Software version ...

Page 65: ...ipment to receive position data from other ships An NMEA 0183 ver 2 0 or later sentence format DSC or DSE compatible navigation equipment is required The supplied GPS outputs RMC GSA and GSV format sentences 2 AF OUT AND DATA LEADS Blue External Speaker Black External Speaker Connects to an external speaker Orange Data line Gray Data line Used only for maintenance purpose NOTE for NMEA In Out and ...

Page 66: ...the transceiver to the high density D Sub 15 pin connector of the MA 500TR using the OPC 2014 cable After connecting an Individual DSC call can be made to the AIS target using the transponder without entering the target s MMSI code The OPC 2014 is supplied with the MA 500TR Listener A Data H lead Yellow Connects to lead 3 of the OPC 2014 Listener B Data L lead Green Connects to lead 2 of the OPC 2...

Page 67: ...own the source of the problem repair it and replace the damaged fuse with a new one of the proper rating Fuse rating 10 A Cleaning If the transceiver becomes dusty or dirty wipe it clean with a soft dry cloth DO NOT use harsh solvents such as Benzine or alcohol as they will damage the transceiver s surfaces Supplied accessories Mounting bracket For mounting bracket Knob bolts Flat washers M5 Screw...

Page 68: ...e than 5 kg using the 2 supplied screws 5 20 mm CAUTION KEEP the transceiver and microphone at least 1 meter 3 3 ft away from the vessel s magnetic navigation compass Mounting Example NOTE When mounting the transceiver on a board fix the bracket to the board using the user supplied bolts and nuts as shown to the right 2 Attach the transceiver to the bracket so that the face of the transceiver is a...

Page 69: ... meter away from your vessel s magnetic navigation compass 4 Attach the clamps on both sides of the transceiver L L Make sure that the clamps align parallel to the transceiver body Clamp 5 Tighten the end bolts on the clamps rotate clockwise so that the clamps press firmly against the inside of the instrument control panel 6 Tighten the locking nuts rotate counterclockwise so that the transceiver ...

Page 70: ... lb D D Transmitter Output power 25 W or 1 W Modulation system Variable reactance frequency modulation Maximum frequency deviation 5 kHz Spurious emissions IC M330 IC M330G Less than 70 dBc High power Less than 56 dBc Low power IC M330E IC M330GE Less than 0 25 µW D D Receiver Receive system Double conversion superheterodyne Sensitivity FM IC M330 IC M330G 0 22 μV typical at 12 dB SINAD IC M330E I...

Page 71: ...iver to a panel MA 500TR class b ais transponder To transmit individual DSC calls to a selected AIS targets D D GPS Antenna Frequency 1575 42 MHz Channel 66 ch Deferential satellites WAAS EGNOS MSAS GAGAN GLONAS receiving frequency 1602MHz D D Dimensions Unit mm inch 66 5 2 6 25 8 1 84 3 3 3 62 4 2 5 137 5 4 51 2 156 5 6 2 ...

Page 72: ... 6 Scan does not start More than 2 favorite channels are not set Set the Favorite channels p 16 No beep sounds The Key Beep function is OFF Turn ON the Key Beep function p 47 Individual or Group ID cannot be set The entered ID code is incorrect First digit must be set to between ʻ1ʼ and ʻ9ʼ for an Individual ID First digit must be set to ʻ0ʼ for a Group ID Enter a correct ID code pp 18 19 blinks i...

Page 73: ...00 27 27 157 350 161 950 27 157 350 157 350 27A 157 400 157 400 28A 28 28 157 400 162 000 28 28B Rx only 162 000 60 156 025 160 625 60 156 075 160 675 61 61A 156 075 156 075 156 125 160 725 62 62A 156 125 156 125 156 175 160 775 63 63A 63A 156 175 156 175 63A 64 156 225 160 825 64 64A 156 225 156 225 156 275 160 875 65 65A 65A 2 156 275 156 275 65A 156 325 160 925 66 66A 66A 2 156 325 156 325 66A ...

Page 74: ... 325 160 925 76 3 156 825 156 825 86 157 325 161 925 07 156 350 160 950 17 1 156 850 156 850 27 157 350 161 950 67 156 375 156 375 77 156 875 156 875 87 157 375 157 375 1037 4 157 850 157 850 P4 4 161 425 161 425 88 157 425 157 425 08 156 400 156 400 18 156 900 161 500 28 157 400 162 000 68 69 156 425 156 425 78 156 925 161 525 09 156 450 156 450 19 156 950 161 550 31 2 157 550 157 550 156 475 156...

Page 75: ...63 13 1 2 3 4 5 6 7 8 9 10 11 14 15 16 12 13 TEMPLATE R11 7 16 Maximum 156 5 6 5 32 53 2 3 32 66 5 2 5 8 Unit mm inch 147 5 25 32 ...

Page 76: ......

Page 77: ...h Republic CZ 22 Netherlands NL 6 Cyprus CY 23 Norway NO 7 Denmark DK 24 Poland PL 8 Estonia EE 25 Portugal PT 9 Finland FI 26 Romania RO 10 France FR 27 Slovakia SK 11 Germany DE 28 Slovenia SI 12 Greece GR 29 Spain ES 13 Hungary HU 30 Sweden SE 14 Iceland IS 31 Switzerland CH 15 Ireland IE 32 Turkey TR 16 Italy IT 33 United Kingdom GB 17 Latvia LV Country code list About CE and DOC Hereby Icom I...

Page 78: ...trast Configuration 49 Distress call Cancel call 23 Receiving 32 Regular call 22 Sending 21 Simple call 21 DSC Address ID 18 Log Receivied 38 Log transmitted 39 Settings 42 DSC data output 43 Dual Tri watch Radio Settings 50 Dualwatch 17 F Favorite channels 16 FAV Settings Radio Settings 51 Front panel 2 Function display 3 Fuse replacement 55 G GPS antenna 54 Group call Receiving 34 Sending 28 Gro...

Page 79: ... Radio Info 52 Receiving 13 S Scan Normal 15 Priority 15 Starting 16 Types 15 Scan Timer Radio Settings 50 Scan Type Radio Settings 50 Self test DSC Settings 44 Simple call Distress call 21 Software keys 4 Specifications 58 Squelch level 11 Supplied accessories 55 T Template 63 Test Acknowledgement Receiving 38 Sending 30 Test call Receiving 37 Sending 29 Time entering 20 Transmitting 13 Tri watch...

Page 80: ... Kamiminami Hirano ku Osaka 547 0003 Japan A7420D 1EX Printed in Japan 2017 Icom Inc Intended Country of Use AT FI IT PL GB RO BE FR LV PT IS TR CY DE LT SK LI HR CZ GR LU SI NO DK HU MT ES CH EE IE NL SE BG ...

Reviews: