background image

5

SCAN OPERATION

5-2

Starting a Scan

A Scan checks for signals on each channel and stops 

when a signal is received.

NOTE:

 Two or more channels must be preset to start 

a Scan.

<Key operation>

Push [Scan Start/Stop] to start a Scan.

 •“ ” blinks. (Depending on the transceiver’s version.)

L

 When a signal is detected, the Scan pauses on the 

channel until the signal disappears, and then the Scan 

resumes.

<Menu operation>

Portable: 

 For the Ten-key and the Simple key types

Mobile:  

For the LCD type

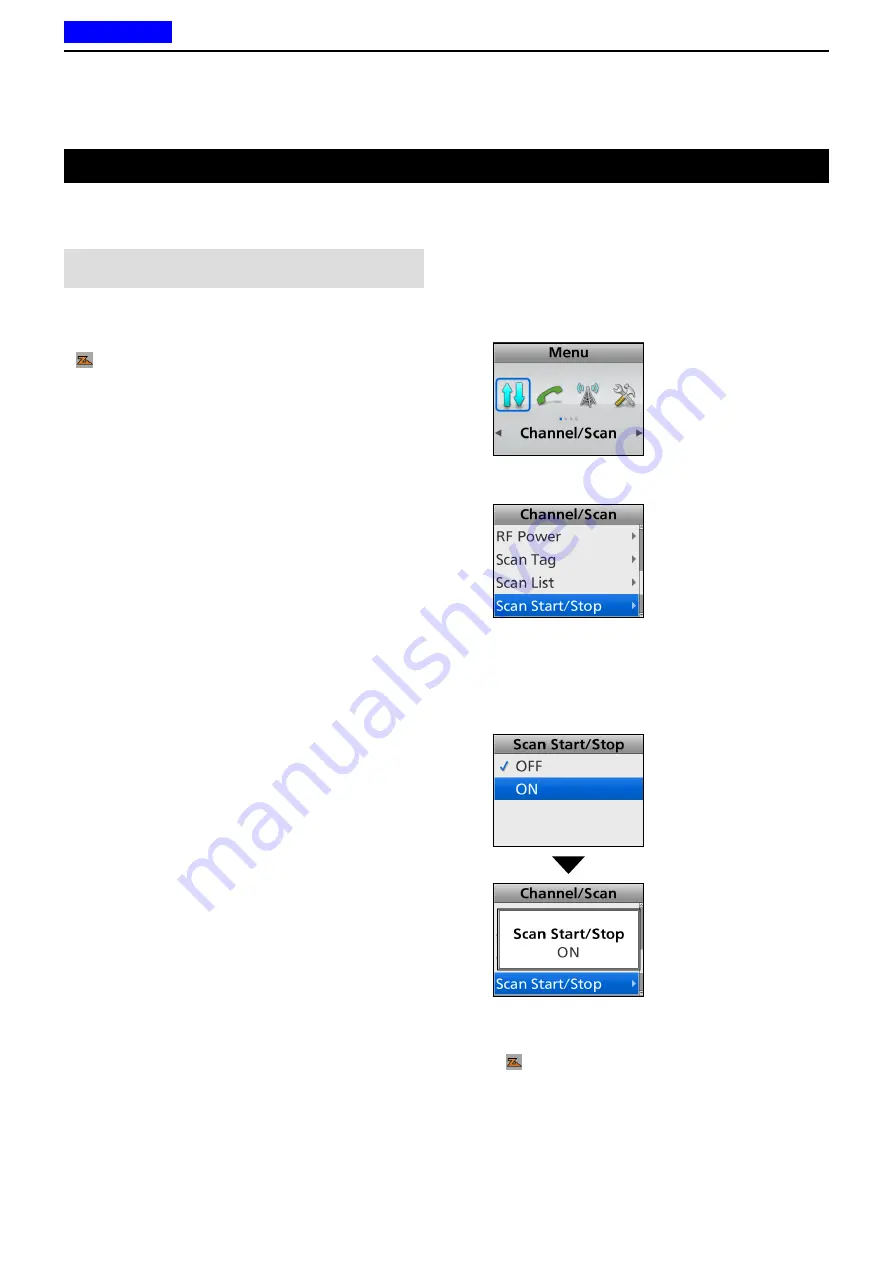
(Menu > Channel/Scan > 

Scan Start/Stop

)

1.  Push [Menu] to display the Menu screen.

2.   Push [Left] or [Right] to select “Channel/Scan,” 

then push [OK].


3.   Push [Up] or [Down] to select “Scan Start/Stop,” 

then push [OK].


4.   Push [Up] or [Down] to select “ON,” then push 

[OK].

 •The Scan starts.

L

 When a signal is detected, the Scan pauses on the 

channel until the signal disappears, then the Scan 

resumes.


5.   Hold down [Back] for 1 second to return to the 

standby screen.

 • “ ” blinks while scanning. (Depending on the 

transceiver’s version.)

Previous view

Summary of Contents for F3400D 21

Page 1: ...CTIONS 9 ABOUT THE microSD CARD 8 MDC 1200 SYSTEM OPERATION 7 NXDN OPERATION 6 MENU SCREEN 5 SCAN OPERATION 4 ADVANCED OPERATION 3 BASIC OPERATION 2 PANEL DESCRIPTION 1 ACCESSORIES INTRODUCTION VHF DI...

Page 2: ...in Japan the United States the United Kingdom Germany France Spain Russia Australia New Zealand and or other countries AquaQuake and COMMANDMIC are registered trademarks or trademarks of Icom Incorpo...

Page 3: ...ES Supplied accessories 1 2 Attaching accessories 1 3 D D Flexible antenna Portable 1 3 D D Battery pack Portable 1 3 D D Belt clip Portable 1 4 D D Connector cover Portable 1 5 D D Mounting bracket M...

Page 4: ...different depending on the transceiver version z z Portable type transceiver z z Mobile type transceiver Microphone Microphone Microphone hanger and screw set Microphone hanger and screw set Hanger gr...

Page 5: ...of the arrow q 2 Push on the bottom of the pack until the battery sliding locks make a click sound w To detach 1 Push the battery sliding locks in the direction of the arrow z The battery pack is the...

Page 6: ...pack from the transceiver if it is attached 2 Slide the belt clip in the direction of the arrow until the belt clip is locked and makes a click sound Belt clip q w BE CAREFUL Don t break your fingern...

Page 7: ...nector cover z x To detach 1 Remove the screw using a Phillips screwdriver z 2 Detach the connector cover and then connect an optional equipment x CAUTION DO NOT detach the connector cover when option...

Page 8: ...that you periodically check whether the screws are loose or not especially after a long period of use Bolt Mounting screw Spring washer Flat washer Nut When using the self tapping screws CAUTION DO NO...

Page 9: ...ile type transceiver 2 5 D D About the transceiver types 2 5 D D About the Status indicator 2 5 D D About the Microphone connector 2 5 D D About the Software key functions 2 5 Rear panel for the Mobil...

Page 10: ...Lights red while transmitting Lights green while receiving a signal or when the squelch is open Blinks magenta when the battery is exhausted D DAbout the Multi connector Connects to an optional speak...

Page 11: ...TE The screen capture is an example The displayed position of each icon may differ depending on the function being used Icon Area q w e BELL ICON Displayed when a matching signal is received depending...

Page 12: ...rted into the card slot L is displayed when the microSD card has not been formatted USB ICON Displayed when a USB device is connected D DText Area Displays the selected Zone number Channel number and...

Page 13: ...connector Connect the supplied or optional microphone CAUTION DO NOT connect non specified microphones The pin assignments may be different and may damage the transceiver Speaker VOL Status indicator...

Page 14: ...L SPEAKER JACK Connect a 4 8 external speaker rIGNITION LEAD Connects to an ignition line R R Do not put pressure on this lead Binding to the DC power cable is recommended tUSB CABLE Connects to a PC...

Page 15: ...ng SCAN ICON Displayed when a scan is paused Blinks while scanning SCAN TARGET CHANNEL ICON Displayed when the channel is selected as a scan target channel SCRAMBLER ICON In the Analog mode Displayed...

Page 16: ...ICON Displayed when a microSD card is inserted L is displayed when the microSD card has not been formatted USB ICON Displayed when a USB device is connected D DText Area Displays the selected Zone num...

Page 17: ...s indicator blinks When a call that includes a matching 2 Tone code is received When a call that includes a matching 5 Tone code is received When a Call Alert is received When a Message is received Wh...

Page 18: ...ency Blinks while the Emergency Locator tone is sounding Searching Bluetooth Blinks while searching for the Bluetooth device Waiting Paring Bluetooth Blinks while in the Waiting Pairing mode Success B...

Page 19: ...ever switch Non display type F1 F2 F3 Emer and the Lever switch Simple key type P1 P2 Up Down Left Right OK Back F1 F2 F3 Emer and the Lever switch Ten key type P1 P2 Up Down Left Right OK Back F1 F2...

Page 20: ...tinued D DMobile type Dealers can assign the Software key functions to the following keys and keypads LCD type P1 P2 Up Down Left Right OK Back and Emer Segment type Up Down F1 F2 F3 and Emer Optional...

Page 21: ...Compander p 2 16 N A N A N A Signaling Call Call p 2 17 5 5 5 Re dial p 2 17 Call List Select 1 p 2 17 Call Menu 1 p 2 17 DTMF Autodial p 2 17 Emergency p 2 17 Power OFF Emergency 3 p 2 17 Telephone 1...

Page 22: ...1 p 2 19 GPS GPS ON OFF p 2 19 GPS Position 1 p 2 19 Voice Recording Call Recorder p 2 19 Play Call Record 1 p 2 19 Play Emergency Call 1 p 2 19 Audio Setting TX Noise Cancel 1 p 2 20 RX Noise Cancel...

Page 23: ...h to enter the Shift mode A user can use a Software key s secondary function in the Shift mode 2 Push this key again to return to the Normal mode Category Channel Scan Voting CH Up CH Down z z Push to...

Page 24: ...save In the Digital mode Push to display the RAN CH Select screen Then push Up or Down to select a RAN code After selecting push OK to save Monitor z z Push to turn the CTCSS DTCS 2 Tone or 5 Tone squ...

Page 25: ...riod has passed an Emergency call is automatically transmitted once or repeatedly NOTE Set the related settings using the programming software This key function is assignable to only Emer or Ext Emer...

Page 26: ...ategory Functions Light Push to turn ON the backlight for about 5 seconds even if the backlight setting is OFF Lock Hold down for 1 second to turn the Key Lock function ON or OFF L All assignable keys...

Page 27: ...Mode Push to turn the Ext CH Select function ON or OFF L When this function is ON Memory channels are selected by only external entry NOTE This function is activated when an external unit is connecte...

Page 28: ...e backlight is continuously OFF ON Turns the backlight is continuously ON Auto When any switch except PTT is pushed the backlight lights for 5 seconds For the Mobile type transceivers OFF The backligh...

Page 29: ...eillance p 2 22 Rotary Selector Shift p 2 22 Individual Group p 2 22 N A N A N A N A LCD Mode p 2 22 Applicable N A Not Applicable Depending on the transceiver s model type some functions may not be a...

Page 30: ...function is turned ON the transceiver cancels resuming a roaming scan and stays on the current site regardless of the error rate VOX Turns the VOX function ON or OFF L The function automatically switc...

Page 31: ...ng a channel 3 4 D D Selecting an operating channel 3 4 D D Selecting the Priority A or B channel 3 4 D D Rewriting the Priority A or B channel 3 5 D D Selecting a Continuous tone channel 3 5 D D Sele...

Page 32: ...the User Password screen is displayed as shown to the right 2 Push Up Down Right or Left to select a number then push OK to enter 3 Repeat step 2 to enter the password 4 After entering the correct pa...

Page 33: ...z Push Zone Select to display the Zone Select screen Then push Up or Down to select a Zone After selecting push OK TIP For the Portable Non display type Zones and Memory channels are assigned to a Sel...

Page 34: ...n The transceiver automatically starts scanning when a Zone specified for the Voting operation is selected The Voting scan detects the signal strength of the repeaters and automatically selects the st...

Page 35: ...ts the selected channel as the Priority A or B channel D DSelecting a Continuous tone channel Key operation Portable For the Ten key and the Simple key types Mobile For the LCD type 1 While in the Ana...

Page 36: ...Menu operation Portable For the Ten key and the Simple key types Mobile For the LCD type Menu Channel Scan RAN CH Select 1 While in the Digital mode push Menu to display the Menu screen 2 Push Left o...

Page 37: ...all only specific stations and prevents unwanted stations from contacting you 1 Select a channel according to your system operator s instructions This may not be necessary depending on the presetting...

Page 38: ...se PTT to return to receive IMPORTANT To maximize the readability of your signal 1 Pause briefly after pushing PTT 2 Hold the microphone 5 to 10 cm 2 to 4 inches from your mouth then speak at your nor...

Page 39: ...r selecting push OK Returns to the Standby screen 4 Push Call to make a call to the selected destination Menu operation Portable For the Ten key and the Simple key types Mobile For the LCD type Menu S...

Page 40: ...wer are usable Key operation Hold down for 1 second to turn the Key Lock function ON or OFF Lever switch operation L The Lever switch can be used only when the Key Lock function is assigned to the Lev...

Page 41: ...D D Manual Dialing 4 2 D D Autodial 4 2 D D Stun function 4 2 Emergency call 4 3 D D Transmitting an Emergency call 4 3 Scrambler 4 7 Radio Access Number RAN 4 7 AquaQuake Water Draining function for...

Page 42: ...Memory s codes After sending automatically returns to the standby screen D DStun function Only for LTR operation The Stun function is used when a transceiver is stolen or lost and the function deactiv...

Page 43: ...riod of time When the transceiver enters the Emergency mode a countdown starts The transceiver counts down during the Reminder Timer set time Before the Reminder Timer set time expires the transceiver...

Page 44: ...e preset angle for the ON Timer preset time AND z z The transceiver is detected as stationary no motion for the ON Timer set time L If a user raises the transceiver back from the preset angle towards...

Page 45: ...s for the ON Timer preset time AND z z The transceiver is detected as stationary no motion for the ON Timer set time L If a user pushes any key or moves the transceiver before the Reminder Timer set t...

Page 46: ...No motion is detected Time The Motion Detection function When the transceiver continuously moves for the ON Timer preset time L If a user holds down Emergency for the Emer SW OFF Timer set time befor...

Page 47: ...Scrambler function is ON push PTT to make a private communication between stations by using a scrambled code RAN is a signaling system designed for digital radio communications When a channel is set u...

Page 48: ...vibration is generating to remove water from the speaker grill Water in the speaker grill may muffle the sound coming from the speaker 2 Release the key to turn OFF the function NOTE After the specif...

Page 49: ...5 1 Section 5 SCAN OPERATION Starting a Scan 5 2 Canceling a Scan 5 3 Selecting a Scan list 5 4 Setting or clearing a Scan tag 5 5 Previous view...

Page 50: ...Menu operation Portable For the Ten key and the Simple key types Mobile For the LCD type Menu Channel Scan Scan Start Stop 1 Push Menu to display the Menu screen 2 Push Left or Right to select Channel...

Page 51: ...u Channel Scan Scan Start Stop 1 Push Menu to display the Menu screen 2 Push Left or Right to select Channel Scan then push OK 3 Push Up or Down to select Scan Start Stop then push OK 4 Push Up or Dow...

Page 52: ...e LCD type 1 Hold down Scan Start Stop for 1 second to display the Scan List screen 2 Push Up or Down to select a list then push OK Menu operation Portable For the Ten key and the Simple key types Mob...

Page 53: ...4 2 Push Scan Add Del Tag to set or clear a Scan tag to or from the channel is displayed for a Scan tag channel When setting a Scan tag When clearing a Scan tag In a selected Scan list 1 Select a cha...

Page 54: ...o display the Menu screen 3 Push Left or Right to select Channel Scan then push OK 4 Push Up or Down to select Scan tag then push OK Displays the Scan tag screen Setting or clearing a Scan tag Continu...

Page 55: ...he Menu screen 6 2 Menu items 6 3 Channel Scan 6 8 Signaling Call 6 9 Trunking 6 10 Functions 6 10 GPS 6 11 Voice Rec 6 12 Audio Setting 6 13 SD Card 6 13 Bluetooth 6 14 Clock 6 15 Vibration 6 15 Sens...

Page 56: ...to select Channel Scan then push OK 3 Push Up or Down to select Scan Start Stop then push OK 4 Push Up or Down to select ON then push OK The Scan starts 5 Hold down Back for 1 second to return to the...

Page 57: ...amble Encrypt Scrambler Encryption Turns the Voice Scrambler or Encryption function ON or OFF p 6 8 Talk Around Turns the Talk Around function ON or OFF p 6 8 Zone Select Selects a Zone p 6 8 Signalin...

Page 58: ...Output level of the connected Public Address PA Mobile only p 6 10 RX Speaker Turns the RX speaker function ON or OFF Mobile only p 6 10 Surveillance Turns the Surveillance function ON or OFF p 6 11 U...

Page 59: ...14 Bluetooth Auto Connect Select whether or not to automatically connect to the paired Bluetooth device when its power is turned ON p 6 14 Bluetooth Audio Setting Selects the AF Output device when a B...

Page 60: ...not to vibrate the transceiver when a user pushes a key Portable only p 6 15 Sensor Man down Angle Sets the Emergency mode detection angle for the Man Down function Portable only p 6 16 Motion Sense S...

Page 61: ...the Ringer output level p 6 17 SQL Level Squelch Level Sets the squelch level p 6 17 Warning Beep Lv Warning beep Level Sets the Warning Beep output level p 6 17 Announce Lv Announce beep Level Sets t...

Page 62: ...y of interference to other stations Scan Tag Sets or clears a Scan tag to or from a channel in a Scan list p 5 6 Scan List Sets a Scan list to be scanned p 5 4 Scan Start Stop Starts or cancels a Scan...

Page 63: ...screen Then push Up or Down to select a DTMF code After selecting push PTT to transmit the selected DTMF code Group Select Displays the Group Select screen Then push Up or Down to select a Group ID fr...

Page 64: ...ing screen of the programming software Hook Scan For the Mobile types Turns the On Hook Scan function ON or OFF When this function is ON after putting the microphone in its hanger on Hook the transcei...

Page 65: ...the user stops speaking and then the VOX switches to receive Range 0 5 3 0 seconds NOTE If you set the time too short a pause in a conversation may be regarded as the end of conversation and the tran...

Page 66: ...is 2016 7 1 Folder name 20160701 The file name is automatically created as shown in the example below Recording date and time is 2016 7 1 15 30 00 File name 20160701_153000 The audio is recorded onto...

Page 67: ...the microSD card L See Loading the saved data fi les onto a microSD card p 9 5 for details SD Unmount Unmounts the microSD card NOTE Before removing the microSD card be sure to electrically unmount th...

Page 68: ...ooth headset Custom Key PLAY FWD RWD is pushed OFF No beep sounds ON A beep sounds Bluetooth P Save VS 3 Selects whether to operate in the Bluetooth headset s Battery Saving mode when the optional VS...

Page 69: ...our times Pattern 04 The transceiver vibrates for 0 3 seconds eight times Pattern 05 to 16 The transceiver vibrates according to the customized pattern NOTE You can customize the Vibration pattern Vib...

Page 70: ...k W o r k K e y O p e r a t i o n W a l k i n g s l o w W a l k i n g f a s t R u n n i n g Sensitivity Level 9 10 1 3 5 6 7 8 4 2 For Stationary Sensitivity For Motion Sensitivity Sensitivity exampl...

Page 71: ...is selected the beep level can be adjusted with VOL Range 1 5 1 Linked 5 Linked or OFF Opening Beep Lv Sets the Opening Beep output level When a Linked option is selected the beep level is adjustable...

Page 72: ...sceiver s firmware information When an optional unit is installed you can also check the unit information Depending on the installed unit only the name may be displayed Own ID Displays the transceiver...

Page 73: ...on data 7 14 Receiving a call 7 15 D D Receiving an Individual call 7 15 D D Receiving a Group call 7 15 D D Receiving a Status message 7 15 D D Receiving a Message 7 15 D D Receiving a Call Alert cal...

Page 74: ...select the Conventional zone see page 3 3 z z Multi site Conventional operation The Multi site Conventional system can support up to 16 sites each site has one repeater through an IP network and enabl...

Page 75: ...Down to select the Individual ID 3 Push PTT to transmit an Individual call 4 Hold down PTT and speak at your normal voice level Release PTT to receive Using Individual 1 Push Individual to display th...

Page 76: ...our normal voice level Release PTT to receive Key operation Portable For the Ten key and the Simple key types Mobile For the LCD types Using Call List Select 1 Push Call List Select to display the Cal...

Page 77: ...Status then push OK Menu Signaling Call Status 1 Push Menu to display the Menu screen 2 Push Left or Right to select Signaling Call then push OK 3 Push Up or Down to select Status then push OK 4 Push...

Page 78: ...es Mobile For the Segment types Using Status Hold down Status for 1 second transmit the preset Status Message TIP This operation is enabled only when Selector s operation is set to Status using the pr...

Page 79: ...then push OK Menu Signaling Call Message 1 Push Menu to display the Menu screen 2 Push Left or Right to select Signaling Call then push OK 3 Push Up or Down to select Message then push OK 4 Push Up or...

Page 80: ...a Message then push PTT to transmit it L Success is displayed after receiving an acknowledgement from the target station L Failed is displayed if the target station does not send back an acknowledgeme...

Page 81: ...space push P1 To delete push P2 When using the Portable Ten key types or Mobile s optional HM 218 HM 220T or HM 221T the Ten Key pad can be used See the list to the right above Key Characters 0 0 1 s...

Page 82: ...all Menu then push OK 4 Push Up or Down to select the Individual or Group ID then push OK 5 Push Up or Down to select Call Alert then push PTT to transmit the Call Alert call L Success is displayed af...

Page 83: ...the target station does not send back an acknowledgement 6 The microphone audio can be heard for the preset period of time D DTransmitting a Radio Check Radio Check call enables you to determine whet...

Page 84: ...dgement from the target station L Failed is displayed if the target station does not send back an acknowledgement D DTransmitting a Revive command A Revive command enables you to send a signal that wi...

Page 85: ...3 Push Up or Down to select Call Menu then push OK 4 Push Up or Down to select the Individual ID then push OK 5 Push Up or Down to select Kill then push PTT to transmit the Kill command The target sta...

Page 86: ...nding a voice message L Set the Send with Login and Send with Logoff items to Enable After sending a status message LSet the Send with Status Call item to Enable After sending a message LSet the Send...

Page 87: ...eivers may vibrate depending on the presetting 2 Push Back to stop the display indication D DReceiving a Message 1 When a Message is received Beeps sound The Message and the calling station or Group n...

Page 88: ...iving an Emergency call 1 When an Emergency call is received Beeps sound RX Emergency and the calling station name or ID are displayed 1 blinks 1 2 When the Send Ack function is turned ON the transcei...

Page 89: ...r to the repeater that has the strongest RSSI level in the last registered site or an adjacent site This roaming type takes more time than other roaming types The transceiver displays Out of Range whe...

Page 90: ...e transceiver to the currently registered site When this function is ON the transceiver cancels resuming a Roaming scan and stays on the current site regardless of the error rate Push Site Lock to tur...

Page 91: ...thout a Roaming scan 1 Push Site Select to display the Site Select screen 2 Push Up or Down to select a site from the preset Site list Up to 48 valid Roaming areas are listed 3 Push OK to set the sele...

Page 92: ...3 Push Up or Down to select Incoming then push OK 4 Push Up or Down to select Voice Call Alert or Message Status then push OK Voice Call Alert The received Individual call and Call Alert call logs are...

Page 93: ...s turned OFF the all records are erased Menu operation Portable For the Ten key and the Simple key types Mobile For the LCD types Menu Signaling Call Outgoing 1 Push Menu to display the Menu screen 2...

Page 94: ...g Call then push OK 3 Push Up or Down to select Clear Incoming then push OK 4 Push Up or Down to select Voice Call Alert or Message Status to be deleted then push OK Voice Call Alert The received Indi...

Page 95: ...r the LCD types Menu Signaling Call Clear Outgoing 1 Push Menu to display the Menu screen 2 Push Left or Right to select Signaling Call then push OK 3 Push Up or Down to select Clear Outgoing then pus...

Page 96: ...ey ID If a call containing a different Key ID is made on the same channel the squelch will not open and the user will not hear the call Depending on the presetting opening the squelch may also require...

Page 97: ...8 D D Transmitting an MDC Stun call 8 10 D D Transmitting an MDC Revive call 8 12 D D Transmitting an MDC Status call 8 14 D D Transmitting an MDC Message call 8 16 Receiving a call 8 18 D D Receiving...

Page 98: ...ve Call SelCall Call Alert Radio Check Stun Revive Status and Message calls Set one of the assignable software key functions for the MDC 1200 system operations pp 2 11 2 20 The display illustration is...

Page 99: ...tation ID When another station receives a PTT ID your station ID is displayed Push PTT to make a call Beeps sound depending on the presetting Your station ID is transmitted when you push PTT at the be...

Page 100: ...signaling operation See Emergency call for details pp 4 3 4 6 The transceiver can also be set to keep the microphone open in the Emergency mode to monitor the situation depending on the presetting D D...

Page 101: ...o select Sel Call 4 Hold down PTT to transmit an MDC Sel Call to the selected station Menu operation Portable For the Ten key and the Simple key types Mobile For the LCD type Menu Signaling Call Call...

Page 102: ...at they have received a call from another user Key operation 1 Push Call Menu to display the Call Menu screen 2 Push Up or Down to select a station or group ID then push OK 3 Push Up or Down to select...

Page 103: ...sh Left or Right to select Signaling Call then push OK 3 Push Up or Down to select Call Menu then push OK 4 Push Up or Down to select a station or group ID then push OK 5 Push Up or Down to select Cal...

Page 104: ...g any action from the targeted station user Key operation 1 Push Call Menu to display the Call Menu screen 2 Push Up or Down to select a station ID then push OK 3 Push Up or Down to select Radio Check...

Page 105: ...n 2 Push Left or Right to select Signaling Call then push OK 3 Push Up or Down to select Call Menu then push OK 4 Push Up or Down to select a station ID then push OK 5 Push Up or Down to select Radio...

Page 106: ...Menu to display the Call Menu screen 2 Push Up or Down to select a station ID then push OK 3 Push Up or Down to select Stun 4 Push PTT to transmit an MDC Stun call After receiving an acknowledgement S...

Page 107: ...ht to select Signaling Call then push OK 3 Push Up or Down to select Call Menu then push OK 4 Push Up or Down to select a station ID then push OK 5 Push Up or Down to select Stun 6 Push PTT to transmi...

Page 108: ...h Call Menu to display the Call Menu screen 2 Push Up or Down to select a station ID then push OK 3 Push Up or Down to select Revive 4 Push PTT to transmit an MDC Revive call After receiving an acknow...

Page 109: ...select Signaling Call then push OK 3 Push Up or Down to select Call Menu then push OK 4 Push Up or Down to select a station ID then push OK 5 Push Up or Down to select Revive 6 Push PTT to transmit a...

Page 110: ...call that make the targeted station to automatically transmit a Status call depending on the presetting Key operation 1 Push Status to display the Status list 2 Push Up or Down to select a Status 3 Ho...

Page 111: ...2 Push Left or Right to select Signaling Call then push OK 3 Push Up or Down to select Status then push OK 4 Push Up or Down to select a Status 5 Hold down PTT to transmit an MDC Status call Transmit...

Page 112: ...es Key operation 1 Push Message to display the Message list 2 Push Up or Down to select a Message 3 Hold down PTT to transmit an MDC Message call After receiving an acknowledgement Success is displaye...

Page 113: ...u to display the Menu screen 2 Push Left or Right to select Signaling Call then push OK 3 Push Up or Down to select Message then push OK 4 Push Up or Down to select a Message 5 Hold down PTT to transm...

Page 114: ...n MDC Emergency call When an MDC Emergency call is received Beeps sound Portable type transceivers may vibrate depending on the presetting The calling station s ID and Emergency is displayed Hold down...

Page 115: ...nks The calling station s ID is displayed Hold down PTT and speak into the microphone D D Receiving an MDC Selective Call Sel Call D DReceiving an MDC Call Alert call When an MDC Call Alert call is re...

Page 116: ...ve call If an MDC Stun call is received that matches your station ID the transceiver displays SORRY and you can not receive or transmit To use the transceiver again you need to receive an MDC Revive c...

Page 117: ...tus call is received Beeps sound The calling station s ID and the Status are displayed once D DReceiving an MDC Message call When an MDC Message call is received Beeps sound The calling station s ID a...

Page 118: ...can be memorized and the oldest call is deleted when a 6th call is received D DChecking the Incoming call log Menu Signaling Call Incoming 1 Push Menu to display the Menu screen 2 Push Left or Right t...

Page 119: ...ing 9 3 D D Removing 9 3 Unmounting the microSD card 9 4 Formatting the microSD card 9 4 Loading the saved data files onto a microSD card 9 5 Displaying the information of the microSD card 9 6 Backing...

Page 120: ...urs or the power cable Mobile type or battery pack Portable type is disconnected while the card is being accessed You drop impact or vibrate the card Do not touch the contacts of the card The transcei...

Page 121: ...side up 5 Insert the card into the slot until it locks in place and makes a click sound The SD card icon is displayed when the microSD card is inserted LBe sure to check the card orientation Transceiv...

Page 122: ...to select SD Format then push OK Are you sure is displayed 4 Push Left or Right to select OK then push OK LTo cancel formatting select Cancel After formatting returns to the SD Card screen 5 Hold down...

Page 123: ...a into the transceiver p 9 7 Menu operation Portable For the Ten key and the Simple key types Mobile For the LCD types Menu SD Card Load Setting SD 1 Push Menu to display the Menu screen 2 Push Left o...

Page 124: ...LCD types Menu SD Card SD Information 1 Push Menu to display the Menu screen 2 Push Left or Right to select SD Card then push OK 3 Push Up or Down to select SD Information then push OK The remaining c...

Page 125: ...orded Emergency audio files are saved in the wav format The folder name is automatically created in the following date format yyyymmdd yyyy Year mm month dd day 4 Setting folder The Firmware and ICF f...

Page 126: ...isplays the IC F3400D_F5400D folder 3 Right click Removable Disk and then click Copy 4 Open the desired folder to make a backup file and then right click on the folder Then click Paste Pastes the copi...

Page 127: ...g 10 2 Recording an Emergency audio 10 4 D D Recording 10 4 Playing back a recorded audio 10 5 D D Playing back a recorded communication audio 10 5 D D Playing back an Emergency audio 10 6 D D Player...

Page 128: ...matically deletes the files in the oldest folder to continue the recording When the recording time becomes over 10 minutes the transceiver continues to record but records to a new file You can display...

Page 129: ...Recorder then push OK The Call Recorder screen is displayed Rec Start is displayed in the screen 4 Push OK to turn ON the Call Recorder function Automatically returns to the standby screen is displaye...

Page 130: ...0 minutes the transceiver continues to record but record to a new file You can display the microSD card capacity remaining capacity and the time remaining for voice recording See page 9 6 for details...

Page 131: ...the standby screen Menu operation Portable For the Ten key and the Simple key types Mobile For the LCD type Menu Voice Rec Play Call Rec 1 Push Menu to display the Menu screen 2 Push Left or Right to...

Page 132: ...5 Hold down Back for 1 second to return to the standby screen Menu operation Portable For the Ten key and the Simple key types Mobile For the LCD type Menu Voice Rec Play Emer Call 1 Push Menu to disp...

Page 133: ...t forward while playing back Push Right to fast forward in 1 second playback steps Hold down Right to fast forward in 1 second playback steps until you release Right Rewind while playing back Push Lef...

Page 134: ...the standby screen Menu operation Portable For the Ten key and the Simple key types Mobile For the LCD type Menu Voice Rec Play Call Rec 1 Push Menu to display the Menu screen 2 Push Left or Right to...

Page 135: ...displayed 3 Double click the IC F3400D_F5400D folder 4 Double click the Voice Rec folder 5 Double click the Call Rec folder 6 Double click the folder where the file you want to playback is saved Exam...

Page 136: ...et 11 6 Headset settings 11 8 D D AF Output 11 8 D D About the VS 3 headset 11 8 Pairing with a data device 11 9 Accepting a pairing request from a Bluetooth device 11 11 Disconnecting from a Bluetoot...

Page 137: ...it up using the optional programming software Headset device Bluetooth Bluetooth Headset Optional VS 3 Bluetooth Headset Bluetooth unit NOTE The Bluetooth communication range may vary depending on th...

Page 138: ...push OK 3 Push Up or Down to select Bluetooth then push OK 4 Push Up or Down to select ON then push OK The Bluetooth function is turned ON 5 Hold down Back for 1 second to return to the standby screen...

Page 139: ...and the headset pairing has succeeded the Status indicator slowly blinks blue 3 times In that case the connection to the headset has also succeeded L The transceiver searches for a headset first Afte...

Page 140: ...ansceiver and the headset pairing has succeeded the Status indicator slowly blinks blue 3 times In that case the connection to the headset has also succeeded L The transceiver searches for a headset f...

Page 141: ...wn to select BT Device List then push OK 4 Push Up or Down to select Find Device then push OK TIP If the transceiver has been connected to the Bluetooth device before its name may be displayed in step...

Page 142: ...on has succeeded is displayed beside the headset icon 3 Hold down Back for 1 second to return to the standby screen While connected to a Bluetooth headset is displayed instead of Pairing with a headse...

Page 143: ...on is performed for 120 seconds to prolong the VS 3 s battery life PTT Beep p 6 14 Menu Bluetooth PTT Beep VS 3 Set a beep to sound when you push PTT on the VS 3 This setting is different from the tra...

Page 144: ...select Bluetooth then push OK 3 Push Up or Down to select BT Device List then push OK 4 Push Up or Down to select Find Device then push OK L If the transceiver has been connected to the Bluetooth devi...

Page 145: ...the device LSee the device s instruction manual for details Example Pairing with a data device Continued TIP When you turn ON the transceiver with the Auto Connect item is set to ON the transceiver au...

Page 146: ...iring mode Bluetooth device LSee the device s instruction manual for details Step 5 Sending a Pairing request to the transceiver Bluetooth device 1 The device displays the transceiver s Bluetooth unit...

Page 147: ...ept it L The content of screen may differ depending on the device LSee the device s instruction manual for details Example NOTE When you pair with the third party s headset entering a PIN code or pass...

Page 148: ...select the Bluetooth device that is currently connected then push OK 5 Push Up or Down to select Disconnect then push OK TIP You can reconnect to the Bluetooth device displayed on the screen again by...

Page 149: ...th BT Device List 1 Push Menu to display the Menu screen 2 Push Left or Right to select Bluetooth then push OK 3 Push Up or Down to select BT Device List then push OK 4 Push Up or Down to select the B...

Page 150: ...2 Push Left or Right to select Bluetooth then push OK 3 Push Up or Down to select Bluetooth Reset then push OK 4 Push Left or Right to select Yes then push OK Resets the Bluetooth unit s settings to...

Page 151: ...down F3 for 1 second to reset the Bluetooth unit s settings to their factory defaults 5 Turn OFF the transceiver then turn it ON again to exit the Bluetooth Set mode Mobile 1 Turn OFF the transceiver...

Page 152: ...plays the paired Bluetooth device The maximum number of paired devices You can pair two types of the Bluetooth devices Headset and Data devices Up to 8 Bluetooth devices can be paired with the install...

Page 153: ...vel 12 3 Setting the Ringer level 12 5 Setting the Squelch level 12 7 Setting the Microphone gain level 12 8 Setting the VOX function 12 9 Setting the VOX Delay 12 10 Setting the VOX gain level 12 11...

Page 154: ...to normally operate it You can set the Backlight status Menu operation Portable For the Ten key and the Simple key types Mobile For the LCD types Menu Display Backlight 1 Push Menu to display the Menu...

Page 155: ...rn OFF the transceiver then turn it ON again to exit the Key touch Beep level Set mode You can set the Key touch Beep level A beep sounds when you operate a key Menu operation Portable For the Ten key...

Page 156: ...o set the Key touch Beep level LInformatio L The setable range is 1 5 1 Linked 5 Linked or OFF When you select a Linked option the beep level is adjustable by rotating VOL A beep sounds after pushing...

Page 157: ...Turn OFF the transceiver then turn it ON again to exit the Ringer level Set mode You can set the Ringer level Rings sound when receiving a call Menu operation Portable For the Ten key and the Simple k...

Page 158: ...n to set the Ringer level LInformatio L The setable range is 1 5 1 Linked 5 Linked or OFF When you select a Linked option the Ringer level is adjustable by rotating VOL A beep sounds after pushing Up...

Page 159: ...key types Mobile For the LCD types Menu Utility SQL Level 1 Push Menu to display the Menu screen 2 Push Left or Right to select Utility then push OK 3 Push Up or Down to select SQL Level then push OK...

Page 160: ...the Menu screen 2 Push Left or Right to select Audio Setting then push OK 3 Push Up or Down to select Mic Gain then push OK 4 Push Up or Down to set the Microphone gain level then push OK L The setabl...

Page 161: ...the Simple key types Mobile For the LCD types Menu Functions VOX 1 Push Menu to display the Menu screen 2 Push Left or Right to select Functions then push OK 3 Push Up or Down to select VOX then push...

Page 162: ...he Ten key and the Simple key types Mobile For the LCD types Menu Functions VOX Delay 1 Push Menu to display the Menu screen 2 Push Left or Right to select Functions then push OK 3 Push Up or Down to...

Page 163: ...or the LCD types Menu Functions VOX Gain 1 Push Menu to display the Menu screen 2 Push Left or Right to select Functions then push OK 3 Push Up or Down to select VOX Gain then push OK 4 Push Up or Dow...

Page 164: ...sed A beep sounds after pushing F2 or F3 An error beep sounds if you try to exceed the setable range 1 3 2 OFF Push F2 Push F3 5 Turn OFF the transceiver then turn it ON again to exit the TX Noise Can...

Page 165: ...Push F2 or F3 to select A7 5 Push Up to increase or push Down to decrease the TX Noise Cancel level LInformatio L The setable range is 1 3 or OFF When OFF is selected the microphone input noise is not...

Page 166: ...ounds after pushing F2 or F3 An error beep sounds if you try to exceed the setable range 1 3 2 OFF Push F2 Push F3 5 Turn OFF the transceiver then turn it ON again to exit the RX Noise Cancel level Se...

Page 167: ...4 Push F2 or F3 to select A8 5 Push Up to increase or push Down to decrease the RX Noise Cancel level LInformatio L The setable range is 1 3 or OFF When OFF is selected the receive audio noise is not...

Page 168: ...13 1 Section 13 OTHERS Displaying the transceiver s firmware information 13 2 LCD Color Check 13 3 Copying data from a transceiver 13 4 D D Connecting 13 4 D D Copying data 13 4 Previous view...

Page 169: ...s firmware information 5 Turn OFF the transceiver then turn it ON again to exit the Firmware Information mode You can display the transceiver firmware s information Menu operation Portable For the Ten...

Page 170: ...transceiver then ON again to exit the LCD Color Test mode You can check whether or not the LCD displays color correctly Menu operation Portable For the Ten key and the Simple key types Mobile For the...

Page 171: ...ing The transceiver enters the Programming mode Step 2 Turning ON the transceiver Sub Step 3 Copying data Master Push the PTT Portable or Power switch Mobile to start copying data to the Sub transceiv...

Page 172: ...ete Master Sub After copying is completed the Master and Sub transceivers automatically restart The user can operate the Sub transceiver with the loaded data Step 1 Entering the Programming mode Maste...

Page 173: ...About the Software key functions 14 2 HM 222 speaker microphone for the Portable type transceiver 14 3 D D Attaching 14 3 MB 136 belt clip for the Portable type transceiver 14 4 D D MB 136 contents 14...

Page 174: ...R Back PTT Status indicator Microphone Function Display Ten Key Pad F2 F3 F1 Speaker Up Down Right Left OK D DConnecting the HM 218 Connect the HM 218 to the optional RMK 5 separation kit or RMK 7 dua...

Page 175: ...ng Attach the connector of the speaker microphone to the multi connector on the transceiver and tighten the screw PTT Emer Speaker Microphone Earphone jack Turn OFF Screw Coin CAUTION Firmly attach to...

Page 176: ...until the clip locks and makes a click sound 3 Attach the battery pack to the transceiver p 1 3 Base clip Battery pack 4 Clip the belt clip on your belt 5 Insert the transceiver upsidedown into the be...

Page 177: ...nch the tab on the base clip q and then slide the clip in the direction of the arrow w q w Battery pack BE CAREFUL Don t break your fingernail NOTE HOLD THE TRANSCEIVER TIGHTLY WHEN INSERTING OR REMOV...

Page 178: ...the Non display types D DAttaching 1 Insert the transceiver into the carrying case as shown to the right 2 Connect the hook and loop tape points hook and loop tape 3 Adjust the snap buttons to secure...

Page 179: ...or cover Portable 1 5 Continuous tone channel 3 5 Copying data from a transceiver 13 4 D DTMF calls 4 2 Autodial 4 2 Manual Dialing 4 2 Stun function For only the LTR operation 4 2 E Emergency call 4...

Page 180: ...play 6 15 DST 6 15 Display Backlight 6 16 Brightness 6 16 Dimmer 6 16 LCD Color Test 6 16 LCD Mode 6 16 Functions Ext CH Sel Mode 6 10 Hook Scan 6 10 Horn 6 10 Lone Worker 6 10 Public Address 6 10 RX...

Page 181: ...nsmitting Position data 7 14 Roaming function 7 17 Single site Trunking operation 7 2 Site Lock function 7 18 Site Select function 7 19 O Options 14 1 HM 218 hand microphone Mobile 14 2 HM 222 speaker...

Page 182: ...1 1 32 Kamiminami Hirano ku Osaka 547 0003 Japan A 7315 1EX 2016 Icom Inc...

Reviews: