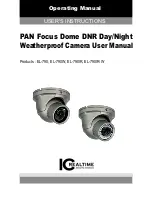
background image

8

USER’S MANUAL

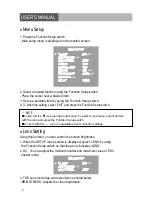
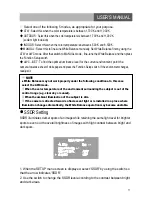
 Menu Setup

 Lens Setting

1. Press the Function Setup switch.
- Main setup menu is displayed on the monitor screen.

3. THE Lens mode has sub menu items as listed below.
- BRIGHTNESS : Adjusts the video brightness.

Using this function, you can control the screen brightness.
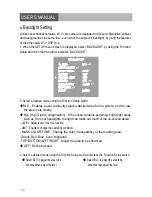
1. When the SETUP menu screen is displayed, select 'LENS' by using  
  the Function Setup switch so that the arrow indicates 'LENS'.
2. DC : You can adjust the minimum shutter and maximum value of ESC 
  shutter mode.

2. Select a desired function using the Function Setup switch.
- Place the cursor over a desired item.
3. Set up a selected item by using the Function Setup switch.
4. T

o finish the setting, select 'EXIT' and press the Function Setup switch.

MAIN SETUP

MAIN SETUP

1.LENS

2.EXPOSURE

3.WHITE BAL

4.SSDR

5.BACKLIGHT

6.DNR3

7.DAY/NIGHT

8.SPECIAL

9.EXIT

1.LENS

2.EXPOSURE

3.WHITE BAL

DC

ATW

OFF

OFF

ON

AUT

O

SAVE

DC

ATW


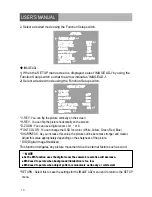
NOTE 

■ 

An item with the


◀ 

icon also has sub menus. To select a sub menu, select an item 

with the icon and press the Function Setup switch.

■ 

An item with the - - - icon is unavailable due to function settings.

Summary of Contents for EL-790

Page 1: ...Operating Manual USER S INSTRUCTIONS PAN Focus Dome DNR Day Night Weatherproof Camera User Manual Products EL 790 EL 790W EL 790IR EL 790IR W ...

Page 2: ...2 USER S MANUAL ...

Page 3: ...cification OSD Control Button Camera Menu Set Up 1 Menu Set Up 2 Lens Setting 3 Exposure Setting 4 White Balance Setting 5 SSDR Setting 6 Backlight Setting 7 DNR3 Setting 8 Day Night Setting 9 Special Setting 10 Exit Setting Trouble Shooting 4 5 6 7 8 8 9 10 11 12 13 14 15 19 20 ...

Page 4: ... definition of the image SSDR For images with high contrast between bright and dark Areas from difficult lighting conditions such as backlighting this camera selectively illuminates darker Areas while retaining the same light level for brighter Areas to even out the overall brightness Miscellaneous Functions HLC High Light Compensation SENS UP FLIP H V REV D ZOOM SHARPNESS MOTION DETECTION and PRI...

Page 5: ...lace the outer plate over the camera body mounting plate and tighten side screws to lock the camera into place Loosen side screws to adjust camera angle as needed then tighten the side screws to lock into place Pan Focus Lens IR LEDs 2 Adjusting 3 Accessories Camera 1ea IR Remote Control 1ea Mounting Screw 3ea Operating Manual USER S INSTRUCTIONS PAN Focus Dome DNR Day Night Weatherproof Camera Us...

Page 6: ...ge Temp Dimension Weight 1 3 Sony Super HAD CCD NTSC 811 H 508 V 768 H 494 V 15 734KHz H 59 94Hz V 2 1 Interlace Internal 600TV Lines IR LED OFF 0 15 Lux IR LED ON 0 00002 Lux More than 52dB CVBS 1 0Vp p 75Ω NTSC 1 60sec 1 120 000sec PAL 1 50sec 1 120 000sec Available On O Level adjustable BLC HLC OFF Color BW AUTO Low High ATW Outdoor Indoor Manual AWC 1 700 K 11 000 K Auto O Selectable x2 x512 O...

Page 7: ...rameters Left button Moves the cursor to the left Use this button to select or adjust the parameters of the selected item The parameter changes each time this button is pressed Right button Moves the cursor to the right Use this button to select or adjust the parameters of the selected item The parameter changes each time this button is pressed Set button Executes selections and displays a submenu...

Page 8: ...er and maximum value of ESC shutter mode 2 Select a desired function using the Function Setup switch Place the cursor over a desired item 3 Set up a selected item by using the Function Setup switch 4 To finish the setting select EXIT and press the Function Setup switch MAIN SETUP MAIN SETUP 1 LENS 2 EXPOSURE 3 WHITE BAL 4 SSDR 5 BACKLIGHT 6 DNR3 7 DAY NIGHT 8 SPECIAL 9 EXIT 1 LENS 2 EXPOSURE 3 WHIT...

Page 9: ...ch 2 Select a desired mode using the Function Setup switch SHUTTER You can select either auto or manual shutter Shutter speed is fixed at 1 60sec 1 50sec ESC Select this to control the shutter speed automatically If ESC is selected the shutter speed is automatically controlled depending on the ambient illumination of the subject MANUAL You can control shutter speed manually NTSC MODEL 1 60 1 120 0...

Page 10: ... menu and return to the SETUP menu NOTE If you press the Function Setup switch to AUTO mode you can adjust brightness by increasing or decreasing the shutter speed x2 x512 Note that the higher the zoom level the brighter the screen but the more likely there will be a ghosting effect It is normal for Noise Spots and Whitish symptoms to appear in SENS UP mode when the D ZOOM level is increased White...

Page 11: ...es readjust it NOTE White Balance may not work properly under the following conditions In this case select the AWC mode When the color temperature of the environment surrounding the subject is out of the control range e g clear sky or sunset When the ambient illumination of the subject is dim If the camera is directed towards a fluorescent light or is installed in a place where illumination changes...

Page 12: ...ht Compensation If the scene contains extremely bright light areas such as from car headlights the light can mask out much of the on screen detail LEVEL Adjust level of the HLC function LIMIT Enable to change the operating condition MASK COLOR TONE Change the color transparency of the masking area Black Red Blue Cyan Magenta TOP BOTTOM LEFT RIGHT Adjust the area to be enhanced OFF Not being used 2...

Page 13: ...ecific size in NIGHT ONLY mode The HLC is not activated in day light or when bright light is not present at night in NIGHT ONLY mode BLC Function doesn t work in the B W mode of the DAY NIGHT menu DNR3 Setting This function reduces the background noise in a low luminance environment 1 When the SETUP menu screen is displayed select DNR3 by using the Function Setup switch so that the arrow indicates ...

Page 14: ...u can display pictures in color or black and white 1 When the SETUP menu screen is displayed select DAY NIGHT by using the Function Setup switch so that the arrow indicates DAY NIGHT MAIN SETUP 1 LENS 2 EXPOSURE 3 WHITE BAL 5 BACKLIGHT 6 DNR3 7 DAY NIGHT 8 SPECIAL 9 EXIT DC ATW OFF OFF ON AUTO SAVE 2 Select a desired mode using the Function Setup Switch according to the picture display you want CO...

Page 15: ... day night mode 3s 5s 7s 10s 15s 20s 30s 40 60s The day night switching point of the camera can be adjusted FAST SLOW COLOR B W 2 5 lux 1 lux B W COLOR 5 lux 10 lux AUTO SETUP 1 BURST MODE 2 COLOR B W DURATION DWELL TIME 3 B W COLOR DURATION DWELL TIME 4 RETURN ON FAST 3SEC FAST 10SEC NOTE When AGC in the EXPOSURE menu is OFF mode operates as like selecting COLOR mode and AUTO mode can not be sele...

Page 16: ... can flip the picture horizontally on the screen D ZOOM You can use a digital zoom of x1 x16 FONT COLOR You can change the OSD font color White Yellow Green Red Blue SHARPNESS As you increase this value the picture outline becomes stronger and clearer Adjust this value appropriately depending on the sharpness of the picture RETURN Select this to save the settings for the IMAGE ADJ menu and to retu...

Page 17: ...ion Setup switch 4 Use the Function Setup switch to move to a desired letter and select the letter by pressing the Function Setup switch Repeat this to enter multiple letters You can enter up to 15 letters 5 Enter a title move the cursor to POS and press the Function Setup switch The entered title appears on the screen Select the position to display the title on the screen by using the Function Se...

Page 18: ... high motion detection sensitivity is increased to recognize even small movement AREA MODE Determines whether to use the MD area selected in SENSITIVITY SEL POS Determines which of the 4 vertices of each MD area is to be used XPOS Determines the coordinate of the horizontal axis for SEL POS YPOS Determines the coordinate of the vertical axis for SEL POS FILL SET Fills in a selected MD area The col...

Page 19: ...ttings value of video appropriate to your monitor LANGUAGE You can select the menu language according to your requirements RETURN Select this to save the SPECIAL menu settings and return to the MAIN SETUP menu Exit Setting Select a desired EXIT mode using the Function Setup Switch SAVE Save the current settings and exit the MAIN SETUP menu NOT SAVE Do not save the current settings and exit the MAI...

Page 20: ...ET been set to ON in the menu Has MD AREA been properly defined Check that the AGC setting in the EXPOSURE menu is t set to OFF Check the EXPOSURE menu and make sure SHUTTER is set to Make sure that the camera isn t facing direct sunlight or fluorescent lighting If necessary change the camera position Check the settings in WHITE BALANCE menu Check the camera is correctly connected to an appropriat...

Page 21: ...21 USER S MANUAL ...

Page 22: ......

Reviews: