v
The
hot-swap
bays
are
arranged
vertically
in
the
standard
hard
disk
drive
cage;
the
bay
numbers
are
0
through
7
(from
top
to
bottom)
on
models
with
eight
hard
disk
drives
and
0
through
11
(from
top
to
bottom)
on
models
with
twelve
hard
disk
drives.
v
For
a
list
of
supported
optional
devices
for
the
server,
see
http://www.ibm.com/
servers/eserver/serverproven/compat/us/.
v
Inspect
the
drive
tray
for
signs
of
damage.
v
Make
sure
that
the
drive
is
correctly
installed
in
the
tray.
v
See
the
documentation
for
the
ServeRAID-8k,
ServeRAID-8s,
and
the
optional
ServeRAID-10is
SAS
controllers
for
instructions
for
installing
a
hard
disk
drive.
v
All
hot-swap
drives
in
the
server
must
have
the
same
throughput
speed
rating;
using
drives
with
different
speed
ratings
might
cause
all
drives
to
operate
at
the
throughput
speed
of
the
slowest
drive.
v
To
minimize
the
possibility
of
damage
to
the
hard
disk
drives
when
you
are
installing
them
in
a
rack
configuration,
install
the
server
in
the
rack
before
you
install
the
hard
disk
drives.
v
You
do
not
have
to
turn
off
the
server
to
install
hot-swap
drives
in
the
hot-swap
drive
bays.
However,
you
must
turn
off
the
server
when
you
perform
any
steps
that
involve
installing
or
removing
cables.
v
Do
not
mix
SAS
and
SATA
drives
in
the
same
array.
v
The
drive
ID
of
each
hot-swap
hard
disk
drive
is
printed
on
the
label
on
the
side
of
the
drive
cage.
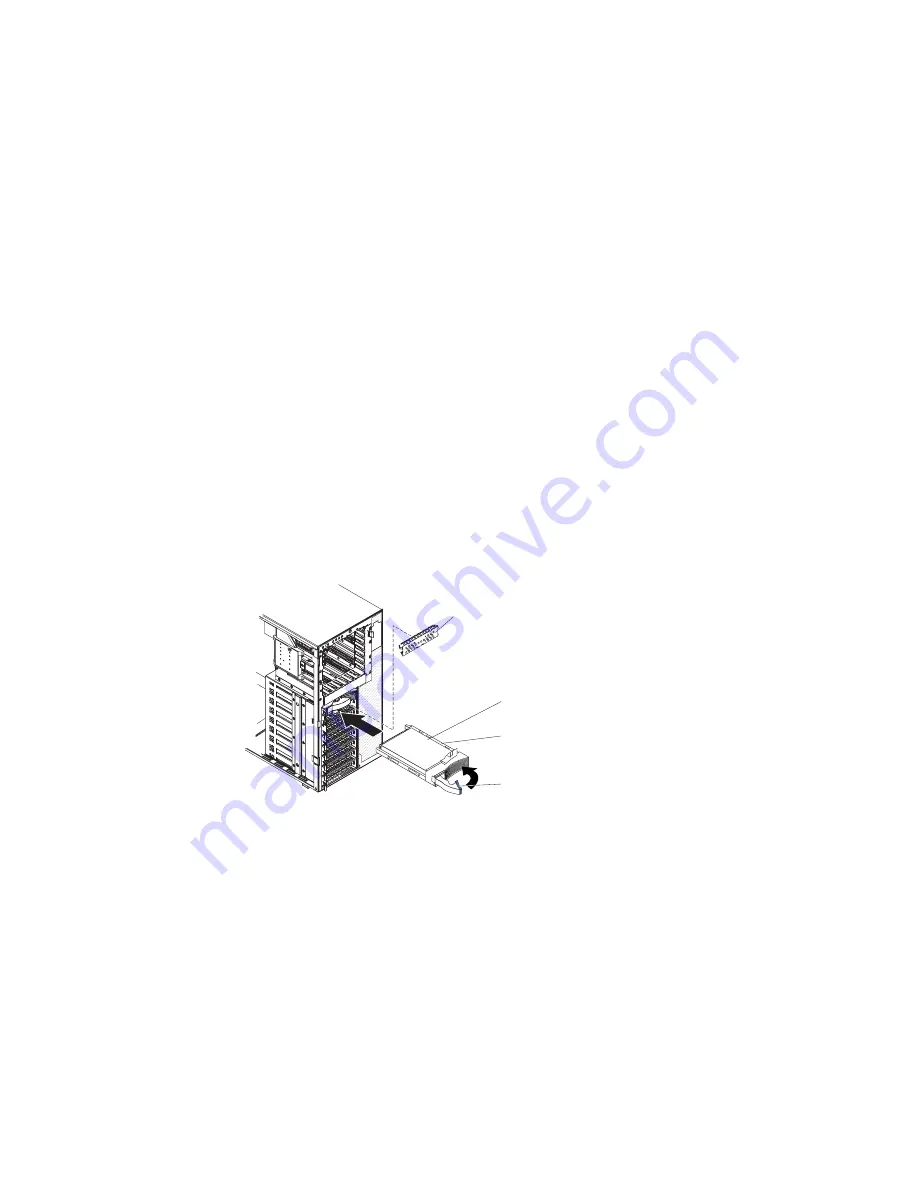
The
following
illustration
shows
how
to
install
a
hot-swap
hard
disk
drive.
EMC shield
Hard disk drive
Drive tray
Drive tray handle
(in open position)
To
install
a
hot-swap
hard
disk
drive,
complete
the
following
steps:
1.
Read
the
safety
information
that
begins
on
page
vii
and
“Installation
guidelines”
on
page
7.
2.
Remove
the
bezel
from
the
server.
3.
Remove
the
EMC
shield
from
one
of
the
empty
hot-swap
bays.
4.
Make
sure
that
the
tray
handle
is
open;
then,
install
the
hard
disk
drive
into
the
hot-swap
bay.
Notes:
1.
When
you
turn
on
the
server,
check
the
hard
disk
drive
status
LEDs
to
verify
that
the
hard
disk
drive
is
operating
correctly.
If
the
amber
hard
disk
drive
status
LED
for
a
drive
is
lit
continuously,
that
drive
is
faulty
and
must
be
replaced.
If
the
green
hard
disk
drive
activity
LED
is
flashing,
the
drive
is
being
accessed.
24
IBM
System
x3500
Type
7977:
Installation
Guide
Summary of Contents for x3500 - System - 7977
Page 3: ...IBM System x3500 Type 7977 Installation Guide...
Page 14: ...xii IBM System x3500 Type 7977 Installation Guide...
Page 48: ...34 IBM System x3500 Type 7977 Installation Guide...
Page 76: ...62 IBM System x3500 Type 7977 Installation Guide...
Page 118: ...104 IBM System x3500 Type 7977 Installation Guide...
Page 122: ...108 IBM System x3500 Type 7977 Installation Guide...
Page 123: ......
Page 124: ...Part Number 44R5218 Printed in USA 1P P N 44R5218...


