background image

Installing an optional tape drive enablement kit and tape drive

The IBM System x37550 M3 tape drive enablement kit is used to install an optional
tape drive in simple-swap models of the server. See http://www.ibm.com/servers/
eserver/serverproven/compat/us/ for a list of supported optional devices. To order a
tape drive enablement kit, contact your IBM marketing representative or authorized
reseller. The IBM System x3755 M3 tape drive enablement kit is compatible only
with the following tape drive:

v

IBM DDS Generation 5 (DDS5) SATA tape drive

The IBM System x3755 M3 tape drive enablement kit contains the following
components:

v

One tape drive tray (with attached cable)

v

Bezel(s)

Note:

The optional tape drive is supported only on simple-swap models of the

server.

To install an optional tape drive, complete the following steps:

1. Read the safety information that begins on page v and “Installation guidelines”

on page 28.

2. Turn off the server and peripheral devices, and disconnect the power cord and

all external cables.

3. If the tape drive comes with a metal spacer attached, remove the spacer

before you install the tape drive on the tray.

4. Prepare the drive according to the instructions that come with the drive, setting

any switches or jumpers.

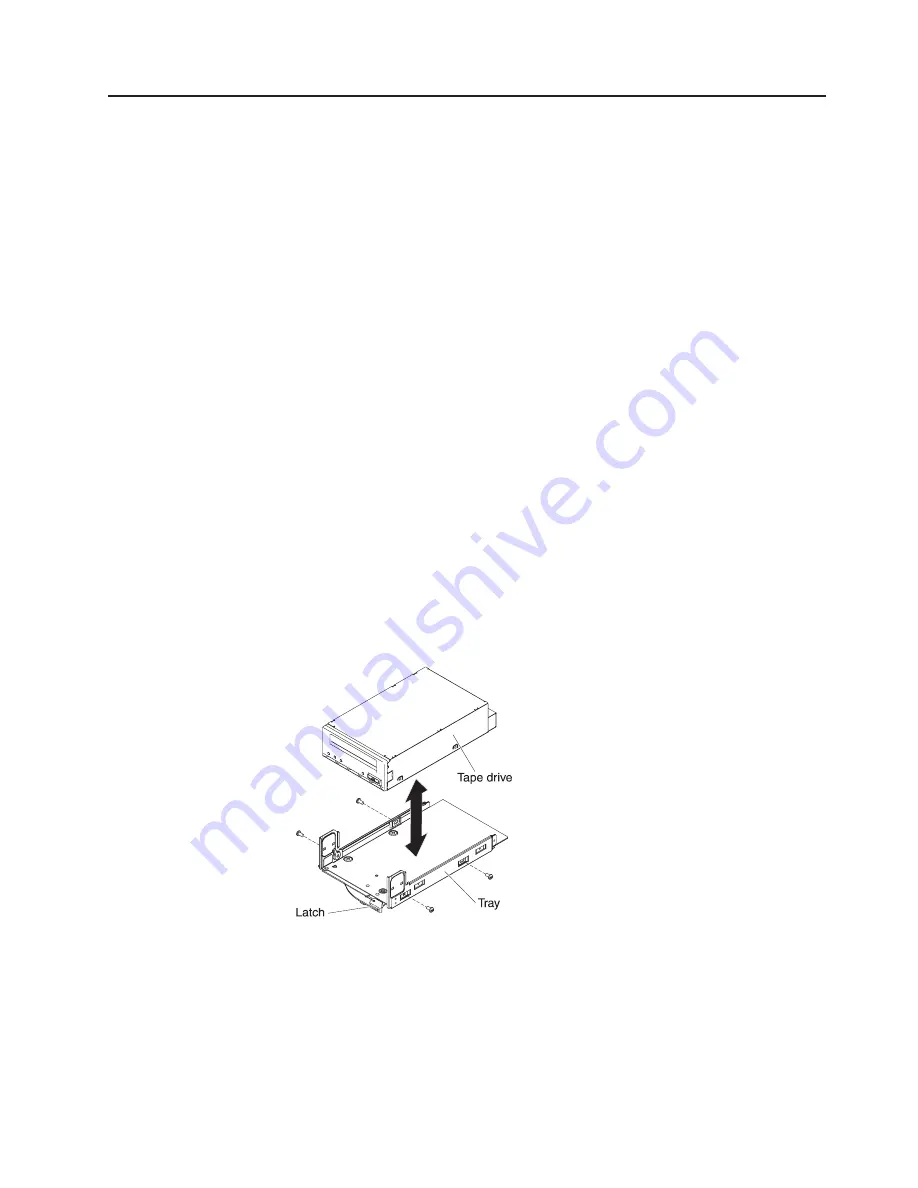
5. Install the drive tray on the new tape drive as shown and tighten the four

screws to secure the tape drive to the bottom tray.

6. Align the tabs on the tape drive bezel with the holes on the tape drive and

insert the tabs until they snap into place.

Chapter 2. Installing optional devices

57

Summary of Contents for System x3755 M3 7164

Page 1: ...IBM System x3755 M3 Type 7164 Installation and User s Guide...

Page 2: ......

Page 3: ...IBM System x3755 M3 Type 7164 Installation and User s Guide...

Page 4: ...ntal Notices and User Guide documents on the IBM Documentation CD and the Warranty Information The most recent version of this document is available at http www ibm com systems support Sixth Edition D...

Page 5: ...8 A single power supply server operating at 100 V or 240 V ac 29 System reliability guidelines 29 Handling static sensitive devices 30 Internal cable routing and connectors 31 Hot swap hard disk drive...

Page 6: ...ing the remote presence and blue screen capture features 85 Enabling the Broadcom Gigabit Ethernet Utility program 85 Configuring the Broadcom Gigabit Ethernet controller 85 Configuring RAID arrays 86...

Page 7: ...statement 100 Japan Electronics and Information Technology Industries Association JEITA statement 100 Korea Communications Commission KCC statement 100 Russia Electromagnetic Interference EMI Class A...

Page 8: ...vi IBM System x3755 M3 Type 7164 Installation and User s Guide...

Page 9: ...en Ennen kuin asennat t m n tuotteen lue turvaohjeet kohdasta Safety Information Avant d installer ce produit lisez les consignes de s curit Vor der Installation dieses Produkts die Sicherheitshinweis...

Page 10: ...statement with translated versions of the caution or danger statement in the Safety Information document For example if a caution statement is labeled Statement 1 translations for that caution stateme...

Page 11: ...quipment when there is evidence of fire water or structural damage v Disconnect the attached power cords telecommunications systems networks and modems before you open the device covers unless instruc...

Page 12: ...um battery replace it only with the same module type made by the same manufacturer The battery contains lithium and can explode if not properly used handled or disposed of Do not v Throw or immerse in...

Page 13: ...he device v Use of controls or adjustments or performance of procedures other than those specified herein might result in hazardous radiation exposure DANGER Some laser products contain an embedded Cl...

Page 14: ...he device and the power switch on the power supply do not turn off the electrical current supplied to the device The device also might have more than one power cord To remove all electrical current fr...

Page 15: ...inside any component that has this label attached There are no serviceable parts inside these components If you suspect a problem with one of these parts contact a service technician Statement 11 CAUT...

Page 16: ...o avoid tipping when the server unit is extended Statement 17 CAUTION The following label indicates moving parts nearby Statement 26 CAUTION Do not place any object on top of rack mounted devices Atte...

Page 17: ...an IT power distribution system whose maximum phase to phase voltage is 240 V under any distribution fault condition Important Maschinenl rminformations Verordnung 3 GPSGV der h chste Schalldruckpege...

Page 18: ...xvi IBM System x3755 M3 Type 7164 Installation and User s Guide...

Page 19: ...e server contains IBM Enterprise X Architecture technologies which help increase performance reliability and availability For more information see What your server offers on page 7 and Reliability ava...

Page 20: ...n CD requires the following minimum hardware and software v Microsoft Windows XP Windows 2000 or Red Hat Linux v 100 MHz microprocessor v 32 MB of RAM v Adobe Acrobat Reader 3 0 or later or xpdf which...

Page 21: ...e the xpdf search function within the document Click Help for detailed information about using the Documentation Browser Related documentation This Installation and User s Guide contains general infor...

Page 22: ...is on the IBM Documentation CD Each statement is numbered for reference to the corresponding statement in your language in the Safety Information document The following notices and statements are used...

Page 23: ...ed acoustical environments according to the procedures specified by ISO 7779 and are reported in accordance with ISO 9296 Actual sound pressure levels in a given location might exceed the average valu...

Page 24: ...oximately 22 kg 48 6 lb to 33 kg 72 7 lb depending on your configuration Integrated functions v Integrated baseboard management controller iBMC which provides service processor control and monitoring...

Page 25: ...on If an environmental condition exceeds a threshold or if a system component fails the iBMC lights LEDs to help you diagnose the problem records the error in the iBMC event log and alerts you to the...

Page 26: ...system memory when unbuffered DIMMs are installed The memory controller supports error correcting code ECC for up to 32 industry standard PC3 10600 registered or unbuffered DDR 3 synchronous dynamic...

Page 27: ...es with an optional tape drive v Light path diagnostics Light path diagnostics provides LEDs to help you diagnose problems For more information see the section about light path diagnostics in the Prob...

Page 28: ...in monitoring for fan power temperature voltage and power supply redundancy v Error codes and messages v Error correcting code ECC L2 cache and system memory v Fault resistant startup v Hot swap hard...

Page 29: ...systems need updates and distributing and installing updates on a schedule v Analyzing real time data for systems and setting critical thresholds that notify the administrator of emerging problems v C...

Page 30: ...is LED is lit it indicates that the DVD drive is in use USB connectors Connect USB devices to these connectors Hard disk drive activity LED Each hot swap hard disk drive has an activity LED When this...

Page 31: ...ng on to the iBMC web interface see Logging on to the web interface on page 84 Note Approximately 1 minute after the server is turned on the screen displays the boot process status Depending on your s...

Page 32: ...utton Check point code display v Remind button This button places the system error LED on the front panel into Remind mode In Remind mode the system error LED flashes once every 2 seconds until the pr...

Page 33: ...se this connector to connect the server to a network for systems management information control This connector is used only by the integrated baseboard management controller iBMC USB connectors Connec...

Page 34: ...are lit For any other combination of LEDs see the Problem Determination and Service Guide Power supply error LED When the power supply error LED is lit it indicates that the power supply has failed Se...

Page 35: ...our server configuration the operating system welcome screen displays after 1 3 minutes The server can also be turned on in any of the following ways v If a power failure occurs while the server is tu...

Page 36: ...y shutdown of the operating system the server will be turned off automatically v You can press the power control button to start an orderly shutdown of the operating system and turn off the server if...

Page 37: ...Follow the installation procedures in this chapter and use the correct tools Incorrectly installed devices can cause system failures because of damaged pins in sockets or connectors loose cabling or...

Page 38: ...use any of the following methods to send diagnostic data to IBM v Standard upload http www ibm com de support ecurep send_http html v Standard upload with the system serial number http www ecurep ibm...

Page 39: ...mponent or an orange label on or near a component indicates that the component can be hot swapped which means that if the server and operating system support hot swap capability you can remove or inst...

Page 40: ...nnector Fan 5 connector Fan 4 connector Fan 3 connector Fan 2 connector Fan 1 connector Power connector 1 Power connector 2 Power connector 3 Power supply distribuation board connector Battery Backpla...

Page 41: ...board DIMM 1 DIMM 2 DIMM 3 DIMM 4 DIMM 5 DIMM 6 DIMM 7 DIMM 8 DIMM 17 DIMM 18 DIMM 19 DIMM 20 DIMM 21 DIMM 22 DIMM 23 DIMM 24 DIMM 16 DIMM 15 DIMM 14 DIMM 13 DIMM 12 DIMM 11 DIMM 10 DIMM 9 DIMM 32 DI...

Page 42: ...s the external connectors and the light path diagnostics button on the system board System management Ethernet Serial Video USB Ethernet 4 Ethernet 3 Ethernet 2 Ethernet 1 Light path diagnostics butto...

Page 43: ...al default This keeps the CMOS data v Pins 2 and 3 This clears the CMOS data such as the power on password and administrator password and loads the default UEFI settings Notes 1 If the clear CMOS jump...

Page 44: ...firmware ROM page Notes v If no jumper is present the server responds as if a jumper is on pins 1 and 2 v Changing the position of the UEFI boot recovery jumper from pins 1 and 2 to pins 2 and 3 befo...

Page 45: ...sembly Light path diagnostics LED Standby power LED DIMM 1 8 error LEDs DIMM 17 24 error LEDs PCI slot 1 error LED PCI slot 2 error LED PCI slot 3 error LED PCI slot 4 error LED System board error LED...

Page 46: ...re addressed and that your server is ready to function at maximum levels of performance To download firmware updates for your server go to http www ibm com support fixcentral Important Some cluster so...

Page 47: ...single power supply server operating at 100 V or 240 V ac One power supply operating at 100 V or 240 V ac supports a server with minimum two microprocessor configuration but it does not support power...

Page 48: ...nts pins or exposed circuitry v Do not leave the device where others can handle and damage it v While the device is still in its static protective package touch it to an unpainted metal surface on the...

Page 49: ...major components in the server Hot swap hard disk drive backplane cable connections The following illustration shows the internal routing of the hot swap hard disk drive backplane cables Port 0 ServeR...

Page 50: ...le swap hard disk drive backplate cables to the connectors on the ServeRAID adapter and system board Note You must disengage the signal cable from the cable clip on the backplate to connect it to the...

Page 51: ...lustration shows the internal routing of the simple swap hard disk drive backplate signal cables to the connectors on the system board Port 0 Power cable Port 0 Port 1 Port 1 Chapter 2 Installing opti...

Page 52: ...DVD cable Attention To disconnect the DVD cable you must first press the connector release tab and then disconnect the cable from the connector on the system board Do not disconnect the cable by usin...

Page 53: ...cable Attention To disconnect the USB hypervisor key signal cable you must first press the connector release tab and then disconnect the cable from the connector on the system board Do not disconnect...

Page 54: ...ows the routing of the power supply distribution board cables Secure the power cables with the cable tie and retention clips Backplane power cable Signal cable Power 3 cable Power 1 cable Power 2 cabl...

Page 55: ...s Disconnect all power cords then disconnect all external signal cables from the server 3 Slide the server out of the rack until the slide rails lock into place 4 Loosen the two thumbscrews that secur...

Page 56: ...eripheral devices Disconnect all power cords then disconnect all external signal cables from the server 3 Remove the cover see Removing the top cover on page 37 4 Pull out the handle to unlatch the PC...

Page 57: ...r see Removing the top cover on page 37 4 Pull up the handle on the power supply cage until the handle locks into place 5 Lift and rotate the power supply cage toward the front of the server then alig...

Page 58: ...r information that you must consider when you install an adapter v To confirm that the server supports the adapter that you are installing see http www ibm com systems info x86servers serverproven com...

Page 59: ...of the non hot plug adapters as follows Expansion slot 1 Full height full length Expansion slots 2 3 and 4 Low profile half length v You must install a ServeRAID adapter in expansion slot 4 on the PCI...

Page 60: ...I slot 2 PCI slot 3 Attention When you install an adapter avoid touching the components and gold edge connectors on the adapter Make sure that the adapter is correctly seated in the connector Incorrec...

Page 61: ...r on page 37 4 Remove the PCI riser card assembly see Removing the PCI riser card assembly on page 38 5 Touch the static protective package that contains the new ServeRAID controller to any unpainted...

Page 62: ...e time occurrence Important You must allow the initialization process to be completed If you do not the battery pack will not work and the server might not start The battery comes partially charged at...

Page 63: ...s 3 Remove the server cover see Removing the top cover on page 37 4 Remove the PCI riser card assembly see Removing the PCI riser card assembly on page 38 5 If a battery and battery carrier are attach...

Page 64: ...rd to the ServeRAID controller 7 Install the battery on the remote battery tray a Pull the loop on the remote battery tray away from the chassis then slide the tray toward the rear of the server to re...

Page 65: ...e be sure to align the black dot on the cable connector with the black dot on the connector on the interposer card Do not force the remote battery cable into the connector 9 Route the remote battery c...

Page 66: ...able through the opening on the PCI riser card assembly Attention To avoid damage to the hardware be sure to align the black dot on the cable connector with the black dot on the connector on the inter...

Page 67: ...mbly see Installing a ServeRAID SAS SATA controller on page 43 If you have other devices to install or remove do so now Otherwise go to Completing the installation on page 68 Notes 1 When you restart...

Page 68: ...ou are given the opportunity to import the existing RAID configuration to the new ServeRAID controller Installing an optional ServeRAID controller advanced feature key To install an optional ServeRAID...

Page 69: ...an meet the power requirements To provide redundant power capabilities in the server install two power supplies in a server with two microprocessors or more microprocessors less than 80W install three...

Page 70: ...oven compat us To install an additional hot swap power supply complete the following steps 1 Read the safety information that begins on page v and Installation guidelines on page 28 2 Grasp the side c...

Page 71: ...en you install a hot swap hard disk drive v To confirm that the server supports the hard disk drive that you are installing see http www ibm com systems info x86servers serverproven compat us v The se...

Page 72: ...BM Business Partners only Complete the additional steps in Instructions for IBM Business Partners on page 19 Notes 1 You might have to reconfigure the disk arrays after you install hard disk drives Se...

Page 73: ...h the static protective package that contains the hard disk drive to any unpainted surface on the outside of the server then remove the hard disk drive from the package 5 Pull the round blue loops of...

Page 74: ...alled Press the release latch on the front of the server and pull out the release latch to remove the DVD drive filler slightly out of the server then remove the DVD drive filler completely out of the...

Page 75: ...e v Bezel s Note The optional tape drive is supported only on simple swap models of the server To install an optional tape drive complete the following steps 1 Read the safety information that begins...

Page 76: ...e tape drive until the retention clips on the side of the bezel securely engages the tape drive Tape drive Tape drive cable Tray cover 8 Remove the drive filler panel from drive bays 6 and 7 9 Slide t...

Page 77: ...orts one internal flash memory or hypervisor key that is installed in the USB connector on the drive cage To install the internal flash memory complete the following steps 1 Read the safety informatio...

Page 78: ...bedded hypervisor flash device If you have other devices to install or remove do so now Otherwise go to Completing the installation on page 68 60 IBM System x3755 M3 Type 7164 Installation and User s...

Page 79: ...ng see http www ibm com systems info x86servers serverproven compat us v The server supports 2 GB 4 GB 8 GB and 16 GB double data rate DDR III registered or unbuffered synchronous dynamic random acces...

Page 80: ...nce in pairs Number of microprocessors DIMM connectors 2 1 9 5 13 3 7 11 15 2 6 10 14 4 8 12 16 4 1 9 17 25 5 13 21 29 3 7 11 15 19 23 27 31 2 6 10 14 18 22 26 30 4 8 12 16 20 24 28 32 v Online spare...

Page 81: ...r DIMM Retaining clip 6 Touch the static protective package that contains the DIMM to any unpainted metal surface on the server Then remove the DIMM from the package 7 Turn the DIMM so that the DIMM k...

Page 82: ...ng the microprocessors This enhances performance for database and point of sale applications integrated manufacturing solutions and other applications v Read the documentation that comes with the micr...

Page 83: ...n When you handle static sensitive devices take precautions to avoid damage from static electricity For details about handling these devices see Handling static sensitive devices on page 30 6 Install...

Page 84: ...n The microprocessor fits only one way on the socket You must place a microprocessor straight down on the socket to avoid damaging the pins on the socket The pins on the socket are fragile Any damage...

Page 85: ...removed from make sure that the following requirements are met v The thermal grease on the heat sink and microprocessor is not contaminated v Additional thermal grease is not added to the existing th...

Page 86: ...talling the top cover on page 71 4 If you removed the top cover fan door replace it see Installing the top cover fan door on page 71 5 Install the server in a rack See the Rack Installation Instructio...

Page 87: ...ly routed and that no cables are pinched 2 Align the air baffle with the slots on the chassis then insert the tabs into the slots and lower the air baffle into the server 3 Press the release latch on...

Page 88: ...that are installed Support the power supply cage with both hands while you rotate it into position 4 While you hold the handle pull the release pin on the side of the handle and lower the handle into...

Page 89: ...ide of the cover engage the chassis correctly If all the tabs do not engage the chassis correctly it will be hard to remove the cover later Thumbscrew Cover 4 Slide the top cover forward and into posi...

Page 90: ...les before you install certain optional devices The following illustration shows the locations of the input and output connectors on the rear of the server DC AC Power connector System serial Video Gi...

Page 91: ...to support SMP For more information see Typical operating system installation on page 82 and the operating system documentation If the server has an optional RAID adapter and you have installed or re...

Page 92: ...74 IBM System x3755 M3 Type 7164 Installation and User s Guide...

Page 93: ...sensor data record field replaceable unit SDR FRU data and to remotely manage a network For information about using the iBMC see Using the integrated baseboard management controller on page 83 or the...

Page 94: ...steps 1 Turn on the server Note Approximately 1 minute after the server is turned on the screen displays the boot process status 2 When the prompt F1 Setup is displayed press F1 If you have set an adm...

Page 95: ...isconnecting the device Power Select this choice to view or change power capping to control consumption processors and performance states Legacy Support Select this choice to view or set legacy suppor...

Page 96: ...ar System Event Log Select this choice to clear the system event log v User Security Select this choice to set change or clear passwords For information about passwords see Passwords on page 79 This c...

Page 97: ...d to complete the system startup A system administrator who types the administrator password has access to the full Setup utility menu the system administrator can give the user authority to set chang...

Page 98: ...s installed a submenu item USB Key Disk is displayed 4 Use the Up Arrow and Down Arrow keys to select an item from the menu and press Enter The next time the server starts it returns to the startup se...

Page 99: ...Insert the CD and restart the server If the CD does not start see ServerGuide problems in the Problem Determination and Service Guide on the IBM Documentation CD 2 Follow the instructions on the scre...

Page 100: ...rsions of the ServerGuide program 1 After you have completed the setup process the operating system installation program starts You will need your operating system CD to complete the installation 2 Th...

Page 101: ...management features v Alerts in band and out of band alerting PET traps IPMI style SNMP email v Auto Boot Failure Recovery v Automatic Server Restart ASR when POST is not complete or the operating sys...

Page 102: ...ich you can obtain through the Setup utility To obtain the IP address complete the following steps 1 Turn on the server 2 When the prompt F1 Setup is displayed press F1 If you have set both a power on...

Page 103: ...C detects an operating system hang condition A system administrator can use the blue screen capture feature to assist in determining the cause of the hang condition Enabling the Broadcom Gigabit Ether...

Page 104: ...on for your RAID controllers Using the IBM Advanced Settings Utility program The IBM Advanced Settings Utility ASU is an alternative to the Setup utility for modifying UEFI settings Use the ASU online...

Page 105: ...he installation wizard If your management server is not connected to the Internet to locate and install updates and interim fixes complete the following steps 1 Make sure that you have run the Discove...

Page 106: ...88 IBM System x3755 M3 Type 7164 Installation and User s Guide...

Page 107: ...erproven compat us to make sure that the hardware and software is supported by your IBM product v Go to http www ibm com supportportal to check for information to help you solve the problem v Gather t...

Page 108: ...nter information is http www ibm com systems bladecenter The address for IBM IntelliStation information is http www ibm com systems intellistation How to send Dynamic System Analysis data to IBM Use t...

Page 109: ...tp www ibm com partnerworld and click Find Business Partners on the right side of the page For IBM support telephone numbers see http www ibm com planetwide In the U S and Canada call 1 800 IBM SERV 1...

Page 110: ...92 IBM System x3755 M3 Type 7164 Installation and User s Guide...

Page 111: ...SS FOR A PARTICULAR PURPOSE Some states do not allow disclaimer of express or implied warranties in certain transactions therefore this statement may not apply to you This information could include te...

Page 112: ...e capacity or communications volume MB stands for 1 000 000 bytes and GB stands for 1 000 000 000 bytes Total user accessible capacity can vary depending on operating environments Maximum internal har...

Page 113: ...r information on proper disposal of these batteries contact IBM at 1 800 426 4333 Have the IBM part number listed on the battery available prior to your call For Taiwan Please recycle batteries For th...

Page 114: ...zardous substances For proper collection and treatment contact your local IBM representative This notice is provided in accordance with Royal Decree 106 2008 of Spain The retail price of batteries acc...

Page 115: ...Limits Particulate v The room air must be continuously filtered with 40 atmospheric dust spot efficiency MERV 9 according to ASHRAE Standard 52 21 v Air that enters a data center must be filtered to...

Page 116: ...truction manual may cause harmful interference to radio communications Operation of this equipment in a residential area is likely to cause harmful interference in which case the user will be required...

Page 117: ...es Produkt entspricht den Schutzanforderungen der EU Richtlinie 2004 108 EG zur Angleichung der Rechtsvorschriften ber die elektromagnetische Vertr glichkeit in den EU Mitgliedsstaaten und h lt die Gr...

Page 118: ...rmationen Das Ger t erf llt die Schutzanforderungen nach EN 55024 und EN 55022 Klasse A VCCI Class A statement This is a Class A product based on the standard of the Voluntary Control Council for Inte...

Page 119: ...Russia Electromagnetic Interference EMI Class A statement People s Republic of China Class A electronic emission statement Taiwan Class A compliance statement Appendix B Notices 101...

Page 120: ...102 IBM System x3755 M3 Type 7164 Installation and User s Guide...

Page 121: ...front of server 12 rear of server 15 system board 22 24 contamination particulate and gaseous 6 97 controller configuring Ethernet 85 controls 12 controls and LEDs on light path diagnostics panel 13...

Page 122: ...les 63 microprocessor 64 optional devices 19 PCI adapter 40 PCI riser card assembly 68 ServeRAID adapter advanced feature key 50 ServeRAID controller 43 ServeRAID controller battery 45 simple swap har...

Page 123: ...40 PCI expansion slots 6 40 PCI riser card assembly 38 installing 68 removing 38 PCI slots 6 power features 17 requirement 6 power settings 77 power supply hot swap 51 installing 51 52 specification 6...

Page 124: ...stem error LED front 13 system locator LED 13 system management connector 15 Systems Director updating 86 systems management 7 11 T tape drive installing 57 telephone numbers 91 temperature 6 thermal...

Page 125: ......

Page 126: ...Part Number 46W8137 Printed in USA 1P P N 46W8137...

Reviews: