c. Select the name of the resource that is replaced from the menu. If the resource replaced is not
shown, choose the resource that is associated with it.
d. Press Enter, and then press Commit.
e. Did the Problem Determination identify any problems?
• No: Continue to the next step.
• Yes: A problem is identified.
– If you are a customer, record the error information, and then contact your service provider.
– If you are an authorized service provider, return to map 210-5.
f. Press the F10 key to exit the diagnostic program.
7. Continue with step “9” on page 21.
8. If you are using the Linux operating system, complete the following steps:
a) In the Linux session on the console, press Enter after you install the NVMe U.2 drive to put the slot
into the action state.
b) Enter the slot information with the
lsslot
command, as shown in the following example.
For example, if the slot in which you installed the NVMe U.2 drive was U78D4.001.AAAXXXX-P2-
C1, enter the following command:
lsslot -c pci -s U78D4.001.AAAXXXX-P2-C1
The following screen is an example of the information that is displayed by this command:
# Slot Description Device(s)
U78D4.001.AAAXXXX-P2-C1 PCI-X capable, 64 bit, 133MHz slot 0001:40:01.0
9. Verify the installed part.
• If you replaced the part because of a service action, verify the installed part. For
instructions, see Verifying a repair (www.ibm.com/support/knowledgecenter/POWER9/p9ect/
pxect_verifyrepair.htm).
• If you installed the part for any other reason, verify the installed part. For instructions, see Verifying
the installed part (www.ibm.com/support/knowledgecenter/POWER9/p9haj/pxhaj_hsmverify.htm).
10. Turn off the identify LED. For instructions, see Deactivating an identify LED (www.ibm.com/support/
knowledgecenter/POWER9/p9haj/p9haj_turn_off_identify_led.htm).
Permanently removing an NVMe U.2 drive from the 9040-MR9
system
Find information about permanently removing an NVMe U.2 drive from the IBM Power System E950
(9040-MR9) server.
About this task
Note: Installing this feature is a customer task. You can complete this task yourself, or contact a service
provider to complete the task for you. You might be charged a fee by the service provider for this service.
If your system is managed by the Hardware Management Console (HMC), use the HMC to repair a
part in the system. For instructions, see Repairing a part by using the HMC (www.ibm.com/support/
knowledgecenter/POWER9/p9haj/p9haj_hmc_repair.htm).
If you do not have an HMC, complete the steps in the following procedures to permanently remove an
NVMe U.2 drive.
NVMe U.2 drives for the 9040-MR9 21
Summary of Contents for Power System System E950
Page 1: ...Power Systems NVMe U 2 drives for the 9040 MR9 IBM...
Page 4: ...iv...
Page 14: ...xiv Power Systems NVMe U 2 drives for the 9040 MR9...
Page 18: ...or or or or 4 Power Systems NVMe U 2 drives for the 9040 MR9...
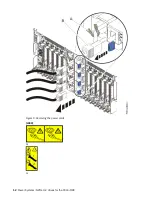
Page 26: ...Figure 9 Removing the power cords L003 or or 12 Power Systems NVMe U 2 drives for the 9040 MR9...
Page 44: ...30 Power Systems NVMe U 2 drives for the 9040 MR9...
Page 55: ......
Page 56: ...IBM...

