background image

v

The amount of usable memory will be reduced depending on the system
configuration. The BIOS will display the total amount of installed memory and the
amount of configured memory.

v

Your server supports a minimum of two 256 MB DIMMs (for a total of 512 MB)
installed in the DIMM 1 and DIMM 2 memory connectors (J1 and J2,
respectively). When you install additional DIMMs, install them in pairs, with the
next pair in DIMM connectors 3 and 4 (J3 and J4).

v

Both DIMMs in a pair must be the same size, speed, type, and technology. You
can mix compatible DIMMs from various manufacturers.

v

The second pair of DIMMs do not have to be the same size, speed, type, and
technology as the first pair.

v

Install only 2.5 V, 184-pin, double-data-rate (DDR), PC2100, registered
synchronous dynamic random-access memory (SDRAM) with error correcting
code (ECC) DIMMs. These DIMMs must be compatible with the latest PC2100
(and downward compatible with PC1600) SDRAM Registered DIMM
specification, which is available from http://www.jedec.org/ on the World Wide
Web. For a list of supported options for your server, go to
http://www.ibm.com/us/compat/ on the World Wide Web.

v

Your server supports Chipkill

technology, if the DIMMs are all of the type 4x.

v

Save new configuration information only if you replace a faulty DIMM that was
marked as

Disabled

in the Configuration/Setup Utility program

Memory Settings

menu. In this case, re-enable the memory row in the Configuration/Setup Utility
program or reload the default memory settings. See the

User’s Guide

on the IBM

xSeries Documentation

CD for more information.

v

Before you begin, read the documentation that comes with your option.

v

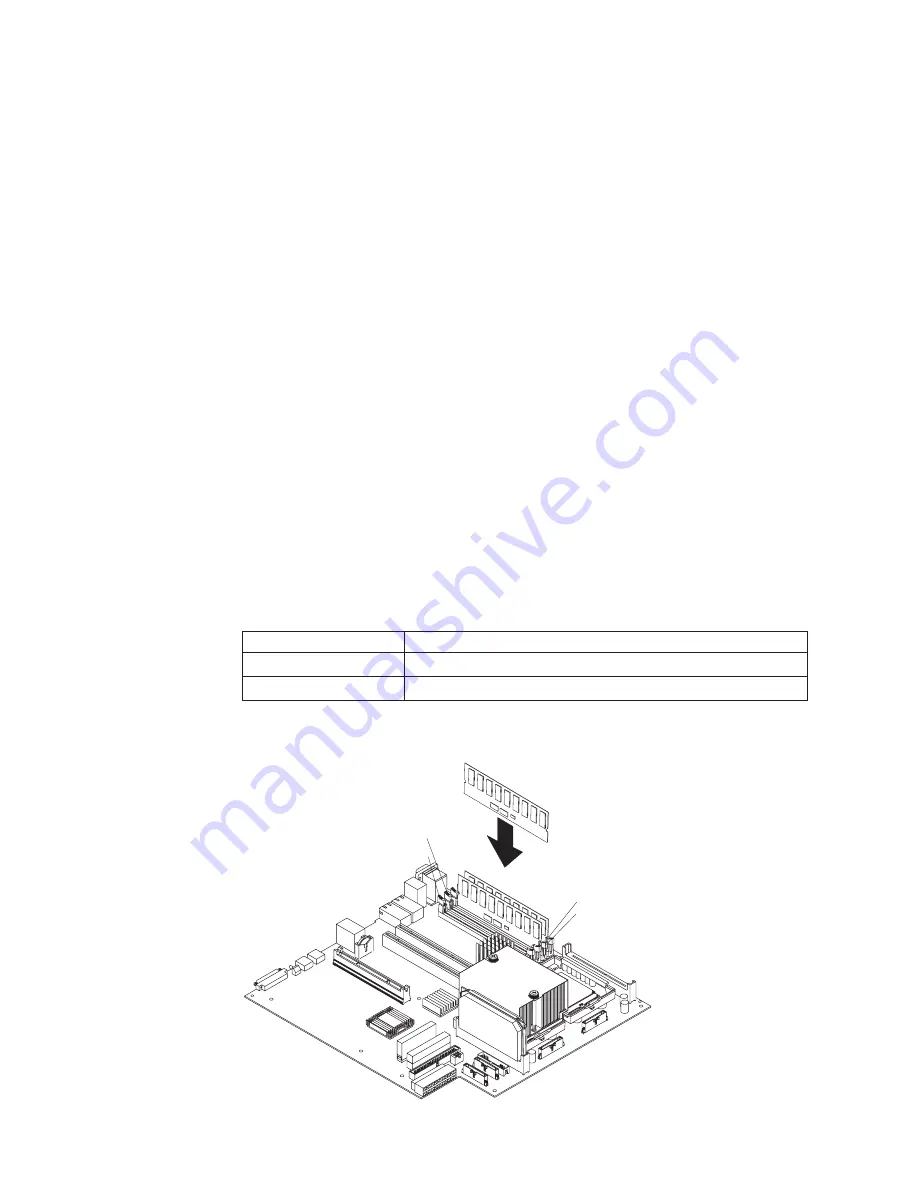
Install the DIMMs in the order shown in the following table:

Table 3. DIMM order of installation

Pair

DIMM connectors

First

1 and 2 (J1, J2)

Second

3 and 4 (J3, J4)

The following illustration shows how to install DIMMs on the system board.

DIMM 4 (J4)

DIMM 3 (J3)

DIMM 2 (J2)

DIMM 1 (J1)

24

IBM xSeries 345 Type 8670: Option Installation Guide

Summary of Contents for Eserver 345 Series

Page 1: ...IBM xSeries 345 Type 8670 Option Installation Guide SC88 P919 00 ERserver...

Page 2: ......

Page 3: ...IBM xSeries 345 Type 8670 Option Installation Guide SC88 P919 00 ERserver...

Page 4: ...ead the general information in Notices on page 45 Second Edition May 2003 Copyright International Business Machines Corporation 2003 All rights reserved US Government Users Restricted Rights Use dupli...

Page 5: ...th adapters 16 Installing a ServeRAID 5i controller 21 Installing a hot swap drive 22 Installing memory modules 23 Installing a microprocessor 26 Installing a hot swap power supply option 31 Replacing...

Page 6: ...tatement 48 Australia and New Zealand Class A statement 48 United Kingdom telecommunications safety requirement 48 European Union EMC Directive conformance statement 48 Taiwanese Class A warning state...

Page 7: ...schriften Ennen kuin asennat t m n tuotteen lue turvaohjeet kohdasta Safety Information Avant d installer ce produit lisez les consignes de s curit Vor der Installation dieses Produkts die Sicherheits...

Page 8: ...cedures v Connect and disconnect cables as described in the following table when installing moving or opening covers on this product or attached devices To connect 1 Turn everything OFF 2 First attach...

Page 9: ...the device v Use of controls or adjustments or performance of procedures other than those specified herein might result in hazardous radiation exposure Danger Some laser products contain an embedded...

Page 10: ...d from the power source 1 2 Statement 8 CAUTION Never remove the cover on a power supply or any part that has the following label attached Hazardous voltage current and energy levels are present insid...

Page 11: ...tions Statement 14 CAUTION Hazardous voltage current and energy levels might be present Only a qualified service technician is authorized to remove the covers where the following label is attached Sta...

Page 12: ...or other reproductive harm Wash hands after handling ADVERTENCIA El contacto con el cable de este producto o con cables de accesorios que se venden junto con este producto pueden exponerle al plomo un...

Page 13: ...instructions for installing your server in a rack v Hardware Maintenance Manual and Troubleshooting Guide This publication is in PDF on the IBM xSeries Documentation CD It contains information to hel...

Page 14: ...id inconvenient or problem situations v Attention These notices indicate potential damage to programs devices or data An attention notice is placed just before the instruction or situation in which da...

Page 15: ...port hot swap and hot plug features The blue color on components and labels indicates touch points where a component can be gripped a latch moved and so on The following illustration shows the major c...

Page 16: ...J1 DIMM 3 J3 DIMM 4 J4 VRM 2 J5 VRM 1 J8 DIMM 2 J2 Microprocessor 2 J6 Microprocessor 1 J7 Battery BH1 PCI riser card option connectors The following illustration shows the connectors on the PCI riser...

Page 17: ...g illustration shows the internal connectors on the system board Fans 4 and 8 J28 Fans 3 and 7 J27 Fans 2 and 6 J29 Fans 1 and 5 J26 Power J24 USB 3 operator panel Internal SCSI J23 IDE J21 Operator p...

Page 18: ...illustration shows the external input output connectors on the system board Serial video J9 Mouse keyboard J10 Ethernet 1 J11 Ethernet 2 J12 USB 1 J17 USB 2 J18 External SCSI J19 RS485 A and B J15 6...

Page 19: ...switches and jumpers The following illustration shows the switches and jumpers on the system board Flash boot block recovery jumper J34 System board switch block SW2 8 7 6 5 4 3 2 1 SW2 ON Chapter 1 I...

Page 20: ...efault position after the password is overridden Changing the position of this switch does not affect the administrator password check if an administrator password is set See the User s Guide on the I...

Page 21: ...tem board DIMM 1 error LED CR12 DIMM 2 error LED CR15 Integrated System Management Processor ISMP activity LED CR41 DIMM 3 error LED CR14 DIMM 4 error LED CR13 Microprocessor 2 error LED CR17 Micropro...

Page 22: ...power supply in bay 1 failed POWER SUPPLY 2 The power supply in bay 2 failed VRM An error occurred on one or both microprocessor voltage regulator modules VRMs CPU One or both microprocessors failed o...

Page 23: ...rk properly Leave approximately 50 mm 2 in of open space around the front and rear of the server Do not place objects in front of the fans v You have followed the cabling instructions that come with o...

Page 24: ...ic protective package touch it to an unpainted metal part of the system unit for at least 2 seconds This drains static electricity from the package and from your body v Remove the device from its pack...

Page 25: ...dapter installed the server can be turned on from the Remote Supervisor Adapter user interface v If your operating system supports the system management software for an optional Remote Supervisor Adap...

Page 26: ...ing system supports this feature v If the operating system stops functioning you can press and hold the power control button for more than 4 seconds to turn off the server v If the server is connected...

Page 27: ...wn on the left and right side latches and pull the server out of the rack enclosure until both slide rails lock Note You can reach the cables on the back of the server when the server is in the locked...

Page 28: ...d universal PCI adapters in the 64 bit PCI PCI X slot 3 and 4 v The PCI bus configuration is Non hot plug 64 bit PCI X slots 1 through 2 PCI bus A 100 MHz Non hot plug 64 bit PCI X slots 3 through 4 P...

Page 29: ...V 100 MHz J13 PCI X slot 1 64 bit 3 3V 100 MHz J14 PCI riser card J16 DIMM 1 J1 DIMM 3 J3 DIMM 4 J4 VRM 2 J5 VRM 1 J8 DIMM 2 J2 Microprocessor 2 J6 Microprocessor 1 J7 Battery BH1 PCI riser card PCI X...

Page 30: ...PCI adapter Adapter retainer Complete the following steps to install a PCI or PCI X adapter 1 Read the safety information beginning on page v and Installation guidelines on page 11 2 Turn off the ser...

Page 31: ...CI riser card assembly Store it in a safe place for future use Attention Expansion slot covers must be installed on all empty slots This maintains the electronic emissions characteristics of the syste...

Page 32: ...rners and align it with the expansion slot c Press the adapter firmly into the expansion slot and close the adapter retainer Attention When you install an adapter in the server be sure that it is comp...

Page 33: ...pter cannot control internal hard disk drives If you have other options to install or remove do so now Otherwise go to Installing the server cover and bezel on page 36 Installing a ServeRAID 5i contro...

Page 34: ...ive package Set the adapter down on a nonconductive static protected surface place it component side up Attention Avoid touching the components and gold edge connectors on the adapter b Remove the 3 U...

Page 35: ...y handle to the closed locked position e Check the hard disk drive status LED to verify that the hard disk drive is operating properly If the amber hard disk drive status LED for a drive is lit contin...

Page 36: ...and downward compatible with PC1600 SDRAM Registered DIMM specification which is available from http www jedec org on the World Wide Web For a list of supported options for your server go to http www...

Page 37: ...5 To install the DIMM repeat the following steps for each DIMM that you install a Turn the DIMM so that the DIMM keys align correctly with the connector on the system board Attention To avoid breakin...

Page 38: ...le VRM that comes with the microprocessor in VRM connector J5 v The microprocessor speeds are automatically set for this server therefore you do not need to set any microprocessor frequency selection...

Page 39: ...1 800 426 7378 Have the following information ready when you call Machine type and model Serial number of your server or computer v Do not remove the first microprocessor from the system board to inst...

Page 40: ...and the same clock speed Microprocessor internal and external clock frequencies must be identical Complete the following steps to install an additional microprocessor 1 Read the safety information beg...

Page 41: ...ll a VRM in the VRM connector J5 See the illustration at the beginning of these instructions for the location of the connectors a Center the VRM over the connector Make sure that the VRM is oriented a...

Page 42: ...ks in the fully open position approximately 135 angle Lever closed Lever fully open Attention v Do not use excessive force when pressing the microprocessor into the socket v Make sure that the micropr...

Page 43: ...secure the heat sink to the microprocessor Turn one screw a few turns and then turn the other screw a few turns alternating between the screws until the heat sink is secure 9 Install the air baffle o...

Page 44: ...ed for proper cooling 3 Install the power supply in the bay a Move the handle on the power supply into the open position pinch the side clip and slide the power supply into the chassis b Gently close...

Page 45: ...8 Fan 1 Fan 2 Fan 3 Complete the following steps to replace a hot swap fan 1 Read the safety information beginning on page v and Installation guidelines on page 11 2 Remove the cover See Removing the...

Page 46: ...lace the battery you must reconfigure your server and reset the system date and time Statement 2 CAUTION When replacing the lithium battery use only IBM Part Number 33F8354 or an equivalent type batte...

Page 47: ...inger to press the top of the battery clip away from the battery b Press the battery into the socket until it clicks into place Make sure the battery clip holds the battery securely 9 Reinstall the ad...

Page 48: ...the components that are located under the air baffle Installing the server cover and bezel The following illustration shows how to install the server cover and bezel Cover release latch Bezel Complet...

Page 49: ...you remove the ServeRAID 5i controller or other RAID controller start the Configuration Setup Utility program and select Devices and I O Ports from the main menu to enable the SCSI controller with RAI...

Page 50: ...bles that come with your server and options Use these identifiers to connect the cables to the correct connectors The following illustrations show the locations of the input and output connectors on y...

Page 51: ...f these connectors Rear view Ethernet 2 Ethernet 1 Mouse SCSI RS 485 A ISMP RS 485 B ISMP Universal Serial Bus USB 1 and 2 Serial Video Keyboard Front view USB 3 The following sections describe these...

Page 52: ...ted system management processor ISMP ports RS 485 A and B use a dual RJ 45 connector to interconnect ISMPs of several servers through an optional Remote Supervisor Adapter Note ISMP ports RS 485 A and...

Page 53: ...ard hot swap drive backplane If you plan to attach external SCSI devices you must order additional cables To select and order the correct cables for use with external devices contact your IBM reseller...

Page 54: ...ing Plug and Play technology USB devices are configured automatically The following illustration shows a USB connector 1 4 Use a 4 pin cable to connect a device to a USB connector If you need to conne...

Page 55: ...The following illustration shows a video connector 1 5 11 15 Chapter 3 Input output connectors 43...

Page 56: ...44 IBM xSeries 345 Type 8670 Option Installation Guide...

Page 57: ...ANY KIND EITHER EXPRESS OR IMPLIED INCLUDING BUT NOT LIMITED TO THE IMPLIED WARRANTIES OF NON INFRINGEMENT MERCHANTABILITY OR FITNESS FOR A PARTICULAR PURPOSE Some states do not allow disclaimer of e...

Page 58: ...ntium ProShare and Xeon are trademarks of Intel Corporation in the United States other countries or both Microsoft Windows and Windows NT are trademarks of Microsoft Corporation in the United States o...

Page 59: ...uit boards cables electromagnetic compatibility gaskets and connectors which may contain lead and copper beryllium alloys that require special handling and disposal at end of life Before this unit is...

Page 60: ...statement This Class A digital apparatus complies with Canadian ICES 003 Avis de conformit la r glementation d Industrie Canada Cet appareil num rique de la classe A est conforme la norme NMB 003 du...

Page 61: ...ays use the power cord and plug with a properly grounded outlet IBM power cords used in the United States and Canada are listed by Underwriter s Laboratories UL and certified by the Canadian Standards...

Page 62: ...gyzstan Laos People s Democratic Republic of Latvia Lebanon Lithuania Luxembourg Macedonia former Yugoslav Republic of Madagascar Mali Martinique Mauritania Mauritius Mayotte Moldova Republic of Monac...

Page 63: ...nes Taiwan United States of America Venezuela 24P6858 Korea Democratic People s Republic of Korea Republic of 34G0232 Japan 36L8880 Argentina Paraguay Uruguay 49P2078 India 49P2110 Brazil 6952300 Anti...

Page 64: ...52 IBM xSeries 345 Type 8670 Option Installation Guide...

Page 65: ...able 5 memory 4 microprocessor 4 port 6 SCSI 41 system board 4 system board switch block 7 Universal Serial Bus 42 VRM 4 D DIMM See memory module drive hot swap installing 23 internal 22 E electrical...

Page 66: ...connectors 6 input output 39 keyboard 40 parallel 42 pointing device 40 serial 41 Universal Serial Bus 42 power cords 49 power supply installing 31 operating requirements 31 power on password override...

Page 67: ...rning on the server 13 U United States electronic emission Class A notice 47 United States FCC Class A notice 47 Universal Serial Bus connector 42 Universal Serial Bus port 42 V video port 42 voltage...

Page 68: ...56 IBM xSeries 345 Type 8670 Option Installation Guide...

Page 69: ......

Page 70: ...Part Number 88P9190 Printed in U S A SC88 P919 00 1P P N 88P9190...

Reviews: