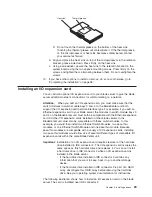
IDE drive
Tray
Riser
card
Short screws
Short screws
IDE connector 1
(J13)
IDE connector 2
(J62)
Complete the following steps to install a 2.5-inch IDE hard disk drive.
Note:
Do not install a hard disk drive in IDE connector 2 if you intend to also install
an optional I/O expansion card. The I/O expansion card occupies the same
area as the second IDE hard disk drive.
1. Review the information in “Safety” beginning on page vii and “Installation
guidelines” on page 19.
2. Shut down the operating system, turn off the blade server, and remove the
blade server from the BladeCenter unit. See “Removing the blade server from
the BladeCenter unit” on page 20 for instructions.
3. Carefully lay the blade server on a flat, non-conductive surface.
4. Open the blade server cover. See “Opening the blade server cover” on
page 21 for instructions.
5. Insert the riser card from the option kit into an IDE connector on the blade
server system board.
Important:
Drives must be installed in the following order: IDE connector 1
(J13) first, then IDE connector 2 (J62).
6. Place the hard disk drive tray from the option kit over the riser card as shown
in the illustration, aligning the tray with the screw holes on the system board.
The screw holes have screws in them.
7. Remove the tray temporarily; then, remove the screws from the screw holes on
the system board and replace the tray. Secure the tray to the system board
with screws from the kit.
8. Set any jumpers or switches on the hard disk drive.
Important:
Both IDE hard disk drives must be set to Master.
Attention:
Do not press on the top of the hard disk drive. Pressing the top
could damage the hard disk drive.
9. Place the hard disk drive into the tray and push it, from the rear edge of the
hard disk drive, into the connector on the riser card until the hard disk drive
moves past the lever at the back of the tray. The hard disk drive clicks into
place.
Chapter 3. Installing options
23
Summary of Contents for BladeCanter HS20
Page 3: ...BladeCenter HS20 Type 8832 Installation and User s Guide ERserver...
Page 7: ...Japanese Voluntary Control Council for Interference VCCI statement 83 Index 85 Contents v...
Page 8: ...vi BladeCenter HS20 Type 8832 Installation and User s Guide...
Page 14: ...xii BladeCenter HS20 Type 8832 Installation and User s Guide...
Page 26: ...12 BladeCenter HS20 Type 8832 Installation and User s Guide...
Page 32: ...18 BladeCenter HS20 Type 8832 Installation and User s Guide...
Page 58: ...44 BladeCenter HS20 Type 8832 Installation and User s Guide...
Page 66: ...52 BladeCenter HS20 Type 8832 Installation and User s Guide...
Page 68: ...54 BladeCenter HS20 Type 8832 Installation and User s Guide...
Page 98: ...84 BladeCenter HS20 Type 8832 Installation and User s Guide...
Page 102: ...88 BladeCenter HS20 Type 8832 Installation and User s Guide...
Page 103: ......
Page 104: ...Part Number 59P6556 Printed in U S A 1P P N 59P6556...


