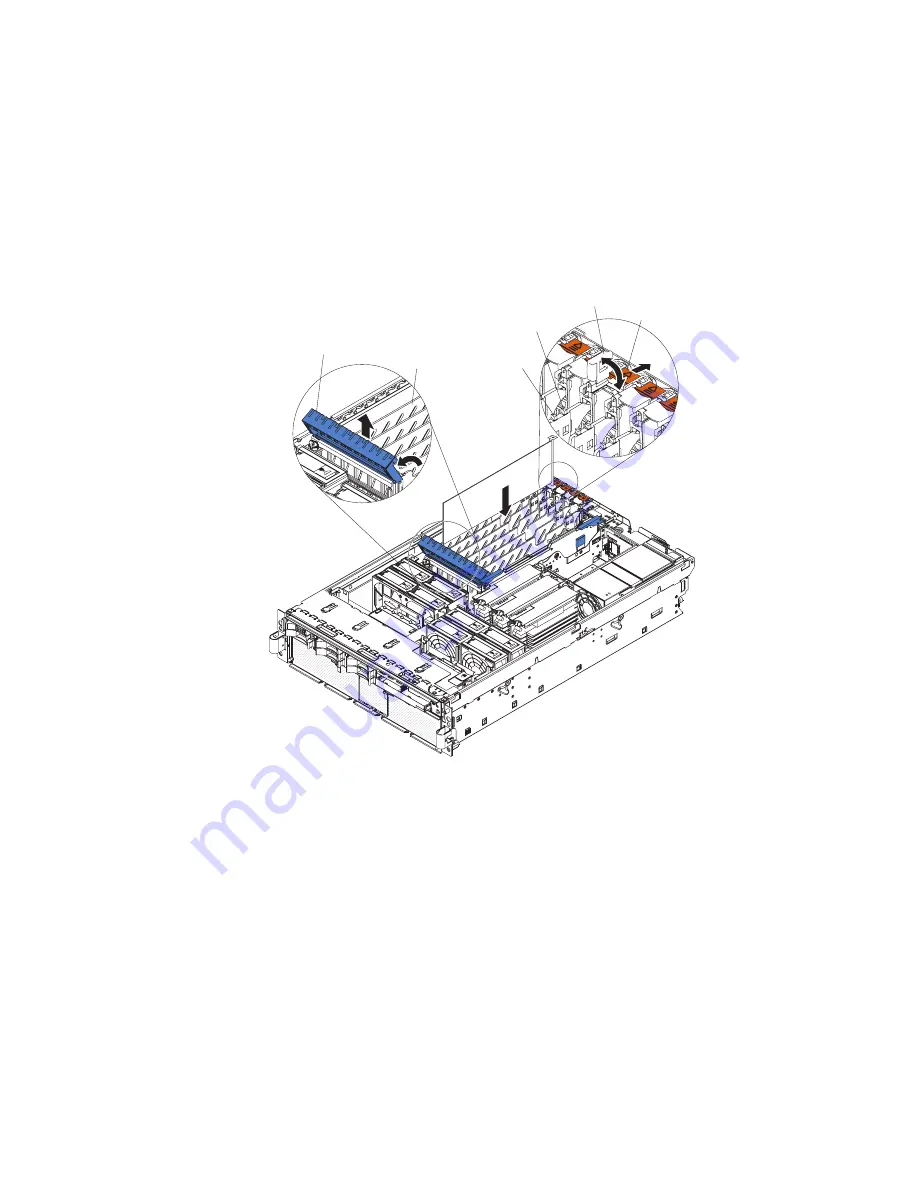
detailed
instructions
and
information
about
installing
PCI/PCI-X
adapters,
see
the
section
about
installing
options
in
the
User’s
Guide
on
the
IBM
Documentation
CD.
1.
Read
the
safety
information
that
begins
on
page
v
and
“Installation
guidelines”
on
page
7.
2.
If
the
adapter
is
not
hot-pluggable,
turn
off
the
server
and
peripheral
devices,
and
disconnect
the
power
cords
and
all
external
cables
necessary
to
remove
or
install
the
adapter.
3.
Remove
the
server
cover
and
determine
which
PCI-X
expansion
slot
you
will
use
for
the
adapter.
AC
DC
Tab
Adapter
retention
latch
Attention
LED
(yellow)
Power
LED
(green)
PCI-X retaining
bar
PCI-X
divider
4.
See
the
documentation
that
comes
with
the
adapter
for
instructions
for
setting
jumpers
or
switches
and
for
cabling.
Note:
Route
adapter
cables
before
you
install
the
adapter.
5.
Install
the
adapter:
a.
Open
the
blue
adapter
guide
by
lifting
the
front
edge.
b.
Push
the
orange
adapter
retention
latch
toward
the
rear
of
the
server
and
open
the
tab.
The
power
LED
for
the
slot
turns
off.
c.
Remove
the
expansion-slot
cover.
d.
Carefully
grasp
the
adapter
by
its
top
edge
or
upper
corners,
and
align
it
with
the
connector
on
the
PCI-X
board.
e.
If
necessary,
remove
the
adapter
guide
before
installing
a
full-length
adapter.
f.
Press
the
adapter
firmly
into
the
adapter
connector.
g.
Push
down
on
the
blue
PCI-X
retaining
bar
to
stabilize
the
adapter.
h.
Close
the
tab;
then,
push
down
on
the
orange
adapter
retention
latch
until
it
clicks
into
place,
securing
the
adapter.
20
IBM
System
x3950
Type
8872
and
System
x3950
E
Type
8874:
Installation
Guide
Summary of Contents for 88728AU - System x3950 - 8872 Datacenter High Availability
Page 3: ...IBM System x3950 Type 8872 and System x3950 E Type 8874 Installation Guide...
Page 42: ...30 IBM System x3950 Type 8872 and System x3950 E Type 8874 Installation Guide...
Page 68: ...56 IBM System x3950 Type 8872 and System x3950 E Type 8874 Installation Guide...
Page 104: ...92 IBM System x3950 Type 8872 and System x3950 E Type 8874 Installation Guide...
Page 105: ......
Page 106: ...Part Number 31R1855 Printed in USA 1P P N 31R1855...


