Chapter
3.
Server
controls,
LEDs,
and
power
This
section
describes
the
controls
and
light-emitting
diodes
(LEDs)
and
how
to
turn
the
server
on
and
off.
Front
view
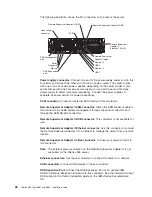
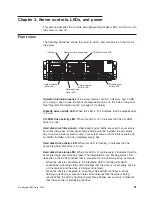
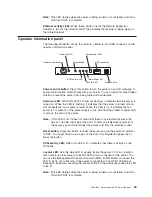
The
following
illustration
shows
the
controls,
LEDs,
and
connectors
on
the
front
of
the
server.
Operator information panel
CD-ROM activity LED
Hard disk drive
filler panel
Hard disk drive
activity LED
USB port
Hard disk drive
status LED
Diskette drive
activity LED
Operator
information
panel:
This
panel
contains
controls,
indicators,
and
a
USB
port.
Swing
it
open
to
see
the
light
path
diagnostics
LEDs
on
the
side
of
the
panel.
See
“Operator
information
panel”
on
page
33
for
details.
Diskette
drive
activity
LED:
When
this
LED
is
lit,
it
indicates
that
the
diskette
drive
is
in
use.
CD-ROM
drive
activity
LED:
When
this
LED
is
lit,
it
indicates
that
the
CD-ROM
drive
is
in
use.
Hard
disk
drive
filler
panels:
A
filler
panel
and
air
baffle
are
used
to
cover
empty
hard
disk
drive
bays.
A
filler
panel
and
air
baffle
must
be
installed
in
each
empty
bay
to
ensure
proper
system
cooling.
Your
server
comes
with
five
filler
panels
and
air
baffles
installed,
and
one
completely
empty
bay.
Hard
disk
drive
activity
LED:
When
this
LED
is
flashing,
it
indicates
that
the
associated
hard
disk
drive
is
in
use.
Hard
disk
drive
status
LED:
When
this
LED
is
lit
continuously,
it
indicates
that
the
associated
hard
disk
drive
has
failed.
The
interpretation
of
a
flashing
status
LED
depends
on
the
SCSI
controller
that
is
connected
to
the
hot-swap
drive,
as
follows:
v
When
the
drive
is
connected
to
the
integrated
SCSI
controller
with
RAID
capabilities,
a
flashing
status
LED
indicates
that
the
drive
is
a
secondary
drive
in
a
mirrored
pair
and
the
drive
is
being
synchronized.
v
When
the
drive
is
connected
to
an
optional
ServeRAID
controller,
a
slowly
flashing
(one
flash
per
second)
status
LED
indicates
that
the
drive
is
being
rebuilt.
When
the
LED
is
flashing
rapidly
(three
flashes
per
second),
it
indicates
that
the
controller
is
identifying
the
drive.
©
Copyright
IBM
Corp.
2003
31
Summary of Contents for 88625RX
Page 3: ...xSeries 365 Type 8861 and 8862 Installation Guide ERserver...
Page 54: ...42 xSeries 365 Type 8861 and 8862 Installation Guide...
Page 56: ...44 xSeries 365 Type 8861 and 8862 Installation Guide...
Page 90: ...78 xSeries 365 Type 8861 and 8862 Installation Guide...
Page 98: ...86 xSeries 365 Type 8861 and 8862 Installation Guide...
Page 102: ...90 xSeries 365 Type 8861 and 8862 Installation Guide...
Page 103: ......
Page 104: ...Part Number 25K9184 Printed in USA 1P P N 25K9184...

