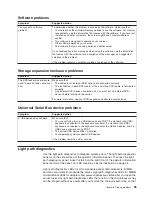
background image

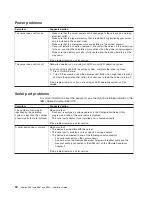
Power


problems


Symptom


Suggested


action


The


server


does


not


turn


on.


v


Make


sure


that


the


server


power


cord


is


connected


to


the


server


and


a


working


electrical


outlet.


v


Make


sure


that


the


type


of


memory


that


is


installed


is


supported


by


your


server


and


is


installed


in


the


correct


order.


v


Make


sure


that


the


microprocessors


are


installed


in


the


correct


sockets.


v


If


you


just


installed


an


option,


remove


it,


and


restart


the


server.


If


the


server


now


turns


on,


you


might


have


installed


more


options


than


the


power


supply


supports.


v


Make


sure


the


memory


cassette


is


fully


seated


and


the


locking


handle


is


all


the


way


down.

If


the


problem


remains,


call


for


service.


The


server


does


not


turn


off.


Determine


whether


you


are


using


an


ACPI


or


non-ACPI


operating


system.


If


you


are


using


a


non-ACPI


operating


system,


complete


the


following


steps:


1.


Press


Ctrl+Alt+Delete.


2.


Turn


off


the


server


by


using


the


power-control


button.


You


might


need


to


press


and


hold


the


power-control


button


for


5


seconds


to


force


the


server


to


turn


off.

If


the


problem


remains


or


if


you


are


using


an


ACPI


operating


system,


call


for


service.


Serial


port


problems


For


more


information


about


the


serial


port,


see


the


Option


Installation


Guide


on


the


IBM


xSeries


Documentation


CD.


Symptom


Suggested


action


The


number


of


serial


ports


identified


by


the


operating


system


is


less


than


the


number


of


serial


ports


that


are


installed.


Make


sure


that:


v


Each


port


is


assigned


a


unique


address


in


the


Configuration/Setup


Utility


program


and


none


of


the


serial


ports


is


disabled.


v


The


serial


port


adapter,


if


you


installed


one,


is


seated


correctly.

If


the


problem


remains,


call


for


service.


A


serial


device


does


not


work.


Make


sure


that:


v


The


device


is


compatible


with


the


server.


v


The


serial


port


is


enabled


and


is


assigned


a


unique


address.


v


The


device


is


connected


to


one


of


the


following


serial


connectors:


The


serial


connector


on


the


server


chassis.


A


serial


port


on


the


Remote


Supervisor


Adapter


II


breakout


cable


and


the


breakout


cable


is


connected


to


the


ASM


port


on


the


REmote


Supervisor


Adapter


II.

If


the


problem


remains,


call


for


service.


54


xSeries


365


Type


8861


and


8862:


Installation


Guide

Summary of Contents for 88625RX

Page 1: ...n Guide Go to the Server Support flowchart Cable the server and options Start the server Install options Drives Microprocessors Adapters Memory Power Supply Did the server start correctly Yes No Use S...

Page 2: ...r loose connections and verify that all optional devices you installed are on the ServerProven list You can view the ServerProven list at http www ibm com pc compat Server working properly Problem sol...

Page 3: ...xSeries 365 Type 8861 and 8862 Installation Guide ERserver...

Page 4: ...ent of Limited Warranty Z125 4753 07 11 2002 on page 61 and Appendix C Notices on page 79 Fourth Edition June 2004 Copyright International Business Machines Corporation 2003 All rights reserved US Gov...

Page 5: ...er and bezel 26 Connecting the cables 27 Updating the server configuration 29 Chapter 3 Server controls LEDs and power 31 Front view 31 Rear view 32 Operator information panel 33 Light path diagnostic...

Page 6: ...ervice and support 60 Hardware service and support 60 Appendix B IBM Statement of Limited Warranty Z125 4753 07 11 2002 61 Part 1 General Terms 61 Part 2 Country unique Terms 64 Part 3 Warranty Inform...

Page 7: ...alleert eerst de veiligheidsvoorschriften Ennen kuin asennat t m n tuotteen lue turvaohjeet kohdasta Safety Information Avant d installer ce produit lisez les consignes de s curit Vor der Installation...

Page 8: ...Antes de instalar este producto lea la informaci n de seguridad L s s kerhetsinformationen innan du installerar den h r produkten vi xSeries 365 Type 8861 and 8862 Installation Guide...

Page 9: ...r reconfiguration of this product during an electrical storm v Connect all power cords to a properly wired and grounded electrical outlet v Connect to properly wired outlets any equipment that will be...

Page 10: ...s DVD drives fiber optic devices or transmitters are installed note the following v Do not remove the covers Removing the covers of the laser product could result in exposure to hazardous laser radiat...

Page 11: ...power control button on the device and the power switch on the power supply do not turn off the electrical current supplied to the device The device also might have more than one power cord To remove...

Page 12: ...esent inside any component that has this label attached There are no serviceable parts inside these components If you suspect a problem with one of these parts contact a service technician Statement 1...

Page 13: ...ck for updated documentation and technical updates 1 Go to http www ibm com pc support 2 In the Learn section click Online publications 3 On the Online publications page in the Brand field select Serv...

Page 14: ...rvice Pack 3 or later Windows 98 or Windows 2000 or Red Hat Linux v 100 MHz microprocessor v 32 MB of RAM v Adobe Acrobat Reader 3 0 or later or xpdf which comes with Linux operating systems Note Acro...

Page 15: ...listed in order of the most occurrences Click a book to view it and press Crtl F to use the Acrobat search function or Alt F to use the xpdf search function within the book Click Help for detailed inf...

Page 16: ...v Depth 715 mm 28 14 in v Width 444 mm 17 46 in v Weight 29 kg 63 lb to 38 kg 83 lb depending upon configuration Integrated functions v IBM XA 32 Chipset with integrated memory I O controller and rem...

Page 17: ...p or hot plug components You can install or remove these components while the system is running provided that the system is configured to support hot swap and hot plug components For information about...

Page 18: ...ckplane Hot swap fans Operator information panel Hot swap Hard disk drive Hard disk drive filler panel Hard disk drive air baffle CD ROM drive Bezel Heat sink Microprocessor Microprocessor baffle xSer...

Page 19: ...while the server is running provided that the server is configured to support this capability See the instructions in this chapter for more information about removing and installing hot swap and hot p...

Page 20: ...ovement Movement can cause static electricity to build up around you v Handle the device carefully holding it by its edges or its frame v Do not touch solder joints pins or exposed circuitry v Do not...

Page 21: ...of memory in the server by replacing the DIMMs with higher capacity DIMMs or installing additional pairs of DIMMs in open sockets The server supports 512 MB 1 GB and 2 GB DIMMs See the ServerProven li...

Page 22: ...nd 8 Eighth pair DIMMs 9 and 11 16 DIMM memory board in mirrored mode First quad DIMMs 1 3 14 and 16 Second quad DIMMs 2 4 13 and 15 Third quad DIMMs 5 7 10 and 12 Fourth quad DIMMs 6 8 9 and 11 Use t...

Page 23: ...n you restart the server after adding or removing a pair or quad of DIMMs the server displays a message that the memory configuration has changed Complete the following steps to install DIMMs 1 Review...

Page 24: ...l external cables Remove the top cover see Removing the cover and bezel on page 8 A C D C P S 2 P S 1 3 Open the two DIMM access doors on the top of the memory cassette 4 Open the retaining clip on ea...

Page 25: ...activity LED and an amber status LED in the upper right corner The activity LED flashes when the drive is active the status LED is lit if the drive has an error Each hot swap drive has a single connec...

Page 26: ...need to reconfigure the disk arrays after installing hard disk drives See the documentation that comes with the adapter for more information Installing a PCI or PCI X adapter Attention The Remote Supe...

Page 27: ...6i adapter it must be installed in slot 2 v If you install an IXA adapter it must be installed in slot 3 and you must set the IXA jumper Instructions for setting the IXA jumper are provided in the Opt...

Page 28: ...ID adapter for any additional cabling instructions That documentation also provides information about installing the RAID software and configuring the RAID adapter For a list of supported RAID adapter...

Page 29: ...to the I O board or to the adapter 6 Connect any required cables to the adapter 7 If you have other options to install or remove do so now otherwise go to Completing the installation on page 26 Instal...

Page 30: ...rror LED v If one microprocessor is installed The microprocessor is installed in microprocessor connector 1 U22 The microprocessor supports both the startup and application processes v If you install...

Page 31: ...c order starting with connector 2 If you install the microprocessors in the wrong order the server will not turn on v Avoid touching the components and pins on the microprocessor Make sure that the mi...

Page 32: ...4 Remove the microprocessor tray a Remove the memory cassette 20 xSeries 365 Type 8861 and 8862 Installation Guide...

Page 33: ...latch 1 Microprocessor tray levers Microprocessor tray release latch d Open the microprocessor tray levers 2 e Pull out the microprocessor tray 3 Attention The microprocessor tray is heavy Pull the tr...

Page 34: ...s 3 and 4 5 Remove the microprocessor baffle from the empty microprocessor socket and store the microprocessor baffle for future use 6 Remove the protective cover tape or label from the surface of the...

Page 35: ...rew fully before loosening the other captive screw helps break the bond between the components without damaging them 10 Remove the heat sink from its package and remove the cover from the bottom of th...

Page 36: ...tions to install or remove do so now otherwise go to Completing the installation on page 26 Installing a hot swap power supply The following notes describe information that you must consider when inst...

Page 37: ...roblem with one of these parts contact a service technician Power supply 2 PS2 Locking handle open Locking latch DC power LED green Fan LED amber AC power LED green Power supply 1 PS1 AC DC A C D C A...

Page 38: ...it also 8 Continue with Completing the installation Completing the installation This section describes how to complete the installation Installing the cover and bezel Complete the following steps to i...

Page 39: ...the Configuration Setup Utility program to enable keyboardless operation and prevent POST error message 301 from being displayed during startup For detailed information about the USB keyboard and how...

Page 40: ...r Remote Supervisor Adapter II ASM connector Attach the ASM breakout cable to this connector to enable system management through the serial connectors and through the ASM RS 485 connectors Remote Supe...

Page 41: ...with the server are in the Rack Installation Instructions that come with the server Notes 1 See the documentation that comes with the option for additional cabling instructions It might be easier for...

Page 42: ...he server has an optional RAID adapter and you have installed or removed a hard disk drive see the documentation that comes with the RAID adapter for information about reconfiguring the disk arrays Fo...

Page 43: ...er empty hard disk drive bays A filler panel and air baffle must be installed in each empty bay to ensure proper system cooling Your server comes with five filler panels and air baffles installed and...

Page 44: ...ing normally When the LED is lit continuously there is a problem with the Remote Supervisor Adapter II When the LED is off the Remote Supervisor Adapter II is not functioning This LED is the topmost L...

Page 45: ...LED is off it indicates that ac power is not present or the power supply or the LED itself has failed A power LED is also on the rear of the server Note If this LED is off it does not mean that there...

Page 46: ...lit it indicates that power supply 1 has failed PS2 LED When this LED is lit it indicates that power supply 2 has failed TEMP LED When this LED is lit it indicates that the system temperature has exce...

Page 47: ...n on the server The power on LED flashes to indicate that the server is connected to ac power but not turned on Turning on the server Approximately 20 seconds after the server is connected to ac power...

Page 48: ...ource 1 2 The server can be turned off in any of the following ways v You can turn off the server from the operating system if your operating system supports this feature After an orderly shutdown of...

Page 49: ...provide device drivers and help you install your operating system For information about the supported operating system versions see the label on the CD Complete the following steps to start the Server...

Page 50: ...from http www ibm com pc support Consider the following information when using the LSI Logic Configuration Utility program and ServeRAID Manager to configure and manage arrays v Use the ServeRAID Mana...

Page 51: ...a different type of RAID adapter in your server use the configuration method described in the instructions that come with that adapter to view or change SCSI settings for attached devices See the Ser...

Page 52: ...onfiguration 3 Click Next The Configuration summary window opens 4 Review the information in the Configuration summary window To change the configuration click Modify arrays 5 Click Apply then click Y...

Page 53: ...AID Manager and remove the CD from the CD ROM drive 11 Restart the server Viewing the configuration You can use ServeRAID Manager to view information about RAID controllers and the RAID subsystem such...

Page 54: ...42 xSeries 365 Type 8861 and 8862 Installation Guide...

Page 55: ...vice driver for your server and operating system f Click the file link for the executable file to download the file and follow the instructions in the readme file to install the device driver 2 Instal...

Page 56: ...44 xSeries 365 Type 8861 and 8862 Installation Guide...

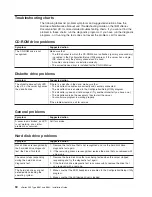
Page 57: ...hooting charts These charts list problem symptoms and steps to correct the problems See Troubleshooting charts on page 50 for more information v Diagnostic programs and error messages The system diagn...

Page 58: ...ter test has failed 2 1 3 Primary interrupt mask register test has failed 2 1 4 Secondary interrupt mask register test has failed 2 2 1 Interrupt vector loading has failed 2 2 2 Keyboard controller te...

Page 59: ...ains call for service Important In some memory configurations the 3 3 3 beep code might sound during POST followed by a blank monitor screen If this occurs and the Boot Fail Count feature in the Start...

Page 60: ...d Make sure that all installed DIMMs are supported by your server and that they are installed correctly 301 303 Keyboard and keyboard controller Make sure that the keyboard cable is connected and that...

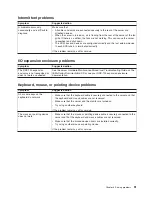
Page 61: ...talled v Make sure that there are no duplicate SCSI IDs or IRQ assignments v Make sure that the hard disk drive is connected correctly The operating system installation program continuously loops Make...

Page 62: ...abled in the Configuration Setup Utility program v The diskette is good and not damaged Try another diskette if you have one v The diskette contains the necessary files to start the server v Your soft...

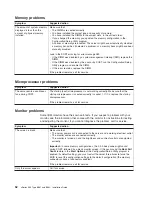
Page 63: ...expected See the server Hardware Maintenance Manual and Troubleshooting Guide on the IBM xSeries Documentation CD or see your RXE 100 expansion enclosure documentation Keyboard mouse or pointing devic...

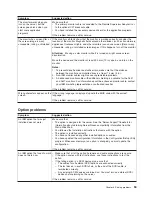
Page 64: ...ly Make sure that the startup microprocessor is seated correctly in socket 1 If it is replace the startup microprocessor If the problem remains call for service Monitor problems Some IBM monitors have...

Page 65: ...able contact your IBM marketing representative or authorized reseller If the problem remains call for service Wrong characters appear on the screen If the wrong language is displayed update the BIOS c...

Page 66: ...for 5 seconds to force the server to turn off If the problem remains or if you are using an ACPI operating system call for service Serial port problems For more information about the serial port see t...

Page 67: ...urning on the server For more information see your SCSI expansion enclosure documentation Universal Serial Bus device problems Symptom Suggested action A USB device does not work Make sure that v You...

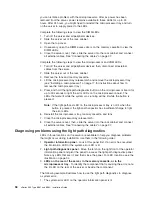
Page 68: ...m was running will be lit while the button is pressed Note If the light path test LED on the microprocessor tray is not lit when the button is pressed the light path capacitor has insufficient charge...

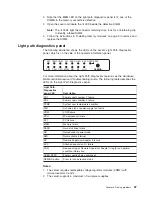
Page 69: ...Maintenance Manual and Troubleshooting Guide The following table describes the LEDs on the Light Path Diagnostics panel Light Path Diagnostics panel LED Description PS1 Power supply number 1 failure...

Page 70: ...til one of the following conditions occurs v All known problems are resolved v The system is restarted v A new problem occurs You can use the Remind button to delay server maintenance until a later ti...

Page 71: ...nce by following the troubleshooting procedures that IBM provides in the online help or in the publications that are provided with your system and software The information that comes with your system...

Page 72: ...ut which products are supported by Support Line in your country or region go to http www ibm com services sl products For more information about Support Line and other IBM services go to http www ibm...

Page 73: ...e removal of parts and their return to IBM A part that replaces a removed part will assume the warranty service status of the removed part Unless IBM specifies otherwise these warranties apply only in...

Page 74: ...s from an IBM Internet Web site or from other electronic media and following the instructions that IBM provides If your problem can be resolved with a Customer Replaceable Unit CRU e g keyboard mouse...

Page 75: ...sit in those cases where IBM is responsible for the transportation charges Neither IBM nor your reseller are responsible for any of your confidential proprietary or personal information contained in a...

Page 76: ...ies and obligations are subject to the courts of the country in which you acquired the Machine Part 2 Country unique Terms AMERICAS ARGENTINA Governing Law The following is added after the first sente...

Page 77: ...goods are of a kind ordinarily acquired for personal domestic or household use or consumption then none of the limitations in this paragraph apply Governing Law The following replaces laws of the cou...

Page 78: ...is added under this heading Disputes arising out of or in connection with this Statement of Limited Warranty shall be finally settled by arbitration which shall be held in Bangalore India in accordan...

Page 79: ...MAGES MORAL INCIDENTAL OR INDIRECT DAMAGES FOR ANY ECONOMIC CONSEQUENTIAL DAMAGES OR Arbitration The following is added under this heading Disputes arising out of or in connection with this Statement...

Page 80: ...ia or Ukraine you may obtain warranty service for that Machine in any of those countries from either 1 an IBM reseller approved to perform warranty service or 2 from IBM If you purchase a Machine in a...

Page 81: ...registered office and or commercial site location only are competent 4 in France Algeria Benin Burkina Faso Cameroon Cape Verde Central African Republic Chad Comoros Congo Republic Djibouti Democrati...

Page 82: ...Helsinki will appoint the chairman EUROPEAN UNION EU THE FOLLOWING TERMS APPLY TO ALL EU COUNTRIES Consumers have legal rights under applicable national legislation governing the sale of consumer goo...

Page 83: ...nternal Code LIC The above limitation shall not apply to damages for bodily injuries including death and damages to real property and tangible personal property for which IBM is legally liable 2 UNDER...

Page 84: ...sed Internal Code LIC Applicability of suppliers and resellers unchanged FRANCE Limitation of Liability The following replaces the second sentence of the first paragraph of this section In such instan...

Page 85: ...tion Except as expressly provided in these terms and conditions all statutory conditions including all warranties implied but without prejudice to the generality of the foregoing all warranties implie...

Page 86: ...claim from IBM UNITED KINGDOM Limitation of Liability The following replaces the terms of this section in its entirety For the purposes of this section a Default means any act statement omission or n...

Page 87: ...inistrative Region of China Machine IBM Eserver xSeries 365 Type 8861 Country or Region of Purchase Warranty Period Type of Warranty Service Worldwide 1 year 1 and 2 See Types of Warranty Service for...

Page 88: ...your Machine and deliver it to the designated service center Following its repair or exchange IBM will arrange the return delivery of the Machine to your location You are responsible for its installa...

Page 89: ...7 450 Spain 34 91 662 4916 Germany 07032 15 4920 Sweden 46 8 477 4420 Greece 30 210 688 1220 United Kingdom 01475 555 055 Ireland 353 1 815 4000 Appendix B IBM Statement of Limited Warranty Z125 4753...

Page 90: ...78 xSeries 365 Type 8861 and 8862 Installation Guide...

Page 91: ...TY OF ANY KIND EITHER EXPRESS OR IMPLIED INCLUDING BUT NOT LIMITED TO THE IMPLIED WARRANTIES OF NON INFRINGEMENT MERCHANTABILITY OR FITNESS FOR A PARTICULAR PURPOSE Some states do not allow disclaimer...

Page 92: ...her countries or both Microsoft Windows and Windows NT are trademarks of Microsoft Corporation in the United States other countries or both UNIX is a registered trademark of The Open Group in the Unit...

Page 93: ...bility gaskets and connectors which may contain lead and copper beryllium alloys that require special handling and disposal at end of life Before this unit is disposed of these materials must be remov...

Page 94: ...te the equipment This device complies with Part 15 of the FCC Rules Operation is subject to the following two conditions 1 this device may not cause harmful interference and 2 this device must accept...

Page 95: ...may cause radio interference in which case the user may be required to take adequate measures Taiwanese Class A warning statement Chinese Class A warning statement Japanese Voluntary Control Council...

Page 96: ...s for a specific country or region are usually available only in that country or region Power cord rating IBM power cord part number 2 5 m Used in these countries and regions 15 A 125 V ac 12J5112 Ant...

Page 97: ...ncipe Saudi Arabia Senegal Serbia Slovakia Slovenia Republic of Somalia Spain Suriname Sweden Syrian Arab Replublic Tajikistan Tahiti Togo Tunisia Turkey Turkmenistan Ukraine Upper Volta Uzbekistan Va...

Page 98: ...86 xSeries 365 Type 8861 and 8862 Installation Guide...

Page 99: ...electronic emission Class A notice 82 environment specifications 4 error messages POST 48 F FCC Class A notice 82 features 4 H hard disk drive activity LED 31 problems 50 status LED 31 types supporte...

Page 100: ...lling 24 specifications 4 power control button shield 33 problems CD ROM drive 50 diskette drive 50 general 50 hard disk drive 50 I O expansion enclosure 51 intermittent 51 keyboard 51 memory 52 micro...

Page 101: ...W Web site server compatibility information 2 weight specifications 4 working inside a server with power on 7 Index 89...

Page 102: ...90 xSeries 365 Type 8861 and 8862 Installation Guide...

Page 103: ......

Page 104: ...Part Number 25K9184 Printed in USA 1P P N 25K9184...

Reviews: