background image

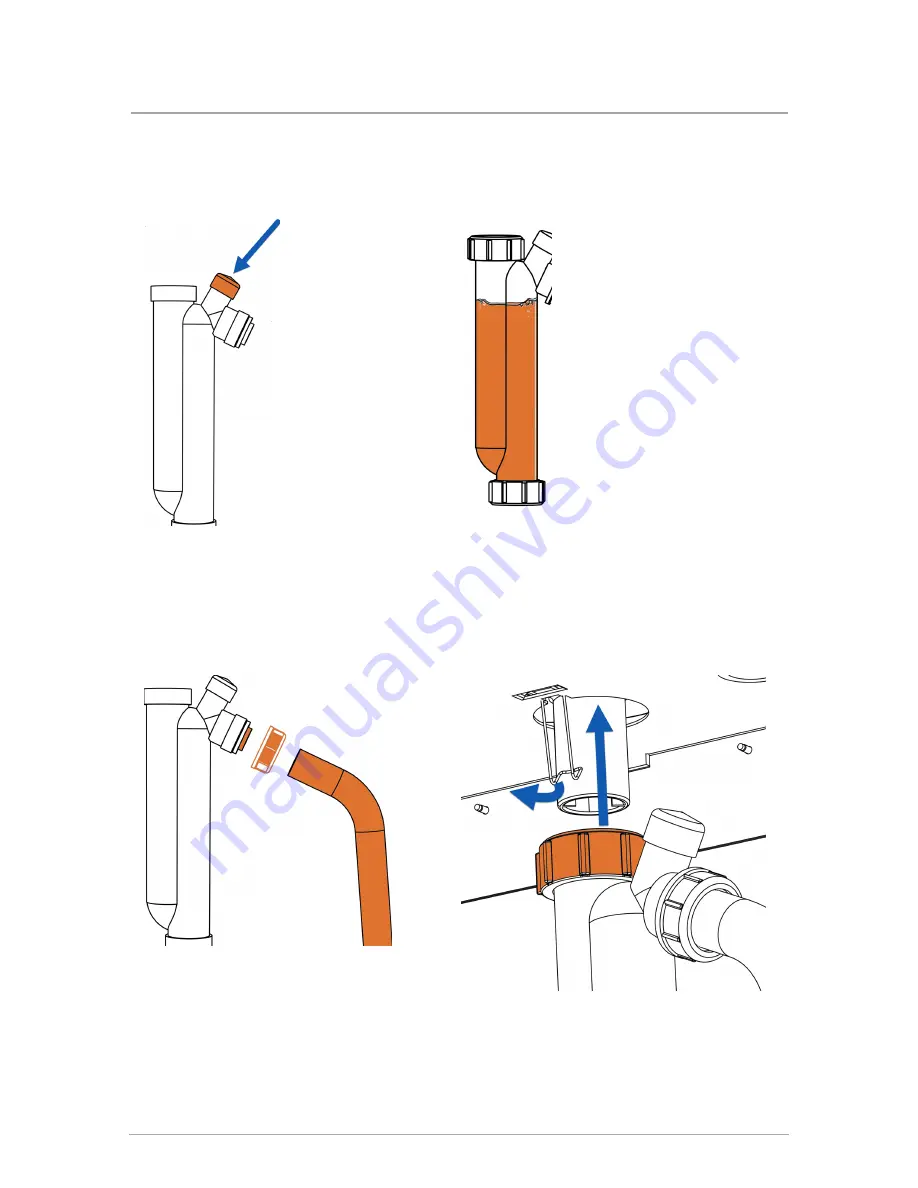
1.

Place the vacuum breaker cap over the
vacuum breaker opening and push
firmly.

2.

Fill the condensate trap with water.

3.

Attach the drain hose and tighten the
drain compression nut (including
washer).

4.

Slide the trap over the boiler drain
outlet, and tighten upper union nut.

44

Section: Installation

Summary of Contents for CX Series

Page 1: ...nity of this or any other appliance If you smell gas Do not try to light any appliance Do not touch any electrical switch do not use any phone in your building Immediately call your gas supplier from...

Page 2: ...in the system A high water volume system with a low hardness count may cause as much damage as a system with less volume and higher hardness so it is recommended to treat water so as to reduce dissolv...

Page 3: ...oving an existing boiler 19 3 3 Determining location of the appliance 20 3 3 1 Best installation conditions 21 3 4 Mounting the boiler 21 3 5 Connecting the vent and air intake pipes 23 3 6 Installati...

Page 4: ...es in place of pumps 68 3 14 6 Thermostat heat anticipator 69 4 0 About the boiler controller 71 4 1 Controller 71 4 2 Control interface 72 5 0 Before operating the boiler 73 Important pre ignition ch...

Page 5: ...s 98 7 6 Cleaning the condensate trap 98 7 7 Ensure door in place 101 8 0 Troubleshooting 103 8 1 Electronic components 103 8 1 1 Temperature sensors 103 8 1 2 Fan 104 8 1 3 Water pressure sensor 104...

Page 6: ...Boiler part diagrams CX 150 CX 199 118 Installation Commissioning Report 122 6 Section Contents...

Page 7: ...oints out installation maintenance and operational notes to enhance efficiency longevity and proper operation of the boiler Important safety instructions Installation start up and servicing of IBC boi...

Page 8: ...se any phone in the building Immediately call the gas supplier from a phone located remotely Follow the gas supplier s instructions or if the supplier is unavailable contact the fire department Warnin...

Page 9: ...to do so could result in damage to appliance and or electric shock Caution The boiler must be installed so that electrical components are not exposed to water during operation Known contaminants Known...

Page 10: ...Intentionally left empty...

Page 11: ...F 1 C Maximum water temp electronic hi limit 190 F 88 C 190 F 88 C Max T supply return electronic fence 40 F 22 2 C 40 F 22 2 C Max water temperature lockout limit 201 F 94 C 201 F 94 C Power use 120...

Page 12: ...Trial for Ignition 4 seconds Flame Failure Response 0 8 second Domestic Hot Water Delivery 70 F 39 C temperature rise CX 150 4 1 GPM CX 199 5 5 GPM Cabinet dimensions CX 150 dimensions Figure 1 Front...

Page 13: ...Figure 2 Top and bottom view CX 150 CX 199 dimensions Figure 3 Front and side view CX 199 13 CX 199 dimensions...

Page 14: ...0 or 3 PP 80 mm 3 Schedule 40 or 3 PP 80 mm B Combustion Air Inlet 3 Schedule 40 or 3 PP 80 mm 3 Schedule 40 or 3 PP 80 mm C Boiler Return Water Inlet 1 NPT M 1 NPT M D Boiler Supply Water Outlet 1 NP...

Page 15: ...rom the front 1 1 Standard features and benefits High thermal efficiency Coordinated Boiler and DHW circuits Compact Turn down ratio 10 to 1 Cascade up to 4 appliances 4 load pump management Built in...

Page 16: ...lowing terms 0 10 years 100 coverage 11 15 years 25 coverage IBC offers a limited combustion heat exchanger warranty with no registration of 0 5 years 100 coverage For commercial applications IBC offe...

Page 17: ...m interior dust sources Do not seal boiler case openings directly when firing allow for air circulation and ventilation in the immediate area Place the exhaust outlet 12 minimum above the down turned...

Page 18: ...well away from all building air intakes including those of neighboring properties Caution Care must be taken to properly size the boiler for its intended use Prolonged full fire run time over sizing...

Page 19: ...lers ANSI ASME CSD 1 If there is any conflict follow the more stringent regulations Table 2 Code requirements by country 3 2 Removing an existing boiler When an existing boiler is removed from a commo...

Page 20: ...ed and approved for indoor installation wall or rack mounting in areas such as an alcove basement or utility room These areas should have a surrounding temperature of 32 F 0 C to 122 F 50 C and less t...

Page 21: ...d exhaust pipes should terminate at a rooftop or sterile wall location to maximize customer satisfaction Keep exhaust plumes well away from all building air intakes including those of neighboring prop...

Page 22: ...pliance to hollow wall structures The combined weight of the boiler its water content and associated piping components can exceed 113 pounds Fasteners must be rated for this strain and must be firmly...

Page 23: ...6 Securing a pipe connection Combustion air piping if used is inserted directly into the 3 connector on the right side PP pipe should be inserted firmly into the connector until it cannot go further T...

Page 24: ...nimum distance below the boiler of 12 is required to provide clearance for the supplied condensation trap assembly More clearance will typically be required to accommodate associated water and gas pip...

Page 25: ...otherwise unused chimney as a vent raceway 3 7 3 Exhaust vent material Warning Covering non metallic vent pipe and fittings with thermal insulation is prohibited Exhaust vent material Canada Use PVC...

Page 26: ...nal Refer to the vent terminal configuration drawings in the Vent Termination sections Flue gas exhaust to outdoors Combustion air from outdoors Direct Vent installation check air intake outside is cl...

Page 27: ...e based on the severity of the problem Exhaust venting installation Exhaust venting must slope down towards the boiler with a pitch of at least per foot PP vent follow PP manufacturer requirements for...

Page 28: ...ng and floor Confirm material meets local codes including fire stopping requirements Check the local jurisdiction on the minimum initial length of pipe that should be exposed or accessible for inspect...

Page 29: ...he exhaust Unequal intake and exhaust piping is allowed Support should be provided for intake and vent piping particularly for horizontal runs follow local code Example of equivalent length calculatio...

Page 30: ...t concern about rain infiltration rain will drain away through the condensate trap Optional bird screen may be placed in a termination fitting Leave unglued and hold in place with a short nipple This...

Page 31: ...on noise allow a gap around the exhaust and air intake piping For roof top venting of multiple boiler sets group all intake terminals together for a common penetration through a custom cap Alternative...

Page 32: ...kits when the outdoor temperature drops below 5 F 15 C Possible blockage of the combustion air intake can occur when the outdoor temperature drops below this temperature 3 7 6 Sidewall vent terminatio...

Page 33: ...Vent terminal Air supply inlet Area where terminal is not permitted Figure 11 Minimum clearances from vent air inlet terminations 33 3 7 6 Sidewall vent termination...

Page 34: ...ator within 3 ft 91 cm horizontally of the vertical center line of the regulator vent outlet to a maximum vertical distance of 15 ft 4 5 m J Clearance to non mechanical air supply inlet to building or...

Page 35: ...style after passing through the wall to gain the required clearance as shown in Figure 12 and Figure 13 Use a 45 elbow on the exhaust termination to launch the plume up and off the sidewall for protec...

Page 36: ...he boiler can result from a failure to maintain these separations Third party vent termination kits and concentric wall penetration kits that do not maintain these minimum separations must not be used...

Page 37: ...4 Vent termination clearance vertical alignment Figure 15 Vent termination clearances vertical alignment side view Figure 16 Sidewall vent termination configuration option 1 37 3 7 6 Sidewall vent ter...

Page 38: ...lculation for exhaust in the preceding table is used Install the SST to comply with the minimum vent clearances listed in Table 5 Install the SST with the vent and intake pipes horizontally beside eac...

Page 39: ...SST Install multiple vent SST installations level with one another and maintain at least the minimum separation distances shown below The terminals shall not be stacked vertically Figure 20 Minimum se...

Page 40: ...ombustion air is drawn from outdoors combustion venting should also transition to vertical and terminations should observe the limitations shown for rooftop terminations 3 7 7 Indoor air combustion ai...

Page 41: ...on air must be made as follows in the USA in accordance with the National Fuel Gas Code ANSI Z223 1 latest edition or applicable provisions of the local building codes in Canada in compliance with B14...

Page 42: ...ch as a closet ventilation openings may be needed through a door or wall to prevent excessive heat from building up inside the space The appliance must not be exposed to surrounding air above 122 F 50...

Page 43: ...water When required add and maintain in good condition a neutralization tank For information on installing a condensate neutralizer see Installing a condensate neutralizer on page 45 The condensate t...

Page 44: ...breaker opening and push firmly 2 Fill the condensate trap with water 3 Attach the drain hose and tighten the drain compression nut including washer 4 Slide the trap over the boiler drain outlet and t...

Page 45: ...ding drain piping materials that are subject to corrosion use a neutralization package Caution After installing a condensate neutralization package the pH of the condensate discharge must be measured...

Page 46: ...tering Condensate water line Warning Risk of damage to appliance All condensate discharge lines including neutralization tank inlet must be at a lower elevation than the condensate water line of the a...

Page 47: ...rformance of a boiler s heat exchanger Improperly prepared water in a heating circuit may cause damage to the heat exchanger through fouling or corrosion Repeated or uncontrolled water fills will incr...

Page 48: ...hydronic heating systems of mixed materials Improper mixtures and chemical additives may cause damage to ferrous and non ferrous components as well as non metallic wetted components normally found in...

Page 49: ...a discharge line that Is connected from the valve outlet with no intervening valve and directed downward to a safe point of discharge Allows complete drainage of both the valve and the discharge line...

Page 50: ...e site 3 11 2 System piping Note The piping drawings in this manual are simple schematic guides to a successful installation For further information and details consult our concept drawings which prov...

Page 51: ...CW Space heating return Figure 28 Piping connections Pressure relief valve required shipped with boiler Important Shut off valves are not allowed between the relief valve and the boiler Space heating...

Page 52: ...commended Thermostatic tempering valve if required by local code Domestic water DHW relief valve Primary loop circulator built into return side of boiler Figure 30 Boiler trim options single boiler Fl...

Page 53: ...s use a primary secondary piping system with a boiler loop piped in 1 or 1 Primary Secondary piping ensures adequate flow and de couples T issues boiler vs distribution Aim for a 20 F to 30 F T across...

Page 54: ...n on secondary loops extending vertically to a load above the primary loop especially where head loss is low install check valves on both supply and return of secondary piping or install a check valve...

Page 55: ...solation valves Thermostatic mixing valve for the lower temperature emitter required for simultaneous operation of two space heating temperatures Thermostatic tempering valve if required by local code...

Page 56: ...few cases C the internal pump will be adequate to provide flow through the building s heat emitters Ensure that the internal pump is powerful enough for system distribution Avoid D where an external...

Page 57: ...Air handler Closely spaced tees Circulator sized for secondary piping only Figure 35 Air handler on primary loop and direct domestic water piping 57 3 11 2 System piping...

Page 58: ...k valve typical of each boiler Closely spaced tees Domestic water Thermostatic tempering valve if required by local code From building To building Figure 36 Multiple boiler piping 58 Section Installat...

Page 59: ...ow sensor and the appliance fires up to begin generating domestic hot water We strongly recommend treating hard water and adjusting the pH between 6 5 and 8 5 Refer to the table on drinking water guid...

Page 60: ...scald hazard or if codes require specific water temperatures at the hot water faucet the installer may Install a field supplied thermostatic mixing valve at this appliance and ensure it is working pr...

Page 61: ...meant to be left open if not used to allow for the air in the coil to expand and contract as the appliance is in operation 3 12 2 Domestic hot water piping The domestic water piping connections are l...

Page 62: ...hot water with a water pressure lower than 40 PSI reduces the amount of hot water generated and increases the risk of scaling in the heat exchanger The domestic hot and cold water connections must be...

Page 63: ...ing valve may be installed on the direct domestic hot water piping connections at the appliance or at the outlet of a domestic hot water storage tank if using the domestic hot water function Failure t...

Page 64: ...er s minimum specification at all firing rates and will not exceed the boiler s maximum pressure rating when locked up with no load 3 13 1 Gas pressure The boilers require a minimum inlet gas supply p...

Page 65: ...during any pressure testing of the system at test pressures in excess of psig Dissipate test pressure prior to reconnecting The boiler and its gas piping must be leak tested before being placed into...

Page 66: ...emoving power to the boiler This will interrupt the moisture management routine fan turns at ultra low RPM for 90 minutes after burner shutdown resulting in serious damage to the boiler Treat the boil...

Page 67: ...s drawing over 1 3 HP use a protective relay 3 14 2 2 Boiler pump The boiler primary pump is factory installed and wired Pumps can be switched on off using the touchscreen controller so there is no ne...

Page 68: ...l boiler controller for direct throttle control The boiler s own sensors act as high limits only The user must enter maximum and minimum boiler supply temperatures Note Sensors connected to any sensor...

Page 69: ...ssociated contacts on the TB1 terminal strip 3 14 6 Thermostat heat anticipator IBC Therm contacts draw no power so an anticipator setting for the thermostat is not applicable with these appliances In...

Page 70: ...Intentionally left empty...

Page 71: ...simultaneous operation of two similar water temperature loads Programmable setback override schedule The control can manage or operate in a network of up to 4 IBC CX boilers without additional contro...

Page 72: ...ols Do not use a sharp or metallic object such as a screw driver to operate the control as it could damage the touchscreen Prior to any interaction with the touchscreen the display shows the Home scre...

Page 73: ...rtant to review the following checklist of precautions Checklist for electrical conditions ducting and water connections Checking electrical conditions Check Check all line voltage electrical connecti...

Page 74: ...e boiler Check The installer must verify that at least one carbon monoxide alarm has been installed within a residential living space or home following the alarm manufacturer s instructions and applic...

Page 75: ...f the sight glass viewport clouds up at start up see Cleaning the sight glass on page 98 6 1 Lighting and shutting down the boiler Start up Checklist Check Followed lighting and shutting down procedur...

Page 76: ...ontrol valve directly outside the boiler case 2 Ensure that the boiler has purged attempted to re light three times has shut off and the appropriate error information is displayed on the controller 3...

Page 77: ...e if the boiler is configured for natural gas but needs to be converted to propane use the conversion kit sold separately by IBC to install the appropriate fitting s and adjust the gas valve according...

Page 78: ...he new fuel appropriate mixer with the Philips head bolts 2 Check that the gasket is in place between the gas valve outlet pipe and the mixer 3 Connect the gas line to the mixer using the brass union...

Page 79: ...est port Gasket Low fire adjustment offset pressure Mixer High Fire Adjustment Fan O ring Gas valve Fan coupler O ring Fan Figure 42 Gas valve and fan components 6 3 3 1 Measuring the inlet gas pressu...

Page 80: ...s pressure test port 8 Tighten inlet gas pressure test port screw 9 Switch on the gas supply and return the boiler to normal operation 6 3 3 2 Performing a combustion test and adjustment The High Fire...

Page 81: ...hen Turn counter clockwise to lower CO2 Start with of a turn until you see the analyzer measure a change then only make 1 16 adjustments If changing direction on this adjustment you may notice a signi...

Page 82: ...LWCO function provides continuous protection against low water in the boiler If the SIM detects low water the boiler enters a lockout state Perform the test to ensure that the LWCO sensor is function...

Page 83: ...erature function 1 Go to SIM Menu Hi Limit Test Read the instructions You will need to enter a cutoff temperature below the actual supply temperature value currently displayed For example if the Suppl...

Page 84: ...Intentionally left empty...

Page 85: ...arance of soot at the vent termination any such signs should be brought to the immediate attention of a qualified service technician Monthly Inspection of the boiler is to be performed annually by a q...

Page 86: ...and have not been adversely amended Annually Check the operating history using the boiler s Logs menu and Error Logs menu The controller tracks the duty cycle of the boiler in each of the loads separa...

Page 87: ...ish a reasonable burner inspection schedule Some combi boiler locations may call for annual service others showing clean burners will only need attention every 2 5 years c Reassemble Visually inspect...

Page 88: ...in the system Use only antifreeze made specifically for hydronic systems Inhibited propylene glycol is recommended Antifreeze volume must be between 25 and 50 of the total volume of water in the syst...

Page 89: ...is functioning normally Check for any noise in the system Annually Check water piping for damage or leaks and repair as needed Annually Check the water pressure Pressure should be stable when the com...

Page 90: ...leak from the discharge pipe perform the test again to try and flush any debris that may be lodged in the valve If repeated tries fail to stop the leakage contact a licensed contractor or qualified s...

Page 91: ...ressure test port Brass union nut Manifold gas pressure test port Gasket Low fire adjustment offset pressure Mixer High Fire Adjustment Fan O ring Gas valve Fan coupler O ring Fan Figure 44 Gas valve...

Page 92: ...the mixer aside for re installation 10 Carefully remove the fan O ring and note its position for re installation 11 Remove the electrical connection to the fan 12 To remove the fan unscrew the two nu...

Page 93: ...e gas valve from the gas valve outlet pipe undo the union nut at the gas valve outlet and set the pipe aside for re installation 9 Ensure that the O ring and nut retainer are secured to the pipe 10 At...

Page 94: ...respirators certified by NIOSH For the most current information NIOSH can be contacted at 1 800 356 4676 or on the web at www cdc gov niosh 2 Wear long sleeved loose fitting clothing gloves and eyes...

Page 95: ...amaged during removal and will likely need to be replaced 14 Install the new burner and gasket ensuring that all screws are tightened evenly by repeating the tightening sequence a few times as shown i...

Page 96: ...drain port not visible below located behind boiler inlet connector and the strainer flow restrictor Boiler circuit water pressure sensor Bypass check valve DHW outlet temperature sensor DHW flat plate...

Page 97: ...harness 4 Sensor is retained by a fork shaped clip Caution this may be sharp to the touch Use needle nose pliers to squeeze the clip prongs together when prongs disengage from their secured position...

Page 98: ...ore you reassemble the sight glass check that the gaskets are in good condition 6 Assemble the components see image below by first inserting the rubber gasket linside the refractory top mfollowed by t...

Page 99: ...allow it to cool down Important Installers or service contractors should ensure that the end user is instructed on cleaning and refilling the trap 1 Pull back the clip to release the trap and pull th...

Page 100: ...p with water and replace the union cap and gasket 4 Slide the trap over the heat exchanger drain outlet making sure it is secured by the clip and tighten the upper union nut to ensure an airtight seal...

Page 101: ...7 7 Ensure door in place The boiler door must be in place during operation Ensure door is in place after service 101 7 7 Ensure door in place...

Page 102: ...Intentionally left empty...

Page 103: ...and compare with the value derived from the measurement of the resistance obtained by connecting a good quality test meter capable of measuring up to 5 000 k 5 000 000 at the controller end of the se...

Page 104: ...82 1 172 85 29 8 250 185 85 1 073 90 35 7 334 190 88 983 95 35 6 532 195 91 903 Table 11 Temperature sensor resistance values 10K ohms 8 1 2 Fan The fan is controlled via the SIM control The SIM provi...

Page 105: ...zero Check the flow sensor for fouling or loose wiring If sensor is spinning freely and connected replace the sensor 8 1 5 Safety and Ignition Module SIM The SIM is a safety control certified to conf...

Page 106: ...Flashing Lockout Possible errors An operating limit was exceeded A sequence failed An external sensor fault was detected Flash alternately with LED 2 Flash alternately with LED 1 Fail safe An error w...

Page 107: ...e if the hi limit switch is operational You can also perform this test for gasket blowouts 8 2 Troubleshooting error messages Warning Never attempt to repair the control module circuit board If the co...

Page 108: ...ler ignites but shuts off at the end of the ignition trial Improperly grounded pressure vessel burner or unserviceable ignition lead or spark module Ensure the pressure vessel is grounded Check the ig...

Page 109: ...k of the controller board Temperature sensor input problem Test each temperature sensor for appropriate readings and Replace defective temperature sensor Error Max Inlet Outlet Sensor Temp Exceeded Ch...

Page 110: ...ssure gas pressure too high too low Check CO2 level via analyzer Check for proper gas piping Check pressure with manometer during ignition Boiler will not attempt to ignite Fan and pump are operating...

Page 111: ...evel Defective thermostat Refer to manufacturer s instructions Obstruction in condensate drain Inspect and clean condensate drain appliance cycling on operating safety controls Check operation with Oh...

Page 112: ...s on clearing errors see Resetting a boiler after a hi limit temperature lockout on page 107 and Resetting a boiler after a LWCO lockout on page 106 DHW taking too long to heat Sensor may be under rea...

Page 113: ...required Confirm adequate pump size and temp rise in the heat exchanger Slow combustion air blower Check that CO2 level is within specification Dirty burner heat exchanger Check pressure drop Low wat...

Page 114: ...Appendices Wiring diagrams Figure 48 Controller electrical diagram 114 Section Troubleshooting...

Page 115: ...Figure 49 Internal wiring diagram 115 Wiring diagrams...

Page 116: ...Figure 50 Sequence of Operation 116 Section Troubleshooting...

Page 117: ...8 4 Exploded views of the CX 150 CX 199 appliance 117 8 4 Exploded views of the CX 150 CX 199 appliance...

Page 118: ...cover CX 199 1 2 Exhaust duct 1 3 Intake duct 1 4 Temperature sensor P 361 1 5 Safety Ignition Module plus SIM P 271B 1 6 Front door cover CX 150 1 Front door cover CX 199 1 7 Thumb screw 2 8 Termina...

Page 119: ...119 Boiler part diagrams CX 150 CX 199...

Page 120: ...asket CX 150 P 1525 1 Refractory and heat exchanger lid gasket CX 199 P 1529 1 10 Burner gasket P 1522 1 11 Burner CX 150 P 1526 1 Burner CX 199 P 1530 1 12 Rollout switch P 9070 1 13 Heat exchanger C...

Page 121: ...P 1606 1 26 Gas inlet 3 4G to 1 2 NPT 1 27 29 Inlet gas line union gasket P 1522 2 28 Flex gas line P 1610 1 30 Gas valve P 326B 1 31 Gasket gas valve outlet pipe to gas valve 1 32 Gas valve outlet pi...

Page 122: ...type concentration of any glycol chemicals used ___________________ Air purge completed Relief Valve correctly installed and piped Relief valve try lever test performed Condensate trap filled Condensa...

Page 123: ...THIS OVERRIDE MUST NOT BE USED UNLESS AT LEAST ONE OF THE FOLLOWING CONDITIONS IS TRUE An external energy management system is installed that reduces the boiler water temperature as the heating load...

Page 124: ...77 0277 T856 877 0544 F604 877 0295 F856 735 5584 Toll Free 1 844 HEAT IBC 1 844 432 8422 www ibcboiler com Information in this document is subject to change without notice IBC assumes no responsibili...

Reviews: