background image

VEO 120XXN CONTROLS

CONTROLS ON THE FRONT PANEL OF THE VEO 120XXN

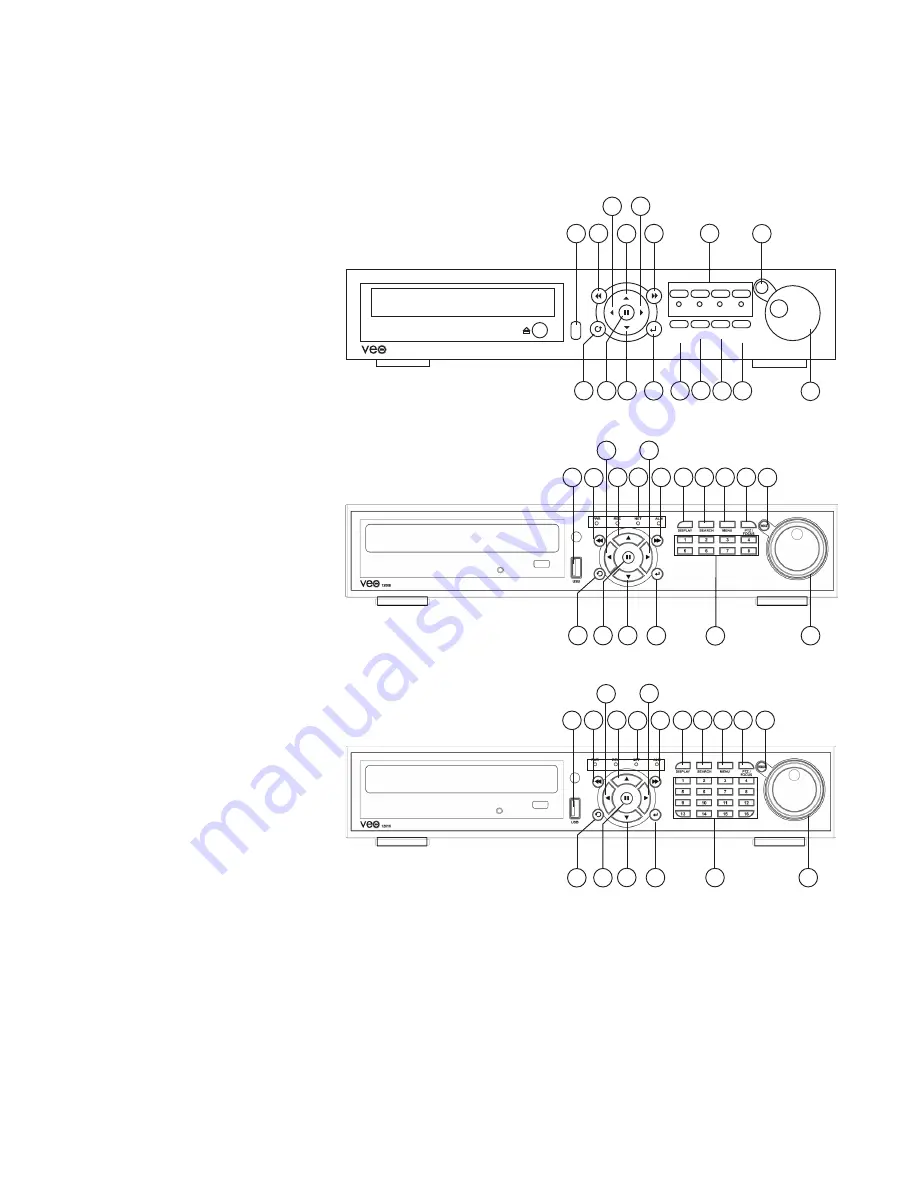
The buttons on the front panel of the unit are used to control PTZ and camera focus, to enter menus 
and adjust settings on the Veo 120XXN, and to search for and play back video. Refer to Figures 4-6 for 
the locations of the buttons on the front panel.

2

3

1

4

5

6

7

8

9

11

12

13 14 15 16

17

EJECT

USB

SCREEN

MODE

SEARCH

MENU

PTZ/

FOCUS

JOG/SCHUTTLE

CH 2

CH 3

CH 4

HOLD

CH 1

12004

10

REC

NET

ALM

PWR

Figure 4. Front Panel of Veo 12004N.

2

3

1

4

5

6

7

8

9

11

12

17

10

13 14 15 16

7

2

3

1

4

5

6

7

8

9

11

12

17

10

13 14 15 16

7

Figure 5. Front Panel of Veo 12008N.

Figure 6. Front Panel of Veo 12016N.

8

Summary of Contents for Veo 12004N

Page 1: ...INNOVATIONS AT THE SPEED OF THOUGHT 2008 i DVR International Inc The contents of this user manual are protected under copyrights and computer program laws 120XXN Series ...

Page 2: ... Audio menu Buzzer menu System menu Event Sensor menu Disk Manage menu Record menu Archiving menu Adding Users Changing Passwords Controlling Cameras from the Veo 120XXN Pan Tilt and Zoom Controls Adjusting the Focus or Iris on a Camera Working With Presets Modifying Recording Schedules Setting Up Timer Motion Based Recording and Parameters Setting Up Alarm Based Recording and Parameters Setting U...

Page 3: ...2004N 5 Front Panel of the Veo 12008N 6 Front Panel of the Veo 12016N 7 Back Panel of the Veo 12004N 8 Back Panel of the Veo 12008N 9 Back Panel of the Veo 12016N 10 Remote Control Operation 11 Logging In as the Administrator 12 Shutdown Screen 13 System Context Menu 14 Veo 120XXN Main Window 15 Screen Display Modes 16 Main Menu General 17 OSD Display Menu 18 Monitor Display Menu 19 Sequence Displ...

Page 4: ...ng to use UPS will result in voided warranty Do not attempt to repair the DVMS Contact your dealer installer for technical support and or repairs Do not drop the system or subject the system to strong vibration Do not unplug the system without turning the power off first Do not use the power cords and extension cords without a ground connection WARNING RISK OF EXPLOSION WARNING To avoid electric s...

Page 5: ...hat the specific custom requirements for length of video retention for each given installation are met For investigation or archiving purposes video recordings can be easily exported to external storage such as DVD R CD R or USB flash With the ability to control pan tilt zoom PTZ cameras such as the daVinci domes the Veo 120XXN has the potential to become a powerful control tool in any surveillanc...

Page 6: ...igurable for multiple camera displays for live and playback video Spot monitor for public view displays MODELS Model Number Veo 12004N Camera Input 4 Description 4 channel digital video recorder with 320 GB of storage space and 1 DVD CD writer device Model Number Veo 12008N Camera Input 8 Description 8 channel digital video recorder with 500 GB of storage space and 1 DVD CD writer device Model Num...

Page 7: ...et Figure 2 shows the maximum number of cameras and alarm sensors that can be connected to the Veo 120XXN system Veo 120XXN also allows for a number of spot monitors to be connected to the system for live viewing of the video inputs The Veo 120XXN supports two types of backup devices CD DVD burner and a USB flash memory device which can be connected via USB port on the front system panel Figure 2 ...

Page 8: ...play back video Refer to Figures 4 6 for the locations of the buttons on the front panel 2 3 1 4 5 6 7 8 9 11 12 13 14 15 16 17 EJECT USB SCREEN MODE SEARCH MENU PTZ FOCUS JOG SCHUTTLE CH 2 CH 3 CH 4 HOLD CH 1 12004 10 REC NET ALM PWR Figure 4 Front Panel of Veo 12004N 2 3 1 4 5 6 7 8 9 11 12 17 10 13 14 15 16 7 2 3 1 4 5 6 7 8 9 11 12 17 10 13 14 15 16 7 Figure 5 Front Panel of Veo 12008N Figure ...

Page 9: ...work when remote clients are connected to the system this LED is lit green ALM Alarm alarm sensor on off 8 JOG HOLD Jog Shuttle hold Adjust the playback speed with Jog Shuttle then press HOLD button to hold the current speed 9 RETURN Returns to the previous menu or cancels action 10 PAUSE Freezes the video recording playback and displays the current video frame 11 Decrease playback speed Decreases...

Page 10: ...vices to the unit please refer to the diagrams of the rear panels of the Veo 120XXN series units Figures 7 9 Figure 7 Back Panel of Veo 12004N 2 3 1 4 5 6 8 9 11 12 10 13 7 Figure 8 Back Panel of Veo 12008N 3 1 4 6 8 9 11 10 13 Figure 9 Back Panel of Veo 12016N 3 1 4 6 8 9 11 10 13 10 ...

Page 11: ...el Veo 12004N has 4 audio inputs Veo 12008N 12016N has 2 audio inputs 10 Ethernet TCP IP RJ45 connector for Network Connection 11 Alarm Relay RS 485 Terminals for Sensor Relay PTZ connection 12 RS 232C Connect Port for Program Debug Available only on Veo 12004N 13 DC Power Input Power Supply by DC 12V Adaptor Veo 12008N 12016N models can be operated with the USB mouse that is included with the uni...

Page 12: ...e channel s up to a maximum of 16 depending on the model or allows entering the user password To enter channel number 10 and above press the 1 button first followed by a second digit 0 6 5 ENTER Enters the menu submenu or confirms action 6 Direction control buttons The functions of these buttons correspond exactly to the similar buttons on the front panel of the system Please refer to page 8 of th...

Page 13: ... PWR button on the remote control if the unit is not already running The Menu screen appears and the appears and the ADMIN user is selected 2 If desired press the up or down arrow to select a different user ID only the ADMIN will appear at first power on of the unit 3 Press the channel buttons on the front panel or numbered buttons on the remote control to enter your password and then press ENTER ...

Page 14: ...dministrator Complete access to all Veo 120XXN system settings and functions Complete access to all Veo 120XXN system settings and functions SYSTEM CONTEXT MENU VEO 12008N 12016N System context menu is available on Veo 12008N and 12016N models through mouse right click on the main screen System context menu allows quick access to the system s most used functions To access the system context menu p...

Page 15: ... video 4 Network Status Indicates the system network status If there are users connected to the Veo 120XXN remotely it is indicated with an amber circle beside the two networked computer icons on the main screen In addition the NET LED light on the front panel is lit green when the remote client s is are connected to the system 5 Hard Disk Status Indicates the estimated amount of storage space use...

Page 16: ...ton on the remote controller The sequencing dwell time determines how long each channel screen display will be displayed on the screen The default dwell time for sequencing mode is set to 3 seconds The default sequencing dwell time can be changed in the Display Monitor menu ADJUSTING MENU SETTINGS To access menus on the Veo 120XXN press the SETUP button on the front panel remote control or right c...

Page 17: ...the main screen A red square indicates that the video is being recorded green indicates that the video is being pre recorded into a buffer The recording status appears for each camera that is connected to the Veo 120XXN Border Turn this setting ON to display the border between each camera view in the quad display mode Border Color Select the border color for the multi screen divisions Choices are ...

Page 18: ...interval that the Alarm Channel will remain in the full screen mode 1 60 seconds Motion Pop Up Mode Turn this setting ON to display the corresponding camera in the full screen mode on the VGA OUT and MONITOR OUT displays each time the motion is detected This setting does not affect the spot monitor display Motion Pop up Dwell Set the time interval that the Motion Channel will remain in the full sc...

Page 19: ...ted cameras to covert mode and or to change the camera title If a camera is set to covert mode the Veo 120XXN continues recording the video however the camera will not be displayed on the screen While labeling the camera s the virtual keyboard will be displayed Please refer to Figure 25 Figure 24 Virtual Keyboard How to use the Virtual Keyboard Input the text by selecting desired characters on the...

Page 20: ...n Setting up Motion Detection Recording on page 33 for complete instructions on how to use this setup Please note that high sensitivity settings increase the occurrences of the false motion detection Figure 28 PTZ Setup Camera Menu Figure 30 Motion Sensor Camera Menu Figure 26 Colour Setup Camera Menu Color Setup Use this option to configure brightness contrast tint and color for each camera The d...

Page 21: ...n over the network Network Audio RX Turn this option ON to receive audio via 2 way audio of the remote client Figure 31 Audio Sound Menu Figure 32 Buzzer Sound Menu Keypad Turn this option ON to hear a sound each time a button on the front panel keypad is pressed Remote Controller Turn this option ON to hear a sound each time a button on the remote keypad is pressed SYSTEM MENU Use the System menu...

Page 22: ...AM 1 59AM in DST and 1 00AM 1 59AM out DST Figure 34 Date Time System Menu If the time is changed to go back in time then data will overlap and will be deleted as shown above Figure 35 Overlapped Date Erased Display Figure 36 Network Menu Network Use this option to set up the network connection information for the Veo 120XXN Network settings are used when someone accesses the Veo 120XXN from a com...

Page 23: ...P address as entered in the Network setup and the MAC address If your unit contains two hard disk drives both sizes are listed in the disk size field In this setup option you may also assign the system name perform firmware upgrade reset all setup configurations to factory defaults and import export system setup configurations Notes Veo 12008N 12016N units automatically switch between PAL and NTSC...

Page 24: ...ps working as soon as the alarm stops being tripped The delay time is ignored with transparent relay mode Duration refers to the length of time that the relay remains in effect after the alarm occurs provided the alarm is in latched mode Duration goes into effect when the relay is in latched mode Duration times can be increased by 5 or 10 second increments for the first minute and then one or two ...

Page 25: ...ldest data is overwritten with the latest data once the hard disk becomes full When it is set to OFF the Veo 120XXN stops recording and the internal BUZZER is activated when the hard disk is full Format Formats the hard disk drive s and deletes all recorded data on the hard drive s WARNING ALL VIDEO WILL BE LOST AND WILL NOT BE RECOVERED Figure 44 Disk Manage Menu RECORD MENU Use the Record menu t...

Page 26: ...s 352 x 240 704 x 240 704 x 480 PAL cameras 352 x 288 704 x 288 704 x 576 Image size and recording rates are related If you select a resolution that changes the recording rate a message appears on the menu You select a different size or recording rate if this happens NTSC cameras 30 15 10 7 3 2 1 PAL cameras 25 12 6 3 2 1 Rates vary between NTSC and PAL cameras Each camera can record up to a maxim...

Page 27: ... video clip that you want to copy To Configure the end time for the video clip that you want to copy Mode Select the recording mode between Burning and Erasing Burning The latter will allow you to re record over the video on your removable media A V Channel Select each video and audio channel if you want to copy only the video audio recorded from specific cameras audio channels Title Enter a name ...

Page 28: ...epending on a system model the password can contain characters 1 4 Veo 12004N 1 8 Veo 12008N or 1 9 Veo 12016N 7 Set the new user s group type Three User Group types are available USER MANAGER and ADMIN Each new account can be assigned to either of the three groups ADMIN user group has full access to the system functions while USER and MANAGER groups have limited access to the system For the list ...

Page 29: ...buttons on the remote control PAN TILT AND ZOOM CONTROLS 1 Press the PTZ Focus button on the front panel of the Veo 120XXN or on the remote control PTZ controls appear in the bottom of the video pane and the screen mode changes to full screen mode 2 If the wrong channel is displayed press the numbered channel button 1 16 of the camera that you want to control 3 Press the ARROW buttons to control t...

Page 30: ...t the camera that you will configure Make sure that you are in PTZ mode and not in Focus mode 2 Move the camera to the desired position 3 Using the DISPLAY and the MENU SETUP buttons choose the preset number that the current position should be stored as DISPLAY button is used to go down in numbers and MENU SETUP to go up in numbers There can be up to 255 presets programmed for each camera 4 Once t...

Page 31: ... motion based Schedules i Select the top row by moving the yellow box to this row using ARROW buttons and press ENTER The yellow box will turn to a green cursor box ii The table will be displayed with the current recording size fps and quality for the time of day where the green box is currently positioned there are 24 cells to represent each hour of the day You can move this green box along the r...

Page 32: ...een cursor box ii Move the green cursor box across the table Once on the desired camera and time press ENTER again and the box becomes a blue cursor box You can then move the camera to highlight a series of cells from here When you press ENTER everything inside the selected cells either becomes activated shown by an blue colored cell or de activated shown by a grey colored cell iii Once a desired ...

Page 33: ...o have Alarm Recording and Motion Recording at the same time To configure Alarm based Recording Schedule select Alarm Setup sub menu Follow instructions for Timer Motion based Recording SETTING UP MOTION DETECTION RECORDING REGIONS The Veo 120XXN can record video based on motion detection as long as a recording schedule has been created Refer to Modifying Recording Schedules on page 31 for instruc...

Page 34: ...in DESELECT ALL to disable the motion detection region on this camera CANCEL to cancel the changes or SAVE EXIT to save the changes that you made and return to the previous menu CANCEL and SAVE EXIT options returns back to the previous menu WORKING WITH RECORDED VIDEO You can search for recorded video by recording date or event play back recorded video and back up video to a CD R RW DVD R RW media...

Page 35: ...eselectedtimeonward eachvideopanecontainsrecordedvideofrom aspecificcamera Theplaybackcontrolpanelwillbedisplayedonthescreen 6 RefertoPlayingRecordedVideoonpage36forinstructionsonplayingbackvideo 7 To searchbyevent selectSEARCHBYEVENTtab Figure64 Selectastarttimeandendtimeasfollows i PresstheENTERbuttontoselectthefield ortoacceptanychanges ii PresstheRightorLeftARROWbuttonstomovetothenextsegmentof...

Page 36: ...e controller To navigate the video playback with the USB mouse supported Veo models only use the on screen playback panel 1 Use the video control buttons on the front panel of the Veo 120XXN to play back video as follows i Press the Play button or right arrow 4 to play the video at the normal speed ii Press the Reverse button or left arrow 3 to play the video backwards at normal speed iii Press th...

Page 37: ...ite existing data on your media change the archiving MODE from BURNING to ERASING BURNING To back up video 1 Press MENU on the front panel of the Veo 120XXN or remote control and login into an administrative account Move to the ARCHIVING tab by pressing the right ARROW button Press the ENTER button to enter Archiving menu The Archiving menu appears RememberthatonlyAdministratorsandManagerscan perf...

Page 38: ...e drive and then press the ENTER button 8 The Backup menu displays a list of recorded video that matches your selection criteria along with estimates of how much storage space the video clips require Review the list and decide whether or not to back up the video Files that indicate a size of 0 MB will not be backed up 9 Press the ENTER on the OK button to start the backup or either select CANCEL o...

Page 39: ... press RETURN repeatedly until the Menu disappears from the video pane Figure 70 System Management Menu EXPORTING IMPORTING SYSTEM SETTINGS Use the System Data option to export all system settings with an exception of Network settings and System Name onto the USB storage device The saved settings can either be retained for backup purposes in case settings are accidentally reset to factory defaults...

Page 40: ...d will appear This will install the codec to play back the video properly on your media player Follow the wizard and finish the installation This must only be done once 4 Using Windows Explorer find the backup media and double click on the camera that you want to view You can only play one video channel at a time It should automatically play using the Windows Media Player Consult your system admin...

Page 41: ... and Front USB Port Storage Capacity Standard 1 x 500GB HDD Upgrade to max 2 x HDD System Operation Front Panel Buttons Remote Control USB Mouse 12008N 12016N Mouse Supported Yes 12008N 12016N No 12004N Remote Software Veo Remote Archive Format AVI File Format via Server Remote JPG BMP via Remote only Standard Accessories 12VDC Adapter AC cable Remote Control 2 x AAA Battery CD Remote Viewer Manua...

Page 42: ...1 866 840 0004 www i3dvr com i DVR INTERNATIONAL INC U S A 415 Lawrence Bell Suite 2 Williamsville NY 14221 Canada 780 Birchmount Road Unit 16 Scarborough ON M1K 5H4 ...

Reviews: