background image


36 

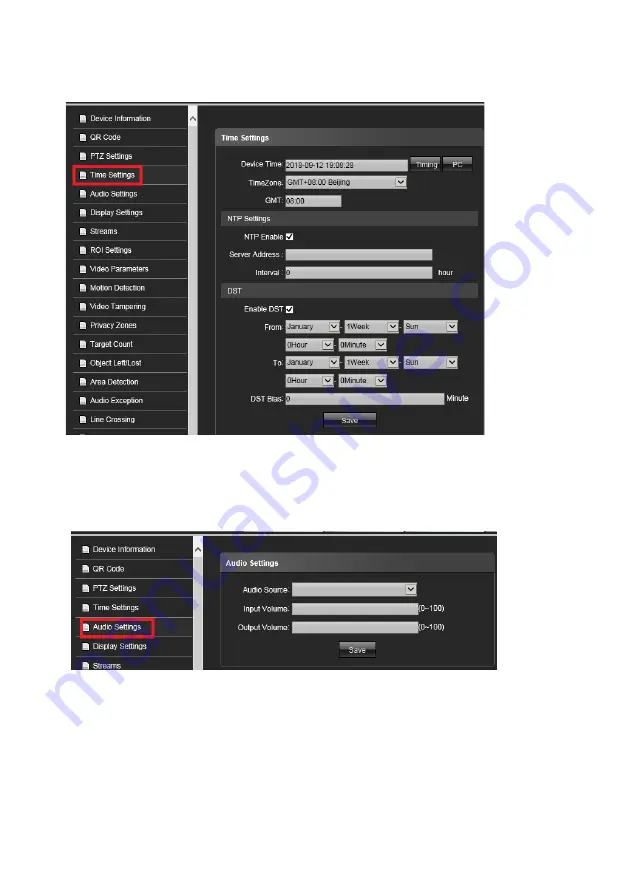
NTP Setting:   

Check “ 

Enable DST

 icon and then select the DST period and DST bias time.   


Save: 

Check “ 

Save “

 icon to set up the setting parameters. 


Audio Settings:


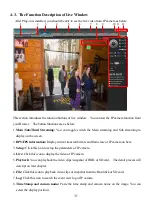
Click this button to setup the Time stamp and Text OSD position. 


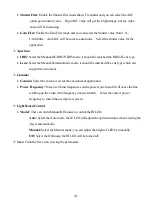
Audio Source

: Select the audio source from Mic in or Line in.   


Encoding Format

: Select the audio encoding 

types, G711u, G711A, G.726, ADPCM mode


Input Value

: Adjust the 

audio input Value, the high number get larger audio in.    0 is 

mute. 


Output Value

: Adjust the audio output Value, the high number get larger sound.    0 is 

mute. 


Save: 

Check “ 

Save “

 icon to set up the setting parameters. 

Summary of Contents for ANYCAM DM-2MIPR04 Series

Page 1: ...5 3 2 mega Pixels Network camera Version V1 0 Doc No 107111801 DM 2mipr04 Series Instruction menu 2 MEGA Face Recognition Network camera...

Page 2: ...the installation instructions WARNING 1 Be sure to use only the standard adapter that is specified in the specification sheet using any other adapter could cause re electric shock or damage to the pro...

Page 3: ...to excessive vibration or magnetic interference Do not install in a location subject to high temperature over 50 C low temperature below 10 C or high humidity Doing so may cause re or electric shock...

Page 4: ...replacement of the obsolete outlet Protect the power cord from being walked on or pinched particularly at plugs convenience receptacles and the point where they exit from the apparatus Only use attach...

Page 5: ...either the retailer where they purchased this product or their local government office for details of where and how they can take these items for environmentally safe recycling Business users should...

Page 6: ...icrosoft Windows 95 98 ME Windows2000 XP Vista 7 and 8 are registered trademarks of Microsoft Corporation All other trademarks are the property of their respective holders Customer Support If technica...

Page 7: ...s Pro NVR software 20 3 3 Setting IP camera for Witness Pro NVR software 22 Chapter4 Accessing IE Chrome Safari and Firefox Browser 28 4 1 Install Plug in on IE Chrome Safari and Firefox Browser 29 4...

Page 8: ...Network failed IP address conflict Illegal access Support export import restore system configuration for backup purpose Adjustable auto reboot schedule by day weekly Removable IR cut filter supports...

Page 9: ...Main High Profile and Motion JPEG video streaming Control Brightness Contrast Saturation Sharpness Hue Exposure Motion detection Mirror Corridor mode Shutter Privacy mask Flicker less 3D Noise reduct...

Page 10: ...ace Recognition Face Detect Human Detect Retrograde Detect Density Detect Object Counting Unattended Object Detection Missing Object Detection Loitering Detection Tripwire Detection Motion Detection C...

Page 11: ...ed Frame Bit rate display Shutter Slow shutter Auto Fixed 1 1s 1 100 000s WDR 120 dB True WDR DWDR OFF Mode Illumination Color 0 01 Lux F1 2 B W 0 005 F1 2 Lux 0 Lux IR LED on White Balance Auto Custo...

Page 12: ...ork failed Backup device configuration to SD card HDD and FTP Up to128G SD card storage capability Housing Aluminum housing with IP 66 Waterproof IK10 Vandal resistant and 3 Axis bracket design Dimens...

Page 13: ...purchase for help The package includes the following items Network IP Camera x 1ea Bundle NVR CMS software CD x 1ea User manual x 1ea Cable cover x 1 ea Accessory package x 1 set 1 3 Product Dimensio...

Page 14: ...4 Product Parts Description A Video ou A RJ45 LAN port IR Sensor IR LED Lens A Alarm out A Alarm out A1 Alarm in C Alarm in A B Audio in out AG Audio ground V DC12V V DC12V Micro SD card slot Reset Bu...

Page 15: ...vertical position screw Zoom screw Focus screw Rubber Seal plug on the hole for RJ45 Ethernet Cables Alarm I O Audio in out port Power block Lens RJ45 Socket Rubber Seal plug on the hole for Power I...

Page 16: ...he three screws marked with the triangle icon on the dome base 3 Remove the back case LAN Cable assembly 1 Drill a hole on the rubber seal plug and insert an Ethernet cable through the opening 2 Strip...

Page 17: ...mounting surface 3 Press the Ethernet cable into the routing path at the bottom of the camera so that the cable will not get in the way when the metal mounting plate is attached and then arrange these...

Page 18: ...18...

Page 19: ...ected to PC 2 Connect the power cable from the Network Camera to a power outlet 3 If you have external devices such as sensors and alarms make the connection from the general I O terminal block Power...

Page 20: ...which allow you run 32 64 channels IP cameras on a PC Please follow the steps below to complete the installation of Witness Pro NVR software While into Windows and insert the I View DVR software CD i...

Page 21: ...different directory otherwise click on the Next button to install the software into the proposed director Step 6 Select No I will restart my computer later and press on the Finish button to exit Fig 1...

Page 22: ...onfiguration This setup window may differ greatly depending on your NVR model 1 Setup the parameters of IPcameras Search IP camera Click this icon will auto search IP cameras of I View brand You can r...

Page 23: ...ras automatically You can use the Static or DHCP IP address mode There are two setting modes for the Static IP address one is Original the other is User define Please refer the diagram shown as above...

Page 24: ...ers of Individual IP camera This section will allow you setup the parameters for individual IP camera for I View s and the other brand Disable channel This will disable the selected channel when enabl...

Page 25: ...d IP cameras User name Password The user name and password must be matched the setting of IP camera which you want to connect Find Click this icon to find out all the currently connected IP cameras on...

Page 26: ...here are some difference setting diagram when used difference models you may not need to I E Browser for the detail IP camera setting Please refer the diagram as below OSD setup Click this icon to con...

Page 27: ...ou can playback the video clips of SD card without download them The icon function description as below Increase speed Increase the speed of playback Decrease speed Decrease the speed of playback Norm...

Page 28: ...the IP address which is come with the CD Follow up the processes to find out the IP address of IP camera by IP Search utility as below Step 1 Click IPCamera Finder exe program will show the window as...

Page 29: ...ssword The default User name Password is admin 123456 and IP address is 192 168 0 123 If you connect to IP Camera first time from IE or Chrome Safari and Firefox Browser please follow up the process a...

Page 30: ...er 2 Choose File Open URL AURL dialog box will pop up 3 The address format is rtsp ip address rtsp port RTSP streaming access name for stream1 or stream2 or streaming 3 The RTSP command code as below...

Page 31: ...rmation Display current transmit bit rate and frame rate of IP camera on here 3 Setup Click this icon to setup the parameters of IP camera 4 Live Click this icon to display the video of IP camera 5 Pl...

Page 32: ...ext page 12 Logout Click this icon to log out 13 Exit Click this icon to exit the I E browser viewing Control Panel function description Voice intercom Click this button to enable 2 Way audio communic...

Page 33: ...format Check this icon will enable Face recognition function The result will show on the side of bar Show Smart Detection Rule Check it the setting status of Smart detection will display on the scree...

Page 34: ...t top of frame Device Type Display the device type Serial No Display the IP camera serial No Firmware version Display the current Firmware version of IP camera Hardware version Display the current Har...

Page 35: ...the time difference between the two time zones From the Time Zone drop down menu to select the Time Zone in which the speed dome locate GMT Adjust the time to make it more exactly NTPSetting ServerAd...

Page 36: ...tamp and Text OSD position Audio Source Select the audio source from Mic in or Line in Encoding Format Select the audio encoding types G711u G711A G 726 ADPCM mode Input Value Adjust the audio input V...

Page 37: ...ts 8 lines and 44 characters per line Time Format Check Show icon and select 12Hours or 24 Hours format Date Format There are 3 kind format of timestamp Video parameters Allowing adjust the Brightness...

Page 38: ...Drop and select the encode type for each steam type there are H 264 H 265 mode Encode Level Drop and select the encode type for each steam type I Frame Interval Drop and select the number of interval...

Page 39: ...width is not enough Follow up the process as below to setup the ROI area 1 Select the Area number then check Enable icon 2 Press the left button and drop the mouse to select where want to setup the RO...

Page 40: ...rror Vertical Mirror 90 180 270 rotation modes for difference application WDR There are Off DWDR TWDR modes selectable The default setting is off 3DNR There are Low Mid Mid High High modes selectable...

Page 41: ...should be matched the Lens type which can support the auto focus Gamma Gamma Select the value to suit for the environment application Power Frequency There are 2 kind frequencies on the power system...

Page 42: ...me period You can select multi period per day Repeat the above process to setup another date 3 Select motion detection area from Area setting section Click Drawing icon then press and drag the left bu...

Page 43: ...e period You can select multi period per day Repeat the above process to setup another date 3 Select motion detection area from Area setting section Click Drawing icon then press and drag the left but...

Page 44: ...to setup the Privacy mask function 1 Check Enable and then press and drag the left button of Mouse to setup the detection areas which you want paste the mask on the image 2 Repeat the step 1 process...

Page 45: ...ing You can press and drag Mouse from top to down Apoint at left side or down to top b point at left side Click the right button to complete the setting and the targets passing through the line will b...

Page 46: ...rgets Once the targets ration is smaller than the setting value the system will ignore the target which passing through the trigger line Email Check Email and once the event triggers that it will send...

Page 47: ...k Drawing icon then press and drag the left Mouse button to setup the detection region fromArea Setting section Click the right button to complete the detection region setting Clear Click Clear to del...

Page 48: ...ddress Alarm Output Check Alarm output and once the event triggers the camera will linkage to alarm output PTZ Check PTZ and once the event triggers the camera will linkage PTZ camera to move the assi...

Page 49: ...ge area of effective counting targets Once the targets ration is smaller than the setting value the system will ignore the target which passing through the trigger line Time Set the upper limit value...

Page 50: ...he Mouse button complete the region and detection setting You can click Swap AB to exchange the PointAand B position Clear Click Clear to delete all detection regions Detect Area To add new Detection...

Page 51: ...inkage to alarm output PTZ Check PTZ and once the event triggers the camera will linkage PTZ camera to move the assign Preset point Preset Setup the Preset point for the PTZ camera move to when the ev...

Page 52: ...ting value the system will ignore the target which passing through the trigger line Snapshot Check Snapshot and then select the value of snap interval and Number once the event triggers that the camer...

Page 53: ...ines from Detect area Clear Click Clear to delete all detection regions Object Percent Setup the minimum percentage ration target size image area of effective counting targets Once the targets ration...

Page 54: ...ction function Arming Schedule Arm schedule of enable area detection Check Uncheck from Monday to Sunday each date can has its own trigger period Area Setting Click Drawing icon then press and drag th...

Page 55: ...nce the event triggers that it will send Email to setting email address Alarm Output Check Alarm output and once the event triggers the camera will linkage to alarm output PTZ Check PTZ and once the e...

Page 56: ...and more sensitivity Choose one for the detection type Email Check Email and once the event triggers that it will send Email to setting email address Alarm Output Check Alarm output and once the even...

Page 57: ...Schedule Arm schedule of enable area detection Check Uncheck from Monday to Sunday each date can has its own trigger period Drawing Area Select the Detection areas or Shield area from Area type sectio...

Page 58: ...the system will ignore to snapshot the image when the pixels higher than the setting number Enable Image Width Check this icon and setup the maximum pixels of image the system will ignore to snapshot...

Page 59: ...re the setting Video Plan Click this button to setup the recording schedule for the deference event Video Mode Click this button to setup recording mode Recording Schedule Press left button of Mouse a...

Page 60: ...hostnames into IP addresses DNS2 Secondary domain name server that backups the Primary DNS 1 If the DHCP server is available you can check to automatically obtain an IP address and other network sett...

Page 61: ...ing RTSP Port Use domain name to access and login device need mapping RTSP default port is 554 RTSPValidation Choose RTSP verification mode Http Base64 Http Digest selectable After clicking to check a...

Page 62: ...able multicast for streams The uncast video transmission delivers a stream through point to point transmission multicast on the other hand sends a stream to the multicast group address and allows mult...

Page 63: ...Dynamic DNS DDNS for network access Before you start please registration on the DDNS server is required before configuring the DDNS settings of the IP Camera Please do the process to setup the DDNS 1...

Page 64: ...Enable UPnP icon from settings interface 2 Entry the Device Port and then click the Save icon to save the setting You can edit the Friendly Name of the IP Camera This name can be detected by correspon...

Page 65: ...1 Entry the email addresses sender s email address 2 Entry the password and confirm the password again 3 Entry the SMTP Server IP address or host name e g smtp 263xmail com 4 Entry the SMTP Port the...

Page 66: ...66 FTPSettings Click this button to setup the FTP server which you want to save the video clips Email and snapshot file Alarm Input Click this button to setup the alarm input parameters...

Page 67: ...to setting email address Alarm Output Check Alarm output and once the event triggers the camera will linkage to alarm output PTZ Check PTZ and once the event triggers the camera will linkage PTZ camer...

Page 68: ...Save Click Save icon to store the setting Exception Settings Click this button to setup the alarm output trigger of exception event Exception Type There are Network Discounted IPAddress Conflict Illeg...

Page 69: ...quit the setup and log out at the same time System Update Click this button to update the newest Firmware You can visit www i view com tw to find put the newest Firmware when needed File Click Browse...

Page 70: ...era does not plug the SD card Restore Click this button to restore the parameters setting Export Config Export and store the existing configuration Import Config Restore the configuration to the IP ca...

Page 71: ...pture file storage path Rec Capture Select and modify the preview interface video record file storage path Live View Mode Real time Fluency two types selectable the value of them can be adjustable Sav...

Page 72: ...ot file which you want to playback Preview Capture To review preview capture files search and double click the files to playback the image file Playback Capture To playback the image of capture files...

Page 73: ...function description Play Click button to playback the video clip Stop Click button to stop the playback the video clip Decrease speed Decrease the speed of playback Increase speed Increase the speed...

Page 74: ...sign time period and then click Search button to find out the view log file Main Type Select the log type to check There are Alarm Exception Settings Operation Setup optional or All to check all log S...

Page 75: ...ame of Group such as VIP Group Type Drop and select the group type There is Black list White List and Others 3 kind preset modes Sensitivity Threshold Enter the confidence percentage of face recogniti...

Page 76: ...escription tab and then click Import icon to finish the process Multi Import 1 Browser the folder which wants to import multi photos at a time 2 Click Import icon after photos load is finished to comp...

Page 77: ...ch icon and the result will list on the window base on the setting parameters Face Comparison Click this tab to search the result of face recognition Please follow up the process as below to search th...

Page 78: ...ce detect function 2 Check Save Face Capture Jpeg and Save Panorama Jpeg icons to save the photo into the SD card or HDD 3 Check Draw ID Score icon to enable the Face ID and score will display on the...

Page 79: ...egment Make sure the Switch Hub is workable Check the LAN cable and Ethernet port of NVR are workable Check IP camera is powered Check the IP address and port number setting is matched with IP camera...

Reviews: