background image

© 2013 I-View Now, LLC. All Rights Reserved. 

Nuvico EasyNet ED-P Series Installation Guide rev 1.0 

Page 12 

Recording Setup 

The Nuvico EasyNet DVR records video with 3 different stream settings. The Event Stream is for motion events. The 
Panic Stream is for sensor inputs. The Continuous Stream is for continuous recording

. It is Essential all of the stream 

settings for a given configuration are the same.  

(i.e if a setup is using Motion and Sensor inputs, it is critical that the 

Panic Stream and the Event Stream are configured the same) 

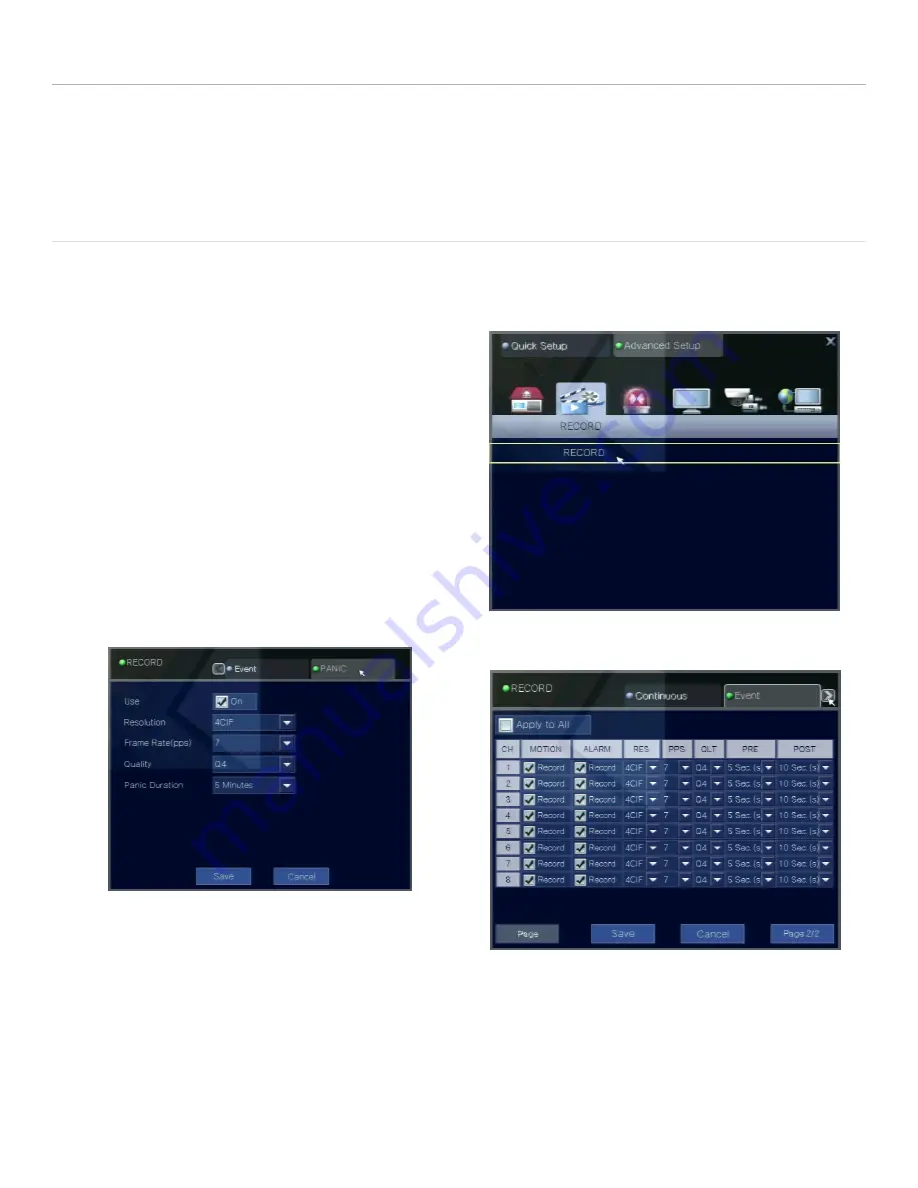
Motion or Event Based Recording 

The Recording setup determines the format of the video recorded onto the DVR. For clips to be decoded properly all 
utilized streams use both the same Frame Rate and Resolution settings. I-View Now suggests setting up all recording 
channels in this manner to avoid any potential issues when upgrading or adding cameras to the system. 


Navigate to Setup->Advanced Setup Tab->Record


Click Record 


Click the Event tab 


Click Apply To all 


Check Motion Record 


Check Alarm Record 


Set RES to 4CIF 


Set PPS(Frame Rate) to 7 


Set QLT Q4 


Set PRE to 5 seconds(Pre-Alarm) 


Set POST to 10 seconds(Post-Alarm) 


Click Save 


Click The Arrow Next to the Event Tab to Display the Panic Tab 


Check Use On 


Set Resolution 4 CIF 


Set Frame Rate 7 FPS 


Set Quality 4 and Click Save 

Encoding types are determined by what triggers the recording IE Alarm, Motion or Scheduled (Time Based recording)


Summary of Contents for easynet ed-p series

Page 1: ...DVR Installation Manual 5 21 2013 V1 0 EasyNet ED P Series DVRs...

Page 2: ...DVR Login 4 NETWORK SETUP 5 Network Time Protocol NTP Setup 6 SMTP Settings 7 Network Port Setup 8 Router Settings 8 RTSP Setup 9 DDNS Setup Optional 9 USER SETTINGS 10 Changing the Admin Password 11...

Page 3: ...y schedule or by events Event recording will only record when either a motion or alarm event is detected Scheduled recordings occur during the scheduled time 5 Alarm Input Setup Here the technician wi...

Page 4: ...arms zone names An example worksheet is printed below You will need to retrieve the IP address while on site Ask the customer or the IT department for the IP address or visit http whatismyip org while...

Page 5: ...tained from the site s IT staff Any DNS server that can resolve ivnview com may be used but 8 8 8 8 and 8 8 4 4 are google s public DNS servers Use them if the location s IT staff does not have a pref...

Page 6: ...iar behavior As such it is good practice to keep the DVR s clock sync d to an NTP time server Return to the network setup menu Select NTP Private NTP servers may be used at the discretion of the site...

Page 7: ...View Now to identify alarms from the DVR Enter The SMTP id from the installer s worksheet into the Receiver address Enter The SMTP id from the installer s worksheet into the Sender address Enter SMTP...

Page 8: ...forwarded to the device This can be done either through port forwarding or NAT Network Address Translation depending on what the installation site s router supports With either of these router featur...

Page 9: ...Check RTSP Over TCP Check RTSP Over HTTP Click Save DDNS Setup Optional For locations that do not have a static external IP address DDNS may be employed Navigate to Setup Advanced Setup Tab Network Cl...

Page 10: ...r Change the password to a password of the location managements choosing Click Save to finalize the password Alternatively a new user and password may be created Next we must give the user account the...

Page 11: ...ssword to retrieve video from the DVR An auto generated password is provided on the Dealer s Web Portal upon device creation The provided password may be used or another password may be used so long a...

Page 12: ...the video recorded onto the DVR For clips to be decoded properly all utilized streams use both the same Frame Rate and Resolution settings I View Now suggests setting up all recording channels in this...

Page 13: ...lick the Zone for the camera that needs to be masked By default all areas will be checked in the mask This means that all areas will be detecting motion Mask A specific area Under All click Clear Sele...

Page 14: ...P notification to I View Now whenever an alarm event occurs I View Now suggests recording on all camera channels whenever an alarm event is detected Navigate to Setup Advanced Setup Event Click Alarm...

Page 15: ...rly configured and the necessary settings entered into the i viewnow com portal it is a good idea to test each alarm input on the DVR by triggering the corresponding device on your alarm panel If rela...

Reviews: