20
How to use the terminals of the ALARM/CONTROL
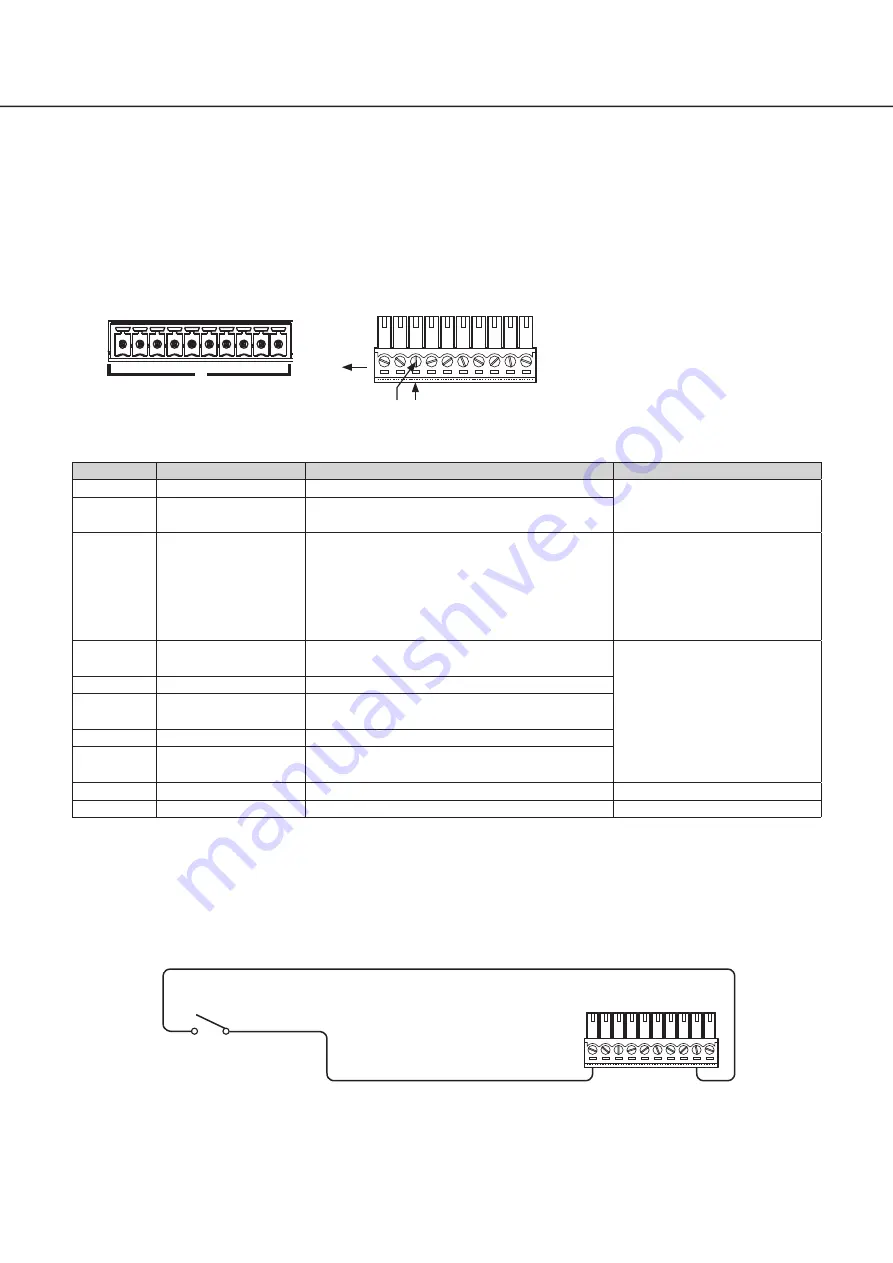
The ALARM/CONTROL connectors on the back is used when connecting an external device such as a sensor that outputs alarm
signals or when installing an external alarm device such as a buzzer or a lamp outside.
Insert the unarmored cable into the provided terminal plug and then mount it on the ALARM/CONTROL connector on the back.
* The cable should be a single or twisted wire with AWG 26~16 and an exposed length of 9 mm.
ALARM/CONTROL connector B
B10
B1
B
Cable connections
②
①
①
Loosen the screw of the desired
terminal on the terminal plug.
②
Tight the screw when the cable is
fully inserted into the terminal hole.
③
Mount the terminal plug with the
cable connected on the ALARM/
CONTROL connector socket on the
back.
③
Terminal plug (10 pin)
ALARM/CONTROL connector B socket
Pin array
Pin No.
Signal
Operation
Remarks
B1
Alarm reset input
Canceling the alarm display
Non-voltage make contact input
+3.3 V pull-up Approx. 23 kΩ
B2
Emergency recording
input
Starting emergency recording signal input
B3
Time adjustment I/O
According to the signal input from the other device,
the time of the recorder will be adjusted to the hour
based on the input time
In addition, the signal is output at the setting time
of the recorder and the time of other equipment is
adjusted to the time of the recorder
Input:
Non-voltage make contact input
+3.3 V pull-up Approx. 23 kΩ
Output:
Open collector output
24 V DC max., –200 mA max.
B4
Network error output
A signal will be output upon detection of a discon-
nected Ethernet link or IP expiration of the DHCP
Open collector output
24 V DC max., –200 mA max.
B5
Camera error output
Signal output upon detection of a camera error
B6
HDD error output/
Recording error output
Signal output upon detection of an HDD error or
recording error in this product
B7
Recorder error output
Signal output upon detection of a recorder error
B8
Face matching output
Signal output at the occurrence of a face matching
alarm
B9
+5 V output
+5 V output
+5 V±0.5 V, 200 mA max.
B10
Signal ground
Connection example for emergency recording
When the external switch is turned on, emergency recording will start.
Recording time and recording rate for emergency recording differ according to the settings of "Emergency rec." on the setup
menu. (Refer to the Operating Instructions.)
B2
(Emergency recording input)
(Signal ground)
External switch
B10
4
Connections
(continued)


