background image

13

Installation of the hard disk drive

Before installing the hard disk drives, turn off the power of the recorder first. When replacing the hard disk drives, the procedures 
will be same as those of installation. When installing or replacing the hard disk drives for playback use only (hard disk drives that 
are formerly used for recording), perform the link process.

Important:

•  When securing the hard disk drives to the HDD brackets, do not mistake the direction of the connectors. (Do not install the 

hard disk drives in the opposite direction.)

•  When installing hard disk drives, use a low-torque powered screwdriver or a torque screwdriver to tighten screws with the 

specified torque.

•  Hard disk drives are precise devices. Handle with care while keeping the following in mind.

•  Do not subject the hard disk drive to any vibration or impact.
•  Before touching the hard disk drive, eliminate static electricity by touching a steel locker, etc. When holding the hard disk 

drive, hold the both sides of the hard disk drive.

•  Do not touch the circuit board or the connectors to prevent the hard disk drive from damaging by static electricity.

•  Contact your dealer for hard disk drives that works on the recorder. Please be forewarned that operation with any hard disk 

drive other than the specified models is not guaranteed under any circumstances.

•  When using multiple hard disk drives, use the same model.
•  If different models are used together, even when the capacities of them are the same, the available capacity may be a few 

percent smaller.

Note:

•  Hard disk drives are locally procured. Contact your dealer for purchasing, installing, and replacing the hard disk drives.

Install the hard disk drives

Installation or replacement of the hard disk drives

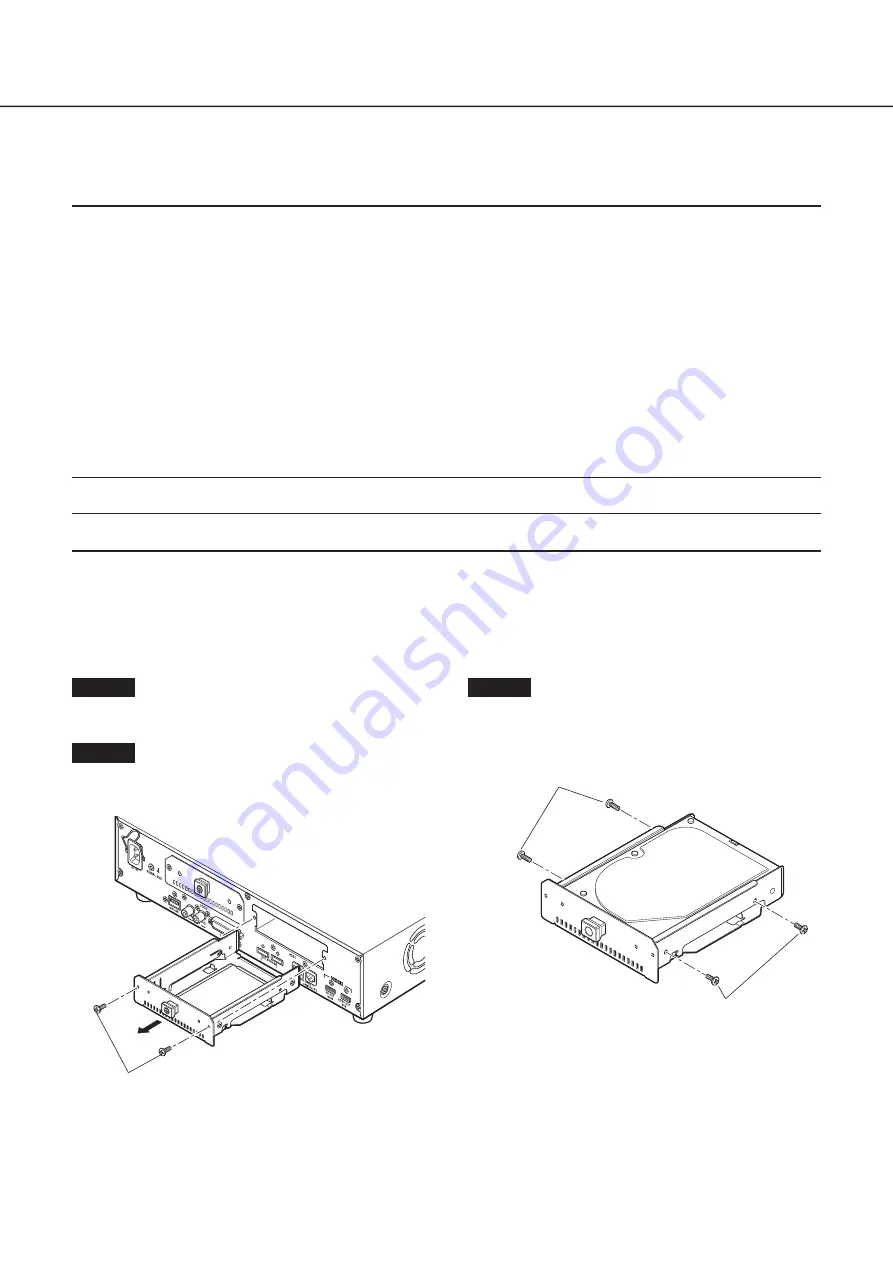
Step 1

Turn off the power of the recorder. (

 Page 26)

Step 2

Remove the HDD bracket screws (x2) on the HDD slots on 
the rear panel of the recorder, and pull out the HDD bracket.

HDD bracket screw

Step 3

Install the hard disk drive into the HDD bracket using 4 HDD 
fixing screws (accessories).
Tightening torque for the screws: 0.49 N·m

HDD fixing screw (accessory)

HDD fixing screw (accessory)

Summary of Contents for WJ-NX200K/G

Page 1: ...is manual for future use The model number is abbreviated in some descriptions in this manual Installation Guide Network Disk Recorder Model No WJ NX200K G Network Disk Recorder WJ NX200 The Operating...

Page 2: ...the hard disk drives 13 When replacing the hard disk drives 14 3 Rack mounting 15 Installation procedure 15 4 Connections 16 Connection of cameras and a mouse 16 Connection of monitors 17 Connection o...

Page 3: ...events REC event Advanced setup Configure the settings relating to monitors Monitor Configure the settings relating to network Network Configure the settings relating to the user management User manag...

Page 4: ...perating instructions indicate the WJ NX200K G Refer to readme txt on the provided CD ROM for further information about the optional dedicated software compatible network cameras hereinafter cameras a...

Page 5: ...uries or property damage resulting from failures arising out of improper installation or operation inconsistent with this documentation Do not place this product in the following places Locations expo...

Page 6: ...place far from the source Grounding Confirm that the wire is connected from the SIGNAL GND terminal to earth ground A grounding connection must be made before connecting the power plug or this product...

Page 7: ...changed using the mouse wheel When no operation is made for 10 seconds or more the mouse cursor will be hidden The mouse cursor will be dis played again when the mouse is moved This section explains o...

Page 8: ...ield A a button This button changes the characters to be entered between capital letters and small letters Next button Changes the keys to be displayed for character entry The displayed keys are chang...

Page 9: ...etup pages Easy Start button It is possible to configure the minimum settings required to operate the recorder such as date time and cam era registration Basic setup Setup page buttons Each Basic setu...

Page 10: ...e 15 Go to step 4 when not installing it in the rack Connect the camera and monitor to this product Turn on the power to launch in the following order Turn on the power of the camera and the monitor T...

Page 11: ...er the date time and cameras on Easy Start When it is not necessary to change other default settings it is possible to start operations If necessary perform the detailed settings for each function Whe...

Page 12: ...registration key number of the additional secure license according to the Secure Communication Kit option To use the business intelligence function get the registration key of the additional business...

Page 13: ...sk drive hold the both sides of the hard disk drive Do not touch the circuit board or the connectors to prevent the hard disk drive from damaging by static electricity Contact your dealer for hard dis...

Page 14: ...the removal process of the hard disk drive Operating Instructions PDF Step 2 Turn off the power of the recorder Page 26 Step 3 Pull out the HDD bracket from the rear panel of the recorder by referring...

Page 15: ...s locally procured to install the recorder in a rack The illustration on this page is schematic Details of the shape are omitted Installation procedure Step 1 Remove the four rubber feet from the bott...

Page 16: ...Connect the provided mouse to the mouse connection port on the front or rear side of the recorder Recorder Ethernet cable locally procured category 7 straight for WJ NX200K G Mouse provided PoE hub Ne...

Page 17: ...or BNC Main monitor HDMI HDMI cable option When outputting audio Connect a powered speaker Sub monitor HDMI Note Use High Speed HDMI Cable When the main monitor is used in 4K 25P 30P use a 10 2 Gbps c...

Page 18: ...Recorder Network PoE hub Network camera 32 max When 3 licenses are used for the additional camera kit PC IP address 192 168 0 250 Subnet mask 255 255 255 0 Default gateway 192 168 0 1 Ethernet cable...

Page 19: ...00K G Ethernet cable locally procured category 7 straight for WJ NX200K G Camera PC port IP address 192 168 0 250 Subnet mask 255 255 255 0 PC port IP address 192 168 1 250 Subnet mask 255 255 255 0 D...

Page 20: ...ther device the time of the recorder will be adjusted to the hour based on the input time In addition the signal is output at the setting time of the recorder and the time of other equipment is adjust...

Page 21: ...Language on the setup menu is set to Slave When a signal output from the other device is supplied to the time adjustment I O B3 terminal and the time difference between the recorder and the other devi...

Page 22: ...nal on the terminal plug Tight the screw when the cable is fully inserted into the terminal hole Mount the terminal plug with the cable connected on the alarm input terminal socket on the back Termina...

Page 23: ...ction will be performed in accordance with the settings When an alarm device such as a buzzer a lamp etc is installed outside connect them to the Alarm output terminal pin no A10 Alarming device Relay...

Page 24: ...the period selected for Error out put duration has passed or the camera reset L active Recorder error output At an error occurrence until the period selected for Error out put duration has passed L ac...

Page 25: ...played on the main monitor Important Never turn off the power of the recorder during startup Insert the power cord fully into the power supply terminal so that it will not loosen or come out Fix the p...

Page 26: ...tration Key will be displayed after the completion of the system check and the administrator registration If the Registration Key for the recorder has not been regis tered yet register the Registratio...

Page 27: ...n the license of the additional camera kit or the additional business intelligence kit is added The added cameras shall be registered on Easy Start Page 29 or on the Camera registration tab Each setti...

Page 28: ...3 fields under Additional camera on the Registration of license page shown in step 5 To use the business intelligence function enter the Registration Key following How to register the license in the u...

Page 29: ...ate time camera registration recording can be config ured on the setup menu the Quick setup menu Easy Start First configure the minimum settings on Easy Start and to configure more advanced settings g...

Page 30: ...layed in a list Displaying image Displays the images from the camera using the IP address that is newly registered or that has already been registered New button Usually use it with no camera register...

Page 31: ...m the current setting value with Advanced in Recording setup All cameras Image quality Selects the image quality of recorded images NQ Normal Standard quality FQ Fine High quality SF Super Fine Super...

Page 32: ...is phenomenon is caused by dispersion of display area on the monitor This is not a malfunction When a function to automatically enlarge the images in the con nected monitor is enabled some part of the...

Page 33: ...h To keep the correct recording set the time periodically or enable the auto time adjustment function on the rear panel terminal or configure the system using the NTP function so as to keep the cor re...

Page 34: ...34...

Page 35: ...35...

Page 36: ...ny potential negative effects on human health and the environment For more information about collection and recycling please contact your local municipality Penalties may be applicable for incorrect d...

Reviews: