background image


Getting Started 


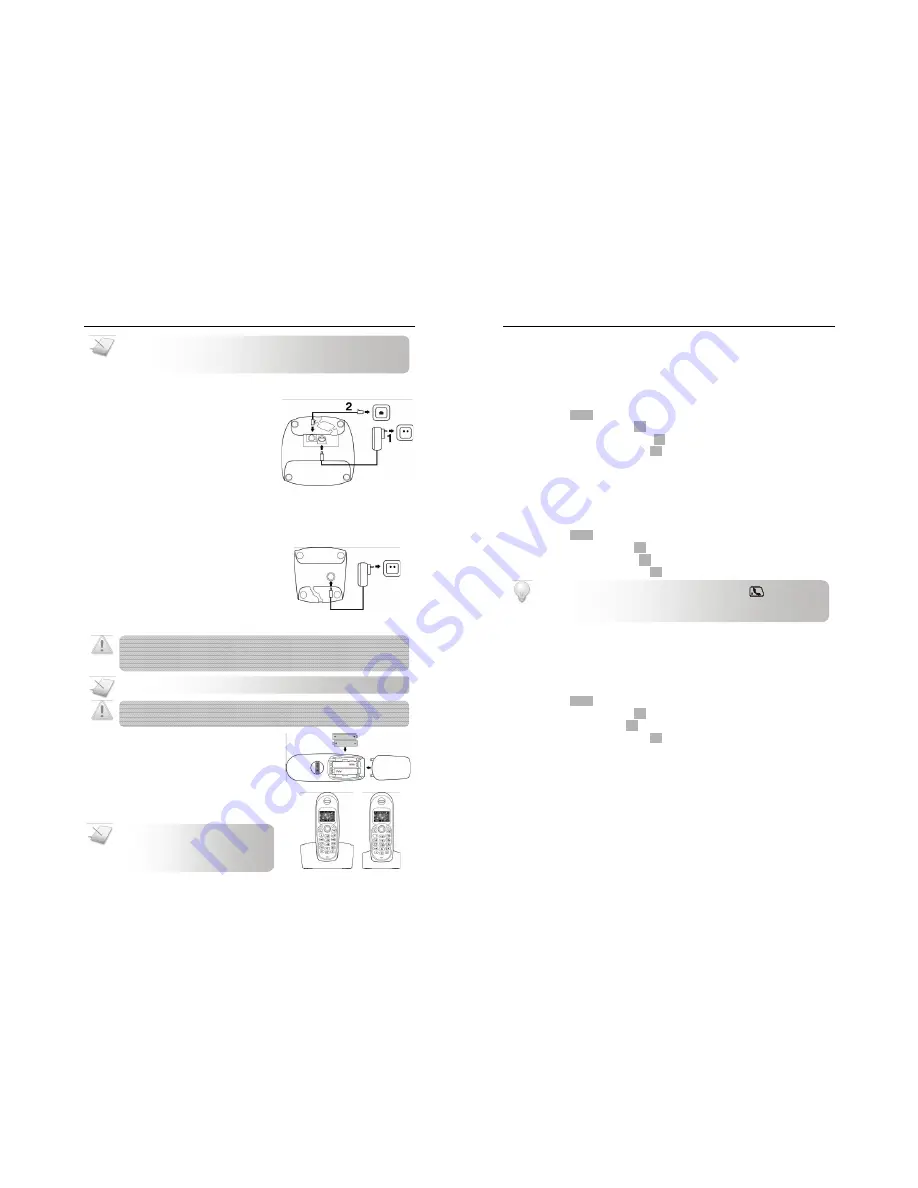
CONNECTING YOUR PHONE 

1.


Connect the output plug of the mains 
adapter to the bottom of the base 
unit. 

 
2.


Connect the mains adapter to a 
standard wall outlet. 

3.


Connect the telephone line cords to 
the phone sockets at the bottom of 
the base unit and the wall phone 
socket. 


CONNECTING YOUR CHARGERS 

* For multi-pack customer only 


1.


Connect the power adapter of the 
charger to a standard wall outlet. 


CHARGING YOUR HANDSET 


1.


Place the 2 rechargeable batteries 
(included) into the battery 
compartment. 

 
2.


Slide the battery door firmly into 
place. 


3.


Place the handset on the base unit or 
charger for charging. 


CAUTION:

  Check the batteries polarity when inserting the batteries. Incorrect polarity may 

damage the product. 

NOTE:

  Handset may get warm during 

initial charge. This is normal. The 
handset may take a few seconds to 
power up. 

WARNING:

  RISK OF EXPLOSION IF BATTERY IS REPLACED BY AN INCORRECT TYPE. Never use non-

rechargeable batteries. Use recommended type supplied with this product. NiMH batteries must 
be disposed of in accordance with the applicable waste disposal regulations. 

NOTE:

  Charge the handset(s) for 14 hours before initial use! 

NOTE:


Low Radiation Mode.

 Your phone is designed with a low-radiation 

mechanism; therefore the antenna switches off automatically in standby mode 
and will not emit any radiation. To turn on this feature, see page 24. 


Calling Features 

Your phone supports a number of call-related features to help you handle and manage your calls. 

AUTO ANSWER 

Auto answer enables you to answer an incoming call by simply picking up the handset from the 
charging cradle. You do not need to press a key to answer the call. 

Activating/Deactivating auto answer 

1.


Press 

MENU

2.


Select 

SETTINGS

. Press 

OK

3.


Select 

AUTO ANSWER

. Press 

OK

4.


Select the new setting. Press 

OK

 to confirm. The new setting is saved. 

DIAL MODE 

Dial mode is the telephone signal used in your country. Your phone supports tone (DTMF) and pulse 
(rotary) dialing. Your phone shall already be set up for use in your country. For details, consult your 
service provider. 

Selecting dial mode 

1.


Press 

MENU

2.


Select 

SETTINGS

. Press 

OK

3.


Select 

DIAL MODE

. Press 

OK

4.


Select the new setting. Press 

OK

 to confirm. The new setting is saved. 


RECALL SELECTION 

Recall is a signal that needs to be sent to the network when making or answering a second call. 
Your phone shall already be set up for use in your country. For details, consult your service 
provider. 

Selecting recall duration 

1.


Press 

MENU

2.


Select 

SETTINGS

. Press 

OK

3.


Select 

RECALL

. Press 

OK

4.


Select the new setting. Press 

OK

 to confirm. The new setting is saved. 


TIP:


Temporary Tone.

 If your phone is in pulse dialing, press and hold 

 during a call for 

tem-porary tone mode. ‘d’ displays. Digits entered after ‘d’ are sent out as tone signal (on this 
call only). 

21

8

Summary of Contents for HDT-H24

Page 1: ...INNOVATIONS SPECTRUM User Guide HDT H24 1 8 GHZ DECT TELEPHONE COLOR LCD CALLER ID HANDS FREE LOW RADIATION ...

Page 2: ...nd Safety 3 3 What s in the Box 5 4 Welcome 5 5 About your phone 6 6 Getting Started 8 7 Call 11 8 Intercom and Conference Calls 14 9 Text and Numbers 15 10 Phonebook 16 11 Call Log 18 12 Custom Options 19 13 Calling Features 21 14 Extra Features 22 15 The System 23 16 Appendix 25 ...

Page 3: ... base unit or charger This could expose you to high voltages Do not allow the charging contacts or the battery to come into contact with conductive materials There is a slight chance that your product could be damaged by an electrical storm We recommend that you unplug the product from the power supply and telephone socket during a storm Do not use the handset in an explosive hazard area such as w...

Page 4: ...s product is suitable for use in the Public Analogue Network PSTN Appendix DEFAULT PRE PROGRAMMED SETTINGS General Setting Language English Handset Name HDT H24 Backlight On Contrast Level 2 Colour Orange Wallpaper Winter Auto Answer On Dial Mode Tone Recall Duration Recall 1 Sounds Setting Handset Melody Melody 1 Handset Ringer Volume Level 3 Handset Key Tones On Receiver Volume Level 2 Handset T...

Page 5: ...Select RESET Press OK 4 Enter the system PIN Press OK to confirm The handset displays a confirmation request 5 Press OK to confirm All settings have reset To find out what settings are being reset see Default pre programmed settings on page 25 NOTE Forgotten PIN Write down your PIN and save it for future use If you have forgotten the PIN call your manufacturer for assistance NOTE After reset your ...

Page 6: ...ect SYSTEM Press OK 4 Select REGISTER Press OK 5 Use to select the base number you want 6 Enter the system PIN Pre set 0000 Your handset starts searching for the base This base number will be assigned to the base unit you are about to register to Your handset starts searching for the base Registration shall be completed within 30 seconds SELECTING A BASE UNIT You can switch your handset between di...

Page 7: ...power adapter again The voicemail indicator shall be cleared NOTE Voicemail Indication Service Consult and subscribe from your service provider NOTE Making Calls You will not be able to make any calls including emergency calls when the keypad is locked TIP Use to navigate the menus About Your Phone 7 THE ICONS Each icon gives you a visual message of what is happening on your handset Battery level ...

Page 8: ...t any radiation To turn on this feature see page 24 Calling Features Your phone supports a number of call related features to help you handle and manage your calls AUTO ANSWER Auto answer enables you to answer an incoming call by simply picking up the handset from the charging cradle You do not need to press a key to answer the call Activating Deactivating auto answer 1 Press MENU 2 Select SETTING...

Page 9: ...ning tones Your call maybe cut off shortly after the warning WHAT IS STANDBY MODE Your phone is in standby mode when it is idle The standby screen displays the handset name the signal icon and the battery icon SETTING YOUR PHONE S COUNTRY This feature is not applicable for use in SINGAPORE It is necessary to setup your phone in order for it to work properly according to your country s standards 1 ...

Page 10: ...lso not be able to carry out many of the phone functions and features NOTE Your handset cannot receive any call if the power is switched off NOTE Your base can register up to 4 handsets After registering 4 handsets your base unit registration memory is full If you attempt to register an additional handset registration will not be successful Custom Options Make this your handset change the look and...

Page 11: ... you will see the new call icon flashing if the call record you selected is a new missed call TIP Use to navigate the menus Call 11 Call MAKING A CALL This section describes the different ways to make a call 1 Press 2 Dial the phone number The number displays on the screen and is dialed out Pre dialing Pre dialing lets you view and make changes to the number before making the call 1 Enter the phon...

Page 12: ...3 Select ADD RECORD Press OK 4 Enter the name Press OK 5 Enter the number 6 Press OK to confirm Your new record is saved EDITING A RECORD 1 Press MENU 2 Select PHONEBOOK Press OK 3 Select VIEW RECORDS Press OK 4 Select the record you want to edit Press OPTIONS 5 Choose EDIT RECORD Press OK 6 Edit the name if necessary Press OK 7 Edit the number if necessary 8 Press SAVE to confirm Your record is s...

Page 13: ...your service provider TIP Use to navigate the menus Call 13 DURING A CALL This section describes the features that are available during a call Making a second call 1 Press during a call R displays on the screen 2 Dial the number you want The number displays on the screen and is dialed out Answering a second call During a call your phone sounds a short beep periodically to notify you of an incoming...

Page 14: ...s during your call with the outside caller 2 Press the target handset number Wait for the other party to answer your call 3 Press and hold for 2 seconds You are now on a 3 way conference call 4 Press to exit from the conference call NOTE A 3 way conference call requires 2 handsets that share the same base unit NOTE An intercom call can only involve 2 handsets that share the same base unit Text and...

Reviews: