background image

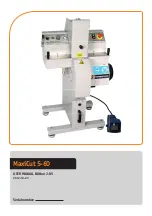
MaxiCut 5-60 USER MANUAL EDITION 2-05 2012-10-23

11

8. Maintenance

8.1 Replacing the cutting blade

Warning !

Always use protective gloves when changing the cutting blade.

• Turn off and disconnect the power supply to the machine. Lock switches if pos

-

sible.

• Wait until the machine has stopped completely.
• Open the lid on the left side of the chassie.
• Lift up the safety hatch, open the front cover to access the cutting blade.
• Lock the motor shaft by inserting the locking tool in the drilled hole behind the 
   cutting blade.
• Loosen the hexagon headed screw by using a 10 mm hexagon wrench.
• The cutting blade is now loose. Dismantle the old blade.
• Mount the new blade and screw the adapter plate tightly with the centre bolt.

   Moment of torsion is 47 Nm.

• A new cutting blade must initially be run according to chapter 7.1.
• Start the cutting machine and check that no vibrations occur

.

8.2 After each working shift

• Turn off the machine, disconnect the power supply.
• Open the waste box, remove cutting residue.

8.3 Regular maintenance

At service and maintenance there should be a warning sign ”Service in progress” 
placed by the machine. Before service or maintenance the power and air supply has 
to be disconnected. The main switch has to be switched off, locked and a warning 
sign ”Service in progress” has to be placed at the connection to the mains.
Make sure that the cutting blade has stopped completely before any service starts.

• Make sure that the cutting blade is in good condition, that no cracks have occured.
• Clean the machine and remove cutting residue to avoid risk of fire.
• Empty the water separator, placed on the machine side.

Summary of Contents for MaxiCut 5-60

Page 1: ...UseR MAnUAL edition 2 05 2012 10 23 serial number MaxiCut 5 60...

Page 2: ...ce in a demanding environment was the primary focus Downtime and unnecessary service is always more expensive than the small extra cost of a quality product That was the philosophy and still is for wh...

Page 3: ...tarting up 9 6 1 preliminary steps 9 6 2 operator position 9 6 3 starting up 9 7 Hose cutting 10 7 1 running in the cutting blade 10 7 2 different hose dimensions 10 8 Maintenance 11 8 1 Replacing the...

Page 4: ...amine in depth the topics of disassembly and extraordi nary maintainance as these operations must always be carried out by our autho rized Technical Service To handle the machine properly it is necess...

Page 5: ...ose make sure that the cutting blade rotates in the cor rect direction see rotation arrow and that the hose is placed steady towards the adjustable cutting support Also make sure that the hose is held...

Page 6: ...ate regarding agreement according to CE standards 3 1 Warranty The cutting machine is guaranteed for one 1 year following the date of purchase the warranty is valid only if all of the instructions lis...

Page 7: ...ting machine consists of one unit equipped with a pneu matic cylinder which is manouvered by a foot pedal and flap doors that are pres sed down by the hose during the cutting process The unit is also...

Page 8: ...to the left on the counter 5 Switch for cutting speed This switch is intended for regulation of cutting speed e g when cutting a 1 1 4 2 dimensioned hose the speed shall be reduced to no 1 speed 6 Cut...

Page 9: ...and maintain safety conditions During this stage make sure that the start stop button and safety switch not are blocked and that there is sufficient visibility and lightning on the machine the surrou...

Page 10: ...5 8 1 must the cutting supports always be used and put in the two outer holes Min cutting length 250 mm Cutting speed no 1 or 2 can be used for these dimensions hoses of dimension 1 1 4 2 layers shal...

Page 11: ...e bolt Moment of torsion is 47 Nm A new cutting blade must initially be run according to chapter 7 1 Start the cutting machine and check that no vibrations occur 8 2 After each working shift Turn off...

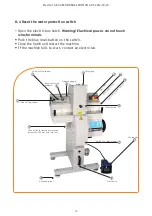
Page 12: ...O N O F F Connection for smoke evacuation system dia 100 mm hole Option Valve cutting speed Valve cutting speed Regulator for air pressure Pressure gauge Lifting eye 14 8 4 Reset the motor protection...

Page 13: ...S MaxiCut 5 60 230V 3 phase 9009 00 01 2003S sPARe PARts PARt nUMBeR Cutting blade HSM 400x4x50 Smooth 9009 01 04 Cutting blade HSM 400x4x50 Toothed 9009 01 05 10 technical data 10 1 noise Level Test...

Page 14: ...MaxiCut 5 60 USER MANUAL EDITION 2 05 2012 10 23 14...

Page 15: ...MaxiCut 5 60 USER MANUAL EDITION 2 05 2012 10 23 15...

Page 16: ...MaxiCut 5 60 USER MANUAL EDITION 2 05 2012 10 23 16...

Page 17: ...MaxiCut 5 60 USER MANUAL EDITION 2 05 2012 10 23 17...

Page 18: ...MaxiCut 5 60 USER MANUAL EDITION 2 05 2012 10 23 18...

Page 19: ...MaxiCut 5 60 USER MANUAL EDITION 2 05 2012 10 23 19...

Page 20: ...MaxiCut 5 60 USER MANUAL EDITION 2 05 2012 10 23 20...

Page 21: ...MaxiCut 5 60 USER MANUAL EDITION 2 05 2012 10 23 21...

Page 22: ...MaxiCut 5 60 USER MANUAL EDITION 2 05 2012 10 23 22...

Page 23: ...MaxiCut 5 60 USER MANUAL EDITION 2 05 2012 10 23 23...

Page 24: ...MaxiCut 5 60 USER MANUAL EDITION 2 05 2012 10 23 24...

Page 25: ...MaxiCut 5 60 USER MANUAL EDITION 2 05 2012 10 23 25...

Page 26: ...MaxiCut 5 60 USER MANUAL EDITION 2 05 2012 10 23 26...

Page 27: ...MaxiCut 5 60 USER MANUAL EDITION 2 05 2012 10 23 27...

Page 28: ...Pungmakarbov gen 1 SE 783 90 S ter Sweden Phone 46 0 225 573 30 Fax 46 0 225 501 08 info hydroscand machine se www hydroscand machine se...

Reviews: