8 –
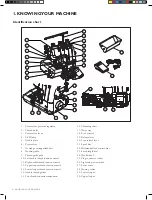
KNOWING YOUR MACHINE
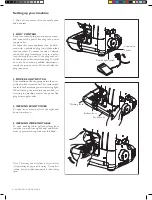
1. Wipe off any excess oil in the needle plate
and bed areas.
2. FOOT CONTROL
Push foot control plug into connector socket,
and connect the power line plug into power
supply outlet.
Be aware that some appliances can be deliv
-
ered with a polarized plug (one blade wider
than the other). To reduce the risk of electric
shock, this plug is intended to fit in a polar-
ized outlet only one way. If the plug does not
fit fully in the outlet, reverse the plug. If it still
does not fit, contact a qualified electrician to
install the proper outlet. Do not modify the
plug in any way.
3. POWER/LIGHT SWITCH
Your machine will not operate unless the pow-
er/light switch is turned on. This same switch
controls both machine power and sewing light.
When leaving the machine unattended, or
servicing the machine, remove the power line
plug from supply outlet.
4. OPENING FRONT COVER
To open front cover, pull it to the right and
down towards you.
5. OPENING WORKING TABLE
To open working table, pull the release lever
towards you with your right hand, and lift the
front of presser foot up with your left hand.
Note: The moving part at the front of the presser foot
is for protecting the fingers while sewing. Normally it
is down, but can be lifted momentarily to check cutting
status.
Connector
Socket
Power/light switch
Working table
Release lever
Front cover
Setting up your machine


