background image

34 – 

CHECKING PERFORMANCE PROBLEMS

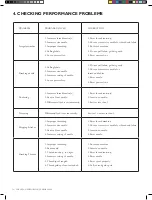
4. CHECKING PERFORMANCE PROBLEMS

PROBLEM

PROBABLE CAUSE

CORRECTION

Irregular stitches

1. Incorrect thread tension(s).

2. Incorrect size needle.
3. Improper threading.
4. Pulling fabric.
5. Loose presser foot.

1. Reset thread tension(s).

2. Choose correct size needle for thread and fabric.
3. Re-thread machine.
4. Do not pull fabric; guide it gently.
5. Reset presser foot.

Breaking needle

1. Pulling fabric.
2. Incorrect size needle.
3. Incorrect setting of needle.
4. Loose presser foot.

1. Do not pull fabric; guide it gently.
2. Choose correct size needle for
thread and fabric.
3. Reset needle.
4. Reset presser foot.

Puckering

1. Incorrect thread tension(s).
2. Bent or blunt needle.

3. Differential feed is set incorrectly.

1. Reset thread tension(s).

2. Insert new needle.

3. Set it at less than 1.

Wavering

Differential feed is set incorrectly.

Set it at 1 or at more than 1.

Skipping Stitches

1. Improper threading.
2. Incorrect size needle.

3. Bent or blunt needle.

4. Incorrect setting of needle

1. Reset thread machine.
2. Choose correct size needle for thread and fabric.
3. Insert new needle.
4. Reset needle.

Breaking Threads

1. Improper threading.

2. Bent needle.
3. Thread tension(s) too tight.

4. Incorrect setting of needle.
5. Thread spool tangled.

6. Thread guide pole not extended.

1. Re-thread machine.
2. Insert new needle.

3. Reset thread tension(s).

4. Reset needle.
5. Reset spool properly.

6. Fully extend guide pole.

Summary of Contents for VIKING Amber S 100

Page 1: ...KEEPINGTHE WORLD SEWING TM User s Guide ...

Page 2: ...ments mentioned in the instruction manual Do not allow to be used as a toy Close attention is necessary when this overlock machine is used by or near children Use this overlock machine only for its intended use as described in this manual Use only attachments recommended by the manufacturer as contained in this manual Never operate this overlock machine if it has a damaged cord or plug if it is no...

Page 3: ...lamp is damaged or broken it must be replaced by the manufacturer or its service agent or a similarly qualified person in order to avoid a hazard If the cord connected with the foot control is damaged it must be replaced by the manufacturer or its service agent or a similarly qualified person in order to avoid a hazard SAVE THESE INSTRUCTIONS ...

Page 4: ...bric Chart 12 12 2 GETTING READYTO SEW Threading the machine 13 Trimming needle thread 16 Stitch Settings 18 Adjusting thread tensions 24 Basic techniques 28 Turning curved edges 28 Removing stitches from sewn fabric 28 Flatlocking using two threads or using three threads flat seam 30 Butted seams using two threads or using three threads flat seam 30 Pintucking using three threads 30 Making decora...

Page 5: ... 3 or 4 threads Overedge stitch width Max 7 mm left needle Needle Overlock Needle Style 2022 Stitch length 1 5mm Stitching speed Up to 1300 stitches per minute Dimensions Width 320mm 12 6 inches Length 385mm 15 2 inches Height 370mm 14 6 inches Weight 9 Kgs 20 Lbs ...

Page 6: ... guide pole 10 Left needle thread tension control 11 Right needle thread tension control 12 Upper looper thread tension control 13 Lower looper thread tension control 14 Needle thread guides 15 Two thread converter instruction 16 Threading chart 17 Waste tray 18 Foot control 19 Release lever 20 Foot release lever 21 Spool disc 22 Differential feed control dial 23 Stitch length dial 24 Hand wheel 2...

Page 7: ...Stitch finger A is already on the ma chine upon delivery 3 Needles 4 Lint brush 5 Screwdriver small 6 Soft dust cover 7 Screwdriver large 8 Moving cutter 9 Tweezer 10 Wrench 11 Thread spool nets 12 Spool discs 13 Spool holders 14 Accessory bag Accessories Parts listed are included with your machine ...

Page 8: ...way 3 POWER LIGHT SWITCH Your machine will not operate unless the pow er light switch is turned on This same switch controls both machine power and sewing light When leaving the machine unattended or servicing the machine remove the power line plug from supply outlet 4 OPENING FRONT COVER To open front cover pull it to the right and down towards you 5 OPENING WORKING TABLE To open working table pu...

Page 9: ...hest point until you hear it click Place thread spools on pins and draw thread through thread guides on the pole from back to front The thread guides of the pole can help hold thread spools in place while the machine is not in use Push down on the pole as illustrated below Thread guide Thread guide pole ...

Page 10: ...or cone spools For large cone spools use the spool holders with the wide end at the top and for small ones use the same spool holders but with the narrow end at the top Spool nets Polyester or bulky nylon threads may tend to spill from the spool while unwinding To keep consistent feeding of such threads utilize spool net sleeving over the spool Spool caps for domestic type spools ...

Page 11: ...e cover Draw the thread chain toward the rear and cut off excess threads with the thread knife as shown Changing presser feet Be sure needle is in the up position Raise presser foot lever 1 Push foot release lever to remove the foot 2 Place the desired foot on the needle plate aligning needle holes 3 Lower the presser foot lever and push foot release lever so that the foot holder snaps on the foot...

Page 12: ...u but leave presser foot down Loosen needle clamp screw to re move the needle and place new needle with flat side away from you into the needle bar as far as it will go and tighten screw Fabric Needle Thread Chart Your machine uses Style 2022 overlock needles There are two Style 2022 needles size 90 14 already inserted The additional needles in your included accessories are 3 more size 90 14 needl...

Page 13: ...dle to its highest point by turning hand wheel towards you and raise the presser foot Before re threading the lower looper after a thread break remove thread from needle eye first then re thread the lower looper This will prevent tangling 1 Feed the thread through the thread guides as illustrated 2 Pull the upper thread through the slot holding the thread with your left hand 3 Draw the thread thro...

Page 14: ...nsion slot Holding the thread with your left hand pull down with right hand firmly 3 Draw the thread through thread guides as illustrated 4 Pass the thread through lower looper eye and then place the thread over the upper looper Make sure the thread is over the up per looper not under it or the machine will not sew Leave about 4 10cm extra thread ...

Page 15: ...h needle thread tension slots Holding the thread with your left hand pull down with right hand firmly 3 Draw the thread through the thread guides as illustrated 4 Thread the needles from front to back through needle eye and pull the threads towards the back passing along the right side of presser foot leaving an extra length of about 4 10cm ...

Page 16: ...Replacing thread spools When replacing thread spools the following steps may be helpful for quick changeover 1 Cut off existing threads near the spools Tie the cut ends thread from new spools as illustrated 2 Raise presser foot 3 Lower needle bar to its lowest position by turn ing hand wheel away from you Carefully pull the existing threads until the connect ing knots pass through needle eye and l...

Page 17: ...d Fig 2 Fig 1 Fig 3 2 Start the machine at low speed and feed in test fabric under the presser foot by slightly pushing it forward This can be done with the presser foot down on most fabrics except bulky materials Guide the fabric gently as machine automatically feeds the fabric 3 Check thread tensions by test sewing on spare fabric See page 17 4 At fabric end carry on running machine at low speed...

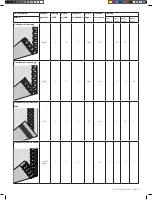
Page 18: ... thread converter Tension Stitch Left Needle Right Needle Upper looper Lower looper 2 thread overlock wide Left 6 2 5 2 A Yes 1 7 2 thread overlock narrow Right 6 2 5 2 B Yes 1 8 5 2 Thread wrapped edge overlock wide Left 6 3 5 2 A Yes 4 1 2 Thread wrapped edge overlock narrow Right 6 3 2 B Yes 4 5 STITCH SETTINGS ...

Page 19: ...s Stitch finger 2 thread converter Tension Stitch Left Needle Right Needle Upper looper Lower looper 2 thread rolled edge Right 6 2 2 None Yes 5 4 2 thread narrow edge Right 4 2 2 None Yes 1 8 5 2 thread flatlock stitch Left 6 2 5 2 A Yes 1 5 5 3 Thread picot stitch Right 7 P 3 None No 4 3 5 5 5 ...

Page 20: ...nger 2 thread converter Tension Stitch Left Needle Right Needle Upper looper Lower looper 3 thread overlock stitch wide Left 6 3 3 A No 4 4 3 5 3 thread overlock stitch narrow Right 6 3 3 B No 4 5 4 3 thread flatlock stitch narrow Right 5 3 3 B No 0 4 9 3 thread stretch overlock Left Right 6 P 3 A Yes 4 4 2 ...

Page 21: ...ch finger 2 thread converter Tension Stitch Left Needle Right Needle Upper looper Lower looper 3 thread rolled edge Right 6 R 3 None No 4 5 3 5 4 3 thread narrow edge Right 6 2 3 None No 4 4 0 5 3 thread flatlock stitch wide Left 5 3 3 B No 0 3 5 9 4 thread overlock stitch Left Right 6 3 4 A No 4 4 4 4 ...

Page 22: ...by turning hand wheel towards you When 2 thread sewing only one needle is used so place a needle in either the right or left position depending on the stitch you are planning to sew Place the unused needle back into the needle pack or into the accessory bag 1 Pull out the converter as shown in Fig 1 2 Attach the two thread converter onto the upper looper as shown in Fig 2 Fig 3 3 When not using co...

Page 23: ... Open the front cover and working table 3 Remove the stitch finger from the needle plate by screw driver and place it securely in the front cover as illustrated or in the ac cessory bag 4 Set the machine according to page 18 NOTE After finishing reset the stitch finger in its place Please ensure inserting it deep as illustrated in Fig 1 After removing the stitch finger from the machine insert it s...

Page 24: ... Top side Underside Upper looper thread Right needle thread Top side Underside Just right Lower looper thread Top side Needle thread Underside Fig 2 Fig 1 Fig 3 Fig 4 Fig 5 Left needle thread loose and visible on under side of fabric Increase left needle thread tension and or decrease either or both looper threads Right needle thread loose and visible on under side of fabric Increase right needle ...

Page 25: ...ial according to the type of fabric It is set at standard width of 6mm when delivered from the factory Turn it towards 5 if fabric edge puckers while sewing Fig 1 Turn it toward 7 if loops hang off the edge Fig 2 Stitch finger B Loops may hang off the edge when you sew with lightweight fabric using 3 threads right needle only and setting cutting width dial at 4 5 Fig 3 In such a case change the st...

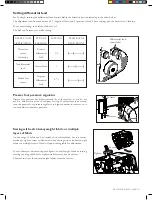
Page 26: ...e differential feed When set for positive differential feed the front row of feed teeth A makes a longer stroke than the rear row of feed teeth B This has the effect of accumulating fabric under the presser foot to offset the wavering on the fab ric removing distortion Negative differential feed When set for negative differential feed the front row of feed teeth A makes a shorter stroke than the r...

Page 27: ...eed control dial Increase Decrease Tighten Loosen Screw EFFECT AND APPLICATION TYPE OF FEEDING SETTING FEED RATIO REAR FRONT Waver free seams Gathering Positive differential feed 1 2 No differential feed Neutral feed 1 Pucker free seams Negative differential feed 0 7 1 A wide range of fabric can be overlocked on this machine but it is recom mended to tighten screw as illustrated when sewing with e...

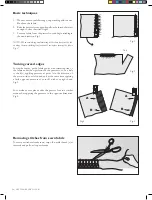
Page 28: ...ine for about 3cm before turning the fabric Fig 2 Turning curved edges For inside curves guide fabric gently with trimming line of the fabric under the right front of the presser foot or a little to the left applying pressure at point A in the direction of the arrow with your left hand and at the same time applying a little opposite pressure at point B with your right hand Fig 3 For outside curves...

Page 29: ... the front or rear hole according to the operation see diagrams Figures 2 and 3 in the presser foot and pass it under and to the rear of the foot 3 Place the fabric to be sewn as normal Start at slow speed observing if cord is feeding correctly and in crease speed as desired For joining shoulder or sleeves pass the cord through the front hole ensuring that it is fixed between the left and right ne...

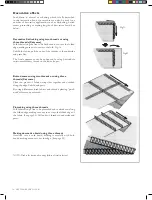
Page 30: ...an be enhanced by using buttonhole twist or embroidery thread on the lower looper Butted seams using two threads or using three threads flat seam Place two pieces of fabric wrong sides together and overlock along the edge Unfold and press By using different colored fabrics and thread a pleasing patch work effect can be achieved Pintucking using three threads Fold fabric along a line to be pintucke...

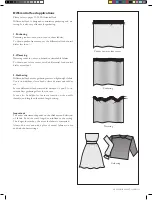
Page 31: ...r free seams set the differential feed control dial at more than 1 3 Gathering Differential feed makes gathering easier on lightweight fabric Use it on waistlines sleeve heads sleeve bottoms and ruffles etc Set the differential feed control dial between 1 5 and 2 to ob tain the best gathering effect for your use It can also be helpful to increase tension on the needle thread s and lengthen the sti...

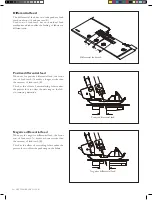
Page 32: ...driving arm to its lowest position by turning the hand wheel towards you by hand In this position set replacement cutter in position and secure it with screw ENSURING THAT THE EDGE OF THE MOVING CUTTER IS APPROXIMATELY 0 5MM BELOW THE SURFACE OF THE FIXED CUTTER Screw Moving cutter Cutter release knob 0 5mm Disengaging moving cutter If you want to sew without cutting open the working table and dis...

Page 33: ...bricated at all times FIRST DISCONNECT MACHINE FROM POWER SUPPLY BY REMOVING PLUG FROM SOCKET OUTLET 1 Open the front cover and working table Using the brush provided remove dust and lint that have accumulated 2 Apply a few drops of oil to the points indicated by arrows ALWAYS USE A GOOD QUALITY SEWING MACHINE OIL ...

Page 34: ...edle 4 Reset presser foot Puckering 1 Incorrect thread tension s 2 Bent or blunt needle 3 Differential feed is set incorrectly 1 Reset thread tension s 2 Insert new needle 3 Set it at less than 1 Wavering Differential feed is set incorrectly Set it at 1 or at more than 1 Skipping Stitches 1 Improper threading 2 Incorrect size needle 3 Bent or blunt needle 4 Incorrect setting of needle 1 Reset thre...

Page 35: ...www husqvarnaviking com 4710960 26A 2021 KSIN Luxembourg II S a r l All rights reserved ...

Reviews: