background image

Read the 

Safety

 section and following pages, if you are 

unfamiliar with the machine.

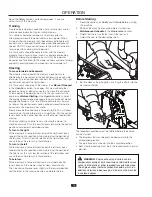
Training

Due to unique steering capabilities, zero turn mowers are far 
more maneuverable than typical riding mowers.
This section should be reviewed in its entirety prior to 
attempting to move the mower under its own power. When 
first operating the mower or until becoming comfortable with 
controls, use a reduced throttle speed and reduced ground 
speed. DO NOT move control levers to the furthest forward or 
reverse positions during initial operation.
First time users should become familiar with the mower’s 
movement on a hard surface, such as concrete or blacktop 
PRIOR to attempting to operate on turf. Until the operator 
becomes comfortable with the mower controls and zero turning 
capability, overly aggressive maneuvers may damage turf.

Steering

To move forward and backward

The direction and speed of the mower’s movements are 
effected by the movement of the control lever(s) on each side 
of mower. The left control lever controls the left wheel. The right 
control lever controls the right wheel.
First time users should push the mower (see

 Manual Transport


in the 

Operation

 section) to an open, flat area without other 

people, vehicles or obstacles nearby. To move the unit under 
its own power, the operator must sit in the seat and start the 
engine (see 

Before Starting

 in the 

Operation

 section). Adjust 

the engine speed to idle, disengage the park brake but do not 
engage the blades at this time. Rotate control levers inward. 
As long as the control levers have not been moved forward or 
backwards, the mower will not move.
Slowly move both control levers forward slightly. This will allow 
mower to start moving forward in a straight line. Pull the control 
levers back to the neutral position and the mower should stop 
moving.
Pull back slightly on control levers, allowing the mower to 
move backwards. Push the control levers forward to the neutral 
position and mower should stop moving.

To turn to the right

While moving in a forward direction, pull the right lever back 
towards the neutral position while maintaining the position of 
the left lever, this will slow the rotation of the right wheel and 
cause the machine to turn in that direction.

To turn to the left

While moving in a forward direction pull the left lever back 
towards the neutral position while maintaining the position of 
the right lever, this will slow the rotation of the left wheel and 
cause the machine to turn in that direction.

To zero turn

While moving in a forward direction, first pull both control 
levers back until the mower stops or slows dramatically.
Then by alternating one lever slightly to the forward position 
and the other in the reverse position, complete the turn.

Before Starting

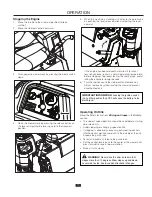
1.  Read the sections on 

Safety

 and 

Controls

 before starting 

the machine.

2.  Perform the daily maintenance before starting (see 

Maintenance Schedule

 in the 

Maintenance

 section).

3.  Check that there is sufficient fuel in the fuel tank.
4.  Adjust the seat to the desired position.

5.  Set the deck cutting height by inserting the lift pin into the 

desired cut height. 

The following conditions must be fulfilled before the engine 
can be started:

•  The blade switch must be pressed downward into the 

disengaged position.

•  The park brake must be up into the activated position.
•  Both steering controls must be in the locked (outer) neutral 

position.

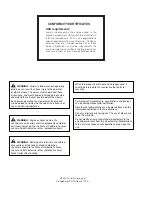
  WARNING!  Engine exhaust and certain vehicle 

components contain or emit chemicals considered to cause 
cancer, birth defects or other reproductive system damage. 
The engine exhaust contains carbon monoxide, which is a 
odorless, colorless, poisonous gas. Do not use the machine 
in enclosed spaces.

16

oPERATIoN

Summary of Contents for 967036502

Page 1: ...fully and make sure you understand the instructions before using the machine Gasoline containing up to 10 ethanol E10 is acceptable for use in this machine The use of any gasoline exceeding 10 ethanol E10 will void the product warranty RZ4221TF 967036502 ...

Page 2: ...d these instructions to operate the mower Each person operating the mower must be of sound mind and body and must not be under the influence of any mind altering substance WARNING Engine exhaust some of its constituents and certain vehicle components contain or emit chemicals known to the State of California to cause cancer and birth defects or other reproductive harm WARNING Battery posts termina...

Page 3: ... Bypass Linkages 14 Fuel Tank 15 OPERATION 16 Training 16 Steering 16 Before Starting 16 Starting the Engine 17 Running 18 Stopping the Engine 19 Operating On Hills 19 Mowing Tips 20 Jumper Cable Use 20 Moving Machine By Hand 21 Maintenance Schedule 22 MAINTENANCE 22 Battery 24 Safety System 25 Park Brake 25 Tire Pressures 25 Caster Wheels 26 Anti scalp Rollers 26 Adjusting the Mower Deck 27 Level...

Page 4: ...sure that the machine is well anchored DO NOT operate this machine on public roadways Towing If machine is equipped with a tow hitch use extreme caution when towing Never allow children or others in or on the towed equipment Make wide turns to avoid jack knifing Travel slowly and allow extra distance to stop Do not tow on sloped ground The weight of the towed equipment may cause loss of traction a...

Page 5: ... to the machine with the manufacturing number Engine Manufacturing Number The machine s manufacturing number can be found on the printed plate affixed to the engine compartment Stated on the plate from the top are The machine s type designation I D The manufacturer s type number Model The machine s serial number Serial no Please have the type designation and serial number available when ordering s...

Page 6: ...ial for misuse or misassembly Reverse Neutral Fast Slow Choke Fuel Warning Park Brake Noise emissions to the surroundings Australia and New Zealand only Do not stand here Use protective glasses Use protective gloves Danger Keep hands and feet away Do not touch parts Warning Rotating blades keep away from the discharge deck Battery acid is corrosive explosive and flammable Read Operator Manual Shut...

Page 7: ...ERVE THE FOLLOWING SAFETY INSTRUCTIONS COULD RESULT IN SERIOUS INJURY OR DEATH Watch for traffic when operating near or crossing roadways Use extra care when loading or unloading the machine into a trailer or truck Always wear eye protection when operating machine Wear proper Personal Protective Equipment PPE while operating this machine including at a minimum sturdy footwear eye protection and he...

Page 8: ...ften attracted to the machine and the mowing activity Never assume that children will remain where you last saw them Keep children out of the mowing area and in the watchful care of a responsible adult other than the operator Be alert and turn machine off if a child enters the area Before and while backing look behind and down for small children Never carry children even with the blades shut off T...

Page 9: ...bject stop and inspect the machine Repair if necessary before restarting Never make any adjustments or repairs with the engine running Check grass catcher components and the discharge guard frequently and replace with manufacturer s recommended parts when necessary Mower blades are sharp Wrap the blade or wear gloves and use extra caution when servicing them Check brake operation frequently Adjust...

Page 10: ...ould be maintained in effective working order by the operator A spark arrestor for the muffler is available through your authorized Husqvarna dealer IMPORTANT INFORMATION The park brake is not sufficient to lock the machine in place during transport Ensure that the machine is well fastened to the transport vehicle Always reverse the machine onto the transport vehicle to avoid tipping it over WARNI...

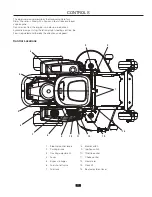
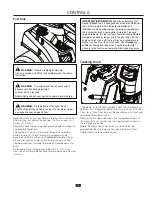
Page 11: ...g the left and right steering controls the flow is regulated and thereby the direction and speed Control Locations 1 2 6 10 9 4 5 12 7 3 11 8 14 13 5 1 Steering control levers 8 Blade switch 2 Parking brake 9 Ignition switch 3 Tracking adjustment 10 Throttle control 4 Fuses 11 Choke control 5 Bypass linkages 12 Hour meter 6 Fuel shut off valve 13 Deck lift 7 Fuel tank 14 Seat adjustment lever 11 C...

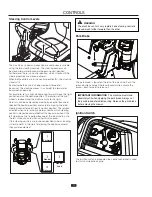
Page 12: ...ne control backward behind the neutral position and carefully moving the other steering control forward from its neutral position The rotation direction when zero turning is determined by which steering control is moved backward behind the neutral position If the left steering control is pulled backward the machine turns to the left Use extra care when using this maneuver If the steering controls ...

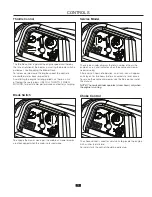
Page 13: ...mower deck pull the knob out mower blades are disengaged when the knob is pressed down Service Minder The service minder displays the total number of hours the engine has run and indicates when the engine and mower need servicing After every 50 hours of operation an oil can icon will appear and stay on for two hours before an automatic reset occurs To service the engine and mower see the Service J...

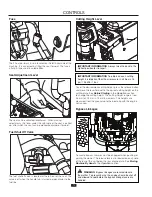
Page 14: ...MPORTANT INFORMATION Always raise the deck to the highest position for transport To set the desired deck cutting height press the release button and move the lever forward to the correct cutting height on the cutting plate See Before Starting in the Operation section to change the cutting height The cutting height range is from 38 mm to 102 mm in 13 mm increments The heights are measured from the ...

Page 15: ...gasoline near an open flame Read the safety instructions before refueling The machine has one fuel tank just behind the console The tank capacity is 3 gallons 11 4 liters Regularly check the gas cap gasket for damage and keep the cap properly tightened The engine will run on a minimum of 85 octane unleaded gasoline no oil mix Environmentally adapted alkylate gasoline can be used See also Technical...

Page 16: ...levers back to the neutral position and the mower should stop moving Pull back slightly on control levers allowing the mower to move backwards Push the control levers forward to the neutral position and mower should stop moving To turn to the right While moving in a forward direction pull the right lever back towards the neutral position while maintaining the position of the left lever this will s...

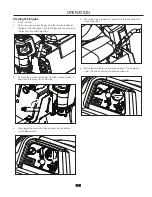
Page 17: ...transport position 3 Activate the park brake by pushing the release button in and pulling the lever fully upwards 4 Disengage the mower blades by pressing the blade switch downwards 5 Move the steering controls outward to the locked outer neutral position 6 Move the throttle to the middle position If the engine is cold the choke control should be pulled up 17 operation ...

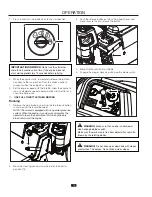
Page 18: ...y the operator to leave the seat without first setting the park brake will shut off the engine IMPORTANT INFORMATION Do not run the starter for more than 5 seconds each time If the engine does not start wait approximately 10 seconds before retrying 2 Move the steering controls inwards out of the neutral position N 3 Push the release button on the cutting height lever and move lever to the pin rele...

Page 19: ... To prevent fouling the spark plugs avoid idling the engine for longer periods 6 Turn the ignition key to the stop position Remove key Always remove key when leaving the mower to prevent unauthorized use WARNING Never drive the rider on terrain that slopes more than 10 degrees Mow slopes up and down never side to side Avoid sudden directional changes Operating On Hills Read the Safety Instructions...

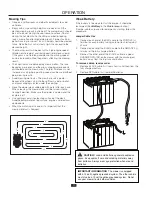
Page 20: ...r deck shall be raised into the transport position Make sure the mower is cooled and the engine is off Use compressed air to clean top surface of the deck Avoid flooding water on top surface engine and electrical components When the mulching kit is used it is important that the mowing interval is frequent IMPORTANT INFORMATION The mower is equipped with a 12 volt negative grounded system The other...

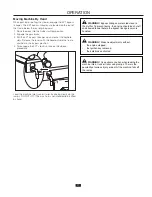
Page 21: ...ive reverse the above procedure WARNING Use extreme caution when loading the machine into a truck or trailer using ramps There is the possibility of serious injury or death if the machine falls off the ramps 1 2 WARNING Make no adjustments without the engine stopped the ignition key removed the park brake activated WARNING Bypass linkages are located close to the muffler To prevent burns the engin...

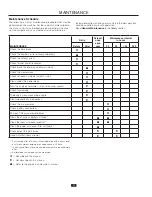
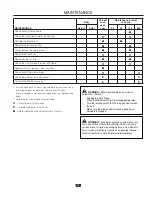
Page 22: ...l in hours Before After 25 50 100 300 Check the park brake Check the engine s oil level every refueling Check the safety system Check for fuel and oil leakages Check clean the engine s cooling air intake Check the mower deck Check for loose hardware screws nuts Clean under the mower deck Start the engine and blades listen for unusual sounds Check for damage Thoroughly clean around the engine Clean...

Page 23: ...ter wheels every 200 hours Replace the air cleaner s foam pre filter 2 Check adjust the mower deck Check the engine valve clearance 3 Perform the 300 hour service 3 1 First change after 8 10 hours When operating with a heavy load or at high ambient temperatures replace every 50 hours 2 In dusty conditions cleaning and replacement are required more often 3 Performed by authorized service workshop D...

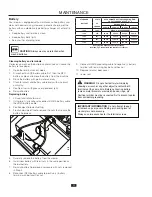
Page 24: ...0 min Charging time depends on battery capacity condition age temperature and efficiency of charger Cleaning battery and terminals Corrosion and dirt on the battery and terminals can cause the battery to lose power 1 Open the terminal access doors 2 Disconnect BLACK battery cable first then the RED battery cable and remove the battery from the machine 3 Rinse the battery with plain water and dry 4...

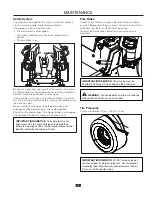
Page 25: ...must be absolutely standing still when applying the park brake WARNING Faulty adjustment will result in reduced braking ability and can cause an accident Make daily inspections to ensure that the safety system works by attempting to start the engine when one of the conditions is not met Change the conditions and try again If the machine starts when one of these conditions is not met turn the machi...

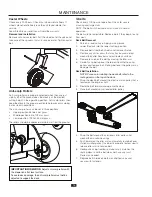
Page 26: ... will show some small cracks in normal operation The belts are not adjustable Replace belts if they begin to slip from wear Deck Belt Removal 1 Park on a level surface Apply parking brake 2 Lower the deck into the lowest cutting position 3 Remove bolts from belt shields and remove shields 4 Remove any dirt or grass that may have accumulated around the cutter housings and entire deck surface 5 Remo...

Page 27: ...measurement 3 Move to the opposite side check that measurement is the same If adjustment is required with a or adjustable wrench turn the lift link adjustment nuts on either side counter clockwise to lower or clockwise to raise Adjust until both measurements are equal 4 Turn any blade to align with the deck front to rear If the front blade tip does not measure 1 8 to higher in the rear with a 5 8 ...

Page 28: ...lace blades that have been bent or cracked when hitting obstacles Let the service workshop decide whether a blade with large nicks can be repaired ground or must be replaced Balance the blades after sharpening Check the blade mounts CAUTION Blades are sharp Protect your hands with gloves and or wrap blades with a heavy cloth when handling The sharpening of blades should be carried out by an author...

Page 29: ...Oil change Level check IMPORTANT INFORMATION Use minimal lubrication and remove excess lubricant so that is does not come into contact with belts or belt pulley drive surfaces Transmission The transmission is maintenance free with no need for level checks or oil changes If a leak occurs replace the unit or contact your Husqvarna dealer Wheel and Deck Zerks Use only good quality bearing grease Grea...

Page 30: ... hydraulic system Machine vibrates Blades are loose Blades are incorrectly balanced Engine is loose Engine overheats Clogged air intake or cooling fins Engine overloaded Poor ventilation around engine Defective engine speed regulator Too little or no oil in the engine Contamination in the carburetor or fuel line Fouled spark plugs Battery not charging Poor contact of the battery terminal cable con...

Page 31: ...lizer Start the engine and allow it to run until the carburetor is drained of fuel or the stabilizer has reached the carburetor 5 Remove the spark plug and pour about a tablespoon of engine oil into the cylinder Turn over the engine so that the oil is evenly distributed and then refit the spark plug 6 Lubricate all grease zerks joints and axles 7 Remove the battery Clean charge and store the batte...

Page 32: ...32 schematic ...

Page 33: ...ansmission Hydrostatic transaxles Productivity 8903 m2 h Steering control Dual levers foam gripped Dimensions Speed forward 0 10 5 km h Weight 263 kg Speed reverse 0 5 6 km h Base Machine Length 191 cm Brakes Mechanical park brake Base Machine Height 102 cm Front caster tires 11 x 6 5 Base Machine Width 100 cm Rear tires turf pneumatic 18 x 8 5 8 Overall Width Chute Up 109 cm Tire pressure 15 PSI ...

Page 34: ...ter in inches fine or coarse thread 9 12 13 18 5 16 18 24 28 38 24 33 3 8 31 42 46 62 40 54 7 16 50 68 75 102 75 102 115 156 9 16 110 149 165 224 5 8 150 203 225 305 250 339 370 502 7 8 378 512 591 801 11 8 782 1060 1410 1912 Grade 5 Minimum commercial quality lower quality not recommended Metric Standard Hardware Grade Grade 8 8 Grade 10 9 Grade 12 9 Size ft lbs Nm ft lbs Nm ft lbs Nm Shank Size ...

Page 35: ... the park brake q The safety switch for the mower deck q The safety switch in the seat q The safety switch in the steering controls q park brake functionality q Driving forward q Driving backward q Engaging the blades q Check the idle speed q Check the engine high idle speed q Inform the customer about Need and advantages of following the service schedule q Need and advantages of leaving machine f...

Page 36: ...lean the air cleaner s foam pre filter q After the First 10 Hours Change engine oil q 50 Hour Service Perform the 25 hour service q Clean replace the air cleaner s paper filter cartridge shorter intervals for dusty operating conditions q Change engine oil q Lubricate according to lubrication chart q Check adjust the park brake q 36 SERVICE JOURNAL Action Date mtr reading stamp sign Date mtr readin...

Page 37: ...the air filter s paper cartridge q Change hydraulic pump oil and filter 200 hours q 300 Hour Service Perform the 25 hour service q Perform the 50 hour service q Perform the 100 hour service q Check adjust the mower deck q Clean the combustion chamber and grind the valve seats q Check the engine valve clearance q Replace the air cleaner s foam pre filter q 37 SERVICE JOURNAL Action Date mtr reading...

Page 38: ...ir filter s paper cartridge q Change the engine oil 50 hours q Replace the engine oil filter 100 hours q Check adjust the cutting height q Check adjust the park brake 50 hours q Clean Change the spark plugs 100 hours q Change the fuel filter 100 hours q Check the engine valve clearance q 38 SERVICE JOURNAL Action Date mtr reading stamp sign ...

Page 39: ......

Page 40: ...www husqvarna com 115 681328 Rev A 2014 02 15 ...

Reviews: