7.9.5 To assemble the cylinder and piston
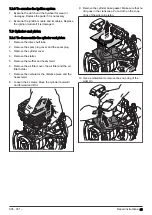
1. Carefully put the piston ring on the piston. Make
sure that you do not cause damage to the piston ring
or the piston.
2. Lubricate the needle bearing with 2-stroke oil and
put it into the connecting rod. Make sure the needle
bearing moves freely in the connecting rod.
3. Attach the piston to the connecting rod. Point the
arrow at the piston top in the direction of the exhaust
port.
Note: Put a cloth in the crankcase opening to make
sure that the piston rings do not fall into the
crankcase. Make sure that the piston rings are
correctly attached in the grooves.
4. Push in the piston pin and attach the G snap ring.
5. Lubricate the piston and piston ring with 2-stroke oil.
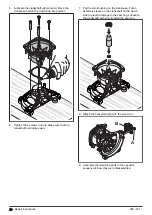
6. Put a new cylinder base gasket on the crankcase.
7. Attach the support plate from the piston assembly
kit. Refer to
Servicing tools on page 10.
8. Use the clamp from the piston assembly kit to
compress the piston ring. Carefully push the piston
into the cylinder opening.
CAUTION: Do not turn the cylinder. The
piston rings break easily.
9. Tighten the 4 screws to the correct torque. Refer to
Servicing data on page 6.
38 - Repair instructions
935 - 001 -
Summary of Contents for 531RB
Page 1: ...Workshop manual 541RB 531RB English 935 001 ...
Page 10: ...5 Servicing tools 10 8 3 11 12 9 1 2 4 5 6 7 13 14 15 16 10 Servicing tools 935 001 ...
Page 61: ...935 001 Technical data 61 ...
Page 62: ...62 Technical data 935 001 ...
Page 63: ...935 001 Technical data 63 ...
Page 64: ...114 10 74 26 2019 04 18 ...


