5 – STITCH ADJUSTMENTS
39
5
STITCH ADJUSTMENTS
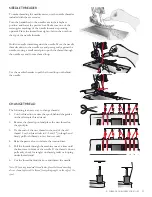
STITCH WIDTH ADJUSTMENTS
The stitch width can be increased or decreased by changing the needle
position or with the cutting width dial.
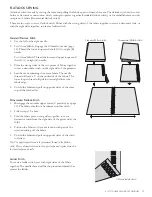
Width Adjustment by Changing Needle Position
$ :KHQRQO\WKHOHIWQHHGOHRUZKHQERWKQHHGOHVDUHXVHGWKHVWLWFK
width is 6 mm.
% :KHQRQO\WKHULJKWQHHGOHLVXVHGWKHVWLWFKZLGWKLVPP
& :KHQXVLQJWKHFKDLQVWLWFKQHHGOHWKHVWLWFKZLGWKLVPP
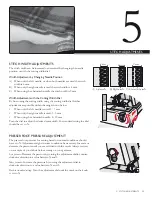
Width Adjustment with the Cutting Width Dial
%\ÀQHWXQLQJWKHFXWWLQJZLGWKXVLQJWKHFXWWLQJZLGWKGLDOIXUWKHU
adjustment are possible within the range shown below.
•
When only the left needle is used: 5 - 7 mm
•
When only the right needle is used: 3 - 5 mm
•
When using the chainstitch needle: 8 - 10 mm
Turn the dial to adjust the desired seam width. For standard setting the dial
should be set to N.
A) Left needle
B) Right needle
PP
PP
PP
C) Chainstitch needle
1
2
4
5
N
5
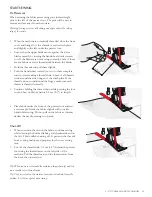
PRESSER FOOT PRESSURE ADJUSTMENT
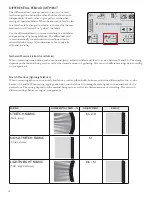
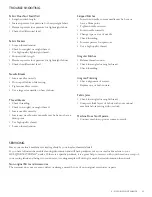
The presser foot pressure for sewing based on normal conditions should
be set to N. Adjustment might in some conditions be necessary. Increase or
GHFUHDVHWKHSUHVVXUHXQWLO\RXDUHVDWLVÀHGZLWKWKHUHVXOW$OZD\VWHVWVHZ
on a sample of your fabric before sewing on your garment.
/HVVSUHVVXUH
Decrease the pressure by turning the adjustment dial in counter-
clockwise direction to a value between N and 1.
0RUHSUHVVXUH
Increase the pressure by turning the adjustment dial in
clockwise direction to a value between N and 5.
Back to standard setting:
Turn the adjustment dial until the mark on the knob
is set to N.
Summary of Contents for Huskylock S25
Page 1: ...KEEPING THE WORLD SEWING User s Guide ...
Page 4: ......
Page 30: ...28 ...
Page 44: ...42 ...
Page 49: ...6 MACHINE MAINTENANCE 47 ...
Page 50: ...48 ...

