10
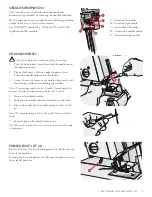
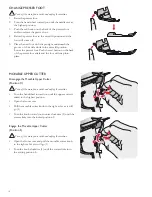
CHANGE PRESSER FOOT
7XUQRII WKHPDLQSRZHUVZLWFKDQGXQSOXJWKHPDFKLQH
1. Raise the presser foot.
2. Turn the hand wheel toward you until the needles are at
the highest position.
3XVKWKHUHGEXWWRQRQWKHEDFNRI WKHSUHVVHUIRRW
ankle to release the presser foot.
4. Raise the presser foot to the extra lift position and the
foot will come off.
3ODFHWKHQHZIRRWZLWKWKHSLQULJKWXQGHUQHDWKWKH
groove of the ankle while in the extra lift position.
/RZHUWKHSUHVVHUIRRW3XVKWKHUHGEXWWRQRQWKHEDFN
of the presser foot ankle and the foot will snap into
place.
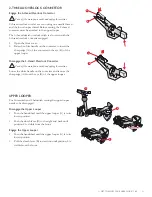
MOVABLE UPPER CUTTER
Disengage the Movable Upper Cutter
(Position C)
7XUQRII WKHPDLQSRZHUVZLWFKDQGXQSOXJWKHPDFKLQH
• Turn the handwheel toward you until the upper cutter is
raised to the highest position.
• Open the front cover.
•
3XOOWKHPRYDEOHFXWWHUNQREWRWKHULJKWDVIDUDVLWZLOO
JR
•
7XUQWKHNQREWRZDUG\RXFRXQWHUFORFNZLVHXQWLOWKH
cutter clicks into the locked position C.
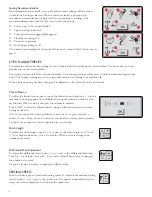
Engage the Movable Upper Cutter
(Position S)
7XUQRII WKHPDLQSRZHUVZLWFKDQGXQSOXJWKHPDFKLQH
• Open the front cover and pull the movable cutter knob
WRWKHULJKWDVIDUDVLWZLOOJR
•
7XUQWKHNQREFORFNZLVHXQWLOWKHFXWWHUFOLFNVLQWR
WKHFXWWLQJSRVLWLRQ6
B
S
C
B
S
1
2
1
2
Summary of Contents for Huskylock S25
Page 1: ...KEEPING THE WORLD SEWING User s Guide ...
Page 4: ......
Page 30: ...28 ...
Page 44: ...42 ...
Page 49: ...6 MACHINE MAINTENANCE 47 ...
Page 50: ...48 ...


