


Hunter 31 • Sails and Rigging
12.4
total slack in the sheet. The sheet that is not being used
— the lazy sheet — should also be attached to the clew
of the spinnaker , led forward
in front of the headstay
,
and then back on the other side of the boat — outside
the shrouds and lifelines — to another turning block
positioned just forward of the stern pulpit. Then take that
sheet and lead it to a winch, with the slack in the sheet.
Now you are ready to hoist the spinnaker. Start by
heading off to a square run. Leave the mainsail fully
out during the hoisting procedure as it will blanket
the spinnaker and keep it from filling until you are
ready for it to be set. A good place to raise the sail
is from the leeward side, just ahead of the boom.
Once it is fully hoisted, slowly head up to your desired
course and pull in the sheet until the sail sets. Make
sure you have at least two turns of the sheet around the
winch.
Now you are off and sailing with your cruising spinnaker.
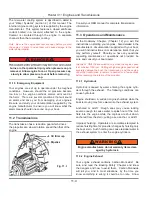
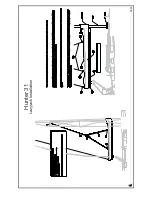
12.9 The Arch
As is customary on Hunters, the traveler is overhead, on
a stainless-steel arch, to keep the cockpit clear of the
obstruction and the boom clear of your head. The helms-
man can easily adjust the mainsheet traveler and the jib
sheets, although the mainsheet itself is at the companion-
way as illustrated above. The setup allows short handed
sailing when there are only a couple of people in the
cockpit or with an autopilot doing the steering.
For instructions on folding the arch for transport or ser-
vice please follow the following instructions:
Arch installation notes and tool list:
Notes: Read all of the installation instructions before begin-
ning.
This job requires two people, it is important that the
arch be supported until firmly attached to the deck.
To avoid injury during the installation process, orient
the arch prior to beginning the installation.
Remember to check all arch nuts bolts after the initial
seatrial and tighten as necessary.
Tool List for arch installation:
Drill and 3/8” drill bit, to clear sealant from holes.
3/8” drive ratchet
6” extension
•
•
•
•
•
•
9/16” deep and regular socket.
9/16” wrench
Phillips head screwdriver (large: P4)
Caulk gun, and sealant (3M-5200)
‘Never Seize” bolt lube
Razor knife
wire strippers / crimps
rags, and acetone, or lacquer thinner for clean-up.
12.10 Protecting Your Rigging
Without careful inspection and proper maintenance, the
rigging is subject to fatigue, wear, discoloration, and
therefore, product failure. Remember: regular inspection
and cleaning will increase the life of your investment and
secure your rigging. We suggest the following:
Always rinse your rigging with fresh water after sail-
ing, especially salt-water sailing. Salt can create corro-
sion pits, causing cracks and deterioration.
Clean with a water-soluble chlorine-free detergent.
Nonabrasive cleansers are best for hard white vinyl
coated cables.
Inspect rigging for stains. Rust stains may indicate
stress cracks or corrosion. Remove stains with synthetic
or brass pads. Never use steel wool pads.
Look for broken wires- a sign of fatigue in rigging.
Replace standing rigging if wires are broken.
Never mix stainless steel and galvanized metals on
cable, fittings, pins, cotter keys, etc. If mixing dissimilar
metals, electric currents may conduct between metal
causing rapid deterioration
Store rigging in a dry place. Never store in a plastic
bag, which can cause corrosion.
12.10.1 Sail Care
Sunlight is a sail’s worst enemy, so
cover the mainsail
when not in use.
An ultraviolet guard, fitted down the
leech of a roller headsail will protect the exposed part
from the weathering effect of the sun and from dirt and
grit. Mildew, can be prevented by storing sails dry and by
hand washing twice a season. Check all sails regularly
for chafe, particularly where they chafe on deck fittings
or rigging, at reef points, batten sleeves and the foot of
the headsail. Sail batten pockets should be inspected on
a regular basis.
To stow the mainsail, start at the leech and flake it onto
the boom, left and right, in about 18-in. (46 cm) folds,
while pulling the leech aft. Secure with a sail tie and con-
tinue to the luff. Lash to the boom with sail ties or shock
•
•
•
•
•
•
•
•
•
•
•
•
•
•
Summary of Contents for H31
Page 1: ...Operator s Operator s Manual Manual H31 H31 V1 031507 P N 1031379 ...
Page 2: ......
Page 9: ...Introduction Introduction H31 H31 Chapter 1 Chapter 1 V1 031507 P N 1031379 ...
Page 14: ...Hunter 31 Introduction 1 6 Notes ...
Page 15: ...V1 031507 P N 1031379 and Documents Documents Forms Forms H31 H31 Chapter 2 Chapter 2 ...
Page 26: ...Hunter 31 Documents and Forms Maintenance Log Date Maintenance Performed Hourmeter 2 12 ...
Page 27: ...Hunter 31 Documents and Forms 2 13 Date Maintenance Performed Hourmeter Maintenance Log ...
Page 33: ...Hunter 31 Documents and Forms 2 19 Spare Parts List ...
Page 34: ...Hunter 31 Documents and Forms Dates of practice drills and onboard safety inspections 2 20 ...
Page 35: ...Hunter 31 Documents and Forms 2 21 My personal preferences for maintenance items safety gear ...
Page 36: ...Hunter 31 Documents and Forms Notes 2 22 ...
Page 37: ...V1 031507 P N 1031379 Warranty Warranty H31 H31 Chapter 3 Chapter 3 ...
Page 38: ...This Page Intentionally Left Blank Hunter Warranty 3 2 ...
Page 45: ...Boating Boating Safety Safety H31 H31 Chapter 4 Chapter 4 V1 031507 P N 1031379 ...
Page 64: ...This Page Intentionally Left Blank Hunter 31 Boating Safety 4 20 ...
Page 65: ...Chapter 5 Chapter 5 Fuel Fuel Systems Systems H31 H31 V1 031507 P N 1031379 ...
Page 71: ...A Quick Fuel Filter Reference Hunter 31 Fuel Systems 5 7 Fig 5 6 ...
Page 76: ...Notes Hunter 31 Fuel Systems 5 12 ...
Page 79: ...Underwater Underwater Gear Gear H31 H31 Chapter 6 Chapter 6 V1 031507 P N 1031379 ...
Page 80: ...Hunter 31 Underwater Gear 6 2 This Page Intentionally Left Blank ...
Page 89: ...Hunter 31 Underwater Gear 6 11 ...
Page 91: ...DC Electric DC Electric Systems Systems H31 H31 Chapter 7 Chapter 7 V1 031507 P N 1031379 ...
Page 100: ...Hunter 31 DC Electric 7 10 Notes ...
Page 105: ...AC Electric AC Electric Systems Systems H31 H31 Chapter 8 Chapter 8 V1 031507 P N 1031379 ...
Page 112: ...Hunter 31 AC Electric Systems 8 8 Notes ...
Page 114: ...Hunter 31 AC Electric Systems 8 10 Notes ...
Page 115: ...Water Water Systems Systems H31 H31 Chapter 9 Chapter 9 V1 031507 P N 1031379 ...
Page 122: ...Hunter 31 Water Systems 9 8 Notes ...
Page 123: ...Waste Waste Systems Systems H31 H31 Chapter 10 Chapter 10 V1 031507 P N 1031379 ...
Page 132: ...Hunter 31 10 10 Waste System Bilge Water ...
Page 134: ...Hunter 31 Waste and Sanitation Systems 10 12 Notes ...
Page 143: ...Hunter 31 11 9 Exhaust System ...
Page 144: ...Hunter 31 Engine and Transmissions 11 10 Notes ...
Page 145: ...V1 031507 P N 1031379 Sails Sails Rigging H31 H31 Chapter 12 Chapter 12 and and ...
Page 150: ...Hunter 31 Sails and Rigging 12 6 Notes ...
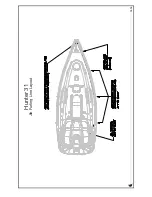
Page 154: ...Hunter 31 12 10 Jib Furling Line Layout ...
Page 155: ...Hunter 31 12 11 Optional Mainsheet Purchase Traveler Layout ...
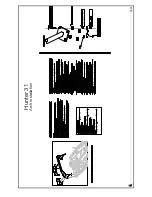
Page 156: ...Hunter 31 12 12 Arch Installation ...
Page 157: ...Hunter 31 12 13 Lazyjack Installation ...
Page 158: ...Hunter 31 12 14 Optional Spinnaker Layout ...
Page 159: ...Getting Getting Underway Underway H31 H31 Chapter 13 Chapter 13 V1 031507 P N 1031379 ...
Page 166: ...Hunter 31 Getting Underway 13 8 Notes ...
Page 167: ...Maintenance H31 H31 Chapter 14 Chapter 14 V1 031507 P N 1031379 ...
Page 180: ...Hunter 31 Maintenance 8 8 Notes ...
Page 181: ...Glossary Glossary H31 H31 Chapter 15 Chapter 15 V1 031507 P N 1031379 ...