background image

QUICK ST

AR

T GUIDE

10

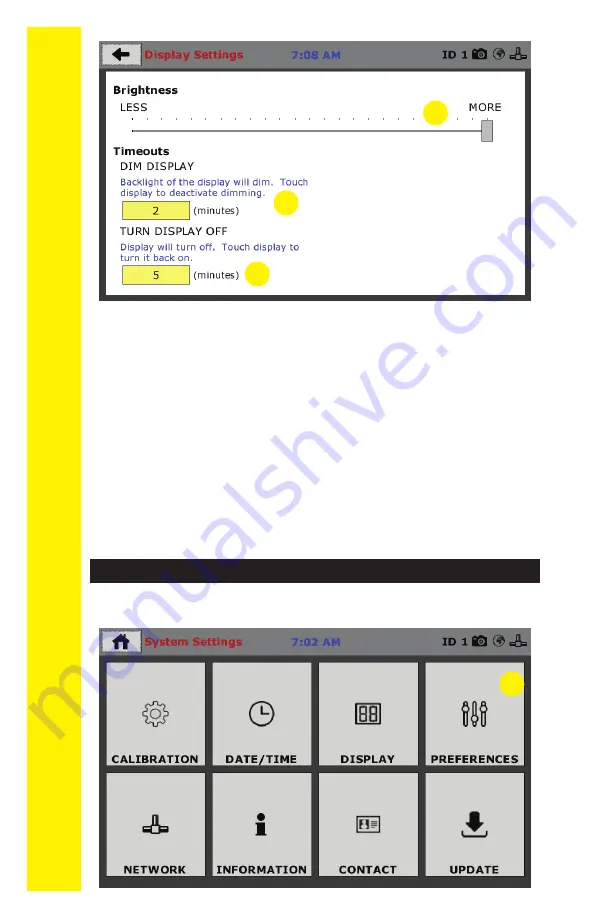
This screen is accessed by clicking on the “Preferences”  

button. 

(1)

Brightness (1)

Slide the gray bar to the left or right to adjust brightness.

Dim Display (2)

The backlight of the display will automatically dim to save 

power. Click the yellow box to change the number of min-

utes before the display goes dim. After the time has elapsed, 

touch the display to deactivate dimming. 

Turn Display Off (3)

The display will automatically turn off to save power. Click 

the yellow box to change the number of minutes before the 

display powers off.

1

2

3

1

 Initial Set Up — Preferences

Summary of Contents for HM-5250.3F

Page 1: ...product manual 03 20 Hydraullic Pressure Controller HM 5250 3F ...

Page 2: ...ows it to be used with most power configurations throughout the world The unit is supplied with an IEC electrical cord with a standard 110V plug The HM 5250 arrives ready for operation Attach the sup plied IEC electrical cord to the machine and plug into a standard wall receptacle for use in the United States For locations other than the U S replace the supplied electrical cord with an IEC cord th...

Page 3: ...Above is a photo of the rear instrumentation panel of the HM 5250 Network 1 Ethernet input for connecting machine to a local area net work LAN and or the internet USB Power 2 The USB Power port is used for powering a wireless access appliance for those who want to use a wireless LAN setup 2 1 3 ...

Page 4: ... the previous page Below are photos of an instrumentation input and the in strumentation plug Install the plugs into the inputs by lining up the guide at the bottom of the plug with the slot at the bottom of the input Instrumentation Input Instrumentation Plug Instrument Inputs 3 The back panel features four 4 inputs for connecting instrumen tation to the machine Each input represents a separate c...

Page 5: ...drop down menu and click on System Settings 1 You will see the following screen From this screen to confirm your machine instrumentation has been calibrated navigate to the Calibration section by clicking the Menu icon in the top left corner of the screen 1 When you click on this button you will see a drop down menu appear see below 1 1 ...

Page 6: ...d calibrate instrumentation and assign them to specific chan nels of the HM 5250 The Calibration Input Screen provides a summary of the calibration status of each channel At this time verify the calibration information A green box at the left of a channel indicates that the chan nel has instrumentation assigned to it and that it is calibrated and ready for use 1 Initial Set Up Calibration 1 ...

Page 7: ...rumentation Note An input cannot be calibrated during testing Units 2 In this field a calibrated instrument will display the units that were chosen for use at the time of calibration This field can also be used to automatically toggle conversion of units between lb in and SI units if the need arises Value 3 This field displays the current calibration value This value should 1 decimal point accurac...

Page 8: ...libration via USB 4 Press this button to select calibrations to export via USB It is a good practice to export all your calibrations to a thumb drive In case of a problem this practice allows you to recover your calibration data quickly To set up Date and Time settings return to the System Set tings screen and click on the Date Time Panel 1 1 2 3 4 Click on the Date Time tab 1 You will see the fol...

Page 9: ...s minutes seconds and am pm Clock Style 3 Select a clock view either a 24 hour or 12 hour clock as well as the option to show seconds or not Clock 4 The current time is displayed and is located on every control ler screen Clicking on the time from any screen you will be taken to the Date Time Settings Screen Click on the Display tab 1 You will see the following screen Initial Set Up Display ...

Page 10: ...f the display will automatically dim to save power Click the yellow box to change the number of min utes before the display goes dim After the time has elapsed touch the display to deactivate dimming Turn Display Off 3 The display will automatically turn off to save power Click the yellow box to change the number of minutes before the display powers off 1 2 3 1 Initial Set Up Preferences ...

Page 11: ...rs can be assigned any number between 1 245 In most cases if you are setting up a new machine it has been given the Logger ID 1 This would show in the Logger ID field 1 If this number conflicts with another machine s Logger ID one of the machines will have to be changed to another Logger ID Sound 2 Checking this box enables or disables audio feedback for logger events Preferences System Units Tab ...

Page 12: ... This field displays the current ambient temperature and allows you to select desired units Fahrenheit or Celsius for temperature recording Manual Control This screen is accessed by clicking on the Manual Control Tab under System Preferences 1 ...

Page 13: ... window These tests are not deleted they are recycled for later use Select this button to view ex port delete recycled tests Test Templates 3 Select this button to delete test templates that have been created but are no longer desired Save to USB Check Box 4 Checking this Box saves the results of a test to USB thumb drive inserted into the front USB slot on the machine Preferences Storage Tab This...

Page 14: ...RT GUIDE 14 A password is required to access the Network Settings That password is 27604 1 To set up Network settings return to the System Settings screen and click on the Network panel 1 Initial Set Up Network ...

Page 15: ...IP please consult your network administrator for this IP Information 2 This information will be filled in automatically if the DHCP is checked otherwise you will have to manually supply this in formation The IP address must be unique for each machine Local Status 3 This indicates the status of the local network connection Connected or Disconnected Internet Status 4 This indicates the status of you...

Page 16: ...formation will be filled in automatically if DHCP is checked otherwise you will have to manually supply this in formation The IP address must be unique for each machine Local Status 3 This indicates the status of the local network connection Connected or Disconnected 1 System Information Below is a view of the System Information screen It provides a current status of the machine 1 2 4 7 3 5 6 ...

Page 17: ...oldtm fg com Please include contact information and a detailed description of your reason for contact Internet Status 4 This indicates the status of your Internet connection Connected or Disconnected Memory 5 This indicates the current status of how much available memory is being used by the machine Factory Screen 6 This is for Humboldt use only Export Log File 7 This button exports a log file fro...

Page 18: ...QUICK START GUIDE 18 Clicking on this panel provides information on checking for Updates performing updates and an update history for the machine 1 1 Initial Set Up Update ...

Page 19: ...will see a list of Humboldt Elite Series machines Click on the HM 5250 Current Version link and the firmware update will begin to download to your computer Once the down load is complete Load the file onto a USB thumb drive and insert the thumb drive into the USB port on the front of the HM 5250 With the USB thumb drive inserted into the USB port click on Update from USB 1 A window will open and y...

Page 20: ... not turn off or reset machine during this process Operation from a Computer and NEXT Software This manual covers the setup and operation of the HM 5250 3F Pressure Controller in Stand alone Mode only For information on operating your load frame with Humboldt s NEXT Software and a computer please refer to the Hum boldt NEXT software manual ...

Page 21: ......

Page 22: ...22 ...

Page 23: ...Equipment Setup 23 ...

Page 24: ...all recep tacle for use in the United States For locations other than the U S replace the supplied electrical cord with an IEC cord that has the correct plug for your application The supplied cord can also be used by cutting the standard plug from the cord and attaching the correct plug Power Switch The Power Switch is located above the electrical cord inlet The Fuse Compartment is located between...

Page 25: ...a photo of the rear instrumentation panel of the HM 5250 Network 1 Ethernet input for connecting machine to a local area network LAN and or the internet USB Power 2 The USB Power port is used for powering a wireless access appli ance for those who want to use a wireless LAN setup 2 1 3 ...

Page 26: ... correct inputs your rear panel should look like the photo on the previous page Below are photos of an instrumentation input and the instrumenta tion plug Install the plugs into the inputs by lining up the guide at the bottom of the plug with the slot at the bottom of the input Instrumentation Input Instrumentation Plug Instrument Inputs 3 The back panel features four 4 inputs for connecting instr...

Page 27: ...See photo below To Connect the HM 5250 to the Base Valve of the Triaxial Cell Measure a length of 0 125 tubing and insert one end into the Base Valve Input 4 on the Left side of the HM 5250 On the other side of the tubing install a HM 4197 12 ferrule and attach the tubing to the Triaxial Cell s Base Valve 4 See photo below 3 4 Priming the Volume Chambers The volume chambers for the HM 5250 are shi...

Page 28: ...28 ...

Page 29: ...29 Test Setup 29 ...

Page 30: ...t is OPEN pointing up see photo below 2 Ensure that the RELIEF VALVE on the top of the CELL PRESSURE Chamber left side is closed circled in Red below Also ensure that the lines running from the water source and the HM 5250 have b een purged of air before connecing them to the input port on the HM 5250 ...

Page 31: ... bottom left of the screen see Red arrow below 4 Once the piston has moved all the way to the bottom of the cylinder press the STOP button in the Cell Section see Red arrow below You will know when the piston has bottomed out when it stops moving and it will be indicated on the volume readout lower display window ...

Page 32: ...moved from the chamber and only water comes out of the drain port on the bleed valve Press the stop button on the touch screen 7 Repeat this process for the BASE PRESSURE Chamber Right side Purging the Lines of Air 1 Turn the CONTROL VALVE at the top of the CELL PRESSURE Chamber left side to the DOWN position 2 Ensure that a line is connected to the CELL PRESSURE Chamber OUTPUT PORT on the HM 5250...

Page 33: ...r with no air bubbles present Note Have a container ready to capture water exiting from the line 5 Once all air has been removed from the line Press the STOP BUTTON and set the VALVE KNOB to the closed position see photo below 6 Repeat steps 1 5 for the BASE PRESSURE Chamber right side ...

Page 34: ...he line from the BASE OUTPUT PORT right chamber on the HM 5250 see photo below to the BASE VALVE port to the right of the CELL VALVE on the Triaxial Cell 4 Before proceeding make sure the Triaxial Cell is configured like the drawing below 5 Input 3 psi for CELL PRESSURE in the yellow PSI Field on the touch screen of the HM 5250 and then Press the corresponding green START BUTTON see photo below to...

Page 35: ... of the HM 5250 and then Press the corresponding green START BUTTON see photo below 8 Open the BASE VALVE valve to the right of the center valve on the Triaxial Cell 9 Once both lines have been purged of air press the stop buttons on the touch screen close the valves on the Triaxial chamber and close the control valves on the HM 5250 ...

Page 36: ...ration of pressures as well as precise results In stand alone mode this pressure controller provides a 7 178mm touch screen controller This new waterproof touch screen provides colorful at a glance monitoring of testing functions without the use of a computer Operator could see all the data in several formats at the controller while the test is running Then can be viewed simultaneously or download...

Page 37: ...makes no recommendations or claims regarding fitness for applica tions other than the specific tests as defined in this User Guide Unpacking Initial inspection should include checking for physical damage during shipping and obvious external damage to the product Package contents are defined by your packing list Each Loader is configured accord ing to customer specifications In your inspection make...

Page 38: ...tion of HUMBOLDT Authorized Service Facilities you may not copy alter de compile or reverse assemble the software in any fashion except as instruct ed in this manual US copyright laws trademark laws and trade secrets protect the materials Any person s and or organizations that attempt or accomplish the above violation or knowingly aid or abet the violation by supplying equipment or technol ogy wil...

Page 39: ...39 ...

Page 40: ...se can be obtained by a request in writing from HUMBOLDT MFG CO With the exception of HUMBOLDT Authorized Service Facilities you may not copy alter de compile or reverse assemble the software in any fashion except as instruct ed in this manual US copyright laws trademark laws and trade secrets protect the materials Any person s and or organizations that attempt or accomplish the above violation or...

Reviews: