background image

Kamvas 13

18 / 18

www.huion.com

5. Trouble Shooting

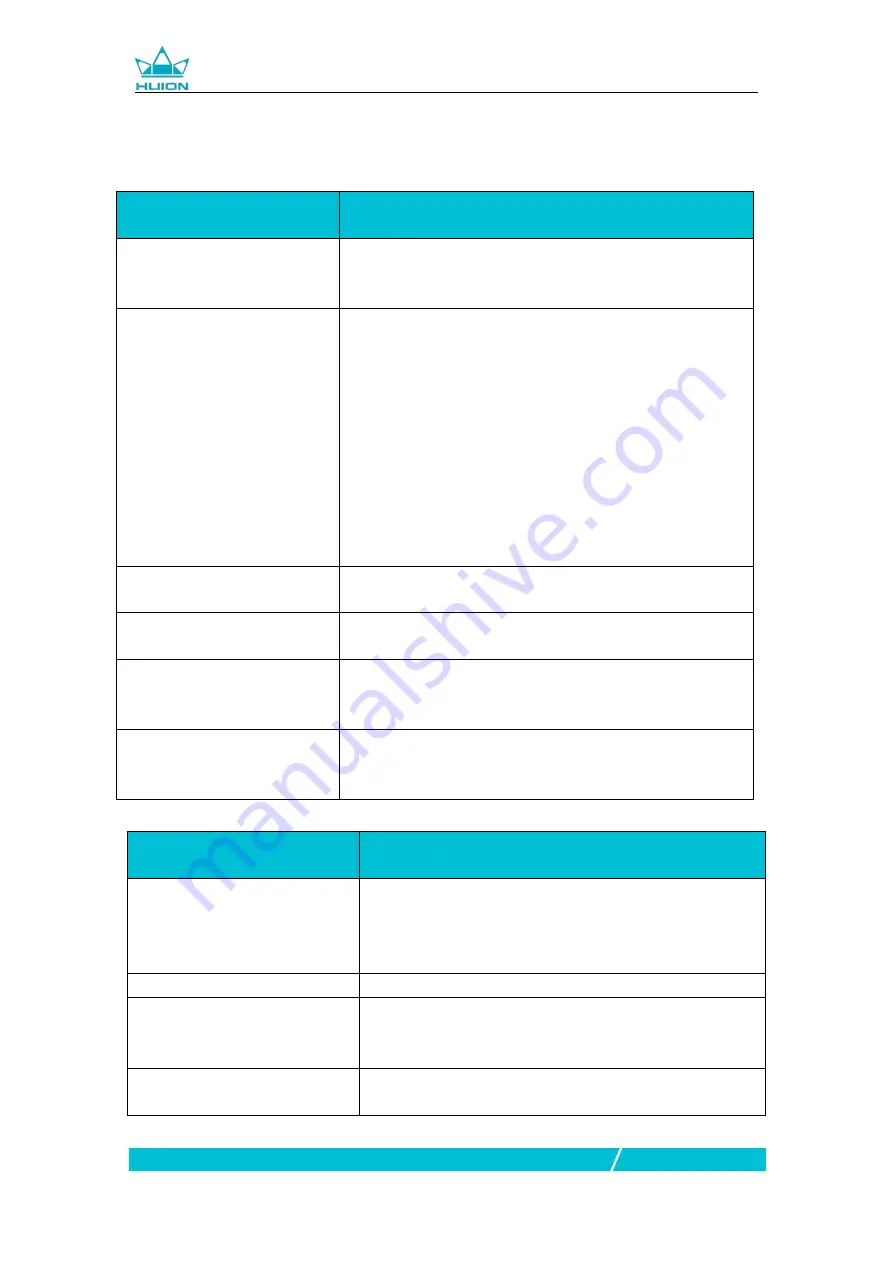
5.1 Possible Breakdowns Related to DISPLAY

Abnormal Phenomena

Possible Solutions

Power indicator does not flash

*Make sure power is on

*Check the socket and power

cable

No display on the screen

1. Make sure power is on.

2. Correctly connect the 3-in-1 cable.

3. If you connect the display with a laptop, please make sure
the display is on the right display mode: extend or duplicate
mode.

4. Check whether the side indicator shows green, if not, it
means no signal in. Please reboot your computer or reconnect
the cable.

5. Is the signal wire broken or bent? If so, please replace the
signal wire.

Images are blurred

Please set the display resolution with 1920 x 1080.

Lack of colors

Check the pins of the signal wire are not bent or fractured.

There is chromatic aberration

As the regional color temperature is different, so minor
chromatic aberration is a normal phenomenon.

Images jitter or ripple images

appear

It is likely that there is electric equipment nearby that brings
about electronic interference.

5.2 Possible Breakdowns Related to FUNCTIONS

Abnormal Phenomena

Possible Solutions

Pen doesn

t work and no

pressure in the graphics software

1. If the driver is damaged or is not properly installed, please
uninstall the driver and reinstall it.
2. Try restarting your computer.
3. Try re-inserting the USB cable.

Cursor movement is abnormal

Try re-inserting the USB cable or restarting your computer.

The side button of the pen

doesn

t work

When pressing the side button, please make sure that the
nib didn’t touch the glass surface and the distance between
the nib and surface is within 10mm

There is a deviation between the

tip and the cursor

Try calibration

Summary of Contents for KAMVAS 13

Page 1: ...User Manual For Windows and Macintosh OS KAMVAS 13 Model GS1331...

Page 2: ...display 8 To protect your display please switch off the power when it is not in use During blackouts or not using for long time please unplug the display from the socket 9 Don t overload the socket o...

Page 3: ...play 10 2 3 OSD Function 10 3 Function Setting 11 3 1 Device Connection Prompt 11 3 2 Working Area Setting 11 3 3 Press Keys Function Setting 13 3 4 Pen Button Setting 14 3 5 Pressure Sensitivity Sett...

Page 4: ...and full of fun You can freely painting and writing depicting different lines and colors just as the pen writes on the paper which brings you a real shock experience To give you a better understandin...

Page 5: ...USB HDMI Power Red USB Port Type C 1 2 3 Display Stand Optional We designed this standspecially for your KAMVAS display you can adjust the angle of the display according to your usage habit and make...

Page 6: ...uion com 1 2 6 Other Accessories Digital Pen Pen Holder Pen Nibs Nib Clip 3 in 1 Cable Stand Optional Cleaning Cloth Glove Quick Start Guide 1 3 Connected to Computer 1 3 1 Connected with 3 in 1 Cable...

Page 7: ...n the package and requires extra cost Please purchase the cable through official channels as it is customized and cables from unknown sources may not be usable with the device 1 4 Driver Installation...

Page 8: ...bank with USB C to USB A cable Note 1 USB C to USB C cable and USB C to USB A cable is not included in the package and requires extra cost Please purchase the cable through official channels as it is...

Page 9: ...place the pen in the pen case or on the desk Do not place the pen on the surface of screen which may interfere with the use of other screen cursor positioning equipment it may also cause your computer...

Page 10: ...k to open it 2 1 4 Move Select the object then slide the pen tip across the screen to move it 2 1 5 Use the side buttons The side buttons of the pen can be set to two different customizable functions...

Page 11: ...3 OSD Function Enter OSD Menu 1 Press K4 K5 for around three seconds until the OSD menu appears and meanwhile the indicator will flash green The function of K2 K3 K6 K7 will become OSD function 2 In t...

Page 12: ...onnected to your computer 3 2 Working Area Setting 3 2 1 Using Multiple Monitors When the KAMVAS Display and other monitors are used in the same system the movement of the screen cursor on the standar...

Page 13: ...display area that will be mapped to the screen area 1 Full Area the entire active area of the Display This is the default setting 2 Same Ratio with LCD 3 Customize Area 1 Enter coordinate values or2 D...

Page 14: ...Press Keys Function Setting Default Setting Place the cursor on the button or click the button icon to see the default values for the press keys Customized press Keys Select the function to be achiev...

Page 15: ...ct the function to be achieved on the pop up dialog box then click APPLY or OK to take effect 3 5 Pressure Sensitivity Setting The pressure sensitivity will be changed by dragging the slider up and do...

Page 16: ...ick Clear button to clear all the ink 3 7 Calibration Screen Calibration Click the red point of the cross center appearing on the screen to complete the calibration Restore Factory Settings Click Rest...

Page 17: ...features are supported in such as Microsoft Office Windows Journal Adobe Photoshop CC SketchBook 6 and so on 3 9 Data Export and Import The driver supports exporting and importing your customized con...

Page 18: ...Touch Type Passive Electromagnetic Resonance Resolution 5080 LPI Pressure Level 8192 Accuracy 0 5 mm Center 3 mm Corner Sensing Height 10 mm Report Rate 266 PPS Pen Model PW517 Dimension 163 7 x 14 3...

Page 19: ...re are not bent or fractured There is chromatic aberration As the regional color temperature is different so minor chromatic aberration is a normal phenomenon Images jitter or ripple images appear It...

Reviews: