Installation Manual – Antenna & Feeder System Installation
BTS3802C & RRU
Chapter 2
Installing RF Antenna & Feeder System
2-11
2.5.4 Installing the antenna support on the roof without wall
1) Hoist the antenna support to the roof.
2) Determine the installation location of the antenna support on the roof according
to the antenna & feeder installation drawing in the engineering design drawings.
3) Solder the lightning rod onto the main supporting post of the antenna (with their
centerlines on the same straight line).
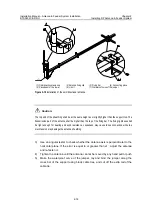
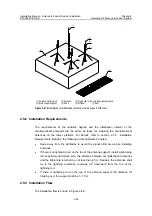
4) Fix the base of the antenna support vertically onto the surface of the roof using
eight M10×45 bolts, as shown in Figure 2-10.
( 1 )
( 2 )
( 3 )
( 4 )
( 5 )
(1) Hex bolt M10×50
(2) Connecting piece of the stiffener
(3) Main supporting post 1 of the antenna
(4) Mat of the main supporting post of the antenna
(5) Expansion bolt M10×50
Figure 2-10
Structure and installation of the antenna support base
5) Reinforce the main supporting post by using the stiffener. The length of the main
supporting post decides that of the stiffener. As shown in Figure 2-8, connect the
stiffener with the main supporting post securely using the connecting pieces of
the stiffener. Connect the anchor onto the stiffener. Fix each anchor of the
stiffener onto the surface of the roof using two expansion bolts M10
×
45. Make all
efforts to ensure that no deformation may happen to the stiffener.
6) As shown in Figure 2-8, connect the main supporting posts 1 and 2 of the
support securely using six bolts M10×80.
7) For the antenna support not soldered with the outdoor cabling rack at the roof or
soldered with the cabling rack that is unconnected with the lightning net of the
building, connect its base with the lightning net of the building using the lightning
connecting bar. (The lightning connecting bar serves as the mounting piece of
the outdoor cabling rack).
8) The antenna support base and all soldered parts shall be coated with the
antirusting paint.

