background image

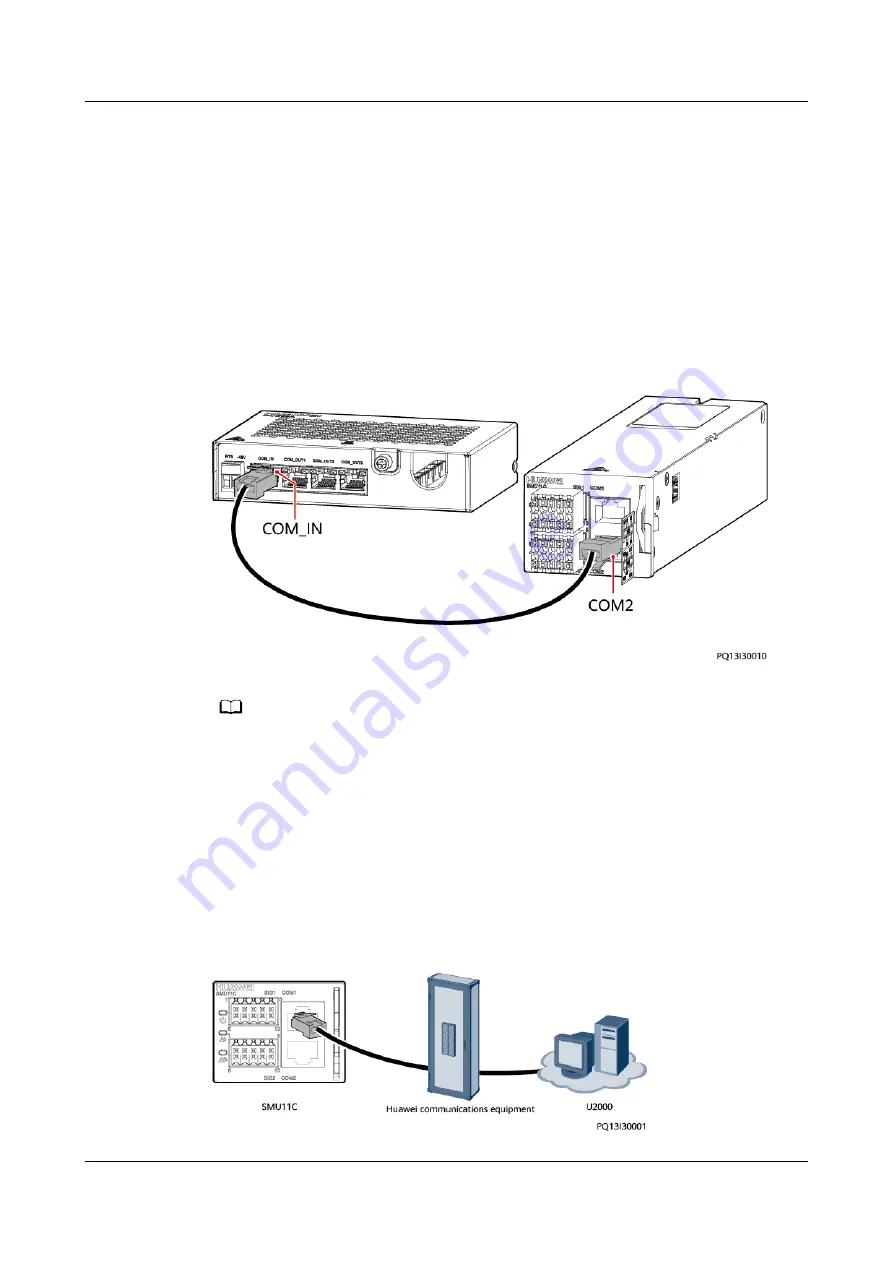
4.4.6 Installing a Cable for the Expansion Box (SMU11C)

Prerequisites

If an expansion box is required, perform the following steps to install the cable.

Procedure

Step 1 Connect one end of a communications cable to the COM_IN port on the

expansion box, and connect the other end to the COM2 port on the SMU.

Figure 4-16 Installing a cable for the expansion box

NO TE

Ensure that the expansion box side with holes does not face downwards.

----End

4.4.7 Installing a Communications Cable (SMU11C)

When there is a need to use the U2000 network management system to remotely

manage the power system, connect the COM1 port on the SMU11C to the

corresponding serial port on the Huawei access network equipment using a

communications cable.

Figure 4-17 Installing a communications cable

ETP4860-B1A2 Embedded Power

User Manual

4 Installation

Issue 04 (2021-01-05)

Copyright © Huawei Technologies Co., Ltd.

45

Summary of Contents for ETP4860-B1A2

Page 1: ...ETP4860 B1A2 Embedded Power User Manual Issue 04 Date 2021 01 05 HUAWEI TECHNOLOGIES CO LTD ...

Page 2: ...cribed in this document may not be within the purchase scope or the usage scope Unless otherwise specified in the contract all statements information and recommendations in this document are provided AS IS without warranties guarantees or representations of any kind either express or implied The information in this document is subject to change without notice Every effort has been made in the prep...

Page 3: ... a hazard with a high level of risk which if not avoided will result in death or serious injury Indicates a hazard with a medium level of risk which if not avoided could result in death or serious injury Indicates a hazard with a low level of risk which if not avoided could result in minor or moderate injury Indicates a potentially hazardous situation which if not avoided could result in equipment...

Page 4: ...t issue contains all the changes made in earlier issues Issue 04 2021 01 05 Updated 6 Commissioning Issue 03 2020 02 10 Updated 3 Components Issue 02 2019 09 12 Added contents about the WiFi function Upgraded installation procedures Issue 01 2019 07 12 This issue is the first official release Software version SMU V500R002C20 LIVE C APP V100R001C80 ETP4860 B1A2 Embedded Power User Manual About This...

Page 5: ...on Box MUE03A 29 4 Installation 34 4 1 Installation Preparations 34 4 1 1 Cables 34 4 1 2 Tools 35 4 1 3 Installation Dimensions 36 4 2 Installing a Subrack 36 4 3 Installing Components 39 4 3 1 Installing an SMU11B 39 4 3 2 Installing an SMU11C 39 4 3 3 Installing a Rectifier 40 4 4 Installing Cables 41 4 4 1 Optional Installing a Dry Contact Signal Cable 41 4 4 2 Installing Signal Cables for a B...

Page 6: ... 2 Checking Electrical Connections 54 5 3 Checking Cable Installation 54 6 Commissioning 55 6 1 Connecting the AC or DC Power Supply 55 6 2 SMU11B 56 6 2 1 Logging In to the WebUI 56 6 2 2 Setting Parameters on the WebUI 57 6 3 LIVE C APP SMU11C 62 6 3 1 Installing the LIVE C APP 62 6 3 2 Logging In to the LIVE C App 62 6 3 3 Setting Parameters 64 6 4 Connecting the Battery Supply 66 7 Maintenance...

Page 7: ...Technical Specifications 83 B Electrical Conceptual Diagram 86 C Acronyms and Abbreviations 87 ETP4860 B1A2 Embedded Power User Manual Contents Issue 04 2021 01 05 Copyright Huawei Technologies Co Ltd vi ...

Page 8: ...er the warranty Follow local laws and regulations when installing operating or maintaining the equipment The safety instructions in this document are only supplements to local laws and regulations Huawei will not be liable for any consequences of the following circumstances Operation beyond the conditions specified in this document Installation or use in environments which are not specified in rel...

Page 9: ... Use insulated tools or tools with insulated handles as shown in the following figure Follow the specified procedures for installation operation and maintenance Ensure that bolts are tightened with a torque wrench and marked using red or blue color Installation personnel mark tightened bolts in blue Quality inspection personnel confirm if the bolts are tightened and then mark them in red The marks...

Page 10: ...nt dust and other sundries on the backplane baseplate and boards After installing the equipment remove idle packing materials such as cartons foam plastics and cable ties from the equipment area In the case of a fire immediately leave the building or the equipment area and turn on the fire alarm bell or make an emergency call Do not enter the building on fire in any case Do not stop using protecti...

Page 11: ...aintenance Warns users of overheating This symbol is attached to a device surface that may overheat and cause scalding It warns users not to touch the surface during operations or maintenance Users should wear heat insulation gloves before operations to prevent scalding or Indicates protection earthing This symbol is attached next to a protection ground terminal next to grounded equipment and an e...

Page 12: ...l or maintain Huawei equipment must receive thorough training understand all necessary safety precautions and be able to correctly perform all operations Only qualified professionals or trained personnel are allowed to install operate and maintain the equipment Only qualified professionals are allowed to remove safety facilities and inspect the equipment Personnel who will operate the equipment in...

Page 13: ...sient contact between the core of the power cable and the conductor will generate electric arcs or sparks which may cause fire or personal injury If the power supply to the equipment is permanently connected install an easily accessible disconnector at the exterior of the device Before making electrical connections switch off the disconnector on the upstream device to cut off the power supply if p...

Page 14: ...ands Package boards with ESD packaging materials before storing or transporting them 1 4 Installation Environment Requirements To prevent fire due to high temperature ensure that the ventilation vents or heat dissipation system are not blocked when the equipment is running Ensure that there are no acid alkaline or other corrosive gases in the installation place Do not place the equipment near heat...

Page 15: ...ation machinery and tools properly to prevent them from falling off and causing injuries Personnel involving working at heights are not allowed to throw objects from the height to the ground or vice versa Objects should be transported by tough slings hanging baskets highline trolleys or cranes Do not perform operations on the upper and lower layers at the same time If unavoidable install a dedicat...

Page 16: ... qualified personnel should perform hoisting operations Check that hoisting tools are available and in good condition Before hoisting objects ensure that hoisting tools are firmly secured onto a load bearing object or wall Ensure that the angle formed by two hoisting cables is no more than 90 degrees as shown in the following figure Do not drag steel ropes and hoisting tools or bump hoisted object...

Page 17: ...ollowing figure An angle rule can be used to measure the angle When climbing a ladder take the following precautions to reduce risks and ensure safety Keep your body steady Do not climb higher than the fourth rung of the ladder from the top To climb onto a roof ensure that the ladder top is at least one meter higher than the roof line as shown in the following figure Ensure that your body s center...

Page 18: ...s or lower edges Do not hold the handles of modules such as power supply units fans and boards that are installed in the equipment because they cannot support the weight of the equipment 1 6 Battery Safety If no battery is involved skip this section Before installing operating or maintaining batteries read the battery manufacturer s instructions The safety precautions specified in this document ar...

Page 19: ...he leaking liquid wash it immediately with clean water and go to the hospital for medical treatment Use dedicated insulated tools Move batteries in the required direction Do not place a battery upside down or tilt it Keep the battery loop disconnected during installation and maintenance Do not drop squeeze or puncture a battery Protect batteries from external high pressure to prevent internal shor...

Page 20: ...ult in excessive voltage drop or cause batteries to burn out in the case of excessive current Check battery connections periodically ensuring that all bolts are securely tightened Battery Short Circuit DANGER Battery short circuits can generate high instantaneous current and release a great amount of energy which may cause equipment damage or personal injury If permitted disconnect the batteries i...

Page 21: ...pt that you also need to note the precautions described in this section WARNING There is a risk of explosion if a battery is replaced with an incorrect model A battery can be replaced only with a battery of the same or similar model recommended by the manufacturer When handling a lithium battery do not place it upside down tilt it or bump it with other objects Keep the lithium battery loop disconn...

Page 22: ...ort on SMU11C Communication and alarm functions remote monitoring and online upgrade Hot swappable rectifiers and monitoring module 2 3 System Configurations Table 2 1 System configuration Item System Configuration Subrack 1 U power system Power distribution unit PDU AC or DC input M4 OT wiring terminal DC output supports a maximum of four 32 A circuit breakers or one 16 A circuit breakers Battery...

Page 23: ... maximum of two R4830G1s or R4815G1s R4830G1 and R4815G1 support HVDC input can be configured Monitoring module SMU11B or SMU11C ETP4860 B1A2 Embedded Power User Manual 2 Overview Issue 04 2021 01 05 Copyright Huawei Technologies Co Ltd 16 ...

Page 24: ...earance 1 Ground screw 2 Input terminals 3 Space for SMU 4 Space for rectifiers 5 Load circuit breakers 6 Battery circuit breaker ETP4860 B1A2 Embedded Power User Manual 3 Components Issue 04 2021 01 05 Copyright Huawei Technologies Co Ltd 17 ...

Page 25: ...scription Running indicator Green Off The SMU is faulty or has no power input Blinking slowly 0 5 Hz The SMU is running and communicating with the host properly Blinking fast 4 Hz The SMU is running properly but fails to communicate with the host properly Minor alarm indicator Yellow Off No minor alarm or warning is generated Steady on A minor alarm or warning is generated ETP4860 B1A2 Embedded Po...

Page 26: ... Signal Description 1 DI1 Dry contact input 6 DI1 2 IO1 Dry contact input Dry contact output When used as a dry contact input the alarm condition is as follows normal when open alarm when closed When used as a dry contact output the alarm action is as follows open when normal closed when alarm 3 IO1 4 IO2 5 IO2 7 IO3 8 IO3 9 IO4 10 IO4 ETP4860 B1A2 Embedded Power User Manual 3 Components Issue 04 ...

Page 27: ...nications Port Communications Parameter Communications Protocol Function COM Baud rate 9600 bit s 19200 bit s 115200 bit s autonegotiation Master slave protocol Connects to a Huawei NMS Provides 12 V power supply for external devices FE 10M 100M autonegotiation SNMP Connects to a third party management system BIN protocol Connects to a Huawei NMS HTTPS protocol Connects to a PC and manages the SMU...

Page 28: ... RS485 data 5 RS485 RS485 data 6 SCL I2C clock 7 SDA I2C data 8 GND Ground Figure 3 5 Pins in the FE port Table 3 6 Pin definitions for the FE port Pin Signal Description 1 TX Transmits data over FE 2 TX 3 RX Receives data over FE 6 RX 4 5 7 and 8 NA ETP4860 B1A2 Embedded Power User Manual 3 Components Issue 04 2021 01 05 Copyright Huawei Technologies Co Ltd 21 ...

Page 29: ...y or has no power input Blinking at long intervals 0 5 Hz The SMU is running properly and communicating with the host properly Blinking at short intervals 4 Hz The SMU is running properly but fails to communicate with the host properly Minor alarm indicator Yellow Off No minor or warning alarm is generated Steady on A minor or warning alarm is generated Major alarm indicator Red Off No critical or...

Page 30: ... settings Monitoring Address Toggle Switch 1 Toggle Switch 2 Toggle Switch 3 Toggle Switch 4 0 OFF OFF OFF OFF 1 ON OFF OFF OFF 2 OFF ON OFF OFF 3 ON ON OFF OFF 4 OFF OFF ON OFF 5 ON OFF ON OFF 6 OFF ON ON OFF 7 ON ON ON OFF 8 OFF OFF OFF ON 9 ON OFF OFF ON 10 OFF ON OFF ON 11 ON ON OFF ON 12 OFF OFF ON ON 13 ON OFF ON ON ETP4860 B1A2 Embedded Power User Manual 3 Components Issue 04 2021 01 05 Cop...

Page 31: ... disconnected and an alarm is generated when the dry contact input is closed When the pin is used as a dry contact output the alarm action is as follows the monitoring of the SMU11C is normal when the dry contact output is disconnected and an alarm is generated when the dry contact output is closed 3 IO1 4 IO2 Dry contact input Dry contact output When the pin is used as a dry contact input the ala...

Page 32: ...VD1 Midpoint voltage detection port 1 6 VD2 Midpoint voltage detection port 2 2 BTE Battery temperature sensor port 3 4 ETE Ambient temperature sensor port 5 7 GAT Door status sensor port 8 9 CAN CAN communications port 10 CAN Communications Ports Table 3 11 Communications port description Communications Port Communications Parameter Communicatio ns Protocol Function COM1 Baud rate 9600 bit s 1920...

Page 33: ... these ports are protected by a security mechanism Figure 3 9 Pins in the COM port Table 3 12 Pin definitions for the COM1 port Pin Signal Description 1 TX Transmits data over RS485 2 TX 3 Reserved 4 RX Receives data over RS485 5 RX 6 PGND Grounding PE 7 Reserved 8 Reserved Table 3 13 Pin definitions for the COM2 port Pin Signal Description 1 TX Transmits data over RS485 ETP4860 B1A2 Embedded Powe...

Page 34: ...r into stable DC power Figure 3 10 Appearance 1 Power indicator 2 Alarm indicator 3 Fault indicator 4 Locking latch 5 Handle Table 3 14 Indicator description Indicator Color Status Description Power indicator Green Steady on The rectifier has an AC input Off The rectifier has no AC input The rectifier is faulty ETP4860 B1A2 Embedded Power User Manual 3 Components Issue 04 2021 01 05 Copyright Huaw...

Page 35: ... to ambient overtemperature or undertemperature AC input overvoltage or undervoltage protection has been triggered The rectifier is in hibernation state Blinking at 0 5 Hz The communication between the rectifier and the external device is interrupted Fault indicator Red Off The rectifier is normal Steady on The rectifier locks out due to output overvoltage The rectifier has no output due to an int...

Page 36: ...ly 48V Power supply Communications Ports Table 3 16 Communications port description Communicatio ns Ports Communications Parameter Communications Protocol Function COM_IN Baud rate 9600 bit s 19200 bit s or 115200 bit s Modbus protocol Connects to the monitoring module COM_OUT1 Baud rate 9600 bit s 19200 bit s or 115200 bit s Modbus protocol Connects to intelligent equipment COM_OUT2 COM_OUT3 ETP4...

Page 37: ...RS485 RS485 data 3 12 V Power supply 4 RS485 RS485 data 5 RS485 RS485 data 6 I2C_SCL I2C clock signal 7 I2C_SDA I2C data signal 8 GND Ground PE Table 3 18 Pin definitions for the COM_OUT1 COM_OUT2 and COM_OUT3 ports Pin Signal Description 1 RS485 RS485 data 2 RS485 RS485 data 3 12 V Power supply 4 RS485 RS485 data 5 RS485 RS485 data 6 Reserved ETP4860 B1A2 Embedded Power User Manual 3 Components I...

Page 38: ...ts water sensor input smoke sensor input and 12 V power outputs The wiring terminals are located inside the MUE03A Figure 3 13 Wiring terminals without the panel top view Figure 3 14 DIN and WATER pin definitions ETP4860 B1A2 Embedded Power User Manual 3 Components Issue 04 2021 01 05 Copyright Huawei Technologies Co Ltd 31 ...

Page 39: ...al input 3 GND Ground PE 4 Reserved Figure 3 15 ALM and SMOKE pin definitions Table 3 20 ALM and SMOKE pin definitions Terminal Pin Signal Description ALM5 ALM10 1 ALM Dry contact output 2 ALM Dry contact output SMOKE 1 SMOKE Smoke sensor signal input 2 12 V 12 V output Figure 3 16 J7 pin definitions ETP4860 B1A2 Embedded Power User Manual 3 Components Issue 04 2021 01 05 Copyright Huawei Technolo...

Page 40: ...J7 pin definitions Terminal Pin Signal Description J7 1 12 V 12 V output 2 GND Ground PE 3 Reserved ETP4860 B1A2 Embedded Power User Manual 3 Components Issue 04 2021 01 05 Copyright Huawei Technologies Co Ltd 33 ...

Page 41: ...um Current A Minimum Cross Sectional Area mm2 Maximum Cross Sectional Area mm2 PE cable 10 25 AC input power cable three phase four wire Live wire L1 L2 L3 21 2 2 5 16 Neutral wire N 21 2 2 5 16 AC input power cable single phase dual live wire HVDC Live wire L L1 HVDC 53 10 16 Neutral wire N live wire L2 HVDC 53 10 16 DC output power cable 16 1 5 16 20 2 5 16 32 4 16 ETP4860 B1A2 Embedded Power Us...

Page 42: ...the ambient temperature is not 30 C or cables in multiple loops are routed together use cables with larger cross sectional areas if the cabling distance is long Battery cables should be able to withstand a temperature of at least 90 C 4 1 2 Tools NOTICE Use tools with insulated handles The following table is for reference only Table 4 2 Installation tools and instruments ETP4860 B1A2 Embedded Powe...

Page 43: ...nt of the subrack is about 29 1 mm When installing subracks ensure to reserve enough space for personnel to install cables 4 2 Installing a Subrack Procedure Step 1 Optional Remove the cover of the RTN ground bar at the bottom of the subrack ETP4860 B1A2 Embedded Power User Manual 4 Installation Issue 04 2021 01 05 Copyright Huawei Technologies Co Ltd 36 ...

Page 44: ... Step 3 Optional Relocate the mounting ears based on the cabinet depth Figure 4 4 Installation positions for mounting ears 1 Adjustable positions 2 Default position Step 4 Optional When installing on an ETSI rack ensure to use the ETSI mounting ears ETP4860 B1A2 Embedded Power User Manual 4 Installation Issue 04 2021 01 05 Copyright Huawei Technologies Co Ltd 37 ...

Page 45: ...nting ears Step 5 Install the subrack in a 19 inch rack Figure 4 6 Installing a subrack Step 6 Install a ground cable ETP4860 B1A2 Embedded Power User Manual 4 Installation Issue 04 2021 01 05 Copyright Huawei Technologies Co Ltd 38 ...

Page 46: ...11B handle upwards until it is in place Figure 4 8 Installing an SMU11B End 4 3 2 Installing an SMU11C Procedure Step 1 Set the DIP switch based on the assigned address Step 2 Insert the SMU11C into the slot and slide it into the subrack along the guide rails Step 3 Push the SMU11C handle upwards until it is in place ETP4860 B1A2 Embedded Power User Manual 4 Installation Issue 04 2021 01 05 Copyri...

Page 47: ...er on the rectifier within seven days after unpacking If the rectifier cannot be powered on in time place it in an indoor environment that is dry and without corrosive gas In an outdoor scenario you are advised to power on the rectifier within 24 hours after unpacking If the rectifier cannot be powered on in time place it in an indoor environment that is dry and without corrosive gas Procedure Ste...

Page 48: ...tact port Step 2 Install a signal cable in the dry contact port Step 3 Remove the screwdriver and check that the signal cable is securely connected to the dry contact Figure 4 11 Installing a dry contact signal cable NOTE Connect the output dry contacts to IO1 and IO2 ports End ETP4860 B1A2 Embedded Power User Manual 4 Installation Issue 04 2021 01 05 Copyright Huawei Technologies Co Ltd 41 ...

Page 49: ...e metal probe of the temperature sensor is not in contact with a metal or an energized conductor The battery temperature sensor should not be directly exposed to sunlight be placed near an air vent or air conditioner vent or come into direct contact with a heat source or cold source Figure 4 12 Installing signal cables for a battery temperature sensor 1 Battery temperature sensor End ETP4860 B1A2 ...

Page 50: ...e SMU Figure 4 13 Installing signal cables for a door status sensor 1 Door status sensor End 4 4 4 Installing an Alarm Signal Cable for the Cable Distribution Frame NOTE Ensure that the RTN ground bar is installed Procedure Step 1 Connect the alarm signal cable for the cable distribution frame to the VD2 port on the monitoring module ETP4860 B1A2 Embedded Power User Manual 4 Installation Issue 04 ...

Page 51: ...ng steps to install the cable Procedure Step 1 Connect one end of a communications cable to the COM_IN port on the expansion box and connect the other end to the COM2 port on the SMU Figure 4 15 Installing a cable for the expansion box NOTE Ensure that the expansion box side with holes does not face downwards End ETP4860 B1A2 Embedded Power User Manual 4 Installation Issue 04 2021 01 05 Copyright ...

Page 52: ...he expansion box NOTE Ensure that the expansion box side with holes does not face downwards End 4 4 7 Installing a Communications Cable SMU11C When there is a need to use the U2000 network management system to remotely manage the power system connect the COM1 port on the SMU11C to the corresponding serial port on the Huawei access network equipment using a communications cable Figure 4 17 Installi...

Page 53: ...alling a communications cable SMU11B 1 User WebUI terminal 2 FE port on the SMU 4 4 8 2 NetEco Management Step 1 Connect the FE port on the SMU by using a network cable Figure 4 19 Connecting a communications cable over the FE port 1 NetEco terminal 2 FE port on the SMU End 4 4 8 3 Third Party NMS Management over SNMP Procedure Step 1 Connect the FE port on the SMU by using a network cable ETP4860...

Page 54: ...nd terminals to prepare DC output power cables NOTE The small capacity circuit breakers include but are not limited to 16 A 32 A and 63 A circuit breakers Table 4 3 Cables small capacity circuit breakers Cross Sectional Area Recommended Cord End Terminal Specifications 0 75 6 mm2 Pre insulated and with an insertion depth of 12 18 mm 10 mm2 Pre insulated and with an insertion depth of 18 mm 16 mm2 ...

Page 55: ...ry circuit breakers Otherwise the power system may break down 1 Use a flat head screwdriver 2 mm wide to push the slider in a wiring hole in place 2 Install a battery cable at the wiring hole 3 Remove the screwdriver and ensure that the battery cable is securely installed Figure 4 22 Installing DC output power cables 1 DC load End ETP4860 B1A2 Embedded Power User Manual 4 Installation Issue 04 202...

Page 56: ...o or more battery terminals Do not use metal or conductors to simultaneously touch battery terminals and grounded objects for example the battery compartment otherwise transient short circuits will occur which may produce sparks or explosions During battery installation ensure that the positive and negative battery terminals are correctly connected to prevent reverse polarity First connect the neg...

Page 57: ...may cause battery bulge or failure due to overcharge 1 Use a flat head screwdriver 2 mm wide to push the slider in a wiring hole in place 2 Install a battery cable at the wiring hole 3 Remove the screwdriver and ensure that the battery cable is securely installed Figure 4 24 Installing battery cables 1 Battery string ETP4860 B1A2 Embedded Power User Manual 4 Installation Issue 04 2021 01 05 Copyri...

Page 58: ...nications ports Lithium Battery Communications Port SMU Communications Port 1 RS485 T 2 RS485 T 3 NC 4 RS485 R 5 RS485 R 6 NC 7 CANH CAN 8 CANL CAN End 4 4 11 Installing Input Power Cables ETP4860 B1A2 Embedded Power User Manual 4 Installation Issue 04 2021 01 05 Copyright Huawei Technologies Co Ltd 51 ...

Page 59: ...r Cables Procedure Step 1 Remove the protective cover from AC input terminals Step 2 Connect the AC input power cables to the corresponding AC input terminals Figure 4 27 Installing 110 V AC dual live wire input power cables Step 3 Reinstall the protective cover for the AC input terminals End 4 4 11 3 Installing DC Input Power Cables Procedure Step 1 Remove the protective cover from DC input termi...

Page 60: ...nstalling DC input power cables Step 3 Reinstall the protective cover for the DC input terminals End ETP4860 B1A2 Embedded Power User Manual 4 Installation Issue 04 2021 01 05 Copyright Huawei Technologies Co Ltd 53 ...

Page 61: ...that all the OT terminals are intact and properly connected Check that batteries are correctly installed and that battery cables are correctly connected and not short circuits exist Check that input and output power cables and ground cables are correctly connected and not short circuits exist 5 3 Checking Cable Installation Check that all cables are securely connected Check that all cables are arr...

Page 62: ... unit or component meets requirements before turning on any switch When you are performing operations and do not want others to operate attach the label Do not turn on the switch because operations are in process to the power distribution device During commissioning shut down the device immediately if any fault is detected Rectify the fault and proceed with the commissioning 6 1 Connecting the AC ...

Page 63: ... SMU IP address The SMU has a default IP address of 192 168 0 10 a subnet mask of 255 255 255 0 and a default gateway of 192 168 0 1 set the IP address to 192 168 0 11 subnet mask to 255 255 255 0 and default gateway to 192 168 0 1 on the PC Figure 6 1 Setting the PC IP address Windows 10 is used as an example Step 2 Enter https local IP address for the SMU default address https 192 168 0 10 in th...

Page 64: ...ctively Change the preset password when you first log in to ensure system security End 6 2 2 Setting Parameters on the WebUI Selecting a Language The SMU11B supports English Chinese French Spanish Portuguese Russian Italian German Turkish and Japanese Figure 6 3 Selecting a language ETP4860 B1A2 Embedded Power User Manual 6 Commissioning Issue 04 2021 01 05 Copyright Huawei Technologies Co Ltd 57 ...

Page 65: ...d click Submit Path System Settings Alarm Parameters Door Sensor Door Open Alarm Figure 6 5 Disabling the door status alarm End Setting Basic Battery Parameters Basic battery parameters are fundamental for the SMU to manage batteries and should be set based on the actual number and capacity of battery strings connected ETP4860 B1A2 Embedded Power User Manual 6 Commissioning Issue 04 2021 01 05 Cop...

Page 66: ...t the battery detect way Path Monitoring Power System Running Parameter Basic Parameters Step 2 Optional Set lead acid battery parameters Path Monitoring Acid Battery Group Running Parameter Basic Parameters Step 3 Optional Set lithium battery parameters Path Monitoring Lithium Battery Group Running Parameter Basic Parameters End Configuring IO Ports You can set the IO ports on the SMU panel to dr...

Page 67: ...enerated dry contacts are open Figure 6 8 Setting alarm actions for dry contact outputs Setting Alarm Conditions for Dry Contact Inputs You can set alarm conditions for dry contact inputs based on site requirements For example if DIN1 Alarm Condition is set to Close the SMU generates a DIN1 Alarm for dry contact input DIN1 when it is closed ETP4860 B1A2 Embedded Power User Manual 6 Commissioning I...

Page 68: ... for each alarm or associate each alarm with relays that have specific dry contact outputs based on site requirements If an alarm is enabled the SMU generates the alarm when the alarm condition is met If an alarm is disabled the SMU does not generate the alarm Alarm severities are classified into critical major minor and warning Step 1 Access the Alarm Parameters menu Path System Settings Alarm Pa...

Page 69: ...u have obtained the LIVE C app user name and password The mobile phone should be within 10 m away from the power equipment The mobile phone app may be occasionally disconnected due to difference in phone model and Bluetooth signal strength Please try again 5 minutes later Certain mobile phones may fail to connect in automatic Bluetooth pairing mode due to Android system differences Please select t...

Page 70: ...r name liveapp initial password Changeme_123 NOTICE After the first login change the password in time to ensure account security and prevent unauthorized network attacks such as data tampering Huawei will not be liable for any security issues caused by your failure to change the default password in time or password loss after changing The password cannot be retrieved if it is lost Step 5 Tap Login...

Page 71: ...not connected to a door status sensor disable the door status alarm Step 1 Set Door Open Alarm to Disable and tap Submit Path System Settings Alarm Settings Door Sensor Door Open Alarm Figure 6 14 Disabling the door status alarm End Setting Basic Battery Parameters Basic battery parameters are fundamental for the SMU to manage batteries and should be set based on the actual number and capacity of ...

Page 72: ... Site Configuration Power System Basic Parameters Battery Type Step 2 Optional Set lead acid battery parameters Path Site Configuration Battery Group Basic Parameters Step 3 Optional Set lithium battery parameters Path Site Configuration Li Battery Group Basic Parameters End Configuring IO Ports You can set the IO ports on the SMU panel to dry contact inputs or outputs based on site requirements P...

Page 73: ...utput Path Site Configuration Power System Basic Control Clear ALM N Association Setting the Alarm Enable Option Alarm Severity and Associated Relays You can enable or disable each alarm set the severity for each alarm or associate each alarm with relays that have specific dry contact outputs based on site requirements If an alarm is enabled the SMU generates the alarm when the alarm condition is ...

Page 74: ... are off Step 4 Set all the circuit breakers to the appropriate status based on site requirements Step 5 Observe the power system for 15 minutes If no alarm except the door status alarm is generated on the SMU during this period the current and voltage for batteries and loads are normal NOTE If the door status sensor is not configured and you need to disable the door status sensor alarm refer to S...

Page 75: ...ebUI NOTICE When importing the backup configuration file ensure that the system types of the exported and imported configuration files are consistent Figure 7 1 Backing up the current settings Restoring Factory Defaults After factory defaults are restored all parameter values change to their default factory values You are advised to back up the current settings before restoring factory defaults ET...

Page 76: ...e data before upgrading software The SMU will restart automatically after the software for the BSP SMU and intelligent device SO library package is upgraded Exercise caution to choose the version rollback function during software upgrade After version rollback the user accounts created are deleted and the initial user name and password are required for login Figure 7 3 Upgrading software ETP4860 B...

Page 77: ... the recorded file storage path select and import it End Changing a User Password Step 1 Choose Maintenance User Management The user management page is displayed Figure 7 5 User management page Step 2 Select the user whose password needs to be changed and click Modify The dialog box for modifying user information is displayed ETP4860 B1A2 Embedded Power User Manual 7 Maintenance Issue 04 2021 01 0...

Page 78: ...st be different from the previous two passwords The password must be different from the user name or its reverse Step 4 Set Password of Current Login User and click Submit End Changing WiFi Password You can locally access the WebUI using WiFi NOTICE You are advised to periodically change the WiFi password to improve account security and prevent unauthorized network attacks such as data tampering H...

Page 79: ...historical alarms Step 2 To view historical alarms Figure 7 9 Viewing historical alarms End Viewing Version Information View the Monitoring unit version number to facilitate fault diagnosis and check whether the upgrade is successful ETP4860 B1A2 Embedded Power User Manual 7 Maintenance Issue 04 2021 01 05 Copyright Huawei Technologies Co Ltd 72 ...

Page 80: ...xport historical data Figure 7 11 Exporting historical data Step 2 To export e label information Figure 7 12 Exporting e label information Step 3 To export fault information ETP4860 B1A2 Embedded Power User Manual 7 Maintenance Issue 04 2021 01 05 Copyright Huawei Technologies Co Ltd 73 ...

Page 81: ...ry Settings The SMU restarts after factory settings are restored Path Site Configuration Power System Basic Control Restore Factory Settings Resetting the SMU Resetting the SMU takes several minutes During the resetting the SMU cannot monitor or manage rectifiers batteries and other connected devices Resetting the SMU has no impact on parameter settings so there is no need to set parameters again ...

Page 82: ...ou can manually switch between equalized charge and float charge when the system works in manual control mode Batteries keep in boost charge state after boost charge is manually started When the float charge conditions are met for example time for boost charge expires the batteries automatically switch to the float charge state Path Site Configuration Battery Group Basic Control Charge Control Con...

Page 83: ...rmal Clamp meter The AC input voltage is beyond the normal range For details see 7 4 Identifying Component Faults The output voltage is normal The battery branch or load branch voltage exceeds the specified range 42 V DC to 58 V DC Preventive maintenance inspection The indicators are normal Observe indicators Alarms are generated Grounding The ground point properly connects to the ground bar in th...

Page 84: ...ns cables are normal The SMU cannot monitor AC or DC power distribution when communications cables are intact and AC and DC power distribution is normal Parameters cannot be set or running information cannot be viewed on the SMU 7 4 3 Identifying Circuit Breaker Faults If the load fuse is blown it indicates that the circuit breaker trips If the circuit breaker is switched on and the downstream dev...

Page 85: ...Gently draw the handle outwards and then remove the rectifier from the subrack Figure 7 14 Removing a rectifier Step 4 Push the locking latch on the new rectifier towards the left and pull out the handle Step 5 Place the new rectifier at the entry to the correct slot Step 6 Gently slide the converter into the slot along guide rails until it is engaged Close the handle and push the locking latch to...

Page 86: ...p and ESD gloves Step 2 Record the cable connection positions on the SMU panel remove the COM communications cables and remove the signal cable terminals Step 3 Pull out the handle of the SMU to remove it from the subrack Figure 7 16 Removing the old SMU Step 4 Insert the SMU into the slot and slide it into the subrack along the guide rails Step 5 Push the handle upwards until it is in place Figur...

Page 87: ... ESD wrist strap and ESD gloves Step 2 Record the cable connection positions on the panel of the SMU remove the COM communications cables and remove the signal cable terminals Step 3 Pull out the handle of the SMU to remove the SMU from the subrack Figure 7 18 Removing the old SMU Step 4 Record the DIP switch settings on the SMU Step 5 Take out a new SMU and set the DIP switch based on the recorde...

Page 88: ... breaker to OFF Do not operate with power on Power off will disconnect the power supply to loads Obtain prior consent from customers before replacing a circuit breaker Procedure Step 1 Switch off the circuit breaker to be replaced Step 2 Record the connection positions of cables remove the cables and insulate them Step 3 Remove the faulty circuit breaker Figure 7 20 Removing a circuit breaker Step...

Page 89: ...Follow up Procedure Pack the removed component and send it to the local Huawei warehouse ETP4860 B1A2 Embedded Power User Manual 7 Maintenance Issue 04 2021 01 05 Copyright Huawei Technologies Co Ltd 82 ...

Page 90: ...rating temperature decreases by 1 C for each additional 200 m Other requirements There is no conductive dust corrosive gas or explosion hazard Dust corrosive substances pests molds and other indicators should be controlled in accordance with class 3 1 requirements in ETSI EN 300 019 1 3 V2 3 2 or a later version AC input Input system 220 V AC single phase 110 V AC dual live wire Rated voltage 200 ...

Page 91: ...age recovery threshold When the voltage is restored to 414 V DC the output restores DC output protection DC output overvoltage protection threshold Range 56 60 V DC EMC specifications Conducted emission Input ports CISPR 22 EN 55032 Class B AC input Class A1 DC input Output ports CISPR 22 EN 55032 Class A Radiated interference CISPR 22 EN 55032 Class B Harmonic IEC 61000 3 2 12 Fluctuation and fli...

Page 92: ...gn Complies with IEC 60950 1 IEC 62368 1 IEC 62368 1 GB 4943 and CE certification MTBF 250 000 hours Structure Power supply system Dimensions H x W x D 43 6 mm x 442 mm x 255 mm without mounting ears Weight 10 kg including two rectifiers and one monitoring module IP rating IP20 Installation mode Horizontally and vertically installed in a 19 inch rack Maintenance mode Maintained from the front Heat...

Page 93: ...Electrical Conceptual Diagram Figure B 1 Electrical conceptual diagram ETP4860 B1A2 Embedded Power User Manual B Electrical Conceptual Diagram Issue 04 2021 01 05 Copyright Huawei Technologies Co Ltd 86 ...

Page 94: ...output E EFT electrical fast transient EMC electromagnetic compatibility ESD electrostatic discharge I IP Internet Protocol M MTBF mean time between failures P PF power factor R RS radiated susceptibility ETP4860 B1A2 Embedded Power User Manual C Acronyms and Abbreviations Issue 04 2021 01 05 Copyright Huawei Technologies Co Ltd 87 ...

Page 95: ...S SMU site monitoring unit T THD total harmonic distortion ETP4860 B1A2 Embedded Power User Manual C Acronyms and Abbreviations Issue 04 2021 01 05 Copyright Huawei Technologies Co Ltd 88 ...

Reviews: