-
8
-
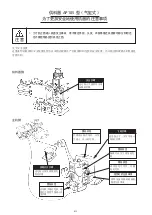
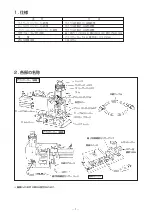
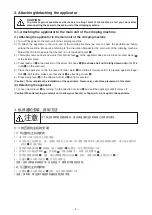
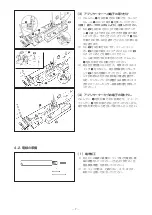
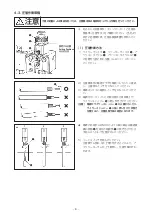
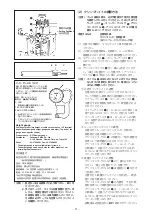
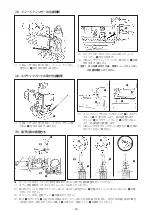
(3) Attaching the terminal to the applicator
1) Turning cam lever
8
in the direction of arrow
B
, insert terminal
9
along terminal guide
!0
.
(Caution) Take care to avoid paper tape from entangling around the terminal.
2) Furthermore, lift screw
!1
in the direction of arrow
C
, and insert the terminal into the applicator until it goes
slightly beyond just above anvil
!2
in terms of the rightward direction. At this time, inserting the terminal while
pressing cut-off punch
!3
in the direction of arrow
D
will allow the terminal to smoothly into the applicator.
3) Lower screw
!1
in the direction of arrow
E
. Check to be sure that the top of feed finger
!4
fits in pilot hole
!5
in
the terminal carrier.
Draw the reel terminal slightly in the direction of arrow
F
and turn cam lever
8
in the direction of arrow
C
. This
completes the installation of the terminal.
4) Align the terminal to the crimping position, turn on switch
!6
mounted on the electrical box and check how
terminal presence/absence checking sensor amplifier
!7
respond. (When the terminal is placed at the best
position, both the red and green indicator lamps simultaneously light up. Refer to the Instruction Manual for the
fiber sensor supplied with the electrical box for how to adjust the sensor amplifier.)
(4) Detaching the terminal from the applicator
Turn cam lever
8
in the direction of arrow
B
and lift feed finger
!4
in the direction of arrow
C
. Then, draw out the
terminal in the direction of arrow
F
until it comes off.
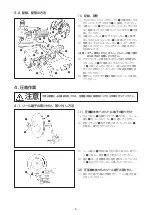
4-2. Preparing an electric cable
(1) Processing the terminal
1) Be sure to strip the covering at the top of the electric cable in prior. (Refer to the “Crimping quality standard”
issued by us.)
2) When stripping the covering, carefully avoid the cable core from breaking, being nicked, loosening and bending.
(3) 向供料器安装端子
1) 向箭头
B
方向转动凸轮杆
8
,沿台轨
9
插入端子
!0
。
( 注意 ) 请注意不要缠住纸带。
2) 向箭头
C
方向上升螺丝
!1
,在移动到砧台
!2
上方稍右的位置插入端子。此时,向箭头 D 方向按压切断钳
!3
,
无障碍的话,端子就可以通过。
3) 向箭头
E
方向下降螺丝
!1
,确认供料指
!4
的前端是否进入端子传送的操作孔
!5
。向箭头
F
方向稍稍拉卷盘端子,
请让凸轮杆
8
向箭头
C
方向转动。
4) 把端子对准压接位置之后,打开 (ON) 电气箱开关
!6
,确认端子传感器放大器
!7
有无反应。( 红、绿灯同时亮
灯的状态是端子最好的位置。另外、传感器放大器的调整方法,请参照电气箱附属的供料指传感器使用说明书。)
(4) 从供料器拆卸端子
让凸轮杆
8
朝箭头
B
方向转动,请向箭头
C
方向上升供料指
!4
。然后,向箭头
F
方向拉端子就可以卸下。
4-2. 电线的准备
(1) 终端加工
1) 请首先确认剥去电线的剥皮长度,然后调整机器。( 请参照本公司印发的「压接质量标准书」。)
2) 剥皮时,请注意不要弄伤和切断芯线,也不要参差不齐和弯曲。

