background image

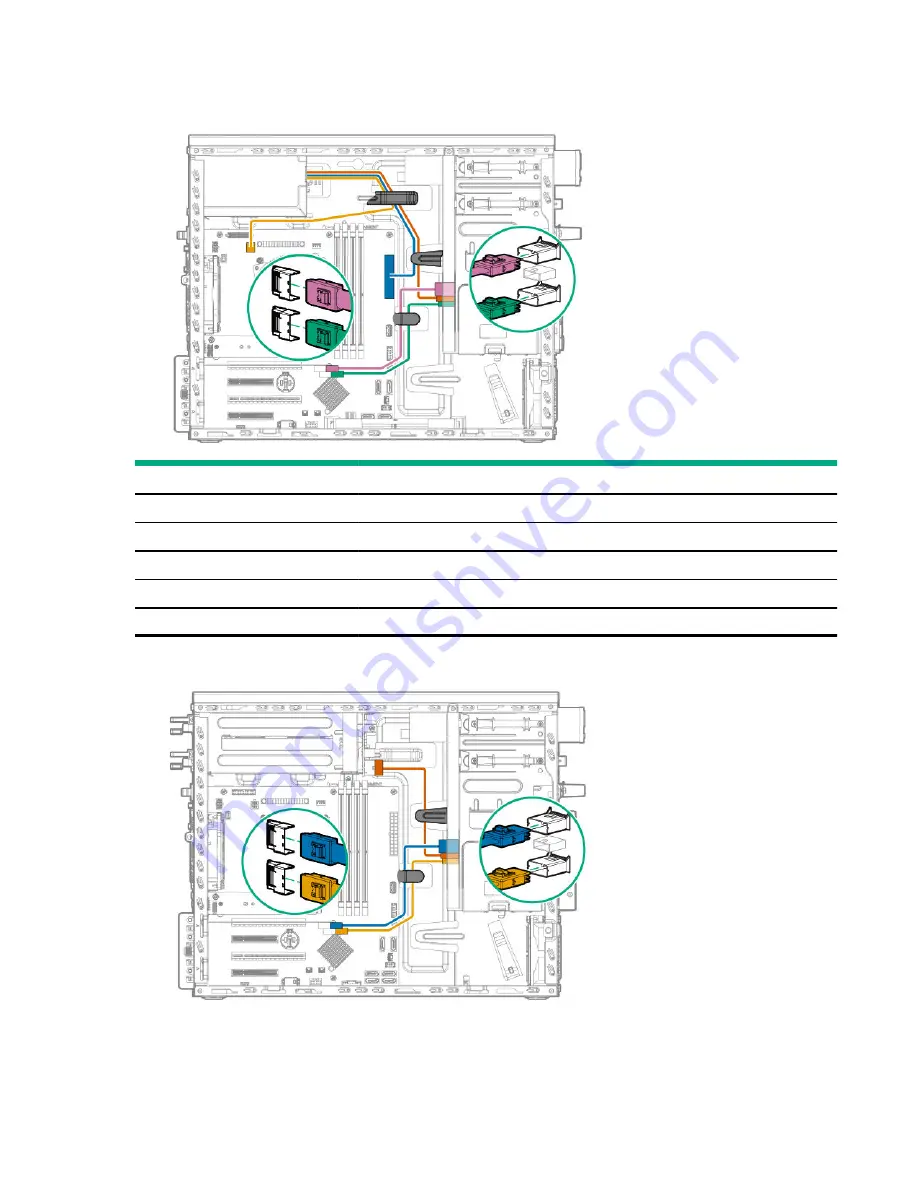
SFF hot-plug drive cabling

SFF hot-plug drive cabling with standard power supply

Cable color

Description

Orange

Drive power cable

Blue

24-pin power supply cable

Gold

4-pin power supply cable

Pink

Mini-SAS cable from controller port 1 to drive backplane port 1

Green

Mini-SAS cable from controller port 2 to drive backplane port 2

SFF hot-plug drive cabling with Flexible Slot power supply

104

Cabling

Summary of Contents for ProLiant ML30 Gen10

Page 1: ...Edition 2 Abstract This document is for the person who installs administers and troubleshoots servers and storage systems Hewlett Packard Enterprise assumes you are qualified in the servicing of compu...

Page 2: ...ware Computer Software Documentation and Technical Data for Commercial Items are licensed to the U S Government under vendor s standard commercial license Links to third party websites take you outsid...

Page 3: ...the server 22 Power down the server 22 Extend the server from the rack 22 Remove the server from the rack 23 Slide the server into the rack 24 Remove the front bezel 25 Install the front bezel 26 Rem...

Page 4: ...ablement option 55 Media device options 58 Installing a SAS LTO tape drive 59 Installing a USB RDX drive 61 Installing an optical drive 63 Installing an LFF non hot plug drive in the media drive bay 6...

Page 5: ...ing 107 SAS LTO tape drive cabling 107 USB RDX drive cabling 109 Serial port cabling 110 Fan cabling 110 Power supply cabling 112 Front I O cabling 113 Front USB cabling 113 Software and configuration...

Page 6: ...nformation 128 Removing and replacing the system battery 128 Safety warranty and regulatory information 131 Regulatory information 131 Notices for Eurasian Economic Union 131 Turkey RoHS material cont...

Page 7: ...Component identification Front panel components Item Description 1 USB 3 0 port 2 USB 2 0 port 3 Drive cage bay 4 PCI fan optional 5 Media bay 2 6 Media bay 1 Component identification 7...

Page 8: ...shing red System critical 1 When the LEDs described in this table flash simultaneously a power fault has occurred For more information see Front panel LED power fault codes Front panel LED power fault...

Page 9: ...1 hot plug 2 Flexible Slot power supply 2 hot plug 3 Standard power supply non hot plug 4 Power cord strain relief clip 5 NIC 1 iLO Shared Network Port 6 Padlock eye 7 System fan 8 Kensington securit...

Page 10: ...escription Status Definition 1 Power supply Solid green Normal Off System is off or power supply has failed 2 NIC link Green Network link Off No network link 3 NIC status Green or flashing green Netwo...

Page 11: ...4 pin power connector 5 Heatsink fan connector 6 24 pin power connector 7 M 2 SSD slot 8 Internal USB 3 0 connector 9 Front I O connector 10 x1 SATA port 1 11 x1 SATA port 2 12 Drive backplane sideba...

Page 12: ...escriptions Position Default Function S11 Off Off iLO 5 security is enabled On iLO 5 security is disabled S2 Off Reserved S3 Off Reserved S4 Off Reserved S51 Off Off Power on password is enabled On Po...

Page 13: ...e DIMM characteristics see the label attached to the DIMM The information in this section helps you to use the label to locate specific information about the DIMM Item Description Example 1 Capacity 8...

Page 14: ...L LRDIMM load reduced E Unbuffered ECC UDIMM For more information about product features specifications options configurations and compatibility see the HPE DDR4 SmartMemory QuickSpecs on the Hewlett...

Page 15: ...width Negotiable link width Supported expansion boards 1 PCI3 FLFH1 x16 16 8 4 1 Single width GPU 10 GB Ethernet adapter Type p Smart Array controller FC HBA 2 PCI3 HLFH2 x8 4 1 1 GB Ethernet adapter...

Page 16: ...drive has failed Solid blue The drive is operating normally and being identified by a management application Flashing amber blue 1 flash per second The drive has failed or a predictive failure alert h...

Page 17: ...efinitions Item LED Status Definition 1 Locate Solid blue The drive is being identified by a host application Flashing blue The drive carrier firmware is being updated or requires an update 2 Activity...

Page 18: ...extension Erasing Spare part activation Flashing amber green The drive is a member of one or more logical drives and predicts the drive will fail Flashing amber The drive is not configured and predict...

Page 19: ...Four bay LFF hot plug drive numbering Eight bay SFF hot plug drive numbering Component identification 19...

Page 20: ...t fan mode If a single fan fails or is missing the following behaviors are exhibited The health LED flashes amber The operating system performs a graceful shutdown Media device screws There are eight...

Page 21: ...Component identification 21...

Page 22: ...nter standby mode This method forces the server to enter standby mode without properly exiting applications and the OS If an application stops responding you can use this method to force a shutdown Us...

Page 23: ...two people are required for all rack server installations A third person may be required to help align the server if the server is installed higher than chest level Use caution when installing the se...

Page 24: ...rface with the access panel facing up Slide the server into the rack Procedure 1 Press and hold the blue release latches on both rails and then slide the server tray back into the rack 2 Tighten the s...

Page 25: ...Remove the front bezel Procedure 1 If locked unlock the front bezel 2 Open the front bezel 3 Pull the front bezel away from the chassis Operations 25...

Page 26: ...beginning any installation removal or replacement procedure Improper grounding can cause electrostatic discharge CAUTION Do not operate the server for long periods with the access panel open or remov...

Page 27: ...de Remove the server from the rack 6 Remove the front bezel 7 Remove the access panel a Loosen the access panel thumbscrew b Slide the access panel and then lift it away from the chassis Install the a...

Page 28: ...ords a Connect each power cord to the server b Connect each power cord to the power source 7 Power up the server Remove the air baffle CAUTION For proper cooling do not operate the server without the...

Page 29: ...m the chassis b Remove the baffle from the slots on the rear chassis Install the air baffle CAUTION For proper cooling do not operate the server without the access panel baffles expansion slot covers...

Page 30: ...the server on the tray 5 Connect all peripheral cables to the server 6 Connect the power cords a Connect each power cord to the server b Connect each power cord to the power source 7 Power up the serv...

Page 31: ...not operate the server unless all PCI slots have either an expansion slot cover or an expansion board installed Procedure 1 Identify the expansion slot compatible with the option see PCI expansion slo...

Page 32: ...erver for hardware configuration Procedure Place the server on a flat level surface with the access panel facing up Position the tower server for operation Procedure Return the server to an upright po...

Page 33: ...are and software Hewlett Packard Enterprise Education Services Help train your IT staff 1The time commitment for this repair service might vary depending on the geographical region of site For more se...

Page 34: ...ttp www hpe com servers spp download Support validation required Verify that your OS or virtualization software is supported http www hpe com info ossupport Obtain the storage driver if needed Downloa...

Page 35: ...LO is licensed to use the remote console feature If iLO is not licensed visit http www hpe com info ilo The iLO port is connected to a secure network b Using a browser navigate to the iLO web interfac...

Page 36: ...tem Utilities screen select System Configurations BIOS Platform Configuration RBSU Storage Options SATA Controller Options Embedded SATA Configuration Smart Array SW RAID Support c Enable Smart Array...

Page 37: ...revent improper cooling and damage to the equipment do not block the ventilation openings When vertical space in the rack is not filled by a server or rack component the gaps between the components ca...

Page 38: ...cts the hardware from damage caused by power surges and voltage spikes and keeps the system in operation during a power failure Electrical grounding requirements The server must be grounded properly f...

Page 39: ...in improper airflow and improper cooling that can lead to thermal damage Rack warnings and cautions WARNING When all components are removed the server weighs 6 12 kg 13 49 lb When all components are i...

Page 40: ...ope the limitations of the rack Before proceeding with the installation consider the following You must fully understand the static and dynamic load carrying capacity of the rack and be sure that it c...

Page 41: ...read the HPE UEFI requirements for ProLiant servers on the Hewlett Packard Enterprise website If UEFI requirements are not met you might experience boot failures or other errors when installing the op...

Page 42: ...before touching them CAUTION To prevent damage to electrical components properly ground the server before beginning any installation procedure Improper grounding can cause electrostatic discharge Towe...

Page 43: ...available Left and right rack rail assemblies These rails occupy 1U position on the rack Server tray T 15 Torx screwdriver Procedure 1 Disassemble the rail assemblies a Pull out the inner rail until...

Page 44: ...e rails is marked FRONT The rear end of the rails is marked with L for left and R for right 4 Fasten the mounting rails to the rack columns a Retract and hold the rear retention bracket b Insert the p...

Page 45: ...e front retention bracket g Repeat steps a f to fasten the other mounting rail h Make sure that both rails are mounted at the same vertical position on both sides of the rack 5 Slide the server tray i...

Page 46: ...The installation is complete Installing the server on the tray Procedure 1 Grasp the tray notch to slide the tray out of the rack 2 Place the server on the tray 46 Hardware options installation...

Page 47: ...thermal requirement when any of the following expansion board options are installed Type p Smart Array controllers High performance NIC controllers 10 GB Ethernet adapters GPUs M 2 SSDs Third party e...

Page 48: ...er mode Position the tower server for hardware configuration If the server is in rack mode Remove the server from the rack 5 Remove the front bezel 6 Remove the access panel 7 Install the PCI fan opti...

Page 49: ...to the server b Connect each power cord to the power source 14 Power up the server The installation is complete Drive options Drive installation guidelines Observe the following general guidelines The...

Page 50: ...dure make sure that you have a T 15 Torx screwdriver available Procedure 1 Power down the server 2 Remove all power a Disconnect each power cord from the power source b Disconnect each power cord from...

Page 51: ...10 Install the drive 11 Install the non hot plug drive cage 12 Connect the drive cables 13 If removed install the air baffle Hardware options installation 51...

Page 52: ...the server b Connect each power cord to the power source 19 Power up the server The installation is complete To configure arrays see the HPE Smart Array SR Gen10 Configuration Guide at the Hewlett Pa...

Page 53: ...zel The installation is complete To configure arrays see the HPE Smart Array SR Gen10 Configuration Guide at the Hewlett Packard Enterprise website Installing an SFF hot plug drive CAUTION To prevent...

Page 54: ...ower supply options Depending on the installed options and the regional location where the server was purchased the server can be configured with one of the following power supplies HPE 350W E star 1...

Page 55: ...ostatic discharge CAUTION Mixing different types of power supplies in the same server might Limit or disable some power supply features including support for power redundancy Cause the system to becom...

Page 56: ...ollowing If the server is in tower mode Position the tower server for hardware configuration If the server is in rack mode Remove the server from the rack 5 Remove the front bezel 6 Remove the access...

Page 57: ...ane cables 12 Install a hot plug power supply in the power supply bay 1 13 To enable power redundancy in the server install a second power supply in the power supply bay 2 a Remove the power supply bl...

Page 58: ...tion If the server is in rack mode Install the server on the tray 18 Connect all peripheral cables to the server 19 Connect the power cords a Connect each power cord to the server b Connect each power...

Page 59: ...cord from the power source b Disconnect each power cord from the server 3 Disconnect all peripheral cables from the server 4 Do one of the following If the server is in tower mode Position the tower s...

Page 60: ...r is in rack mode Install the server on the tray 16 Connect all peripheral cables to the server 17 Connect the power cords a Connect each power cord to the server b Connect each power cord to the powe...

Page 61: ...t each power cord from the server 3 Disconnect all peripheral cables from the server 4 Do one of the following If the server is in tower mode Position the tower server for hardware configuration If th...

Page 62: ...r is in rack mode Install the server on the tray 16 Connect all peripheral cables to the server 17 Connect the power cords a Connect each power cord to the server b Connect each power cord to the powe...

Page 63: ...wer down the server 2 Remove all power a Disconnect each power cord from the power source b Disconnect each power cord from the server 3 Disconnect all peripheral cables from the server 4 Do one of th...

Page 64: ...rive cage a Slide the optical drive into the optical drive cage b Secure the drive to the cage with the two screws and then with the four media device screws 12 Connect the SATA power Y cable to the d...

Page 65: ...nt bezel 18 Do one of the following If the server is in tower mode Position the tower server for operation If the server is in rack mode Install the server on the tray 19 Connect all peripheral cables...

Page 66: ...cedure 1 Power down the server 2 Remove all power a Disconnect each power cord from the power source b Disconnect each power cord from the server 3 Disconnect all peripheral cables from the server 4 D...

Page 67: ...dia device screws from the front panel 11 Install the media device screws in the drive cage 12 Slide the drive cage into the media bay until it locks into place 13 Connect the drive cables Hardware op...

Page 68: ...lett Packard Enterprise website Memory options IMPORTANT This server does not support mixing RDIMMs and UDIMMs Attempting to mix any combination of these DIMMs can cause the server to halt during BIOS...

Page 69: ...t it does not fit easily into the slot you might have positioned it incorrectly Reverse the orientation of the DIMM and insert it again 10 If removed install the air baffle 11 Install the access panel...

Page 70: ...ort cable connector 4 M 2 22110 SSD standoff 5 M 2 2280 SSD standoff 6 M 2 2242 SSD standoff 7 M 2 SSD slot 8 Serial port cable 9 Serial port cable clip Installing the M 2 SSD dedicated iLO serial por...

Page 71: ...e server 4 Do one of the following If the server is in tower mode Position the tower server for hardware configuration If the server is in rack mode Remove the server from the rack 5 Remove the front...

Page 72: ...ort enablement board a Insert the enablement board into the M 2 SSD slot at a 45 angle b Carefully press the enablement board down to the horizontal position c Install the enablement board screw 12 In...

Page 73: ...ct all peripheral cables to the server 20 Connect the power cords a Connect each power cord to the server b Connect each power cord to the power source 21 Power up the server 22 If you plan to use the...

Page 74: ...power cord from the server 3 Disconnect all peripheral cables from the server 4 Do one of the following If the server is in tower mode Position the tower server for hardware configuration If the serv...

Page 75: ...10 Remove the mylar tape 11 Attach the serial port cable clip to the chassis Hardware options installation 75...

Page 76: ...ower cord to the server b Connect each power cord to the power source 19 Power up the server The installation is complete Enabling the dedicated iLO management module The onboard NIC 1 shared iLO conn...

Page 77: ...dicated iLO connector appears on the POST screen on the subsequent boot up Access the Network Options screen again to view this IP address for later reference M 2 SSD option Use the M 2 slot on the sy...

Page 78: ...the access panel 7 If installed remove the air baffle 8 Remove the alignment screws If installing an M 2 2242 or 2280 SSD remove both the hex nut and Phillips screw If installing the M 2 22110 remove...

Page 79: ...eration If the server is in rack mode Install the server on the tray 15 Connect all peripheral cables to the server 16 Connect the power cords a Connect each power cord to the server b Connect each po...

Page 80: ...configuration If the server is in rack mode Remove the server from the rack 5 Remove the front bezel 6 Remove the access panel 7 If installed remove the air baffle 8 Install the M 2 SSD dedicated iLO...

Page 81: ...e power source 17 Power up the server The installation is complete To configure the M 2 SSD see the HPE Smart Array SR Gen10 Configuration Guide at the Hewlett Packard Enterprise website Storage contr...

Page 82: ...the new Smart Array is not the new boot device go to the next step 5 Ensure that users are logged off and that all tasks are completed on the server CAUTION In systems that use external data storage b...

Page 83: ...Smart Array SR SmartCache in a Smart Array P class type p Gen10 controller install an energy pack SmartCache and CacheCade enable solid state drives to be used as caching devices for hard drive media...

Page 84: ...erver in Legacy Boot Mode change the controller boot order 6 If the new controller is not the new boot device install the device drivers 7 If the controller firmware is not the latest version use SPP...

Page 85: ...Storage Battery with the 145mm cable HPE Smart Storage Hybrid Capacitor The HPE Smart Storage Hybrid Capacitor supports the following devices HPE Smart Array SR controllers The capacitor pack can supp...

Page 86: ...er cord from the power source b Disconnect each power cord from the server 3 Disconnect all peripheral cables from the server 4 Do one of the following If the server is in tower mode Position the towe...

Page 87: ...ase latch on the holder c Position the other end of the energy pack into the holder d Connect the energy pack cable 11 Connect the storage controller backup power cable 12 If removed install the air b...

Page 88: ...requirement The PCI fan option is required to meet the system thermal requirement when any of the following expansion board options are installed Type p Smart Array controllers High performance NIC co...

Page 89: ...server from the rack 5 Remove the front bezel 6 Remove the access panel 7 If installed remove the air baffle 8 Remove the PCI slot blank retainer 9 Remove the PCI slot blank 10 Install the expansion...

Page 90: ...mentation that ships with the option 18 Connect all peripheral cables to the server 19 Connect the power cords a Connect each power cord to the server b Connect each power cord to the power source 20...

Page 91: ...server is in tower mode Position the tower server for hardware configuration If the server is in rack mode Remove the server from the rack 5 Remove the front bezel 6 Remove the access panel 7 If insta...

Page 92: ...see the product QuickSpecs on the Hewlett Packard Enterprise website http www hpe com info qs For more information about Microsoft Windows BitLocker Drive Encryption feature see the Microsoft website...

Page 93: ...keys will be erased When using BitLocker always retain the recovery key password The recovery key password is required to complete Recovery Mode after BitLocker detects a possible compromise of syste...

Page 94: ...air baffle 10 Remove any components or cables that may prevent access to the TPM connector 11 Proceed to Installing the TPM board and cover Installing the TPM board and cover Procedure 1 Observe the...

Page 95: ...mly press straight down on the middle of the cover 4 Proceed to Preparing the server for operation Preparing the server for operation Procedure 1 Install any options or cables previously removed to ac...

Page 96: ...Module configuration can be changed between TPM 1 2 and TPM 2 0 default but only TPM 1 2 operation is supported Enabling the Trusted Platform Module as TPM 2 0 Procedure 1 During the server startup s...

Page 97: ...o one of the following If in graphical mode click Yes If in text mode press the Y key 7 Press the ESC key to exit System Utilities The server reboots a second time without user input During this reboo...

Page 98: ...ce to verify the length of the cable Use the internal cable management features to properly route and secure the cables When routing cables be sure that the cables are not in a position where they can...

Page 99: ...flow If you intend to use the removed cables later label and store them for future use Storage cabling LFF non hot plug drive cabling from the media bay LFF non hot plug drive cabling with standard po...

Page 100: ...on Orange Power supply cable Blue Drive power cable Gold SATA port 6 cable LFF non hot plug drive cabling from the drive cage LFF non hot plug drive cabling with standard power supply Cable color Desc...

Page 101: ...e power cable Black Power supply cable LFF non hot plug drive cabling with Flexible Slot power supply Cable color Description Orange SATA port 2 cable Blue SATA port 1 cable Gold SATA port 3 cable Pin...

Page 102: ...ower supply Cable color Description Orange Mini SAS cable with sideband connector Blue Drive power cable LFF hot plug drive cabling with Flexible Slot power supply Cable color Description Orange Drive...

Page 103: ...y Cable color Description Orange Drive power cable Blue Mini SAS cable to controller port 1 LFF hot plug drive cabling for controller with Flexible Slot power supply Cable color Description Orange Dri...

Page 104: ...tion Orange Drive power cable Blue 24 pin power supply cable Gold 4 pin power supply cable Pink Mini SAS cable from controller port 1 to drive backplane port 1 Green Mini SAS cable from controller por...

Page 105: ...drive backplane port 2 SFF hot plug drive cabling for controller with standard power supply Cable color Description Orange Drive power cable Blue Mini SAS cable from controller port 1 to drive backpla...

Page 106: ...range Drive power cable Blue Mini SAS cable from controller port 1 to drive backplane port 1 Gold Mini SAS cable from controller port 2 to drive backplane port 2 Energy pack cabling Controller backup...

Page 107: ...ATA optical drive cabling Cable color Description Orange Power supply cable Blue Optical drive power cable Gold Optical drive SATA cable SAS LTO tape drive cabling SAS LTO tape drive with standard pow...

Page 108: ...le Blue SAS LTO tape drive power cable Gold SAS LTO tape drive cable SAS LTO tape drive with Flexible Slot power supply Cable color Description Orange Power supply cable Blue SAS LTO tape drive power...

Page 109: ...USB RDX drive with standard power supply cabling Cable color Description Orange Power supply cable Blue USB RDX drive power cable Gold USB RDX drive cable USB RDX drive with Flexible Slot power suppl...

Page 110: ...Cable color Description Orange Power supply cable Blue USB RDX drive power cable Gold USB RDX drive cable Serial port cabling Fan cabling System fan cabling 110 Cabling...

Page 111: ...Heatsink fan cabling PCI fan cabling Cabling 111...

Page 112: ...able color Description Orange 24 pin power supply cable Blue 4 pin power supply cable Flexible Slot power supply cabling Cable color Description Orange 24 pin power supply cable Blue 4 pin power suppl...

Page 113: ...Front I O cabling Front USB cabling Cabling 113...

Page 114: ...tion about product features specifications options configurations and compatibility see the product QuickSpecs on the Hewlett Packard Enterprise website http www hpe com info qs Active Health System V...

Page 115: ...hen the Active Health System Log is full new data overwrites the oldest data in the log It takes less than 5 minutes to download the Active Health System Log and send it to a support professional to h...

Page 116: ...up virtual media Group power control Group power capping Group configuration and Group firmware update For more information about iLO Federation see the iLO user guide at the following website http ww...

Page 117: ...Interface Tool iLOREST is a scripting tool that allows you to automate HPE server management tasks It provides a set of simplified commands that take advantage of the iLO RESTful API You can install...

Page 118: ...Intelligent Provisioning IMPORTANT HPE ProLiant DX XL servers do not support operating system installation with Intelligent Provisioning but they do support the maintenance features For more informat...

Page 119: ...from advanced cyber attacks For more information see the HPE Gen10 Server Security Reference Guide on the Hewlett Packard Enterprise Information Library at http www hpe com support gen10 security ref...

Page 120: ...from URL Fibre Channel FCoE Scan Policy NOTE The boot mode you use must match the operating system installation If not changing the boot mode can impact the ability of the server to boot to the instal...

Page 121: ...rise website http www hpe com info redfish Using the secboot command in the Embedded UEFI Shell to display Secure Boot databases keys and security reports Launching the Embedded UEFI Shell Use the Emb...

Page 122: ...line environment such as setting the boot controller and boot volume Accessing HPE SSA in the online environment This method requires an administrator to download the HPE SSA executables and install t...

Page 123: ...ProLiant SPP HPE online flash components Moonshot Component Pack Service Pack for ProLiant SPP is a systems software and firmware solution delivered as a single ISO file download This solution uses S...

Page 124: ...E OneView for updates through the management network and orchestrates staging deploying and activating updates You can adjust the polling interval by issuing the appropriate command line option provid...

Page 125: ...ary component for your server Enter one of the fsx file systems available such as fs0 or fs1 and press Enter 7 Use the cd command to change from the current directory to the directory that contains th...

Page 126: ...risk and helps customers realize agility and stability Hewlett Packard Enterprise helps customers succeed through Hybrid IT by simplifying and enriching the on premise experience informed by public cl...

Page 127: ...he iLO Virtual NMI feature Troubleshooting resources Troubleshooting resources are available for HPE Gen10 server products in the following documents Troubleshooting Guide for HPE ProLiant Gen10 serve...

Page 128: ...ays the correct date and time then replace the battery that provides power to the real time clock Under normal use battery life is 5 to 10 years Removing and replacing the system battery Procedure 1 P...

Page 129: ...1 Install the access panel 12 Install the front bezel 13 Do one of the following If the server is in tower mode Position the tower server for operation If the server is in rack mode Install the server...

Page 130: ...the server 17 Properly dispose of the old battery For more information about battery replacement or proper disposal contact an authorized reseller or an authorized service provider 130 System battery...

Page 131: ...eport for this product can be found at https www hpe com info reach For Hewlett Packard Enterprise product environmental and safety information and compliance data including RoHS and REACH see https w...

Page 132: ...T rkiye Cumhuriyeti AEEE Y netmeli ine Uygundur Ukraine RoHS material content declaration GS Gloss declaration The product is not suitable for use at visual display workplaces according to 2 of the G...

Page 133: ...104 F at sea level with an altitude derating of 1 0 C per every 175 m 1 8 F per every 574 ft above 900 m 2953 ft to a maximum of 3050 m 10 000 ft 40 C to 45 C 104 F to 113 F at sea level with an altit...

Page 134: ...nput current 5A Rated input power 427 W at 115 VAC 427 W at 240 VAC Efficiency No less than 82 at 100 load No less than 85 at 50 load No less than 82 at 20 load Power supply output Rated steady state...

Page 135: ...r China only BTUs per hour 1902 at 100 VAC 1840 at 200 VAC 1832 at 240 VDC for China only Power supply output Rated steady state power 500 W at 100 VAC to 127 VAC input 500 W at 100 VAC to 240 VAC inp...

Page 136: ...e spock Storage white papers and analyst reports www hpe com storage whitepapers For additional general support websites see Support and other resources Product websites Product QuickSpecs http www hp...

Page 137: ...provided by Hewlett Packard Enterprise Support for ClearOS and ClearVM is purchased and delivered by ClearCenter You can purchase single support incidents by submitting a support ticket to ClearCenter...

Page 138: ...nformation about CSR contact your local service provider or go to the CSR website http www hpe com support selfrepair Remote support Remote support is available with supported devices as part of your...

Page 139: ...prove the documentation send any errors suggestions or comments to Documentation Feedback docsfeedback hpe com When submitting your feedback include the document title part number edition and publicat...

Page 140: ...PI application program interface CAS column address strobe CSA Canadian Standards Association CSR customer self repair DDR4 double data rate 4 EMI shield Electromagnetic shield FC Fibre Channel FCoE F...

Page 141: ...band interface PCA printed circuit assembly PCIe Peripheral Component Interconnect Express PCI Peripheral Component Interconnect PDU power distribution unit POST Power On Self Test PXE Preboot eXecuti...

Page 142: ...lkit SPP Service Pack for ProLiant SSD solid state device SUM Smart Update Manager TMRA recommended ambient operating temperature TPM Trusted Platform Module UDIMM unbuffered dual in line memory modul...

Reviews: