background image

10103

POR

T 1

ACT

/

LNK

ACT/

LNK

POR

T 1

POR

T 0

ETHERNET

FIBRE

CHANNEL

FIBRE

CHANNEL

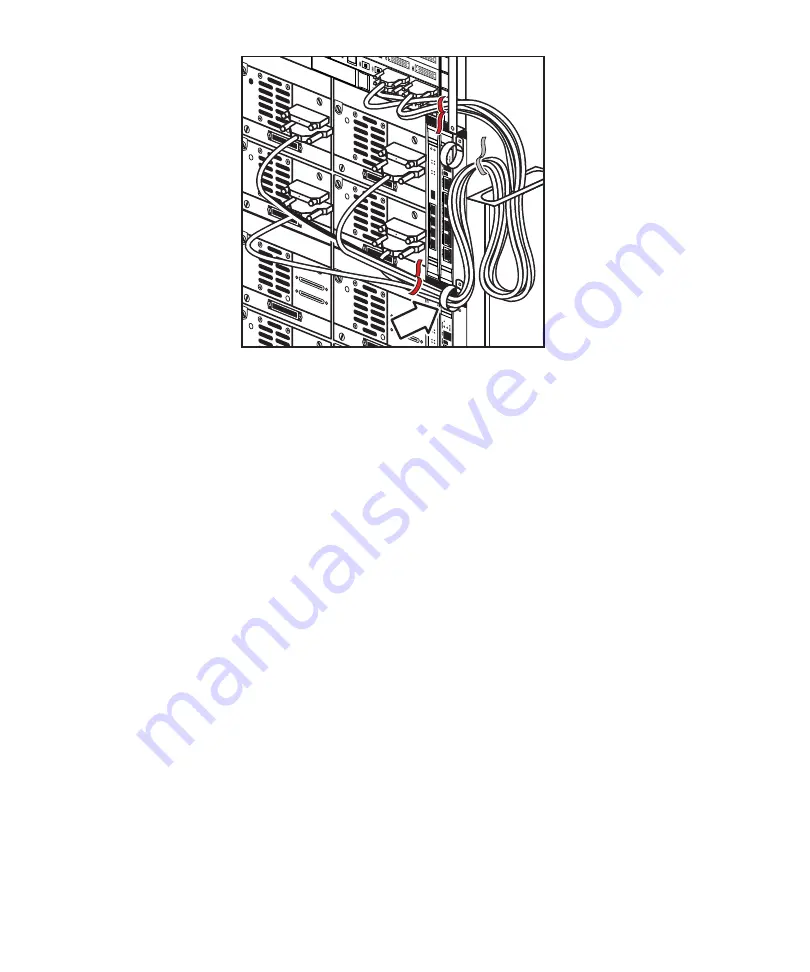
Figure 30 Routing cables through the cluster cable clamp

a.

Using a #2 Phillips screwdriver, remove the screw from the clamp.

b.

Route the SCSI cables through the clamp.

c.

Secure the clamp to the cluster frame by replacing the screw.

6.

Repeat these steps for each interface controller and drive cluster combination

installed in the library.

Connecting FC cables for HBA

Connect two FC cables (not provided) from the interface controllers, through an access

hole in the library cabinet, and to a switch or Host Bus Adapter (HBA) (see

Figure 31

).

1.

Attach a FC cable (one per every two drives) to the FC0 and FC1 ports on the

interface controller. If you are only attaching one cable, attach it to port FC0.

2.

Route the cable(s) through access holes on the top or bottom of the library cabinet.

HP StorageWorks ESL E-Series Tape Library unpacking and installation guide

51

Summary of Contents for StorageWorks ESL E Series

Page 1: ...HP StorageWorks ESL E Series Tape Library unpacking and installation guide Part number 350800 007 Seventh edition December 2005 ...

Page 2: ...etary information which is protected by copyright No part of this document may be photocopied reproduced or translated into another language without the prior written consent of Hewlett Packard The information is provided as is without warranty of any kind and is subject to change without notice The only warranties for HP products and services are set forth in the express warranty statements accom...

Page 3: ...Preparing for the installation 17 Tools for installation 17 Taking ESD precautions 18 Unpacking the library 18 Receiving the library 19 Unpacking the library 19 Moving the library to the installation site 27 Setting up the library 28 Storing the packaging materials 40 2 Installing the library 41 Cabling the library 42 Connecting drive cluster cables 42 Connecting drive cables 42 Connecting FC cabl...

Page 4: ...els 57 Media label identifiers 58 Setting the write protect switch 59 Write protecting Ultrium tape cartridges 59 Write protecting SDLT tape cartridges 60 Library storage locations and slot numbering 61 Ultrium library 67 SDLT library 69 Mixed media library 71 4 Configuring the IP address 73 Index 77 4 ...

Page 5: ...ng the load port latching mechanism shown from inside the library for clarity 37 22 Removing the panel shipping restraints panels shown outside of library for clarity 38 23 Storing the panel shipping restraints 39 24 Attaching SCSI terminators to the Ultrium 460 or SDLT drive 43 25 Preparing the cable restraint bracket 44 26 Matching drives and interface controller ports 45 27 Managing drive SCSI ...

Page 6: ...41 Bin shelf numbering left panels 64 42 Bin shelf numbering right panels 65 43 Bin shelf numbering back panel SDLT shown 66 44 Powering up the library 73 45 Menu screen 74 46 Setup screen 75 6 ...

Page 7: ...ry storage elements removable magazines 67 4 Ultrium library storage elements fixed magazines 68 5 SDLT library storage elements removable magazines 69 6 SDLT library storage elements fixed magazines 70 HP StorageWorks ESL E Series Tape Library unpacking and installation guide 7 ...

Page 8: ...8 ...

Page 9: ...ion the section called Document conventions and symbols HP technical support Related documentation In addition to this guide HP provides corresponding information HP StorageWorks ESL E Series pre installation site survey HP StorageWorks ESL E Series Tape Library users guide HP StorageWorks ESL E Series Tape Library service manual HP StorageWorks ESL E Series Tape Library unpacking and installation...

Page 10: ...alic font Text emphasis Monospace font File and directory names System output Code Text typed at the command line Monospace italic font Code variables Command line variables Monospace bold font Emphasis of file and directory names system output code and text typed at the command line WARNING Indicates that failure to follow directions could result in bodily harm or death CAUTION Indicates that fai...

Page 11: ...ides you with e mail updates on the latest product enhancements newest versions of drivers and firmware documentation updates as well as instant access to numerous other product resources After signing up you can quickly locate your products by selecting Business support and then Storage under Product Category Other HP web sites For additional information see the following HP web sites http www hp...

Page 12: ...Helpful web sites For other product information see the following HP web sites http www hp com http www hp com go storage http www hp com support http www docs hp com 12 About this guide ...

Page 13: ... StorageWorks ESL E Series tape library Selecting an installation location When choosing an installation site for the HP StorageWorks ESL E Series tape library consider the requirements described in the section called Floor space the section called Floor clearance the section called Floor strength and inclination the section called Power and grounding the section called Environmental conditions NO...

Page 14: ...s the minimum floor space required by a standalone library 1 2 4 5 6 3 1 28 inches 71 cm 2 30 inches 76 cm 3 Back door 4 50 inches 127 cm 5 Front door 6 23 inches 58 cm Figure 1 Floor space requirements 14 Unpacking the library ...

Page 15: ...l to within 0 25 inch 6 4 mm over a 6 ft by 6 ft 1 83 m by 1 83 m area Ventilation Do not place the library directly over any cooling vents Placing the library over cooling vents will result in an out of temp reporting in the library log Power and grounding For the United States and Canada one or two UL CSA certified power cords are supplied with each library Each power cord uses a 14 3 SJT cord a...

Page 16: ...d with an HP approved power cord for your specific geographic region Use of a non HP approved power cord may result in 1 not meeting individual country specific safety requirements 2 insufficient conductor ampacity that could result in overheating with potential personal injury and or property damage and 3 an unapproved power cord could fracture resulting in the internal contacts being exposed whi...

Page 17: ...on Preparations needed before installing the library are described in the section called Tools for installation the section called Taking ESD precautions Tools for installation These tools are needed for unpacking and setting up the library 2 Phillips screwdriver Snips for metal bands Safety goggles Ratchet with 3 8 inch socket or 3 8 inch open end wrench Ratchet with 3 4 inch socket or 3 4 inch o...

Page 18: ... inside their protective shipping bag or on an antistatic mat Avoid touching connectors and other components NOTE Dry climates and cold weather heating environments have lower relative humidity and are more likely to produce static electricity Unpacking the library This section explains how to unpack the library and move it to its final installation location The library is shipped in packing mater...

Page 19: ...o unpack the library 1 Note the side of the pallet where the library will be unloaded The library may be unloaded from only the ramp side of the pallet see Figure 4 2 Verify the minimum floor space requirements see Figure 4 NOTE Figure 4 shows the minimum floor space required by the library at its unboxing site Unboxing the library requires a minimum of 3 feet 91 cm on all sides The side used for ...

Page 20: ...r space requirements unpacking site 3 Cut the two steel bands that secure the library and packing material to the pallet see Figure 5 WARNING The steel bands are under tension and may snap away when cut Wear safety goggles when cutting the steel bands 20 Unpacking the library ...

Page 21: ...eel bands Figure 5 Removing the steel bands 4 Lift the cardboard box top cover straight up and remove it from the box see Figure 6 HP StorageWorks ESL E Series Tape Library unpacking and installation guide 21 ...

Page 22: ... Removing the box top cover 5 Remove the eight cardboard box retaining clips and unwrap the cardboard box from around the library see Figure 7 NOTE The cardboard box is in two sections 22 Unpacking the library ...

Page 23: ...ct the library for any damage that may have occurred during shipment Pay special attention to areas behind any scuffs on the anti static bag If damage is detected contact your authorized service representative HP StorageWorks ESL E Series Tape Library unpacking and installation guide 23 ...

Page 24: ...nd flat washers from the front rail of the pallet and set aside Remove the front rail from the pallet see Figure 8 1 1 Bolts Figure 8 Removing the front pallet rail 8 Cut the tape securing the ramp against the library 9 Use two of the 3 3 8 inch hex head bolts lock washers and flat washers previously removed to secure the ramp to the pallet see Figure 9 24 Unpacking the library ...

Page 25: ... ramp 10 Remove the four 3 4 inch restraining bolts securing the library to the shipping pallet see Figure 10 One restraining bolt is located near each leveling foot on the library HP StorageWorks ESL E Series Tape Library unpacking and installation guide 25 ...

Page 26: ...1 1 Bolts Figure 10 Removing the restraining bolt 11 Raise the leveling feet securing the library to the pallet see Figure 11 26 Unpacking the library ...

Page 27: ...tion site 2 Carefully roll the library down the ramp and guide it to the installation site see Figure 12 WARNING Libraries weigh between 1 135 pounds 515 kg and 1 459 pounds 662 kg depending on their configuration At least two people should move and install the library HP StorageWorks ESL E Series Tape Library unpacking and installation guide 27 ...

Page 28: ...bilize the library by lowering the leveling feet a Rotate each foot of the library until it makes contact with the floor b Rotate each foot an additional 1 4 turn to begin raising the library c Level the library using a carpenter s level 2 Remove the antistatic bag covering the library 3 Remove the shipping foam from around the bottom perimeter of the library see Figure 13 28 Unpacking the library...

Page 29: ...your HP sales representative 6 Using the key from the accessories kit unlock and open the library doors right front and back a Lift each door handle straight up and then turn the handle to unlatch each door The key lock for the front library door is located behind the laptop tray see Figure 14 Open the laptop tray by gently pushing on the top of the tray to release it from the cabinet Support the ...

Page 30: ... library frame at the bottom of the door Release this latch then open the door 7 From the front of the library remove the foam from the Y axis cover plate from the left front door and also from the back door frame see Figure 15 Store the foam in case you need to relocate the library in the future 30 Unpacking the library ...

Page 31: ...e restraint from the front of the library by completing these steps see Figure 16 a Remove the four 1 4 inch hex nuts securing the two pieces of the restraint b Remove the 1 4 inch bolts securing the restraint to the top and bottom of the library frame HP StorageWorks ESL E Series Tape Library unpacking and installation guide 31 ...

Page 32: ...me restraint 9 From the front of the library remove two shipping restraints using a 2 Phillips screwdriver see Figure 17 The vertical axis shipping restraint is secured by four screws and the robot shipping restraint is secured by seven screws 32 Unpacking the library ...

Page 33: ...ical axis and robot shipping restraints 10 Attach the vertical axis shipping restraint to the robot shipping restraint using the four screws removed from the vertical axis shipping restraint in Figure 17 see Figure 18 HP StorageWorks ESL E Series Tape Library unpacking and installation guide 33 ...

Page 34: ...igure 18 12 Use the remaining two screws to secure the combined shipping restraints in the library as shown in Figure 18 13 From the back of the library use a ratchet with a 7 16 inch socket or a 7 16 inch open end wrench to remove the two nuts securing the counterweight shipping restraint to the back wall of the library cabinet see Figure 19 NOTE HP recommends that you use a 12 inch socket extens...

Page 35: ...hipping restraint 14 Reverse the counterweight shipping restraint so that the pin is facing out Reinstall it onto the back wall of the library using the two nuts previously removed see Figure 20 HP StorageWorks ESL E Series Tape Library unpacking and installation guide 35 ...

Page 36: ...ter weight shipping restraint 15 Remove the six panel shipping restraints three on each side of the cabinet a Use a 1 4 in Phillips screwdriver to press on the bottom of the white load port latching mechanism to disengage it and release the load port see Figure 21 36 Unpacking the library ...

Page 37: ... the load port latching mechanism shown from inside the library for clarity b Pull out the load port to expose the middle and lower shipping restraints see Figure 22 HP StorageWorks ESL E Series Tape Library unpacking and installation guide 37 ...

Page 38: ... a 2 Phillips screwdriver remove the middle and lower panel shipping restraints d Close the load port e Locate the upper shipping restraint above the upper panel see Figure 22 and remove it using a 2 Phillips screwdriver f Repeat for the panels on the other side of the library cabinet 16 Store the panel shipping restraint hardware three sets on each side on the lower cabinet frame see Figure 23 38...

Page 39: ... Connect the cables to the library s main power source b Route the cables through the cable access hole at the bottom of the cabinet c Connect the cables to a grounded power source NOTE Do not power on the library The two breaker switches on the power distribution unit should remain in the off position to the left until the library is fully installed HP StorageWorks ESL E Series Tape Library unpac...

Page 40: ...the internal contacts being exposed which potentially could subject the user to a shock hazard HP disclaims all liability in the event a non HP approved power cord is used Storing the packaging materials Store the library packaging materials 1 Detach the ramp and place on top of the pallet 2 Fold the shipping bag 3 Place the shipping bag foam cap screws and other packaging materials on the pallet ...

Page 41: ...lled Power and grounding for power requirements For a native FC environment you need the following Four FC drive cables and one Ethernet cable for each e2400 FC 2G or 4G Interface Controller Two Fibre Channel FC cables for the host switches for every e2400 160 interface controller not included Power source see the section called Power and grounding for power requirements To set up a Cross Linked C...

Page 42: ...tions include procedures for cabling the library These procedures will be slightly different for the e2400 160 interface controller and Ultrium 460 drives and the e2400 FC 2G and 4G interface controller and Ultrium 460 FC and 960 drives The instructions for cabling each type of library are presented below CAUTION Before cabling the library ensure the library is powered off and that the main switch...

Page 43: ...choose to combine the two drive types see the mixed interface technical document on the web for important information Access the Technical documentation page from the ESL E Series libraries link found on http www hp com go tape NOTE Each e2400 160 interface controller card ships with four SCSI cables one Ethernet cable and seven sets of color coded tie wraps FC cables are not provided These parts ...

Page 44: ...ure 25 Preparing the cable restraint bracket 3 Connect the SCSI cables from the drives in drive cluster 0 to the e2400 160 interface controller in slot 0 of the card cage see Figure 26 44 Installing the library ...

Page 45: ...C D 0 Port 0 1 Port 1 2 Port 2 3 Port 3 A Drive A B Drive B C Drive C D Drive D Figure 26 Matching drives and interface controller ports HP StorageWorks ESL E Series Tape Library unpacking and installation guide 45 ...

Page 46: ...ontroller NOTE Clusters are numbered sequentially from 0 to 5 with 0 at the top of the cabinet just below the card cage a Gently tighten the screws to secure the cable to the drive port using a slotted screwdriver CAUTION Do not overtighten the screws that secure the cable to the drive port b Route it through the cable access holes in the sheet metal on the right of the library cabinet For drive c...

Page 47: ... c Continue routing the cable up through the cable restraint bracket located to the right of the card cage and attach the cable to the corresponding SCSI port on the e2400 160 interface controller NOTE Tighten the SCSI connector screw on the left and then the right for easier installation due to cable interference Pull the cable toward you to provide more clearance when tightening the right connec...

Page 48: ...in preparation for adding them in the future 10101 POR T 1 POR T 0 ACT LNK ACT LNK POR T 1 POR T 0 ETHE RNE T FIBR E CHA NNE L FIBR E CHA NNE L Figure 28 Attaching SCSI cables 4 The e2400 160 interface controller ships with several sets of tie wraps Each color set should be used to designate a different drive cluster see Figure 29 48 Installing the library ...

Page 49: ...e wraps NOTE Ensure that different colors of tie wraps are used for each drive cluster and e2400 160 interface controller combination If you have multiple sets of the same color do not use them within the same library Colors help identify which SCSI cables are associated with which cluster HP StorageWorks ESL E Series Tape Library unpacking and installation guide 49 ...

Page 50: ...to the SCSI port end of the e2400 160 interface controllers Attach it between the cluster cable restraint bracket and the SCSI ports c Take one white tie wrap and use it to group the cluster s SCSI cables together near the cable access holes in the sheet metal on the right of the library cabinet NOTE The other white tie wraps are provided as spares 5 Route the SCSI cables through the cluster cable...

Page 51: ... and drive cluster combination installed in the library Connecting FC cables for HBA Connect two FC cables not provided from the interface controllers through an access hole in the library cabinet and to a switch or Host Bus Adapter HBA see Figure 31 1 Attach a FC cable one per every two drives to the FC0 and FC1 ports on the interface controller If you are only attaching one cable attach it to po...

Page 52: ...NEL FIBRE CHANNEL ACT LNK PORT 2 FIBRE CHANNEL ACT LNK ACT LNK PORT 1 PORT 0 ETHERNET SERIAL PWR FIBRE CHANNEL FIBRE CHANNEL ACT LNK PORT 2 FIBRE CHANNEL ACT LNK ACT LNK PORT 1 PORT 0 FIBRE CHANNEL FIBRE CHANNEL ACT LNK PORT 2 FIBRE CHANNEL ACT LNK ACT LNK PORT 1 PORT 0 ETHERNET SERIAL PWR FIBRE CHANNEL FIBRE CHANNEL ACT LNK PORT 2 FIBRE CHANNEL ACT LNK ACT LNK PORT 1 PORT 3 FIBRE CHANNEL FIBRE CH...

Page 53: ...le is factory installed The second port should be vacant and is available for connecting to your local network 1 1 Ethernet ports Figure 32 Connecting the cabinet controller LAN cable Powering on the library You are now ready to power on the library and ensure that all components are functioning properly see Figure 33 HP StorageWorks ESL E Series Tape Library unpacking and installation guide 53 ...

Page 54: ... main switches on the power distribution unit to the on right position 3 Press the power button located behind the laptop tray on the front of the library 4 After several minutes verify that the current state of the library appears in the System State display on the front panel System On line or System Off Line 5 Make sure that LEDs on the power supplies tape drives terminators the interface manag...

Page 55: ...s CAUTION Handle tape cartridges with care Do not drop or mishandle them or place them near sources of electromagnetic interference Rough handling can damage the cartridge making it unusable and potentially hazardous to the tape drives Labeling tape cartridges CAUTION The misuse and misunderstanding of bar code technology can result in backup and restore failures To ensure that your bar codes meet...

Page 56: ...f the tape is faulty Ultrium bar code labels Ultrium cartridges have a recessed area located on the face of the cartridge next to the write protect switch Use this area for attaching the adhesive backed bar code label see Figure 34 Do not apply labels onto the cartridge except in this designated area CAUTION The bar code label should be applied as shown in Figure 34 with the alphanumeric portion f...

Page 57: ... to the write protect switch see Figure 36 Use this slot for inserting the bar code label by sliding it into the slot CAUTION Do not apply labels onto the top bottom sides or back of the cartridge as this may cause damage to the tape drive or interfere with reliable operation HP StorageWorks ESL E Series Tape Library unpacking and installation guide 57 ...

Page 58: ...per bar code labels for your drive technology Table 2 lists the identifier that is found at the end of 7 or 8 character SDLT and Ultrium bar code labels Table 2 Media label identifiers Cartridge type Density Label identifier SDLT 110 220 GB S or S1 SDLT 160 320 GB S or S2 SDLT 600 300 600 GB 2 Ultrium 230 100 200 GB L1 Ultrium 460 200 400 GB L2 Ultrium 960 400 800 GB L3 58 Loading tape cartridges ...

Page 59: ...ing the write protect switch Each tape cartridge has a sliding write protect switch This switch determines whether new data can be written to the tape cartridge write enabled or whether data on the tape cartridge is protected from being erased or overwritten write protected Write protecting Ultrium tape cartridges By moving the switch to the left Figure 37 the tape cartridge is write enabled By mo...

Page 60: ...rite protecting Ultrium tape cartridges Write protecting SDLT tape cartridges By moving the switch to the left Figure 38 the tape cartridge is write protected orange indicator is visible By moving the switch to the right the tape cartridge is write enabled orange indicator is not visible 60 Loading tape cartridges ...

Page 61: ... numbering The HP StorageWorks ESL E Series tape library is an automated tape storage and retrieval library that may consist of up to 24 tape drives and up to 718 Ultrium tape cartridges or 636 SDLT tape cartridges The library stores tape cartridges in the following locations Left panels Right panels Back panels HP StorageWorks ESL E Series Tape Library unpacking and installation guide 61 ...

Page 62: ... called Ultrium library and the section called SDLT library for tape cartridge quantity information Also designating the load ports as active reduces the capacity by the number of slots in the load port To slide the slot panels out of the cabinet press the slot panel latches down and pull the slot panel out of the cabinet see Figure 39 and Figure 40 62 Loading tape cartridges ...

Page 63: ...g the slot panel latch on an upper or lower load port Figure 41 shows the left panel bins Begin with panel 1 and load top to bottom and left to right Continue with panel 2 in the same manner and finally panel 3 HP StorageWorks ESL E Series Tape Library unpacking and installation guide 63 ...

Page 64: ...nel 3 Figure 41 Bin shelf numbering left panels Figure 42 shows the right panel bins Begin with panel 4 and load top to bottom and left to right Continue with panel 5 in the same manner and finally panel 6 64 Loading tape cartridges ...

Page 65: ... drives each column has seven slots with SDLT drives each column has six slots Begin at the top with the panel corresponding to cluster 0 and load top to bottom and left to right Continue loading each sequential cluster top to bottom and left to right HP StorageWorks ESL E Series Tape Library unpacking and installation guide 65 ...

Page 66: ...he number of slots located in the back panel varies with the number of drive clusters installed 1 2 1 Cluster 0 2 Back panel bins Figure 43 Bin shelf numbering back panel SDLT shown 66 Loading tape cartridges ...

Page 67: ... 5 8 Left only 16 682 5 8 Right only 32 666 5 8 Both 48 650 9 12 0 0 684 9 12 Left only 16 668 9 12 Right only 32 652 9 12 Both 48 636 13 16 0 0 670 13 16 Left only 16 654 13 16 Right only 32 638 13 16 Both 48 622 17 20 0 0 656 17 20 Left only 16 640 17 20 Right only 32 624 17 20 Both 48 608 21 24 0 0 642 21 24 Left only 16 626 21 24 Right only 32 610 21 24 Both 48 594 1Slots in enabled load ports...

Page 68: ...4 5 8 0 0 704 5 8 Left only 18 686 5 8 Right only 36 668 5 8 Both 54 650 9 12 0 0 690 9 12 Left only 18 672 9 12 Right only 36 654 9 12 Both 54 636 13 16 0 0 676 13 16 Left only 18 658 13 16 Right only 36 640 13 16 Both 54 622 17 20 0 0 662 17 20 Left only 18 644 17 20 Right only 36 626 17 20 Both 54 608 21 24 0 0 648 21 24 Left only 18 630 21 24 Right only 36 612 21 24 Both 54 594 1Slots in enabl...

Page 69: ... Left only 14 604 5 8 Right only 28 590 5 8 Both 42 576 9 12 0 0 606 9 12 Left only 18 592 9 12 Right only 28 578 9 12 Both 42 564 13 16 0 0 594 13 16 Left only 18 580 13 16 Right only 28 566 13 16 Both 42 552 17 20 0 0 582 17 20 Left only 18 568 17 20 Right only 28 554 17 20 Both 42 540 21 24 0 0 570 21 24 Left only 18 556 21 24 Right only 28 542 21 24 Both 42 528 1Slots in enabled load ports can...

Page 70: ...5 8 0 0 624 5 8 Left only 16 608 5 8 Right only 32 592 5 8 Both 48 576 9 12 0 0 612 9 12 Left only 16 596 9 12 Right only 32 580 9 12 Both 48 564 13 16 0 0 600 13 16 Left only 16 584 13 16 Right only 32 568 13 16 Both 48 552 17 20 0 0 588 17 20 Left only 16 572 17 20 Right only 32 556 17 20 Both 48 540 21 24 0 0 576 21 24 Left only 16 560 21 24 Right only 32 544 21 24 Both 48 528 1Slots in enabled...

Page 71: ...as the rest of panels 2 and 5 If panels 1 and 2 or 1 2 and 3 are converted to a new media type the left load port can be used to insert or remove media from the converted panels The right load port is used to insert or remove media from the existing panels The type of media added to your library is on the left side of the library only therefore the additional media type has only one column of load...

Page 72: ...72 Loading tape cartridges ...

Page 73: ...ystem State display on the front panel System On line or System Off Line 1 2 3 4 1 Power button 2 Front door latch 3 Laptop tray 4 Laptop tray latch Figure 44 Powering up the library 2 Take the library off line if it is not off line already a Press the Ops button on the OCP to access the Operations screen b Select Cabinet c Use the Up and Down arrows to take the library off line HP StorageWorks ES...

Page 74: ...ys the Menu screen see Figure 45 10389 Figure 45 Menu screen 4 From the Menu screen use the Up and Down arrows to highlight Setup and press Select 5 The library prompts you for a password Enter the 6 digit password NOTE The default password is 001122 The Setup screen displays see Figure 46 74 Configuring the IP address ...

Page 75: ...ion use the Up and Down arrows to highlight the section and press Select To view or change network settings highlight Network Settings and press Select To set the IP address subnet mask and gateway use the Up and Down buttons to select the appropriate number and press Select to accept To enable disable DHCP use the Up and Down buttons to toggle between enable disable Press Select to accept the set...

Page 76: ...tape drives in the cabinet use the Up and Down arrows to select the number of drives and press Select CAUTION If you have a partially filled drive cluster change the number of tape drives to reflect the number of installed drives For example a cluster with two drives will show as four drives total with two being inactive Use the Setup menu to change Configured Drives to 2 instead of 24 which is th...

Page 77: ...ions text symbols 10 Cross Link CLM 41 D document related documentation 9 doors 29 drive autounload 75 drive clusters installing cables 42 E environmental conditions 17 ESD 18 ethernet cables cabinet controller 52 LAN 52 F factory settings 75 FC cables 51 feet leveling 27 28 floor clearance 15 inclination 15 space 14 19 strength 15 front panel 74 H help obtaining 11 HP storage web site 11 Subscrib...

Page 78: ...ing 71 password 74 ports FC interface controller 46 power cables 39 cord 15 requirements 15 R related documentation 9 removable magazines 71 requirements power 15 restore factory settings 75 restraining bolts 26 right load port 75 right panel 61 S SCSI cables 43 SDLT 69 71 SDLT bar code labels 57 SDLT write protecting 60 setup 74 slots 67 panel 61 SDLT 69 71 storage capacity 71 storage elements 67...

Page 79: ...otecting 59 unpacking 13 18 V ventilation 15 W wall outlet 16 web sites HP documentation 11 HP storage 11 HP Subscriber s choice 11 write protecting SDLT tapes 60 Ultrium tapes 59 HP StorageWorks ESL E Series Tape Library unpacking and installation guide 79 ...

Reviews: