


Removal and replacement procedures 56
○
Grasp the fan by the
two handles, and lift it up from the chassis (3).
3.
Remove the system fan from its protective packaging.
4.
Install the new system fan.
○
Route the fan cable through the vacated fan bracket.
○
Insert the fan in the fan bracket (1).
○
Fasten the 4 screws (2)
○
Connect the fan cable to its corresponding board connector (3).
5.
Perform the post-installation procedure.
Power supply unit
PSU of this server is Standard PSU or other compatible supplies with PFC (power factor correction)
function.
Summary of Contents for ProLiant MicroServer
Page 12: ...Customer self repair 12 ...
Page 13: ...Customer self repair 13 ...
Page 14: ...Customer self repair 14 ...
Page 15: ...Customer self repair 15 ...
Page 16: ...Illustrated parts catalog 16 Illustrated parts catalog Mechanical components ...
Page 20: ...Illustrated parts catalog 20 ...
Page 21: ...Illustrated parts catalog 21 System components ...
Page 38: ...Removal and replacement procedures 38 6 Perform the post installation procedure ...
Page 50: ...Removal and replacement procedures 50 5 Perform the post installation procedure ...
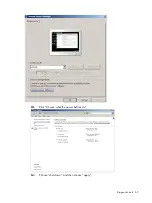
Page 66: ...Diagnostic tools 66 5 Click Browse to select folder and then click Next 6 Click Next ...
Page 67: ...Diagnostic tools 67 7 Click Install 8 Click Finish ...
Page 70: ...Diagnostic tools 70 13 Click options Enable or Disable to change Write cache and NCQ status ...


