background image

Removal and Replacement Procedures 

Powering Down the Server 


WARNING:  To reduce the risk of personal injury, electric shock, or damage to the 
equipment, remove the power cord to remove power from the server. The front panel 
Power On/Standby button does not completely shut off system power. Portions of the 
power supply and some internal circuitry remain active until AC power is removed. 


IMPORTANT:  If installing a hot-plug device, it is not necessary to power down the server. 

1.  Back up the server data. 

2.  Shut down the operating system as directed by the operating system documentation. 

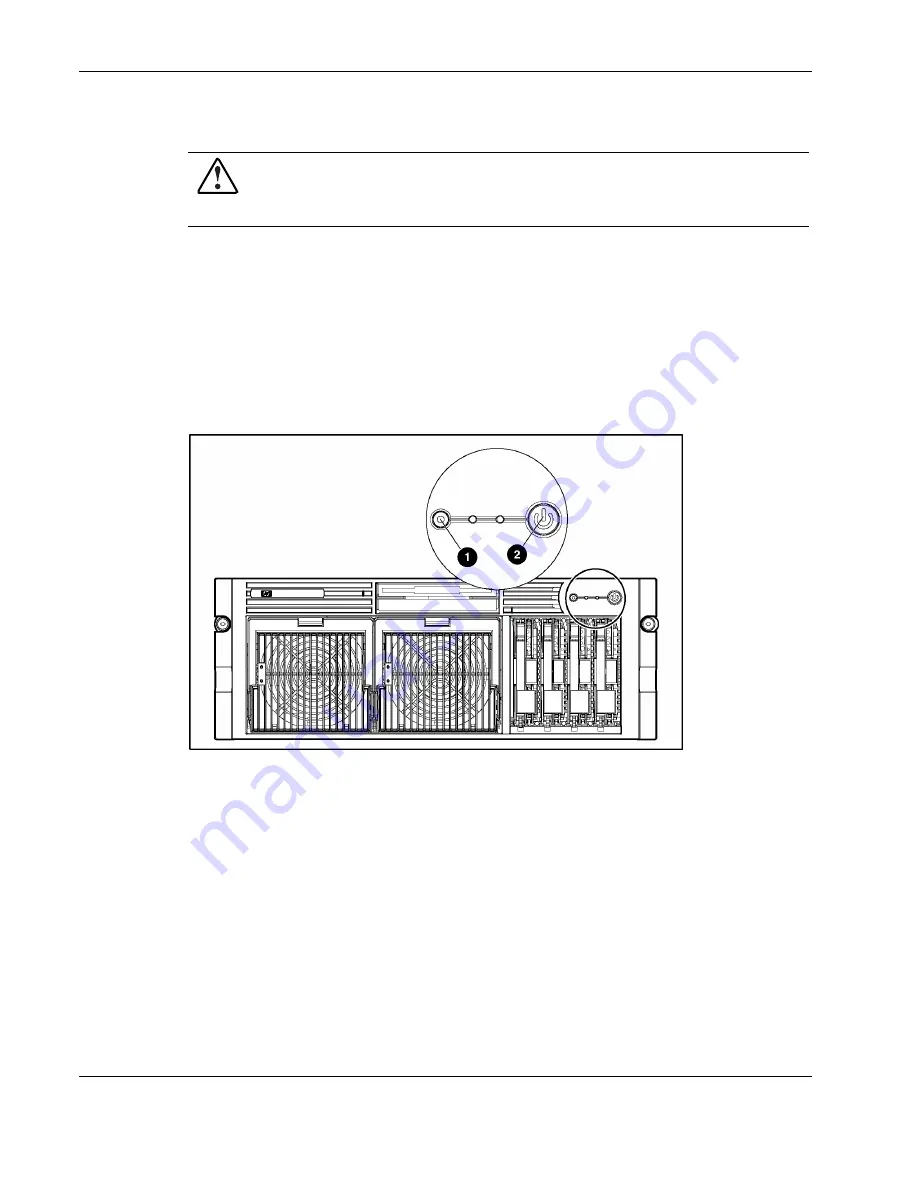
3.  If the server is installed in a rack, press the UID LED button (1) on the front panel. Blue 

LEDs illuminate on the front and rear of the server. 

4.  Press the Power On/Standby button (2) to place the server in standby mode. When the 

server activates standby power mode, the system power LED changes to amber.  


Figure 2-1:  Identifying the UID LED (1) and Power On/Standby 
buttons (2) 

5.  If the server is installed in a rack, locate the server by identifying the illuminated rear 

UID LED button. 

6.  Disconnect the power cords. 

The system is now without power. 

2-4 

HP ProLiant DL585 Server Maintenance and Service Guide 


Summary of Contents for ProLiant DL585

Page 1: ...HP ProLiant DL585 Server Maintenance and Service Guide February 2005 Fourth Edition Part Number 358708 004 ...

Page 2: ...othing herein should be construed as constituting an additional warranty HP shall not be liable for technical or editorial errors or omissions contained herein AMD Opteron and HyperTransport are trademarks of AMD Corporation in the United States and other countries Microsoft Windows and Windows NT are U S registered trademarks of Microsoft Corporation HP ProLiant DL585 Server Maintenance and Servi...

Page 3: ...ions 2 1 Electrostatic Discharge 2 1 Server Warnings and Cautions 2 2 Preparation Procedures 2 3 Powering Down the Server 2 4 Locating and Removing the Torx T 15 Tool 2 5 Extending the Server from the Rack 2 6 Removing the Access Panel 2 8 Installing the Access Panel 2 8 Removing the Server from the Rack 2 9 Processor Memory Boards 2 10 Processor Memory Board Population Guidelines 2 10 Processor P...

Page 4: ...Rear Panel 4 2 SCSI Backplane Board 4 3 Processor Memory Board 4 4 Processor and Processor Power Module 4 5 LEDs 4 6 Front Panel 4 6 QuickFind Diagnostic Display 4 7 Hot Plug SCSI Hard Drive 4 9 Hot Plug Fan 4 11 Hot Plug Power Supplies 4 12 NIC LEDs 4 13 Battery Backed Write Cache Enabler 4 14 Internal Diagnostic Display 4 15 System Board Switches 4 16 System Maintenance Switch SW3 4 17 System ID...

Page 5: ...ve blank 2 19 2 17 Removing a hot plug SCSI hard drive 2 21 2 18 Removing a power supply blank 2 22 2 19 Removing a hot plug power supply 2 23 2 20 Removing a hot plug fan 2 24 2 21 Removing a drive from bay 1 2 25 2 22 Removing a drive from bay 2 2 26 2 23 Removing the exterior and interior chassis screws 2 27 2 24 Disengaging the locking tabs and removing the front bezel 2 28 2 25 Removing the p...

Page 6: ...t 1 3 1 2 System Components Spare Parts List 1 5 1 3 Model DL585R01 01 6GHz 2GB PC2100 SKU 356818 xx1 1 8 1 4 Model DL585R01 01 8GHz 2GB PC2100 SKU 356819 xx1 1 8 1 5 1 Model DL585R01 02 2GHz 2GB PC2100 SKU 356820 xx1 1 9 1 6 Model DL585R01 02 4GHz 2GB PC2100 SKU 365504 xx1 1 9 1 7 Model DL585R01 02 4GHz 2GB PC2700 SKU 378020 xx1 1 9 1 8 Model DL585R02 02 6GHz 2GB PC3200 SKU 380125 xx1 1 10 2 1 Pr...

Page 7: ...tch 1 4 22 5 1 Diagnostic Steps 5 4 5 2 Is the System Power LED Off 5 4 5 3 Is the System Power LED Green 5 5 5 4 Is the External Health LED Green 5 5 5 5 Is the Internal Health LED Green 5 6 5 6 Is the Monitor Displaying Information 5 8 5 7 Problems After Initial Boot 5 9 5 8 Troubleshooting Resources 5 13 6 1 Server Specifications 6 1 HP ProLiant DL585 Server Maintenance and Service Guide vii ...

Page 8: ......

Page 9: ...air Because of the complexity of the individual boards and subassemblies no one should attempt to make repairs at the component level or to make modifications to any printed wiring board Improper repairs can create a safety hazard WARNING To reduce the risk of personal injury from electric shock and hazardous energy levels do not exceed the level of repairs specified in these procedures Because of...

Page 10: ...of the server CAUTION The computer is designed to be electrically grounded earthed To ensure proper operation plug the AC power cord into a properly grounded AC outlet only NOTE Any indications of component replacement or printed wiring board modifications may void any warranty x HP ProLiant DL585 Server Maintenance and Service Guide ...

Page 11: ...rver includes an integrated nonvolatile management log that contains fault and management information The contents of the Integrated Management Log IML can be viewed with Insight Manager Telephone Numbers For the name of the nearest HP authorized reseller In the United States call 1 800 345 1518 In Canada call 1 800 263 5868 For HP technical support In the United States and Canada call 1 800 474 6...

Page 12: ...can replace the part Replacement parts are express shipped most in stock parts are shipped the very same day you contact HP You may be required to send the defective part back to HP unless otherwise instructed Available for most HP products currently under warranty or contract For information on the warranty service refer to the HP website at http h18004 www1 hp com products servers platforms warr...

Page 13: ...Illustrated Parts Catalog Mechanical Components Exploded View Figure 1 1 Mechanical components exploded view 1 2 HP ProLiant DL585 Server Maintenance and Service Guide ...

Page 14: ...e U320 10K 271837 007 289041 001 Yes 4c 36 4 GB SCSI hard drive U320 15K 271837 016 289241 001 Yes 4d 72 8 GB SCSI hard drive U320 10K 271837 008 289042 001 Yes 4e 72 8 GB SCSI hard drive U320 15K 271837 018 289243 001 Yes 4f 145 6 GB SCSI hard drive U320 10K 271837 010 289044 001 Yes 4g 300 GB SCSI hard drive U320 10K 271837 021 351126 001 Yes 5 Power supply blank 233685 001 267133 001 Yes 6a Pow...

Page 15: ...Illustrated Parts Catalog System Components Exploded View Figure 1 2 System components exploded view 1 4 HP ProLiant DL585 Server Maintenance and Service Guide ...

Page 16: ...es 5 Diagnostic display board and lightpipe 012134 001 356784 001 Yes 6 Pass through board 010873 001 249106 001 Yes 7 System board 011977 001 002 356782 001 No 8a Processor Memory Board PC2100 PC2700 011974 001 002 356783 001 Yes 8b Processor Memory Board PC3200 012567 001 378476 001 Yes 9a Processor 1 6 GHz 359126 001 359769 001 Yes 9b Processor 1 8 GHz 359126 002 359770 001 Yes 9c Processor 2 2...

Page 17: ...hot plug 92 x 38 mm 321520 001 359773 001 Yes 18 Fan cage cable assembly 321518 001 361442 001 No 19 Plastics kit 359768 001 Yes a Processor memory board air baffle 337992 001 b Chassis air baffle lower 338886 001 c Chassis air baffle upper 333359 001 20 AC power cord 15 A 125 V 178968 001 237457 001 Yes 21 AC power cord 20 A 250 V 177857 001 237458 001 Yes 22 AC power cord 16A C19 C20 242867 001 ...

Page 18: ...5 041 300701 001 Yes 31 2 GB PC2100 DDR SDRAM 261586 051 300702 001 Yes 32 512 MB PC2700 DDR SDRAM 331561 041 370780 001 Yes 33 1 GB PC2700 DDR SDRAM 331562 051 367167 001 Yes 34 2 GB PC2700 DDR SDRAM 331563 051 367553 001 Yes 35 512 MB PC3200 DDR SDRAM 373028 051 378913 001 Yes 36a 1 GB PC3200 DDR SDRAM 373029 051 378914 001 Yes 36b 2 GB PC3200 DDR SDRAM 373030 051 378915 001 Yes Not shown HP Pro...

Page 19: ...y spare part number 192201 002 in January of 2005 All SKUs will begin shipping with Processor Power Module PPM spare part number 383337 001 in February 2005 This PPM is backward compatible with 365873 001 Table 1 4 Model DL585R01 01 8GHz 2GB PC2100 SKU 356819 xx1 Configuration Code Processor Memory Board Processor Processor Heatsink Power Supply Processor Power Module Memory DIMM MLK2 356783 001 3...

Page 20: ...00700 001 300701 001 300702 001 Note All SKUs except 380125 xx1 will start shipping with Processor Memory Board spare part number 382596 001 in February of 2005 All SKUs will begin shipping with Power Supply spare part number 192201 002 in January of 2005 All SKUs will begin shipping with Processor Power Module PPM spare part number 383337 001 in February 2005 This PPM is backward compatible with ...

Page 21: ...ocessor Processor Heatsink Power Supply Processor Power Module Memory DIMM MLK6 378476 001 382043 001 383420 001 192201 002 383337 001 378913 001 378914 001 378915 001 Note All SKUs except 380125 xx1 will start shipping with Processor Memory Board spare part number 382596 001 in February of 2005 All SKUs will begin shipping with Power Supply spare part number 192201 002 in January of 2005 ...

Page 22: ...c damage Transport products in static safe containers such as conductive tubes bags or boxes Keep electrostatic sensitive parts in their containers until they arrive at static free stations Cover workstations with approved static dissipating material Use a wrist strap connected to the work surface and properly grounded earthed tools and equipment Keep work area free of nonconductive materials such...

Page 23: ...shock or damage to the equipment Do not disable the AC power cord grounding plug The grounding plug is an important safety feature Plug the power cord into a grounded earthed electrical outlet that is easily accessible at all times Unplug the power cord from each power supply to disconnect power to the equipment WARNING To reduce the risk of personal injury from hot surfaces allow the hot plug dri...

Page 24: ...he RackSolutions com website www racksolutions com hp Access internal components If you need to access internal components for removal or replacement you can remove the access panel without removing the server from the rack Power down the server NOTE Do not power down the server if you are performing a hot plug procedure Remove the server from the rack If the rack environment cabling configuration...

Page 25: ...ver data 2 Shut down the operating system as directed by the operating system documentation 3 If the server is installed in a rack press the UID LED button 1 on the front panel Blue LEDs illuminate on the front and rear of the server 4 Press the Power On Standby button 2 to place the server in standby mode When the server activates standby power mode the system power LED changes to amber Figure 2 ...

Page 26: ...val of Torx T 15 screws that have been installed for shipping or security reasons A Torx T 15 tool ships with the server for the removal of these screws 1 Locate the Torx T 15 tool on the back of the server 2 Slide the tool upward out of the retaining clips Figure 2 2 Removing the Torx T 15 tool HP ProLiant DL585 Server Maintenance and Service Guide 2 5 ...

Page 27: ...crews that secure the server to the front of the rack Figure 2 3 Loosening the front panel thumbscrews 2 Extend the server on the rack rails until the server rail release latches engage Figure 2 4 Extending the server from the rack 2 6 HP ProLiant DL585 Server Maintenance and Service Guide ...

Page 28: ...ding rails could pinch your fingertips 3 After performing the installation or maintenance procedure press the rail release levers at the front of both server rails and slide the server into the rack Figure 2 5 Sliding the server into the rack 4 Secure the server by tightening the thumbscrews HP ProLiant DL585 Server Maintenance and Service Guide 2 7 ...

Page 29: ...ponents Properly ground yourself before beginning any installation procedure 1 Power down the server Refer to Powering Do wn the Server ea rlier in this chapter 2 Extend the server from the rack Refer to Extending the Server from the Rack earlier in this chapter 3 Unlock the access panel latch 1 4 Lift up on the latch 2 and remove the access panel 3 Figure 2 6 Removing the access panel Installing ...

Page 30: ...o lift and maneuver the server To remove the server from the rack 1 Power down the server Refer to Powering Down the Server ea rlier in this chapter 2 Extend the server from the rack Refer to Extending the Server from the Rack earlier in this chapter 3 Unplug the cables from the rear of the server 4 Press the rail release levers on the rails and slide the server off the rack rails Figure 2 7 Remov...

Page 31: ... installing For the most recent ROMPaq refer to the HP website and follow the support link on the product website Failure to flash the ROM before installing processor memory boards can cause system failure IMPORTANT Mixing processor speeds and cache sizes is not supported Processor Memory Board Population Guidelines All processors must be of the same speed and cache size Processor memory boards 1 ...

Page 32: ...Table 2 1 Processor Memory Boards Item Description 1 Processor memory board slot 1 processor 2 Processor memory board slot 2 boot processor 3 Processor memory board slot 3 air baffle 4 Processor memory board slot 4 air baffle HP ProLiant DL585 Server Maintenance and Service Guide 2 11 ...

Page 33: ...erver from the rack Refer to Extending the Server from the Rack earlier in this chapter 3 Remove the access panel Refer to R emoving the Access Panel earlier in this chapter 4 Remove the processor memory board Figure 2 9 Removing a processor memory board Reverse the steps to install a processor memory board 2 12 HP ProLiant DL585 Server Maintenance and Service Guide ...

Page 34: ...fer to Extending the Server from the Rack earlier in this chapter 3 Remove the access panel Refer to R emoving the Access Panel earlier in this chapter 4 Remove the processor memory board Refer to Proces sor Memory Boards earli er in this chapter 5 Remove the PPM from the processor memory board Figure 2 10 Removing a PPM Reverse the steps to install a PPM HP ProLiant DL585 Server Maintenance and S...

Page 35: ... Refer to Extending the Server from the Rack earlier in this chapter 3 Remove the access panel Refer to R emoving the Access Panel earlier in this chapter 4 Remove the processor memory board Refer to Proces sor Memory Boards earli er in this chapter 5 Remove the processor heatsink Figure 2 11 Removing the processor heatsink 2 14 HP ProLiant DL585 Server Maintenance and Service Guide ...

Page 36: ...cedures 6 Remove the processor Figure 2 12 Removing a processor IMPORTANT Align the processor to the socket before installing it Reverse the steps to install a processor HP ProLiant DL585 Server Maintenance and Service Guide 2 15 ...

Page 37: ...Memory Population Guidelines Supported configurations DIMMs on different processor memory boards can be of different sizes DIMMs on the same processor memory board must be of the same size and have the same part number DIMMs must be installed on a processor memory board in pairs and in bank order DIMMs must populate three or fewer banks on a memory board with PC2700 DIMMs to maintain a memory cloc...

Page 38: ...rds can be of different sizes DIMMs on the same processor memory board must be of the same size and have the same part number DIMMs must be installed on a processor memory board in pairs and in bank order NOTE PC3200 DIMMs are only supported by processor memory boards with four DIMM slots Figure 2 14 Four DIMM slots Table 2 3 Processor Memory Board Memory Banks with four DIMM slots Slot Bank 5 6 B...

Page 39: ... the access panel Refer to R emoving the Access Panel earlier in this chapter 4 Remove the processor memory board Refer to Proces sor Memory Boards earli er in this chapter 5 Remove the DIMM Figure 2 15 Removing a DIMM IMPORTANT Be sure all DIMM retention clips are in the closed locked position before reinstalling processor memory board into the system Reverse steps to install a DIMM 2 18 HP ProLi...

Page 40: ...ank 1 Push the sliding release button to unlock the blank 1 2 Pull the drive blank out of the drive cage 2 Figure 2 16 Removing a drive blank NOTE Keep the blank for future use Reverse the steps to replace a drive blank HP ProLiant DL585 Server Maintenance and Service Guide 2 19 ...

Page 41: ...that a replaced drive is being rebuilt from the data stored on the other drives NOTE An online spare drive does not activate and start rebuilding after a predictive failure alert because the degraded drive is still online The online spare activates only after a drive in the array has failed Do not replace multiple degraded drives at the same time since the fault tolerance can be compromised When a...

Page 42: ...ly one hard drive at a time The controller relies on other drives to reconstruct data on the replaced drive Drive reconstruction is active when the drive online LED is flashing green 1 Press the release button to unlock the ejector lever on the hard drive 1 2 Open the ejector lever to release the drive 2 3 Slide the drive out of the cage 3 Figure 2 17 Removing a hot plug SCSI hard drive IMPORTANT ...

Page 43: ...ndle of the power supply blanks 1 2 Pull on the lever to release the blank 2 3 Remove the power supply blank from the server 3 Figure 2 18 Removing a power supply blank NOTE Keep the power supply blank for future use Reverse the steps to replace the power supply blank 2 22 HP ProLiant DL585 Server Maintenance and Service Guide ...

Page 44: ...re keyed to be sure that only 800 W hot plug power supplies can be installed in the server The handles on 800 W power supplies are black to distinguish them from other power supplies To remove a hot plug power supply 1 Remove the power supply shipping screw from the bottom of the server if installed 2 Press the lever release button on the handle of the power supply 1 3 Pull on the lever to release...

Page 45: ...tending the Server from the Rack earlier in this chapter 2 Remove the access panel Refer to R emoving the Access Panel earlier in this chapter 3 Identify the malfunctioned fan by checking for an amber LED on the QuickFind Diagnostic Display or on the failed fan 4 Remove the malfunctioned fan Figure 2 20 Removing a hot plug fan 2 24 HP ProLiant DL585 Server Maintenance and Service Guide ...

Page 46: ...ermal damage For information on hot plug fan diagnosis refer to Hot Plug Fan in Chapter 4 Server Component Identification Universal Media Drives To remove a universal media drive 1 Power down the server Refer to Powering Down the Server ea rlier in this chapter 2 Use the Torx T 15 tool to press the appropriate ejection button and pull the universal media drive out of the universal media bay Refer ...

Page 47: ...rive into the slot until it engages the connector IMPORTANT For the diskette drive to be bootable it must be installed in the top universal media drive bay For the CD ROM or DVD ROM drive to be bootable it must be installed in the bottom universal media drive bay 2 26 HP ProLiant DL585 Server Maintenance and Service Guide ...

Page 48: ...r from the Rack earlier in this chapter 3 Remove the access panel Refer to R emoving the Access Panel earlier in this chapter 4 Using the T 15 Torx tool remove the six screws on the exterior of the chassis 1 and the two screws on the interior of the chassis next to the universal media drive bays 2 Figure 2 23 Removing the exterior and interior chassis screws HP ProLiant DL585 Server Maintenance an...

Page 49: ...sengage the locking tabs on the bezel from underneath the chassis 1 6 Remove the front bezel 2 Figure 2 24 Disengaging the locking tabs and removing the front bezel Reverse the steps to replace the front bezel 2 28 HP ProLiant DL585 Server Maintenance and Service Guide ...

Page 50: ...xtending the Server from the Rack earlier in this chapter 3 Remove the access panel Refer to R emoving the Access Panel earlier in this chapter 4 Unplug the cable from the diagnostic display board 1 5 Push on the locking tab until the opposite side comes out 2 Figure 2 25 Removing the power button LED assembly Reverse the steps to replace the power button LED assembly HP ProLiant DL585 Server Main...

Page 51: ...sion slots and buses Table 2 4 PCI X Expansion Slots and Buses Item Slot Bus Description 1 Slot 1 Fifth bus 133 MHz 2 Slot 2 Sixth bus 133 MHz 3 Slot 3 Seventh bus 100 MHz 4 Slot 4 Seventh bus 100 MHz 5 Slot 5 Eighth bus 100 MHz 6 Slot 6 Eighth bus 100 MHz 7 Slot 7 Third bus 100 MHz 8 Slot 8 Third bus 100 MHz Note All PCI X slots are 64 bit 3 3 V keyed 2 30 HP ProLiant DL585 Server Maintenance and...

Page 52: ...ng refer to the white paper PCI Bus Numbering in a Windows NT Environment on the HP website at www hp com PCI X Expansion Boards To remove a PCI X expansion board 1 Power down the server Refer to Powering Down the Server ea rlier in this chapter 2 Extend the server from the rack Refer to Extending the Server from the Rack earlier in this chapter 3 Remove the access panel Refer to R emoving the Acc...

Page 53: ...and Replacement Procedures 8 Remove the board from the slot 3 Figure 2 27 Removing an expansion board Reverse the steps to replace an expansion board 2 32 HP ProLiant DL585 Server Maintenance and Service Guide ...

Page 54: ...g the Server from the Rack earlier in this chapter 3 Remove the access panel Refer to R emoving the Access Panel earlier in this chapter 4 Disconnect the SCSI cables from the SCSI backplane 5 Disconnect the SCSI cables from the PCI X expansion boards Figure 2 28 Disconnecting the SCSI cables Reverse the steps to replace or install the SCSI cables HP ProLiant DL585 Server Maintenance and Service Gu...

Page 55: ...ove the PCI X expansion boards Refer to PCI X Expansion Boards earli er in this chapter 6 Remove the SCSI cables Refer to SCSI Cables earlier in this chapter 7 Loosen the three thumbscrews that secure the front fan cage to the chassis 1 NOTE It is not necessary to remove the fans prior to removing the fan cage The fan cage can be removed with the fans installed 8 Remove the hot plug fans in the fr...

Page 56: ...ds Refer to PCI X Expansion Boards earli er in this chapter 6 Remove the SCSI cables Refer to SCSI Cables earlier in this chapter 7 Remove the front fan cage Refer to F ront Fan Cage earlier in this chapter 8 Loosen the two thumbscrews that secure the pass through board to the diagnostic display board and the side chassis wall 1 You may need to use a Torx T 15 screwdriver 9 Lift the pass through b...

Page 57: ...les earlier in this chapter 7 Remove the front fan cage Refer to F ront Fan Cage earlier in this chapter 8 Remove the pass through board Refer to P ass Through Board earlier in this ch apter 9 Eject all devices from the universal media drive bays Refer to U niversal Media Drives earlier in this chapter 10 Unplug the Power Button LED cable Refer to Power Button LED Assembly earlier in this chapter ...

Page 58: ...Panel earlier in this chapter 4 Remove the processor memory boards Refer to Proce ssor Memory Boards earli er in this chapter NOTE It is not necessary to remove the fans prior to removing the fan cage The fan cage can be removed with the fans installed 5 Loosen the two thumbscrews that secure the rear fan cage to the chassis 1 6 Remove the rear fan cage from the chassis 2 Figure 2 32 Removing the ...

Page 59: ... chapter 2 Extend the server from the rack Refer to Extending the Server from the Rack earlier in this chapter 3 Remove the access panel Refer to R emoving the Access Panel earlier in this chapter 4 Remove the processor memory boards Refer to Proce ssor Memory Boards earli er in this chapter 5 Remove the SCSI cables Refer to SCSI Cables earlier in this chapter 6 Remove the PCI X expansion boards R...

Page 60: ...ecting the BBWCE and the 5i Plus BBWC Module Unplugging the cable deletes all the data in the cache 9 Remove the BBWCE Figure 2 33 Removing the BBWC enabler and 5i Plus BBWC Module Reverse the steps to replace the BBWC Enabler and 5i Plus BBWC Module HP ProLiant DL585 Server Maintenance and Service Guide 2 39 ...

Page 61: ... SCSI Hard Drives earlier in this chapter NOTE If you plan to take the hard drives out of the drive cage label them so that they will be installed in the same slot 4 Remove the access panel Refer to R emoving the Access Panel earlier in this chapter 5 Disconnect any SCSI cables from the SCSI backplane Refer to S CSI Cables earlier in this chapter 6 Loosen the thumbscrew 1 7 Remove the SCSI backpla...

Page 62: ... packs and accumulators with the general household waste To forward them to recycling or proper disposal use the public collection system or return them to either HP or an authorized service provider To remove the battery 1 Power down the server Refer to Powering Down the Server ea rlier in this chapter 2 Extend the server from the rack Refer to Extending the Server from the Rack earlier in this c...

Page 63: ...emoving the battery from the system board 6 Install the new battery 7 Install the access panel 8 Restore the server to its operating position in the rack 9 Run the RBSU to reconfigure the system if the settings were lost 2 42 HP ProLiant DL585 Server Maintenance and Service Guide ...

Page 64: ...rlier in this chapter 5 Remove the access panel Refer to R emoving the Access Panel earlier in this chapter 6 Remove the processor memory boards Refer to Proce ssor Memory Boards earli er in this chapter 7 Remove the SCSI cables Refer to SCSI Cables earlier in this chapter 8 Remove the PCI X expansion boards Refer to PCI X Expansion Boards earli er in this chapter 9 Remove the front fan cage Refer...

Page 65: ...essary to use the Torx tool located on the back of the server 16 Slide the system board toward the front of the unit Figure 2 37 Unscrewing the thumbscrews and sliding the system board IMPORTANT When handling the system board place your hands only on the two handles 2 44 HP ProLiant DL585 Server Maintenance and Service Guide ...

Page 66: ... settings on the old board against the settings in chapter 4 to be sure that they are in the correct positions Figure 2 38 Removing the system board from the chassis Reverse the steps to replace the system board IMPORTANT The server serial number must be re entered through RBSU after replacing the system board Refer to the Re entering the Server Serial Number section HP ProLiant DL585 Server Maint...

Page 67: ...ack for best performance See Removing the Server from the Rack ea rlier in this chapter 5 Remove the access panel Refer to R emoving the Access Panel earlier in this chapter 6 Remove the processor memory boards Refer to Proce ssor Memory Boards earli er in this chapter 7 Remove the SCSI cables Refer to SCSI Cables earlier in this chapter 8 Remove the PCI X expansion boards Refer to PCI X Expansion...

Page 68: ...r cable to the chassis Figure 2 39 Cutting the cable tie wraps 16 Remove the seven cable clips a Lift to disengage the cable clip 1 b Slide the clip forward and lift it off the chassis 2 Figure 2 40 Removing the cable clips HP ProLiant DL585 Server Maintenance and Service Guide 2 47 ...

Page 69: ... the server 3 Figure 2 41 Removing the power supply connectors 20 Use the Torx T 15 tool or a screwdriver to remove the four screws that secure the AC filter cable assembly to the rear chassis wall 1 21 Slide the assembly into the chassis and then lift the assembly out of the chassis 2 Figure 2 42 Removing the AC filters Reverse the steps to replace the AC filter cable assembly 2 48 HP ProLiant DL...

Page 70: ... following warning is displayed WARNING WARNING WARNING The serial number is loaded into the system during the manufacturing process and should NOT be modified This option should ONLY be used by qualified service personnel This value should always match the serial number sticker located on the chassis Press the Enter key to clear the warning 4 Enter the serial number and press the Enter key 5 Pres...

Page 71: ...o the IML resets the server and tries to restart the operating system Run RBSU and set ASR 2 to enable this tool Diagnostics Diagnostics tests and verifies operation of HP hardware If Diagnostics finds a hardware failure it isolates the replaceable part if possible Access Diagnostics when POST detects a system configuration error For a complete list of POST error messages refer to the HP Servers T...

Page 72: ...ration Install the Survey Utility from the SmartStart CD the Integration Maintenance Utility or the Management CD Integrated Management Log IML The IML is a log of system events such as system failures or nonfatal error conditions View events in the IML from within Insight Manager 7 Survey Utility Operating system specific IML utilities The IML requires HP operating system management drivers Refer...

Page 73: ...er explains the location and function of system connectors internal and external LEDs and system switches Connectors Use this section to identify system connectors for service procedures HP ProLiant DL585 Server Maintenance and Service Guide 4 1 ...

Page 74: ...tion 1 Integrated Lights Out Manager connector 2 USB connector 1 3 USB connector 2 4 Rear Unit Identification button and LED 5 Keyboard connector 6 Mouse connector 7 Video connector 8 Serial connector 9 NIC 2 10 NIC 1 11 AC inlet 1 primary 12 AC inlet 2 optional 4 2 HP ProLiant DL585 Server Maintenance and Service Guide ...

Page 75: ...e Board Figure 4 2 SCSI backplane board connectors Table 4 2 SCSI Backplane Board Connectors Item Description 1 SCSI channel A 2 SCSI simplex duplex switch default duplex 3 SCSI channel B HP ProLiant DL585 Server Maintenance and Service Guide 4 3 ...

Page 76: ...ification Processor Memory Board DIMM Slots Figure 4 3 DIMM slots Table 4 3 Processor Memory Board Memory Banks Slot Bank 1 2 Bank 1 3 4 Bank 2 5 6 Bank 3 7 8 Bank 4 4 4 HP ProLiant DL585 Server Maintenance and Service Guide ...

Page 77: ...d Processor Power Module Figure 4 4 Processor and processor power module Table 4 4 Processor and Processor Power Module Item Description 1 Processor Power Module 2 Processor and heatsink HP ProLiant DL585 Server Maintenance and Service Guide 4 5 ...

Page 78: ...Activated Blue flashing System being managed remotely Off Deactivated 2 Internal health Green Normal Red System critical Amber System degraded Off System off 3 External health Green Normal Red Critical power supply failure Amber Redundant power supply failure Off System off 4 Power Green On Amber Off auxiliary power only Off Power cord not attached to the server or power supply failure 4 6 HP ProL...

Page 79: ...ff normal On attention required Processor pre failure notification Inspect the IML logs and or POST messages Processor may need to be replaced 3 Processor memory board Off normal On attention required Processor memory board power failure If problem persists replace processor memory board 4 Processor power module Off normal On attention required PPM power failure If problem persists replace PPM If ...

Page 80: ...OST messages 7 I O power fault Off normal On attention required A power fault on the system I O board occurred If problem persists replace the system I O board 8 Therm trip Off normal On attention required The server experienced a thermal shutdown If one of the CPU thermal LEDs is amber that CPU experienced an overtemperature condition Be sure that the processor heatsink is properly attached For m...

Page 81: ...gure 4 7 Hot plug SCSI hard drive LEDs Table 4 7 Hot Plug SCSI Hard Drive LEDs Item Description Status 1 Drive activity On Drive activity Flashing High activity on the drive or drive is being configured as part of an array Off No drive activity 2 Online status On Drive is part of an array and is currently working Flashing Online activity Off No online activity 3 Fault status On Drive failure Flash...

Page 82: ... the drive Off Off Off OK to replace the drive online if a predictive failure alert is received and the drive is attached to an array controller The drive is not configured as part of an array Or If this drive is part of an array then a powered on controller is not accessing the drive Or The drive is configured as an online spare Off Off On OK to replace the drive online The drive has failed and h...

Page 83: ...e hot plug fan LED indicates the following conditions Table 4 9 Hot Plug Fan LED LED Status Description Off Power is not applied to the fan Green Power is applied to the fan and the fan is functional Amber Fan failure HP ProLiant DL585 Server Maintenance and Service Guide 4 11 ...

Page 84: ...r LED Status Green 2 Fault LED Status Amber Description Off Off No AC power Off On No AC power to power supply Or Power supply failure Blinking Off AC power present System in standby mode On Off Power supply on and working properly On Blinking Power supply current limit exceeded 4 12 HP ProLiant DL585 Server Maintenance and Service Guide ...

Page 85: ... Table 4 11 NIC LEDs Item Description LED Color Status 1 Activity LED Green On or flashing network activity Off no network activity 2 Link LED Green On linked to the network Off not linked to the network HP ProLiant DL585 Server Maintenance and Service Guide 4 13 ...

Page 86: ...30 seconds after power up Amber 1 or green 2 On Temporary lock out state data is lost due to cable being detached Server is off and is in data retention mode Amber 1 Blinking every 15 seconds User data held in write cache is being backed up CAUTION After the server is powered down wait 15 seconds and then check the LED illumination pattern before unplugging the cable from the battery module The LE...

Page 87: ...mation on Port 84 refer to the Port 84 diagnostic codes that occur during the boot process Reserved OFF ON N A iLO ON OFF For more information on iLO refer to the Integrated Lights Out User Guide 5i Plus ON ON For more information on 5i Plus refer to the Smart Array 5i Plus Controller User Guide NOTE System defaults to iLO codes when powered off with SW1 and SW2 both off HP ProLiant DL585 Server M...

Page 88: ...y and you may receive error messages on the screen Setting and checking the system board switches is an important part of the overall troubleshooting process The server has three switch banks System maintenance switch SW3 System ID switch SW4 iLO Redundant ROM Override switch SW5 This section provides figures and tables to identify the locations positions functions and settings for each of these s...

Page 89: ... Open off Configuration can be changed Closed on Configuration is locked and cannot be changed 3 Reserved 4 Off Diskette boot override Enables or disables booting from diskette drive Both settings enable you to read from and write to the diskette after the system completes the boot sequence Open off The diskette drive boot is controlled by the configuration Closed on The diskette drive boots regar...

Page 90: ...on Power on password is disabled 6 Off Configuration validation Invalidates nonvolatile RAM NVRAM configuration information Open off NVRAM is valid Closed on NVRAM is invalid and configuration is lost 7 Off Reserved 8 Off Reserved CAUTION When maintenance mode is turned on the maintenance switch is set to on closed and the system is powered up NVRAM configuration is invalidated 4 18 HP ProLiant DL...

Page 91: ...t Identification System ID switch SW4 Figure 4 14 System ID switch SW4 Table 4 15 System ID Switch SW4 Position Description 1 Reserved 2 Reserved 3 Reserved HP ProLiant DL585 Server Maintenance and Service Guide 4 19 ...

Page 92: ...ir password or if the iLO boot block needs to be flashed Figure 4 15 iLO Redundant ROM Override switch SW5 Table 4 16 iLO Redundant ROM Override Switch SW5 Position Default Function Description Settings 1 Off iLO security override The override allows the administrator full access to the iLO processor Open off Normal Closed on Override 2 Off Redundant bootblock select Forces booting from the redund...

Page 93: ...supports root cause analysis Systems running supported Microsoft operating systems experience a blue screen trap when the operating system crashes When this happens Microsoft recommends that system administrators perform a NMI event by pressing a dump switch The NMI event allows a hung system to become responsive The Server is equipped with an NMI switch that when pushed performs a memory dump bef...

Page 94: ...ance and Service Guide Rear Unit Identification LED Switch Figure 4 17 Rear Unit Identification LED switch Table 4 17 Rear Unit ID Switch 1 LED Status Description On blue The switch is activated Off The switch is deactivated Flashing The system is being remotely accessed ...

Page 95: ...stic tools error messages and preventative maintenance refer to the HP Servers Troubleshooting Guide included on the Documentation CD that ships with the server WARNING A risk of personal injury exists from hazardous energy levels The installation of options and the routine maintenance and service of this product shall be performed by individuals who are knowledgeable about the procedures precauti...

Page 96: ... of LEDs refer to Chapter 4 Server Component Identification For more information about power refer to the HP Servers Troubleshooting Guide 4 Check the interlock LEDs on the hood label If any LEDs are amber reseat the component 5 If the system does not complete POST or start loading an operating system refer to the HP Servers Troubleshooting Guide 6 If the server is rebooting repeatedly verify that...

Page 97: ... CRTL A only to support HP storage and clustering options f PXE initialization g Option ROMs h SCSI devices 10 The operating system loads to complete the boot process If the server completes POST and attempts to load the operating system go to the Problems After Initial Boot section in this chapte r HP ProLiant DL585 Server Maintenance and Service Guide 5 3 ...

Page 98: ...e to question 5 If no refer to Table 5 5 Question 5 Is the monitor displaying information If yes use the POST messages for further diagnosis Refer to Table 5 6 for details If no refer to Table 5 6 Table 5 2 Is the System Power LED Off Answer Possible Reasons Possible Solutions The system is not connected to AC power or no AC power is available A power supply problem exists The power supply may not...

Page 99: ...wer backplane No it is off If these solutions do not solve the problem contact an authorized service provider for assistance Yes If the system power button LED is green refer to Table 5 4 Note For LED locations and functions refer to Chapter 4 Server Component Identification Table 5 4 Is the External Health LED Green Answer Possible Reasons Possible Solutions No it is amber One power supply has fa...

Page 100: ...ort Contact an authorized service provider for replacement parts and service No it is red A processor has failed Processor 1 is not installed A processor is an unsupported type Processor does not have an associated PPM installed A PPM has failed A DIMM has experienced a multibit error DIMM pairs have mismatched DIMMs DIMMs are missing DIMMs are an unsupported type A required fan has failed A therm...

Page 101: ...failed component A PPM failure will be shown by the PPM LED being illuminated on the specific processor memory board If the processor memory board BRD LED is amber refer to Troubleshooting a Failed Processor later in this chapter If the I O power LED is amber replace the system I O board Thermal shutdown If the Therm Trip LED is amber the system encountered an unexpected thermal shutdown If one of...

Page 102: ...any audible indicators such as a series of beeps A series of beeps is the audible signal indicating the presence of a POST error message Refer to the HP Servers Troubleshooting Guide for a complete description of each beep sequence and the corresponding error messages Refer to the Troubleshooting a Failed Processor section later in this chapter If these steps do not solve the problem contact an au...

Page 103: ...display the first time ProLiant Essentials is booted on certain unconfigured systems Cold boot the machine with the ProLiant Essentials Foundation Pack inserted in the CD ROM drive to correct the problem System cannot load ProLiant Essentials Foundation Pack Existing software is causing conflict Run the System Erase Utility Read the Caution at the end of the table Refer to the instructions in the ...

Page 104: ... a new configure to order system where available You must complete the factory installed operating system software installation before adding new hardware to the system Be sure you are following the instructions provided in the Factory Installed Operating System Software Installation Guide Remove the new hardware and complete the software installation Then reinstall the new hardware CAUTION The Sy...

Page 105: ...oards along with processors may be required to troubleshoot IMPORTANT Be sure that the processor memory board in slot 2 has DIMMs installed For more information on memory population guidelines refer to the Memory Options section in Chapter 2 1 Reseat both processor memory boards and power up the server If this does not resolve the problem proceed to the next step 2 Replace the processor memory boa...

Page 106: ...n the 2P description above to isolate the failed components 4 If this does not resolve the problem replace the processor memory boards in slots 1 and 2 with the two boards that were removed from slots 3 and 4 5 If this works one or both of the processor boards originally in slots 1 and 2 could be bad Go through the steps in the 2P description above to isolate 6 If all processor boards work run two...

Page 107: ... software troubleshooting information for all ProLiant servers a complete list of error messages along with explanations of probable causes and a list of remedial measures This guide resides on the Documentation CD that ships with the server To be sure that you have the most up to date copy of the HP Servers Troubleshooting Guide document visit the product website at www hp com Other Online Docume...

Page 108: ... input current 6 A Low line voltage requirements Rated input voltage 90 V to 132 V Rate input frequency 47 Hz to 63 Hz Rated input current 12 A Power supply output power Rated steady state power 800 W Maximum peak power 800 W Temperature range Operating 10 to 35 C 50 to 95 F Non operating 30 to 60 C 20 to 140 F Relative humidity non condensing Operating 20 to 80 Non operating 5 to 90 Maximum wet b...

Page 109: ...cing 2 41 electrostatic sensitive parts precautions 2 1 BBWC Battery Backed Write Cache assembly error messages POST 5 8 removing 2 38 ESD electrostatic discharge 2 1 replacing 2 39 events log 3 2 bezel front removing 2 27 expansion boards bus numbering white paper 2 31 installation guidelines 2 30 non hot plug slot removing 2 31 peak frequency PCI X 2 30 C expansion slots CarePaq 5 13 features 2 ...

Page 110: ...1 online status 4 9 minimum requirements 2 16 hot plug SCSI hard drive See hard drives hot plug population guidelines 2 16 hot plug SCSI hard drives removal replacement guidelines 2 20 population guidelines 4 DIMM slots 2 17 population guidelines 8 DIMM slots 2 16 HP authorized reseller xi problem diagnosis 5 9 I N iLO Redundant ROM Override switch SW5 non hot plug PCI X expansion board removing 2...

Page 111: ...OM Based Setup Utility described 3 2 air baffle 2 12 2 15 ROMPaq Utility described 3 2 cautions 2 10 installing 2 12 2 14 S locating 2 11 processor power modules PPMs when to replace 5 8 SCSI backplane removing and replacing 2 40 SCSI cables removing and replacing 2 33 processors See processor memory boards See processor memory boards server extending from the rack 2 6 ProLiant Essentials mechanic...

Page 112: ... required for servicing 2 1 ventilation clearances x Torx T 15 locating and removing 2 5 video problem diagnosis 5 8 Torx T 15 tool locating 2 5 W removing 2 5 troubleshooting warranty x BIOS problems 5 9 websites CD ROM problems 5 9 CarePaq 5 13 CMOS problems 5 9 maintenance and service guide 5 13 configure to order system problems 5 10 warranty 5 13 factory installed software problems 5 10 weigh...

Reviews: