


Service Testing and Qualification
59
1. Press
Menu
on the proper remote control to make sure the on-screen menus can be accessed.
2. Verify that all buttons on the front panel perform the proper function.
3. Connect an input to the Antenna RF connector. Press
Source
and use the Source menu to change the
input source to Antenna, and verify that video and audio are present.
4. Connect an input to the Antenna cable connector. Press
Source
and use the Source menu to change the
input source to Cable, and verify that video and audio are present.
5. Connect an input to the HDMI 1 connector. Use the Source menu to change the input source to HDMI 1,
and verify that video and audio are present.
6. Connect an input to the HDMI 2 connector. Use the Source menu to change the input source to HDMI 2,
and verify that video and audio are present.
7. Connect a DVI input to the HMDI 2, and connect the left and right audio to the HDMI 2 audio input
connectors. Use the Source menu to change the input source to HDMI 2, and verify that video and audio
are present.
8. Connect an input to the S-Video 1 connector. Use the Source menu to change the input source to
S-Video 1, and verify that video and audio are present.
9. Connect an input to the S-Video 2 connector. Use the Source menu to change the input source to
S-Video 2, and verify that video and audio are present.
10. Connect an input to the composite Video/Audio 1 connector. Use the Source menu to change the input
source to Composite 1, and verify that video and audio are present.
11. Connect an input to the composite Video/Audio 2 connector. Use the Source menu to change the input
source to Composite 2, and verify that video and audio are present.
12. Connect an input to the composite Video/Audio 3 connector on the side of the television. Use the Source
menu to change the input source to Composite 2, and verify that video and audio are present.
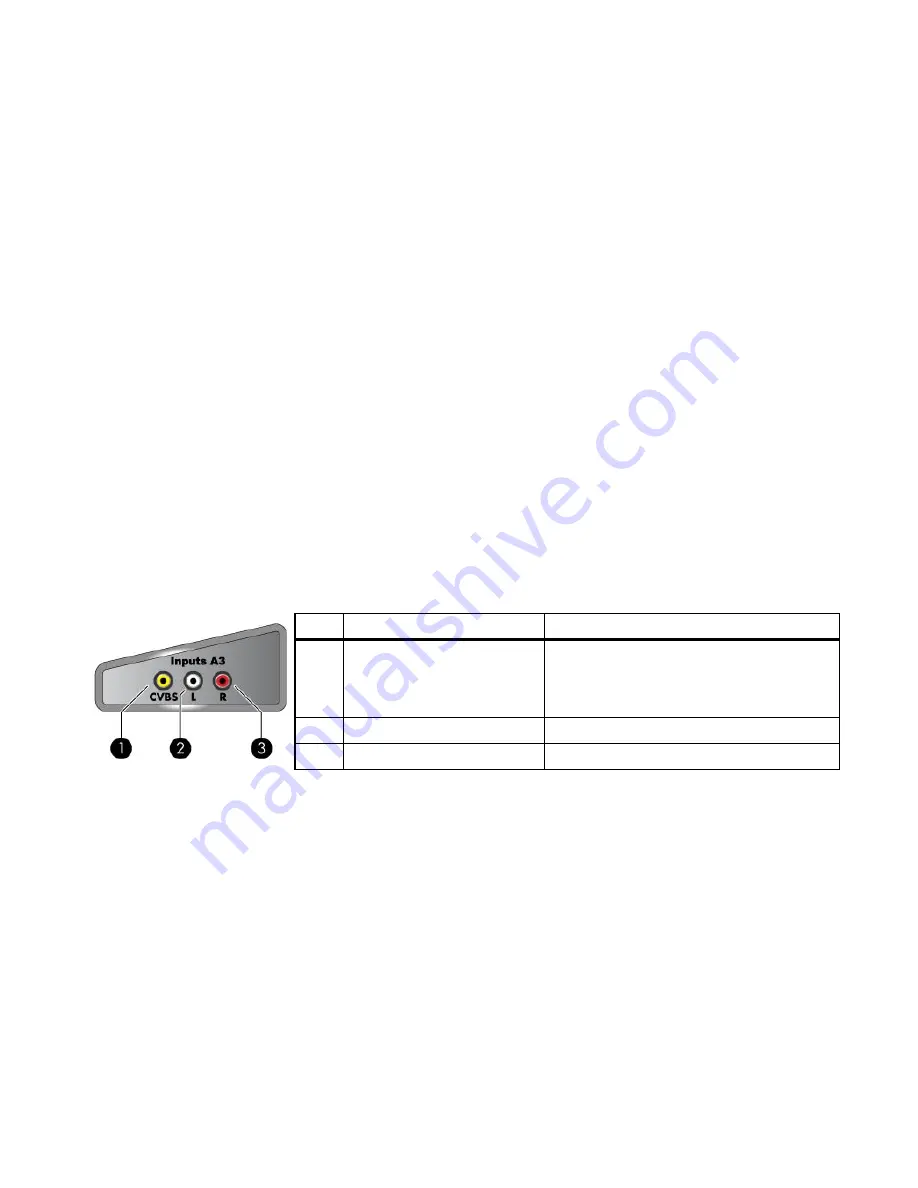
Item
Description
1 Composite/CVBS
input
Provides composite video input
(composite video is also referred to as
CVBS — color, video, blanking, and
sync).
2
Left channel audio input
For connecting external input equipment.
3
Right channel audio input
For connecting external input equipment.
13. Connect an input to the component Video/Audio 1 connector. Use the Source menu to change the input
source to Component 1, and verify that video and audio are present.
14. Connect an input to the composite Video/Audio 2 connector. Use the Source menu to change the input
source to Component 2, and verify that video and audio are present.
15. Insert a media card that contains a JPG image into the media card reader. Verify that Photo Viewer opens
and displays the thumbnail of the stored JPG.
16. While still in the Photo Viewer, connect a PictBridge-compliant printer to the PictBridge port. Print the JPG
file from the compact flash card on the printer, and verify that the picture printed properly.
17. Insert a cable card into the cable card connector. Verify that the television detects the cable card.
Summary of Contents for ID5220N
Page 1: ...Service Manual HP High Definition Lamp DLP TV ID5220N ...
Page 8: ...2 Model Specifications ...
Page 11: ...Technical Specifications 5 Block Diagram ...
Page 12: ...6 Technical Specifications ...
Page 30: ...24 Disassembly Procedures 1 To remove the fan assembly lift it straight up ...
Page 35: ...Disassembly Procedures 29 5 Push the fan assembly downward and remove it from the baffle ...
Page 48: ...42 Troubleshooting Power TV Shutting Down ...
Page 49: ...Troubleshooting 43 Audio No Audio ...
Page 50: ...44 Troubleshooting Audio Bad Audio ...
Page 51: ...Troubleshooting 45 Video Input Problems All ...
Page 52: ...46 Troubleshooting Video Input Problems Select ...
Page 53: ...Troubleshooting 47 Video Display Problems ...
Page 54: ...48 Troubleshooting Remote Control Problems Keypad Problems ...
Page 55: ...Troubleshooting 49 Photo Viewer Media Card Reader Photo Viewer Problems ...
Page 56: ...50 Troubleshooting Photo Viewer PictBridge Printing Problems ...
Page 60: ...54 Using the Service Menu ...
Page 62: ...56 Using the Service Menu ...
Page 68: ......


