background image

16 

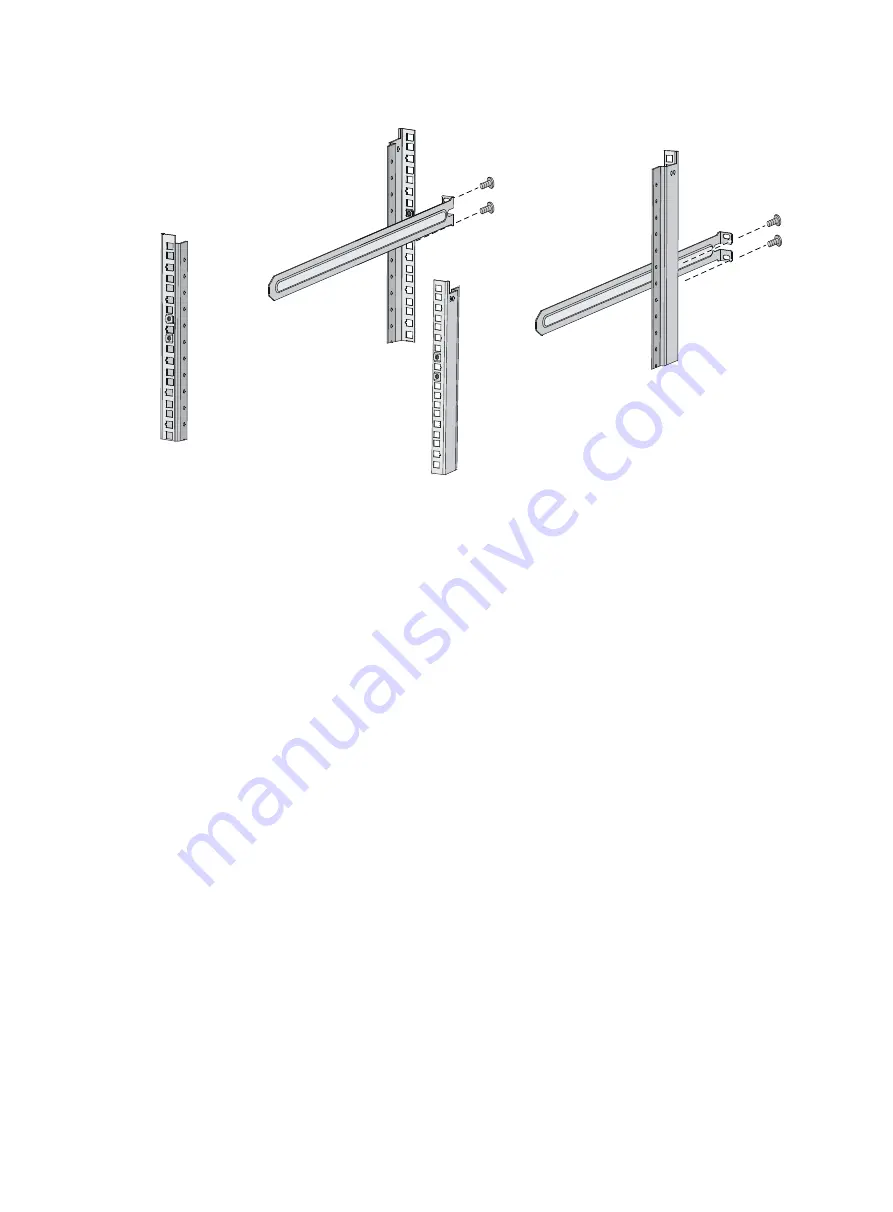
Figure 19 Installing the 1U slide rails 


Mounting the switch in the rack 

This task requires two people. 

To mount the switch in the rack:  

1. 

Wear an ESD wrist strap and make sure it makes good skin contact and is reliably grounded. 

2. 

Verify that the mounting brackets and chassis rails have been securely attached to the switch 
chassis. 

3. 

Verify that the slide rails have been correctly attached to the rear rack posts. 

4. 

Attach cage nuts (user-supplied) to the front rack posts and make sure they are at the same 
level as the slide rails. 

5. 

One person performs the following operations: 

a. 

Supporting the bottom of the switch, aligns the chassis rails with the slide rails on the rack 
posts. 

b. 

Pushes the switch slowly to slide the chassis rails along the slide rails until the mounting 
brackets are flush with the rack posts. 

6. 

Another person uses screws (user-supplied) to attach the mounting brackets to the rack. 

To secure the switch in the rack, make sure the front ends of the slide rails reach out of the 
chassis rails. 

The rack-mounting procedures are the same for the HPE 5950 48SFP28 8QSFP28 and HPE 5950 
32QSFP28 switches. The following figures use the HPE 5950 32QSFP28 switch as an example. 

Summary of Contents for FlexFabric 5950 Series

Page 1: ...HPE FlexFabric 5950 Switch Series Installation Guide Part number 5200 2233b Document version 6W102 20170125 ...

Page 2: ...nd 12 212 Commercial Computer Software Computer Software Documentation and Technical Data for Commercial Items are licensed to the U S Government under vendor s standard commercial license Links to third party websites take you outside the Hewlett Packard Enterprise website Hewlett Packard Enterprise has no control over and is not responsible for information outside the Hewlett Packard Enterprise ...

Page 3: ... supply 24 Connecting the power cords 26 Connecting an AC power cord 26 Connecting a DC power cord 27 Installing removing expansion cards 27 Verifying the installation 29 Accessing the switch for the first time 30 Setting up the configuration environment 30 Connecting the console cable 30 Connecting the mini USB console cable 31 Setting terminal parameters 33 Powering on the switch 33 Setting up a...

Page 4: ... 52 Management Ethernet port 53 100 Megabit SFP modules 53 USB port 54 SFP port 54 SFP port 56 QSFP28 port 56 SFP28 port 59 LEDs 60 System status LED 60 QSFP28 port LED 61 SFP28 port LED 61 SFP port LED 61 SFP port LED 62 Management Ethernet port LEDs 62 Fan tray alarm LEDs 62 Appendix D Cooling system 64 Document conventions and icons 67 Conventions 67 Network topology icons 68 Support and other ...

Page 5: ...HV2 fan tray JH185A HPE 5930 4 slot B pwr F prt Fan Tray 5930 4 slot B pwr F prt Fan Tray JH186A HPE 5930 4 slot F prt B pwr Fan Tray 5930 4 slot F prt B pwr Fan Tray For regulatory identification purposes the HPE 5950 switches are assigned Regulatory Model Number RMN The Regulatory Model Number for these products is listed below Product code RMN Description JH321A BJNGA AD0065 HPE FlexFabric 5950...

Page 6: ...ng devices from entering the top device The rack is sturdy enough to support the switch and its accessories The rack is reliably grounded To ensure correct operation and long service life of your switch install it in an environment that meets the requirements described in the following subsections Temperature humidity Maintain appropriate temperature and humidity in the equipment room Lasting high...

Page 7: ...coupling To prevent EMI use the following guidelines If AC power is used use a single phase three wire power receptacle with protection earth PE to filter interference from the power grid Keep the switch far away from radio transmitting stations radar stations and high frequency devices Use electromagnetic shielding for example shielded interface cables when necessary To prevent signal ports from ...

Page 8: ...unting brackets for the HPE 5950 48SFP28 8QSFP28 switch 1 kit HPE 5950 48SFP28 8QSFP28 5190 0720 Mounting brackets for the HPE 5950 4 slot switch 1 kit HPE 5950 4 slot 5185 8681 1 U short slide rail kit including one pair of slide rails and four M4 countersunk screws 1 kit HPE 5950 32QSFP28 5185 8713 1 U long slide rail kit including one pair of slide rails one pair of guide rails and four M4 coun...

Page 9: ...950 switches 5185 9579 Grounding screw 2 All HPE 5850 switches 5190 1773 Power supply filler module 1 All HPE 5950 switches 5003 2403 Interface module filler module 1 HPE 5950 4 slot 5185 8688 5400 0249 DC power cord The power cord color code scheme is for illustration only The cable delivered for your country or region might use a different color scheme 1 650 W DC power supply 5185 8748 Removable...

Page 10: ...6 Product code Description Quantity Applicable models 5185 8722 SFP SFP dust plug Optional All HPE 5950 switches 5187 9022 QSFP28 dust plug Optional All HPE 5950 switches ...

Page 11: ...se shall not be liable for any consequence caused thereby Figure 1 Hardware installation flow Start Install the switch Ground the switch Connect power cords Verify the installation Turn on the circuit breakers Operating correctly Turn off the circuit breakers Troubleshoot the switch Install expansion cards Yes Yes No No Install expansion cards Operating correctly Yes No Resolve the problem End Ins...

Page 12: ...air of 1U long slide rails and one pair of chassis rails See Figure 6 Optional A pair of 1U short slide rails and one pair of chassis rails See Figure 5 HPE 5950 48SFP28 8QSFP28 1U high one pair See Figure 3 1U high including one pair of long slide rails and one pair of chassis rails provided See Figure 6 HPE 5950 4 slot 2U high one pair See Figure 4 2U high including one pair of slide rails and o...

Page 13: ... the HPE 5950 4 slot switch 1 Cable management bracket 2 Mounting bracket Figure 5 1U short slide rail and chassis rail 1 Chassis rail 2 Short slide rail Figure 6 1U long slide rail and chassis rail 1 Chassis rail 2 Long slide rail 1 2 1 2 1 2 ...

Page 14: ...iliary grounding point 1 and auxiliary grounding point 2 The HPE 5950 32QSFP28 and HPE 5950 48SFP28 8QSFP28 switches provide two grounding points primary grounding point with a grounding sign and auxiliary grounding point See Figure 8 Figure 9 and Figure 10 Select installation positions for the mounting brackets chassis rails and grounding cable as required Figure 8 Mounting brackets and grounding...

Page 15: ...2 2 Power supply side mounting position 3 Primary grounding point 4 Port side mounting position 5 Auxiliary grounding point 1 Installation methods Figure 11 Rack mounting procedure by using mounting brackets chassis rails and slide rails 1 2 3 4 1 2 3 4 5 Select the mounting position power module side or port side for the mounting brackets Attach chassis rails to both sides of the switch Connect t...

Page 16: ...llation holes with the screw holes in the chassis Use M4 screws provided to attach the mounting bracket to the chassis To install the mounting brackets at the power supply side mounting position see Figure 12 Figure 13 and Figure 14 To install the mounting brackets at the port side mounting position see Figure 15 Figure 16 and Figure 17 For the HPE 5950 48SFP28 8QSFP28 and HPE 5950 4 slot switches...

Page 17: ... the mounting brackets Figure 13 Attaching the mounting brackets and chassis rails to the HPE 5950 48SFP28 8QSFP28 switch power supply side mounting position for the mounting brackets Figure 14 Attaching the mounting brackets and chassis rails to the HPE 5950 4 slot switch power supply side mounting position for the mounting brackets ...

Page 18: ... the mounting brackets Figure 16 Attaching the mounting brackets and chassis rails to the HPE 5950 48SFP28 8QSFP28 switch network port side mounting position for the mounting brackets Figure 17 Attaching the mounting brackets and chassis rails to the HPE 5950 4 slot switch network port side mounting position for the mounting brackets ...

Page 19: ...int 2 Unpack the grounding cable and grounding screws 3 Use two grounding screws to attach the two hole grounding lug of the grounding cable to the grounding holes at the grounding point Use a screwdriver to tighten the screws See Figure 18 Figure 18 Attaching the grounding cable to the primary grounding point on the HPE 5950 32QSFP28 switch Attaching the slide rails to the rack The procedure is t...

Page 20: ...are at the same level as the slide rails 5 One person performs the following operations a Supporting the bottom of the switch aligns the chassis rails with the slide rails on the rack posts b Pushes the switch slowly to slide the chassis rails along the slide rails until the mounting brackets are flush with the rack posts 6 Another person uses screws user supplied to attach the mounting brackets t...

Page 21: ...ing the HPE 5950 32QSFP28 switch in the rack power supply side mounting position for the mounting brackets Figure 21 Mounting the HPE 5950 32QSFP28 switch in the rack Port side mounting position for the mounting brackets ...

Page 22: ...osition for the mounting brackets NOTE To rack mount the HPE 5950 4 slot switch by using 2U high mounting brackets and slide rails use two screws and two cage nuts to attach each mounting bracket to the rack Determine the screw installation positions based on the distances between the square holes on the rack posts The screw installation positions in Figure 22 and Figure 23 are for illustration on...

Page 23: ...tch NOTE The power and grounding terminals in this section are for illustration only Grounding the switch with a grounding strip WARNING Connect the grounding cable to the grounding system in the equipment room Do not connect it to a fire main or lightning rod If a grounding strip is available at the installation site connect the grounding cable to the grounding strip To connect the grounding cabl...

Page 24: ...through the protective earth PE wire of the power cord Make sure the following requirements are met The power cord has a PE terminal The ground contact in the power outlet is securely connected to the ground in the power distribution room or on the AC transformer side The power cord is securely connected to the power outlet NOTE If the ground contact in the power outlet is not connected to the gro...

Page 25: ...all slots have a module or filler panel installed when the switch is operating If multiple fan trays fail on an operating HPE 5950 32QSFP28 or HPE 5950 48SFP28 8QSFP28 switch do not remove the fan trays at the same time Replace the fan trays one after another and finish replacing a fan tray within 3 minutes If a fan tray fails on an operating HPE 5950 4 slot switch replace the fan tray immediately...

Page 26: ...ir specifications see Fan trays To install a fan tray 1 Wear an ESD wrist strap and make sure it makes good skin contact and is reliably grounded 2 Unpack the fan tray and verify that the fan tray model is correct 3 Orient the fan tray with the TOP mark on top Grasp the handle of the fan tray and slide the fan tray along the guide rails into the slot until the fan tray seats in the slot and the fa...

Page 27: ...ies for the switch as required For information about the available power supplies see Appendix B FRUs Figure 28 Installation procedure Figure 29 Removal procedure Installing a power supply CAUTION Follow the forward inertia of the power supply when inserting it into the chassis and make sure the power supply has firm contact with the connectors on the backplane To prevent damage to the connectors ...

Page 28: ... If you cannot insert the power supply into the slot re orient the power supply rather than use excessive force to push it in Figure 31 Installing a power supply 650W AC power supply Removing a power supply CAUTION When an HPE 5950 32QSFP28 or HPE 5950 48SFP28 8QSFP28 switch has two power supplies in 1 1 redundancy mode removing one power supply does not affect the operation of the switch When the...

Page 29: ...igure 32 3 Hold the handle on the power supply with one hand pivot the latch on the power supply to the right with your thumb and pull the power supply part way out of the slot as shown in Figure 33 4 Supporting the power supply bottom with one hand slowly pull the power supply out with the other hand 5 Put the removed power supply in an antistatic bag for future use 6 If you are not to install a ...

Page 30: ...ing an AC power cord 1 Insert the female connector of the AC power cord supplied with the power supply into the power receptacle on the power supply 2 Use a cable tie to secure the power cord to the handle of the power supply as shown in Figure 34 3 Connect the other end of the power cord to an AC power outlet Figure 34 Connecting an AC power cord to the 650W AC power supply 1 Cable tie 2 Tighten ...

Page 31: ...d to the 650W DC power supply Installing removing expansion cards CAUTION When you install or remove an expansion card follow these guidelines Never touch the components on the expansion card surface with bare hands Do not use excessive force The HPE 5950 4 slot switch provides four expansion slots For the available expansion cards see Appendix B FRUs The expansion card installation and removal pr...

Page 32: ...1 Ejector lever 2 Latch 4 Press the latch on the expansion card to release the ejector lever 5 Insert the expansion card slowly into the slot along the guide rails as shown by callout 1 in Figure 37 6 Rotate inward the ejector lever as shown by callout 2 in Figure 37 until the latch locks the ejector lever in place Figure 38 Installing the LSWM18CQ interface card 2 1 1 1 2 1 2 ...

Page 33: ...ver as shown by callout 1 in Figure 39 5 Pull out the expansion card slowly out of the expansion slot as shown by callout 2 in Figure 39 6 Place the removed expansion card in the anti static bag Figure 39 Removing an LSWM18CQ interface card Verifying the installation After you complete the installation verify the following items There is enough space for heat dissipation around the switch and the ...

Page 34: ... uses a console cable to connect a console terminal PC to the serial console port on the switch Figure 40 Connecting the serial console port to a terminal Connecting the console cable A serial console cable is an 8 core cable with a crimped RJ 45 connector at one end for connecting to the serial console port of the switch and a DB 9 female connector at the other end for connecting to the serial po...

Page 35: ...r at one end to connect to the mini USB console port of the switch and a standard USB Type A connector at the other end to connect to the USB port on the configuration terminal To connect to the configuration terminal through the USB mini console cable 1 Connect the standard USB Type A connector to the USB port of the configuration terminal 2 Connect the USB mini Type B connector to the Mini USB c...

Page 36: ...32 Figure 42 Device Driver Installation Wizard 6 Click Continue Anyway if the following dialog box appears Figure 43 Software Installation 7 Click Finish ...

Page 37: ... see the user guides for these programs The following are the required terminal settings Bits per second 9600 Data bits 8 Stop bits 1 Parity None Flow control None Powering on the switch 1 Before powering on the switch verify that the following conditions are met All the fan tray slots have a fan tray installed The power cords are connected correctly The input power voltage is as required by the s...

Page 38: ... vary by software version For more information about BootWare menu options see the software matching release notes for the device 3 After the startup completes you can access the CLI to configure the switch For more information about the configuration commands and CLI see HPE FlexFabric 5950 Switch Series Configuration Guides and HPE FlexFabric 5950 Switch Series Command References ...

Page 39: ...abric setup Plan the installation site and IRF fabric setup parameters Planning IRF fabric size and the installation site Identifying the master switch and planning IRF member IDs Planning IRF topology and connections Identifying physical IRF ports on the member switches Planning the cabling scheme Start Plan IRF fabric setup Install IRF member switches Connect grounding cables and power cords Pow...

Page 40: ...ll member switches Plan the installation site depending on your network solution as follows Place all IRF member switches in one rack for centralized high density access Distribute the IRF member switches in different racks to implement the top of rack ToR access solution for a data center As your business grows you can add member switches into the IRF fabric to increase the switching capacity wit...

Page 41: ...he logical interfaces for the connections between IRF member switches Each IRF member switch has two IRF ports IRF port 1 and IRF port 2 To use an IRF port you must bind a minimum of one physical port to it When connecting two neighboring IRF member switches you must connect the physical ports of IRF port 1 on one switch to the physical ports of IRF port 2 on the other switch The IRF port connecti...

Page 42: ...an bind several ports to an IRF port for increased bandwidth and availability Identifying physical IRF ports on the member switches Identify the QSFP28 QSFP and SFP28 ports for IRF connections on the member switches according to your topology and connection scheme All the QSFP28 QSFP and SFP28 ports on the HPE 5950 switches can be used for IRF connections When you select ports in a port group for ...

Page 43: ... QSFP28 to SFP28 QSFP SFP28 cables or QSFP28 QSFP SFP28 transceiver modules and fibers to connect the HPE switches for IRF connections If the switches are all in one equipment room choose QSFP28 QSFP28 to SFP28 QSFP SFP28 cables for IRF connections If the switches are far away from one another choose QSFP28 QSFP SFP28 transceiver modules and fibers for IRF connections For more information about ca...

Page 44: ...ide to configure their member IDs member priorities and IRF port bindings Follow these guidelines when you configure the switches Assign the master switch higher member priority than any other switch Bind physical ports to IRF port 1 on one switch and to IRF port 2 on the other switch You perform IRF port binding before or after connecting IRF physical ports depending on the software release Execu...

Page 45: ... Switch Series Fundamentals Configuration Guide 4 Verify that you can manage all member switches as if they were one node 5 Display the running status of the IRF fabric by using the commands in Table 8 Table 8 Displaying and maintaining IRF configuration and running status Task Command Display information about the IRF fabric display irf Display all members IRF configurations display irf configura...

Page 46: ...CAUTION The HPE 5950 32QSFP28 switch has six fan tray slots The HPE 5950 48SFP28 8QSFP28 switch has five fan tray slots The HPE 5950 4 slot switch has two fan tray slots To replace failed fan trays on an operating switch follow these guidelines If multiple fan trays fail on an operating HPE 5950 32QSFP28 or HPE 5950 48SFP28 8QSFP28 switch do not remove the fan trays at the same time Replace the fa...

Page 47: ...g correctly 2 Verify that the console cable is connected correctly 3 Verify that the console cable does not have any problems and the terminal settings are correct 4 If the problem persists contact Hewlett Packard Enterprise Support Garbled display Symptom The configuration terminal has a garbled display Solution To resolve the problem 1 Verify that the following settings are configured for the te...

Page 48: ...n tray 6 11 Power Supply 1 12 Power Supply 2 13 Fiber management Ethernet port 14 Fiber Management Ethernet port LED LINK ACT 15 Copper management Ethernet port LED ACT 16 System status LED SYS 17 Copper management Ethernet port LED LINK The HPE 5950 switches come with power supply slot PWR1 empty and power supply slot PWR2 installed with a filler panel You can install one or two power supplies fo...

Page 49: ...8 port 2 SFP28 port LED 3 QSFP28 port 4 QSFP28 port LED Figure 55 Rear panel 1 Mini USB console port 2 Copper management Ethernet port 3 Serial console port 4 USB port 5 SFP port 6 SFP port LED 7 Fan tray 1 8 Fan tray 2 9 Fan tray 3 10 Fan tray 4 11 Fan tray 5 12 Power Supply 1 13 Power Supply 2 14 Fiber management Ethernet port 15 Fiber management Ethernet port LED LINK ACT 16 Copper Management E...

Page 50: ...s of the same model for the switch In Figure 55 five X712 Bck pwr Frt prt HV2 fan trays are installed in the fan tray slots The HPE 5950 48SFP28 8QSFP28 switch comes with a dust plug in the fiber management Ethernet port on the rear panel To use the fiber management Ethernet port first remove the dust plug In Figure 55 the dust plug has been removed from the fiber management Ethernet port Figure 5...

Page 51: ... filler panel You can install one to four expansion cards for the switch as needed In Figure 57 four LSWM18CQ interface cards are installed in the expansion slots The HPE 5950 4 slot switch comes with power supply slots PWR2 and PWR3 empty and the other two power supply slots each installed with a filler panel You can install two to four power supplies for the switch as needed In Figure 58 four 65...

Page 52: ...t 32 8 N A Fan tray slots 6 5 2 Power supply slots 2 2 4 AC input voltage Rated voltage 100 VAC to 240 VAC 50 or 60 Hz Max voltage 90 VAC to 264 VAC 47 to 63 Hz DC input voltage Rated voltage 48 VDC to 60 VDC Max voltage 40 VDC to 72 VDC Minimum power consumptio n Single AC input 280 W Dual AC inputs 286 W Single DC input 270 W Dual DC inputs 275 W Single AC input 188 W Dual AC inputs 200 W Single...

Page 53: ...ce UL60950 1 EN60950 1 IEC60950 1 GB4943 Melting current of power supply fuse 650W AC power supply 10 A 250 VAC 650W DC power supply 30 A 250 VDC Operating temperatur e 0 C to 45 C 32 F to 113 F Operating humidity 10 to 90 noncondensing Fire resistance compliance UL60950 1 EN60950 1 IEC60950 1 GB4943 ...

Page 54: ...ot F prt B pwr Fan Tray JH186A No No Yes Expansion cards LSWM18CQ No No Yes LSWM116Q No No Yes LSWM18QC No No Yes LSWM124XG2Q No No Yes LSWM124XGT2Q No No Yes LSWM124XG2QFC No No Yes LSWM124XG2QL No No Yes LSWM124TG2H No No Yes The HPE 595032QSFP28 and HPE 5950 48SFP28 8QSFP28 switches can operate correctly with only one power supply You can install two power supplies on the switch for 1 1 redunda...

Page 55: ...72 VDC Max output power 650 W For more information about the 650W DC power supply see HPE FlexFabric Switch 650W 48V Hot Plug NEBS Compliant DC Power Supply JH336A User Guide Fan trays Table 12 Fan tray specifications Fan tray model Item Specifications X712 Bck pwr Frt prt HV2 fan tray X711 Frt prt Bck pwr HV2 fan tray Dimensions 40 6 42 5 118 7 mm 1 60 1 67 4 67 in Fan speed 21000 R P M Max airfl...

Page 56: ... modules and cables available for the SFP28 ports see SFP28 port JH405A HPE 5950 16 port QSFP Module LSWM116Q 16 x QSFP port JH183A HPE 5930 8 port QSFP Module LSWM18QC 8 x QSFP port JH182A HPE 5930 24 port 10GBase T and 2 port QSFP with MacSec Module LSWM124XGT2Q 24 x 10 GE copper port 2 x QSFP port JH181A HPE 5930 24 port SFP and 2 port QSFP with MacSec Module LSWM124XG2Q 24 x SFP port 2 x QSFP ...

Page 57: ...cations Item Specification Connector type 10 100 1000BASE T management port RJ 45 SFP management port LC Port transmission rate 10 100 1000BASE T management port 10 100 Mbps half full duplex MDI MDI X auto sensing 1000 Mbps full duplex MDI MDI X auto sensing SFP management port 1000 100 Mbps full duplex Transmission medium and max transmission distance 10 100 1000BASE T management port 100 m 328 0...

Page 58: ...orts support the following transceiver modules and cables 10 Gigabit SFP transceiver modules in Table 17 10 Gigabit SFP copper cables in Table 18 10 Gigabit SFP copper cables in Table 19 Gigabit SFP transceiver modules in Table 20 Table 17 10 Gigabit SFP transceiver modules available for the SFP ports Product Code Description Central wavelength nm Fiber diameter µm Multimode fiber modal bandwidth ...

Page 59: ...92A HPE X2A0 10G SFP to SFP 20m Active Optical Cable 20 m 65 62 ft Table 20 Gigabit SFP transceiver modules available for the SFP ports Product Code Description Central wavelength nm Fiber diameter µm Multimode fiber modal bandwidth MHz km Maximum transmission distance JD089B HPE X120 1G SFP RJ45 T Transceiver N A Category 5 twisted pair N A 100 m 328 08 ft JD118B HPE X120 1G SFP LC SX Transceiver...

Page 60: ...bout HPE transceiver modules and network cables see HPE Comware Based Devices Transceiver Modules User Guide SFP port The HPE 5950 48SFP28 8QSFP28 and HPE 5950 4 slot switches each provide two SFP ports You can install FE SFP transceiver modules in Table 16 and GE SFP transceiver modules in Table 20 in the SFP ports as needed IMPORTANT The SFP ports on the HPE 5950 48SFP28 8QSFP28 and HPE 5950 4 s...

Page 61: ...28 1m Direct Attach Copper Cable 1 m 3 28 ft JL272A HPE X240 100G QSFP28 to QSFP28 3m Direct Attach Copper Cable 3 m 9 84 ft JL273A HPE X240 100G QSFP28 to QSFP28 5m Direct Attach Copper Cable 5 m 16 40 ft Table 23 QSFP28 fiber cables available for the QSFP28 ports Product code Cable description Cable length JL276A HPE X2A0 100G QSFP28 to QSFP28 7m Active Optical Cable 7 m 22 97 ft JL277A HPE X2A0...

Page 62: ...ect Attach Copper Cable 1 m 3 28 ft JG327A HPE X240 40G QSFP QSFP 3m Direct Attach Copper Cable 3 m 9 84 ft JG328A HPE X240 40G QSFP QSFP 5m Direct Attach Copper Cable 5 m 16 40 ft Table 27 QSFP fiber cables available for the QSFP and QSFP28 ports Product Code Description Cable length JL287A HPE X2A0 40G QSFP to QSFP 7m Active Optical Cable 7 m 22 97 ft JL288A HPE X2A0 40G QSFP to QSFP 10m Active ...

Page 63: ...d fiber type As a best practice use HPE transceiver modules and network cables for the switch HPE transceiver modules and network cables are subject to change over time For the most up to date list of HPE transceiver modules and network cables contact Hewlett Packard Enterprise Support or marketing staff For more information about the transceiver modules and network cables see HPE Comware Based De...

Page 64: ...faces in HPE FlexFabric 5950 Switch Series Layer 2 LAN Switching Configuration Guide Table 30 SFP28 copper cables available for the SFP28 ports Product Code Description Cable length JL294A HPE X240 25G SFP28 to SFP28 1m DAC 1 m 3 28 ft JL295A HPE X240 25G SFP28 to SFP28 3m DAC 3 m 9 84 ft LEDs System status LED The system status LED shows the operating status of the switch Table 31 System status L...

Page 65: ...tion Steady green A transceiver module or cable has been correctly installed The port has a link and is operating at 25 Gbps Flashing green The port is sending or receiving data at 25 Gbps Steady yellow A transceiver module or cable has been correctly installed The port has a link and is operating at 10 Gbps Flashing yellow 3 Hz The port is sending or receiving data at 10 Gbps Off No transceiver m...

Page 66: ...r the copper management Ethernet port and one double color LED LINK ACT for the fiber management Ethernet port Table 36 Copper management Ethernet port LED description LED mark Status Description LINK Off No link is present on the port Steady green The port is operating at 10 100 1000 Mbps ACT Off The port is not receiving or sending data Flashing yellow The port is sending or receiving data Table...

Page 67: ... 38 X711 Frt prt Bck pwr HV2 fan tray and X711 Frt prt Bck pwr HV2 fan tray alarm LED description Status Description On The fan tray is faulty Off The fan tray is operating correctly or no power is being input ...

Page 68: ...ection HPE 5950 32QSFP28 HPE 5950 48SFP28 8QSFP28 X712 Bck pwr Frt prt HV2 From the power supply side to the port side X711 Frt prt Bck pwr HV2 From the port side to the power supply side HPE 5950 4 slot Switch 5930 4 slot B pwr F prt Fan Tray From the power supply side to the port side 5930 4 slot F prt B pwr Fan Tray From the port side to the power supply side Figure 63 Airflow from the power su...

Page 69: ...Bck pwr Frt prt HV2 fan trays Figure 66 Airflow from the port side to the power supply side through the HPE 5950 48SFP28 8QSFP28 chassis with X711 Frt prt Bck pwr HV2 fan trays Figure 67 Airflow from the power supply side to the port side through the HPE 5950 4 slot chassis with 5930 4 slot B pwr F prt Fan Tray fan trays ...

Page 70: ...66 Figure 68 Airflow from the port side to the power supply side through the HPE 5950 4 slot chassis with 5930 4 slot F prt B pwr Fan Tray fan trays ...

Page 71: ... which you select at least one x y Asterisk marked square brackets enclose optional syntax choices separated by vertical bars from which you select one choice multiple choices or none 1 n The argument or keyword and argument combination before the ampersand sign can be entered 1 to n times A line that starts with a pound sign is comments GUI conventions Convention Description Boldface Window names...

Page 72: ...rwarding and other Layer 2 features Represents an access controller a unified wired WLAN module or the access controller engine on a unified wired WLAN switch Represents an access point Represents a wireless terminator unit Represents a wireless terminator Represents a mesh access point Represents omnidirectional signals Represents directional signals Represents a security product such as a firewa...

Page 73: ...s provide a mechanism for accessing software updates through the product interface Review your product documentation to identify the recommended software update method To download product updates go to either of the following Hewlett Packard Enterprise Support Center Get connected with updates page www hpe com support e updates Software Depot website www hpe com support softwaredepot To view and u...

Page 74: ...ht Remote Support not applicable to all devices www hpe com info insightremotesupport docs Customer self repair Hewlett Packard Enterprise customer self repair CSR programs allow you to repair your product If a CSR part needs to be replaced it will be shipped directly to you so that you can install it at your convenience Some parts do not qualify for CSR Your Hewlett Packard Enterprise authorized ...

Page 75: ...d any errors suggestions or comments to Documentation Feedback docsfeedback hpe com When submitting your feedback include the document title part number edition and publication date located on the front cover of the document For online help content include the product name product version help edition and publication date located on the legal notices page ...

Page 76: ... Fan tray failure 42 Fan trays 51 G Grounding the switch 19 I Installation accessories XE installing accessories XE accessories needed for installation 4 Installation tools 3 Installing the switch in a 19 inch rack 8 Installing removing fan trays 21 Installing removing power supplies 23 IRF fabric setup flowchart 35 L LEDs 60 N Network topology icons 68 P Planning IRF fabric setup 36 Ports 52 Powe...

Reviews: