•
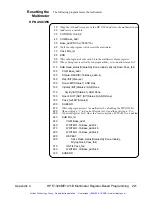
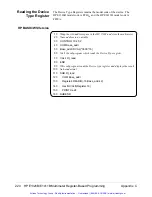
Bit 2 of the Status Register is monitored to determine when the reset
is finished.
•
Writing a "0" to bit 1 re-enables SYSFAIL.
Configuring the
Multimeter
Configuring the multimeter consists of:
•
Setting the multimeter’s analog-to-digital A/D parameters
–
function
–
range
–
aperture time
–
autozero mode
–
offset compensation mode
•
Setting up the multimeter trigger system
–
trigger source
–
trigger count
–
trigger delay
–
sample count
–
sample source
–
sample rate
–
wait-for-trigger state
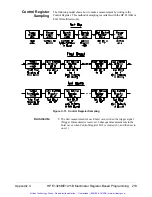
This process is accomplished as indicated by the flowchart in Figure C-4.
Comments
•
The registers used are:
–
Status Register (base + 04
16
)
–
Command Register (base + 08
16
)
–
Parameter Register (base + 0A
16
)
•
Status Register bit 0 is monitored to determine when a command and
parameters can be written to the Command and Parameter Registers.
•
Status Register bit 7 is monitored to determine when the multimeter
has finished processing the current command and parameter(s).
•
Repeated passes through the flowchart are made until the desired
configuration is set.
Appendix C
HP E1326B/E1411B Multimeter Register-Based Programming 211
Artisan Technology Group - Quality Instrumentation ... Guaranteed | (888) 88-SOURCE | www.artisantg.com


