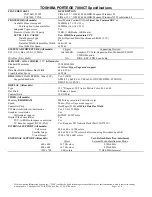
background image

Specifications 

Rated input power 

The power information in this section might be helpful if you 
plan to travel internationally with the computer. 

The computer operates on DC power, which can be supplied by 
battery or an AC-to-DC adapter. Although the computer can be 
powered from a standalone DC power source, it should be 
powered only with an AC adapter or a DC power source supplied 
and approved by HP for use with this HP computer. 

The computer is capable of accepting DC power within the 
following specifications. 

Input power 

Rating 

Operating voltage 

18.5 V dc @ 3.5 A - 65 W 

Operating current 

3.5 A 

This product is designed for IT power systems in Norway with 
phase-to-phase voltage not exceeding 240 V rms. 

D–2 

Getting Started 

Summary of Contents for Compaq NC4400

Page 1: ...arted HP Compaq Tablet PC Series Document Part Number 367427 002 May 2006 This guide explains how to set up your hardware and software and begin using the computer in Microsoft Windows Enhanced for Accessibility ...

Page 2: ...herein is subject to change without notice The only warranties for HP products and services are set forth in the express warranty statements accompanying such products and services Nothing herein should be construed as constituting an additional warranty HP shall not be liable for technical or editorial errors or omissions contained herein Getting Started HP Compaq Tablet PC Series Second Edition ...

Page 3: ...mmended 1 13 2 Next steps Install additional software and hardware 2 1 Identify and install hardware 2 1 Locate or install software 2 2 Protect the computer 2 3 Protect the computer from viruses 2 3 Protect your system files 2 3 Protect your privacy 2 4 Protect the computer from power surges 2 4 Use the computer safely 2 5 Connect to a computer network 2 6 Update your software 2 7 Locate the user ...

Page 4: ...ng 3 6 Help and Support Center 3 7 Customer Care 3 7 Prepare to contact Customer Care 3 8 Contacting Customer Care by e mail or telephone 3 8 A Notebook tour Top components A 2 Keys A 3 Pointing devices A 4 Display components A 5 Pen activated buttons A 6 Wireless antennae A 7 Front components A 8 Rear components A 8 Left side components A 9 Right side components A 9 Bottom components A 10 Pen com...

Page 5: ...ic files or folders C 2 Back up the entire system C 3 Back up modifications made to the system C 5 Schedule backups C 6 Recover the system C 7 Create recovery discs recommended C 8 Perform a recovery C 10 D Specifications Operating environment D 1 Rated input power D 2 Index Getting Started v ...

Page 6: ...fy required hardware To set up the computer for the first time you will need the computer HP Smart AC adapter power cord and the battery Components included with the computer may vary by region and by model Getting Started 1 1 ...

Page 7: ... Modem cable optional for setup 2 Power cord 5 Modem adapter optional for setup 3 Battery pack Use only the included AC adapter or one approved for this computer Unless you use dial up networking the modem cable is optional for setup 1 2 Getting Started ...

Page 8: ...discs recommended Refer to Appendix C Backup and recovery for instructions ÄCAUTION To prevent file corruption and ensure that the correct drivers are installed Do not set up the computer for the first time while the computer is docked in an optional docking device During the hardware and software setup procedures Do not unplug the computer from external power Do not shut down the computer or init...

Page 9: ...ack Battery packs vary by model 1 Turn the computer upside down on a flat surface with the battery bay toward you 2 Slide the battery pack 1 into the battery bay until it is seated 3 Press the battery pack 2 into the computer until it clicks into place 1 4 Getting Started ...

Page 10: ...uded AC adapter or one approved for this computer To connect the computer to external AC power 1 Plug the AC adapter into the power connector 1 on the computer 2 Plug the power cord into the AC adapter 2 3 Plug the other end of the power cord into an AC outlet 3 Getting Started 1 5 ...

Page 11: ...ned off Leave the computer connected to external power until the battery pack is fully charged and the battery light is turned off A partially charged new battery pack can run the computer after software setup is complete but battery charge displays will not be accurate until the new battery pack has been fully charged Power cords and electrical outlets vary in appearance by region and country 1 6...

Page 12: ...ease button 1 to open the display 2 Raise the display 2 Rotating the Display The computer display can rotate from notebook mode to tablet mode When the computer is docked in an optional docking device in either notebook mode or tablet PC mode the display will not rotate Getting Started 1 7 ...

Page 13: ...he computer from notebook mode to tablet PC mode 1 Rotate the computer display clockwise until it snaps into place facing away from the keyboard 2 Tilt the computer display downward onto the keyboard until it snaps into place 1 8 Getting Started ...

Page 14: ...First time setup Notebook mode To change the computer from tablet PC mode to notebook mode 1 Press the display release button 2 Open the computer display Getting Started 1 9 ...

Page 15: ...tate the computer display counterclockwise until it snaps into place facing the keyboard ÄCAUTION To prevent a lack of response when you turn on the computer make sure the battery pack is firmly seated 1 10 Getting Started ...

Page 16: ...er Slide the power switch 1 toward the front of the computer The power standby light 2 is turned on and you are prompted to begin software setup The power standby light is visible whether the computer is open or closed Getting Started 1 11 ...

Page 17: ...ated by an hourglass icon ÄCAUTION If you are prompted to select an operating system language before the Welcome to Windows page is displayed choose carefully On some models the languages that you do not choose are deleted from the system and cannot be restored during software setup To register the operating system and the computer you must be connected to the Internet For more information about c...

Page 18: ...ery discs of your full factory image using HP Backup and Recovery Manager The recovery discs are used to start up boot the computer and restore the operating system and software applications to factory settings in case of system failure or instability Refer to Appendix C Backup and recovery for detailed instructions Getting Started 1 13 ...

Page 19: ...eft pane of the System Tasks window select View system information 3 Select Hardware tab Device Manager You can also add hardware or modify your device configurations using Device Manager To install additional hardware such as an optional printer follow the instructions provided by the hardware manufacturer to install the device and any required drivers Getting Started 2 1 ...

Page 20: ... the optical drive on the optional external MultiBay device 2 When the installation wizard opens follow the on screen instructions 3 Restart the computer if prompted to do so Preloaded software This is software provided on the hard drive but not ready to use To locate or install preloaded software or drivers 1 Select Start All Programs Software Setup 2 Follow the on screen instructions and select ...

Page 21: ...air any damage they have caused To provide ongoing protection against newly discovered viruses antivirus software must be updated Norton Internet Security software is preinstalled on the computer select models only For information about using and updating your Norton Internet Security software click Start All Programs Norton Internet Security Help and Support For more information about computer vi...

Page 22: ... outgoing traffic Protect the computer from power surges To protect the computer from the power surges that might be caused by an uncertain power supply or an electrical storm Plug the computer power cord into an optional high quality surge protector Surge protectors are available from most computer or electronics retailers During an electrical storm either run the computer on battery power or shu...

Page 23: ...oper workstation setup and proper posture health and work habits for computer users The Safety and Comfort Guide also provides important electrical and mechanical safety information This guide is available on the Web at http www hp com ergo and in the Help and Support Center To access the Help and Support Center select Start Help and Support User Guides ÅWARNING To avoid potential discomfort or bu...

Page 24: ...etworking capabilities Local area network LAN Wireless local area network WLAN Bluetooth Internal modem If you plan to connect the computer to a home office LAN or WLAN refer to the Help and Support Center for information on networking If you need assistance to connect to a company LAN or WLAN contact your network administrator If the computer has a Bluetooth device you can create a personal area ...

Page 25: ...system and other software provided on the computer as soon as the computer is connected to the Internet To access update links for the operating system and other software provided on the computer Select Start Help and Support Locate the user guides User guides regulatory and safety notices and other resources that provide information about using the computer are available through the Help and Supp...

Page 26: ...button you click will be called Shut Down instead of Turn Off Computer If you are unable to turn off the computer with these procedures try the following emergency procedures in the sequence provided ÄCAUTION Emergency shutdown procedures result in the loss of unsaved information 1 Press ctrl alt delete and then select Shut Down Turn Off 2 Slide the power switch toward the front of the computer an...

Page 27: ...n this chapter 2 Access additional information about the computer and Web site links through the Help and Support Center Select Start Help and Support Although many checkup and repair tools require an Internet connection other tools can help you fix a problem when the computer is offline 3 Contact Customer Care for any further assistance Getting Started 3 1 ...

Page 28: ...t If the computer is running on battery power or is plugged into an external power source other than an AC outlet plug the computer into an AC outlet using the AC adapter Be sure the power cord and AC adapter connections are secure If the computer is running on battery power Remove the primary battery pack and optional accessory battery pack if applicable and plug the computer into an AC outlet us...

Page 29: ...hen the computer has reached a low battery condition To change these and other power settings select Start Control Panel Performance and Maintenance Power Options To transfer the image to the computer screen press fn f4 On most models when an optional external display device such as a monitor is connected to the computer the image can be displayed on the computer screen or the external display or ...

Page 30: ... information about using the antivirus resources on the computer refer to Protect the computer from viruses in Chapter 2 Next steps The computer is turned on but not responding If the computer is turned on but not responding to software or keyboard commands turn off the computer by using the standard shutdown procedure 1 Save your work and close all open applications 2 Shut down the computer throu...

Page 31: ...lly warm it may be overheating because a vent is blocked If you suspect that the computer is overheating allow the computer to cool to room temperature Then be sure to keep all vents free from obstructions while you are using the computer ÄCAUTION To prevent overheating do not obstruct vents Use the computer only on a hard flat surface Do not allow another hard surface such as a printer or a soft ...

Page 32: ... the device manufacturer s Web site The correct drivers are installed and updated Drivers may be available on a CD included with the device or on the device manufacturer s Web site For more information about updating drivers select Start Help and Support The home wireless network connection is not working If a home wireless network connection is not working as expected Be sure that the wireless li...

Page 33: ...ding information about your operating system the Help and Support Center provides Information about the computer such as model and serial number installed software hardware components and specifications Answers to questions about using the computer Product information to help you learn to use computer and operating system features Updates for your operating system device drivers and the software p...

Page 34: ...ased Conditions under which the problem occurred Error messages that have been displayed The manufacturer and model of a printer or other accessories connected to the computer Operating system version number and registration number To display the operating system version number and registration number select Start Help and Support My HP Computer On some models the registration number may be identi...

Page 35: ... Notebook tour Components included with the computer may vary by region and by model The illustrations in this appendix identify the standard features included on most computer models Getting Started A 1 ...

Page 36: ...Notebook tour Top components Components 1 Caps lock light 5 Volume down button 2 Presentation button 6 Volume up button 3 Volume mute light 7 Num lock light 4 Volume mute button A 2 Getting Started ...

Page 37: ...Notebook tour Keys Components 1 Function keys 6 4 Windows application key 2 fn key 5 Embedded numeric keypad keys 15 3 Microsoft Windows logo key Getting Started A 3 ...

Page 38: ... tour Pointing devices Components 1 Pointing stick 5 Right TouchPad button 2 Left pointing stick button 6 TouchPad scroll zone 3 TouchPad 7 Right pointing stick button 4 Left TouchPad button A 4 Getting Started ...

Page 39: ...Notebook tour Display components Components 1 Pen holder 4 Jog dial 2 Pen eject button 5 Windows Security button 3 Rotating hinge 6 Fingerprint reader Getting Started A 5 ...

Page 40: ...Notebook tour Pen activated buttons Components 1 Tablet PC Input Panel launch button 2 Rotate button 3 Q Menu button A 6 Getting Started ...

Page 41: ...e not visible from the outside of the computer For wireless regulatory notices pertaining to your region refer to the Regulatory Safety and Environmental Notices located in the Help and Support Center For optimal transmission keep the area immediately around the antennae free from obstructions Getting Started A 7 ...

Page 42: ... 1 Wireless light 8 USB port 2 Power standby light 9 RJ 11 modem jack 3 Battery light RJ 45 network jack 4 Drive light q Power connector 5 Infrared port w External monitor port 6 Bluetooth module e S Video out jack 7 Display release button A 8 Getting Started ...

Page 43: ...nt 8 Audio out headphone jack 3 Wireless button 9 Audio in microphone jack select models only 4 USB port Powered USB port 5 Info Center button q PC Card slot or optional smart card reader 6 Power switch w Digital Media Slot Depending on computer model vents vary in number and location Getting Started A 9 ...

Page 44: ...om components Components 1 Docking connector 5 Primary battery pack release latch 2 Accessory battery connector 6 Hard drive bay 3 Vents 2 7 Expansion memory module compartment 4 Primary battery bay A 10 Getting Started ...

Page 45: ...Notebook tour Pen components Components 1 Pen tip 2 Pen button 3 Pen tether eyelet 4 Pen eraser Getting Started A 11 ...

Page 46: ...he type of Internet connection you want such as broadband wireless or dial up and connect the hardware Internet hardware and software features vary depending on the computer model and your location Choose an ISP You must set up Internet service before you can connect to the Internet The New Connection Wizard helps you set up a new Internet account or configure the computer to use an existing accou...

Page 47: ...would like to select an ISP from the list provided within the wizard If you have selected an unlisted ISP and the ISP has provided you with such information as a specific IP address POP3 and SMTP settings To access the New Connection Wizard and instructions for using the wizard Select Start Help and Support If you are prompted within the wizard to choose between enabling or disabling Windows Firew...

Page 48: ...cess additional hardware and or software must be provided by your ISP Wireless For high speed mobile Internet access you can use a wireless connection A wireless network set up at home requires a wireless router purchased separately To learn about setting up wireless access visit http www hp com go wireless English only Dial up You can access the Internet by dialing into a service provider using a...

Page 49: ...using the HP Backup and Recovery Manager To copy software to a disc on this computer the computer must be connected to an optional external MultiBay device with an optical drive Safeguard your data Software or devices added to the computer can cause your system to become unstable To safeguard your documents store personal files in the My Documents folder and periodically create a backup copy of th...

Page 50: ...u can back up specific files or folders to the hard drive to an optional external hard drive or to discs To back up specific files or folders 1 Select Start All Programs HP Backup Recovery Manager HP Backup and Recovery Manager The HP Backup and Recovery Manager opens 2 Click Next 3 Click Backup to protect system settings and important data files and then click Next 4 Click Backup individual files...

Page 51: ...a disc you will be prompted to insert a blank disc into the optical drive Back up the entire system When you perform a complete system backup you are saving the full factory image including the Windows operating system software applications and all personal files and folders A copy of the entire hard drive image can be stored on another hard drive on a network drive or on recovery discs that you c...

Page 52: ... drive On another drive This option backs up your information to an optional external hard drive On a network This option backs up your information to a mapped network drive 7 Select the Protect data access with password check box and type your password in the Password box This step is optional If you do not want to password protect your data access clear the Protect data access with password chec...

Page 53: ...te recovery points Before you add or extensively modify software or hardware Periodically whenever the system is performing optimally Recovering to an earlier recovery point does not affect data files or e mails created since that last recovery point After you create a recovery point you are prompted to schedule subsequent recovery points You can schedule recovery points for a specific time or eve...

Page 54: ...3 Click Schedule Backups 4 Click Next The Backup Scheduler opens 5 Click Next 6 Schedule recovery points at specific intervals daily weekly or at specific events such as at system start or when you dock to a docking station Click Next to further define the settings A summary of your recovery point settings is displayed 7 Click Next to finalize these settings 8 Click Finish to exit C 6 Getting Star...

Page 55: ...m Restore The HP Backup and Recovery Manager allows you to Create recovery discs recommended The recovery discs are used to boot the computer and to restore the full factory image operating system and software in case of system failure or instability To create recovery discs or boot this computer using recovery discs the computer must be connected to an optional external MultiBay device with an op...

Page 56: ...recommended If you delete this partition you will lose any information that is on the partition Only one set of recovery discs can be created for this computer Before creating recovery discs Connect the computer to an optional external MultiBay device with an optical drive Use high quality CD R DVD R or DVD R media purchase separately DVD RW R and double layer DVD RW are not compatible with the HP...

Page 57: ... 6 Click Write to CD DVD and then click Next 7 Click Factory image recovery discs and then click Next If you are operating the computer on battery power you will be prompted to connect to AC power before you can go to the next step 8 Select the type of discs you want to use and then click Next The software examines the image and displays the number of blank discs needed to create your recovery dis...

Page 58: ...e on screen instructions Performing a recovery from the hard drive Start the full system recovery from either the Start button or f11 1 From the Start menu a Select Start All Programs HP Backup Recovery Manager HP Backup and Recovery Manager The HP Backup and Recovery Manager opens b Click Expert Mode c Click Start PC Recovery and then click Next d Click Next again to restart the computer PC Recov...

Page 59: ...ecover PC s original factory installation and backup data Backs up your information and then performs a full system recovery Recover PC s factory installation Formats the hard drive and performs a full system recovery This option does not perform a backup your Ä information will be erased Back up files Allows you to back up your files on the hard drive 3 Click Next The system prepares your hard dr...

Page 60: ...mperature Operating not writing to optical disc 0 C to 35 C 32 F to 95 F Operating writing to optical disc 5 C to 35 C 41 F to 95 F Nonoperating 20 C to 60 C 4 F to 140 F Relative humidity noncondensing Operating 10 to 90 10 to 90 Nonoperating 5 to 95 5 to 95 Maximum altitude unpressurized Operating 14 7 to 10 1 psia 15 m to 3 048 m 50 ft to 10 000 ft Nonoperating 14 7 to 4 4 psia 15 m to 12 192 m...

Page 61: ... be powered from a standalone DC power source it should be powered only with an AC adapter or a DC power source supplied and approved by HP for use with this HP computer The computer is capable of accepting DC power within the following specifications Input power Rating Operating voltage 18 5 V dc 3 5 A 65 W Operating current 3 5 A This product is designed for IT power systems in Norway with phase...

Page 62: ...ery light 1 6 A 8 battery pack charging 1 6 inserting 1 4 battery pack release latch A 10 Index Bluetooth module location A 8 bottom components A 10 buttons display release 1 7 A 8 Info Center A 9 left pointing stick A 4 left TouchPad A 4 mute A 2 pen eject A 5 presentation A 2 Q Menu A 6 right pointing stick A 4 right TouchPad A 4 Rotate A 6 Tablet PC Input Panel launch A 6 volume control A 2 Win...

Page 63: ... 1 7 docking connector A 10 drive light A 8 drivers obtaining 3 6 E electrical storm safety issues 2 4 embedded numeric keypad keys A 3 emergency shutdown procedures 2 8 environment altitude D 1 humidity D 1 operating D 1 temperature D 1 eraser pen A 11 external devices drivers 3 6 troubleshooting 3 6 external monitor port A 8 F fingerprint reader A 5 firewalls 2 4 fn key A 3 front components A 8 ...

Page 64: ... A 8 caps lock A 2 drive A 8 mute A 2 num lock A 2 power standby 1 11 A 8 wireless A 8 M memory module compartment A 10 microphone jack A 9 Microsoft Windows logo key A 3 model number 3 7 modem surge protection 2 4 virus protection 2 3 modem cable 2 4 modem internal 2 6 monitor external 3 6 mute button A 2 mute light A 2 N Norton Internet Security 2 3 num lock light A 2 O opening the computer 1 7 ...

Page 65: ...8 powered USB port A 9 presentation button A 2 printer 3 6 privacy protection features 2 4 Product Id 3 8 product number 3 8 Q Q Menu button A 6 Quick troubleshooting 3 2 R rated input power specifications D 2 reader fingerprint A 5 rear components A 8 recovery system C 1 registration displaying operating system registration number 3 8 regulatory information notices 2 6 right pointing stick button...

Page 66: ...product information 3 7 traveling with your computer environmental factors D 1 troubleshooting procedures external device problems 3 6 hibernation or standby problems 3 3 overheating problems 3 5 power problems 3 2 software problems 3 4 virus problems 3 4 wireless network problems 3 6 troubleshooting resources Help and Support Center 3 7 turning off the computer 2 8 turning on the computer 1 11 tu...

Page 67: ...Index wireless light A 8 Wireless Regulatory Notices 2 6 WLAN wireless local area network 2 6 Index 6 Getting Started ...

Reviews: