background image

54

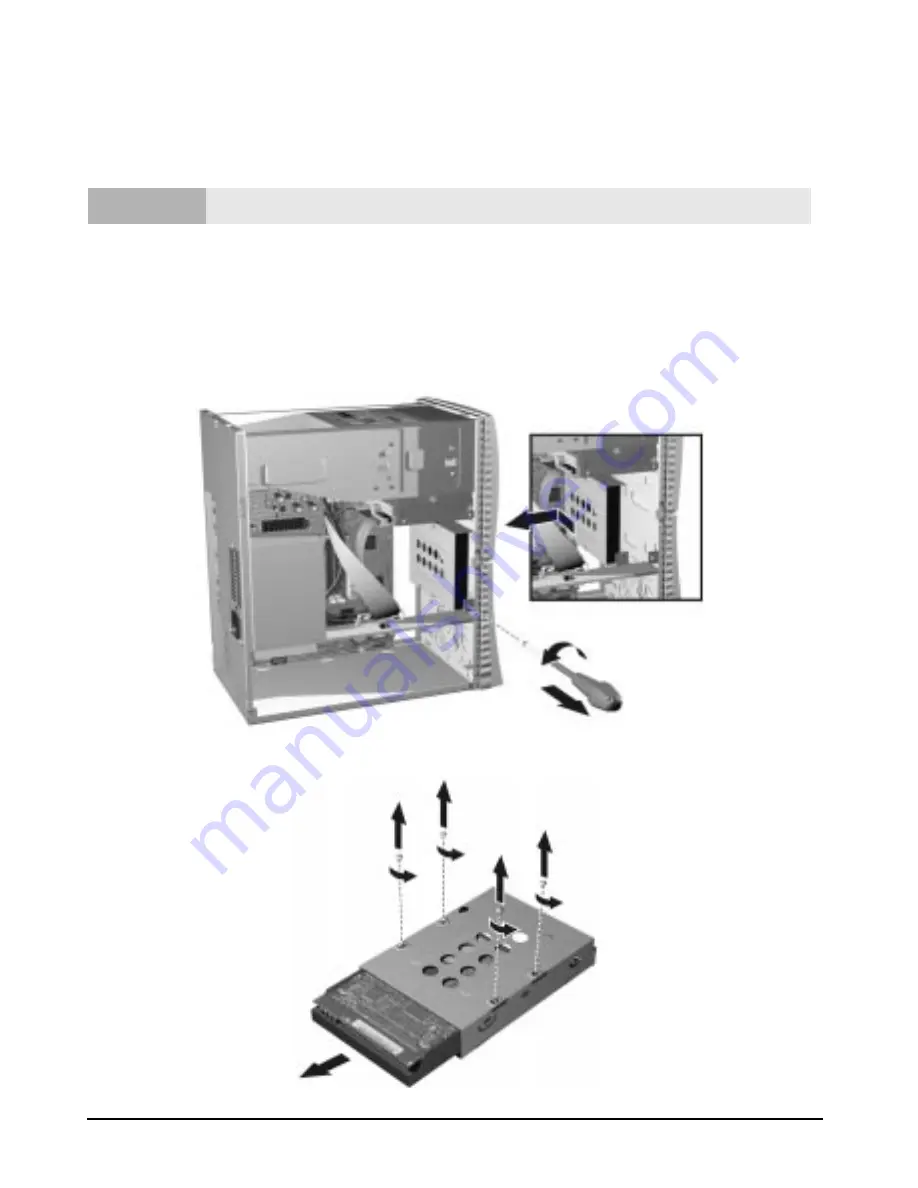
Replacing the Hard Drive

Replacing the Hard Drive

For information on recovering the contents of your old hard drive, refer to ”Brio 
Assist CD-ROM” on page 18. 

1

Remove the cover. Refer to page 44.

2

Remove the hard drive tray fixing screw.

3

Slide the drive tray towards the rear of the PC until the tray is released from its 
mountings. Pull the drive tray out of the computer casing.

4

Disconnect the power and data cables from the hard drive.

5

Undo the four screws and slide the old drive out of the tray.

Warning

For your safety, disconnect the power cord and all external cables.

Summary of Contents for Brio BA400

Page 1: ...www hp com go briosupport Brio Guide Business PCs HP Setting Up Getting Started Fixing Problems Adding Components ...

Page 2: ...aterial This document contains proprietary information that is protected by copyright All rights are reserved No part of this document may be photocopied reproduced or translated into another language without the prior written consent of Hewlett Packard Company Adobe and Acrobat are trademarks of Adobe Systems Incorporated Microsoft MS DOS Windows and Windows NT are U S registered trademarks of Mi...

Page 3: ...o Internet Center available in some countries only Click on the HP Brio Internet Center desktop shortcut or click on the button within the HP Brio Center to access a range of Web based information and services For more information refer to Get Connected with the HP Brio Internet Center on page 11 Information on the HP Brio Support Web Site The HP Brio support web site www hp com go briosupport con...

Page 4: ... recommended by the manufacturer The battery in this PC is a lithium battery that does not contain any heavy metals Nevertheless in order to protect the environment do not dispose of batteries in household waste Please return used batteries either to the shop from which you bought them or to the dealer from whom you purchased your PC or to HP so that they can either be recycled or disposed of in t...

Page 5: ...cess to Information with the Brio Center 10 Using Your Software 14 3 If You Have a Problem 15 What to Do First 16 Troubleshooting Quick Reference 17 HP Hardware Diagnostics DiagTools 18 Brio Assist CD ROM 18 Your PC s BIOS 20 HP Setup Program 20 Troubleshooting Help Zone 22 Support and Information Services 39 4 Upgrading and Replacing Brio Hardware 41 Important Before You Start 42 Inside the Compu...

Page 6: ...e Power Supply Unit 61 Replacing the Battery 62 5 Working in Comfort 63 About Repetitive Strain Injury 64 Preparing Your Work Environment 65 Setting Up Your HP Computing Equipment 68 Comfort and Safety Checklist 72 6 Technical Information 75 Technical Characteristics 76 Clearing Your PC s CMOS BIOS Settings 77 Regulatory and Software License Information 81 Regulatory Information 82 HP Software Lic...

Page 7: ...working with your HP Brio PC Unpacking the Computer and the Monitor page 2 Choosing a Comfortable Workspace page 2 Connecting a Mouse Keyboard Power Cords and Monitor page 3 Connecting Other Equipment to Your PC page 4 Setting Up Windows for the First Time page 5 The HP Brio Center page 6 1 ...

Page 8: ... Comfortable Workspace Choose a workspace for your computer near a grounded electrical wall outlet If your monitor has a tilt swivel base attach it to the monitor as described in the monitor manual Position the monitor on your desk Position the computer to allow proper ventilation and access to the cables Warning If you are in any doubt that you can lift the equipment safely do not try to move it ...

Page 9: ...k that the correct power supply voltage is selected for your country the voltage is set during manufacturing and should already be correct Note If you have a Brio BA600 PC with an add on video card fitted you must connect your monitor to the connector on the add on video card and not to the monitor connector shown above All connectors can go in one way only Power connector Keyboard Monitor Mouse V...

Page 10: ...odem Do not attempt to connect this product to the telephone line during a lightning storm Never install telephone jacks in wet locations unless the telephone line has been disconnected at the network interface Never touch uninsulated telephone wires or terminals unless the telephone line has been disconnected at the network interface Use caution when installing or modifying telephone lines Avoid ...

Page 11: ... When your PC starts up for the first time you will have to enter the unique Product ID provided with Windows When prompted simply type in the Product ID printed on the Microsoft Certificate of Authenticity usually on the front of your Windows documentation On Off Button Power On Status Light Hard Drive Activity Light ...

Page 12: ...rmation of interest to the small business Using your HP Brio PC use to get advice on using your mouse keyboard USB modem DVD and CD RW drives if fitted Also provides advice on working comfortably with your PC and allows you to access the Windows tour Fix a Problem use to troubleshoot your HP Brio PC Register Now this allows you to register your PC electronically for support if your PC has an Inter...

Page 13: ...pter describes how to use your PC s desktop and the online HP Brio Center preinstalled on your PC Using Your PC s Desktop page 8 Easy Access to Information with the Brio Center page 10 Using Your Software page 14 Getting Started with Brio ...

Page 14: ... It fills up with all the files you have deleted until you decide to empty it You can use it to find things you might have deleted by mistake Note All the features described in this section are standard to Windows For further details on any of these features together with details on general Windows functionality please refer to the relevant Windows documentation or the Windows Help system Recycle ...

Page 15: ...r things on your computer and change settings within your computer Taskbar Buttons Every time you open a program a button for that program appears on the taskbar To switch between programs simply click on the taskbar button for the program you want Notification Area Depending on what you are working on with your HP Brio PC small indicators may appear in the notification area to the left of the clo...

Page 16: ... you might have From the HP Brio Center you can access HP Brio Internet Center only available in some countries Click on to connect to the Internet and access Internet based services tailored to the needs of the small business See Get Connected with the HP Brio Internet Center on page 11 for more details Using Your HP Brio PC Click on to learn how to use your HP Brio PC See Using Your Brio on page...

Page 17: ... you have an Internet connection Non electronic Registration If your HP Brio PC is not fitted with a modem or you are in a region where electronic registration is not possible please return the registration card when provided with your PC Get Connected with the HP Brio Internet Center You can access the Internet Center by clicking on from within the HP Brio Center or double clicking on the Brio In...

Page 18: ...ost it on the Web Create an Online Store click on to set up an online store to sell your products over the Web available in some regions only Control Your Costs monitor the costs of your Internet connection available in some regions only Using Your Brio The Using Your Brio window provides the following links Getting Started click on for tips on using the mouse keyboard modem and if fitted CD RW an...

Page 19: ...bleshoot Your PC click on for tips on solving problems when using your PC Topics covered include basic problems with Windows your DVD drive or USB modem Diagnose Your Hardware click on for information on how to run DiagTools to check your PC s hardware for problems This easy to use utility can perform a thorough check on your system helping you solve hardware problems quickly and easily Get the La...

Page 20: ...ntaining the program to view its contents 3 Find the file used to launch the program The file name will end in exe 4 Select the file by clicking on it once with the mouse then click on the right mouse button This makes a pop up menu appear 5 Select Create Shortcut This creates a shortcut file in the current folder 6 Click on the newly created file and drag it onto the PC s desktop 7 If you want to...

Page 21: ... or solving problems with your HP Brio PC What to Do First page 16 Troubleshooting Quick Reference page 17 HP Hardware Diagnostics DiagTools page 18 Brio Assist CD ROM page 18 Your PC s BIOS page 20 HP Setup Program page 20 Troubleshooting Help Zone page 22 Support and Information Services page 39 ...

Page 22: ...ave a problem and need to do some troubleshooting Does it seem to be a basic problem with Windows or a problem with your modem DVD or CD RW drive Yes Refer to your online HP Brio Center Fix a Problem refer to page 13 No For quick tips refer to Troubleshooting Quick Reference on page 17 For more detailed help refer to the Troubleshooting Help Zone starting on page 22 Run HP s powerful diagnostics u...

Page 23: ...Refer to page 20 Check the drive cable is correctly connected Refer to page 52 Run the HP Setup program to correct the configuration problem Refer to page 20 Check power cord is correctly connected Check the device driver is correctly installed Check the device configuration in Setup Refer to page 20 Clean the mouse ball Check the devices are connected and on line Check device drivers are installe...

Page 24: ...nables you to restore your PC to its original factory configuration includes operating system drivers and utilities recover your operating system only downgrade Windows 98 to Windows 95 available on Windows 98 models in some countries only reconfigure your operating system for example when Windows prompts you to insert your operating system CD ROM after you install a new device reinstall device dr...

Page 25: ...iginal configuration PC must be restored Reinstalling Drivers from the Brio Assist CD ROM 1 Insert the Brio Assist CD ROM in the CD ROM drive while your operating system is running This launches a Web browser which you can use to select the driver s you need to reinstall 2 Select the link for the driver you want and follow the installation instructions contained in the README file accompanying the...

Page 26: ... The latest BIOS for your PC along with instructions on updating can be downloaded from HP s Brio Support Web site at www hp com go briosupport HP Setup Program The HP Setup program allows you to view and change the configuration of your Brio PC Sometimes you may also need to enter the Setup program to reconfigure your PC after installing new hardware components The Setup program has online help t...

Page 27: ...ower Mode within a few seconds Other events may also wake up the system a ring on an external modem a signal sent by an expansion card network card etc Boot for choosing your boot device order and priority You can select the order of the devices from which the BIOS Basic Input Output System attempts to boot the operating system During the POST Power On Self Test if the BIOS is unsuccessful at boot...

Page 28: ...have forgotten your password page 26 You can t shut down your PC page 26 You have a software problem page 27 PC does not start properly and displays an error message on the monitor Memory test error page 28 Keyboard test error page 29 Floppy drive test error page 30 Hard disk DVD or CD ROM test error page 31 CMOS test error page 32 Serial or parallel port test error page 33 Other configuration pro...

Page 29: ... for your safety when the PC is open and switched on do not touch any of the internal components with a screwdriver or other metal instrument An internal device may be causing the problem 1 Disconnect the PC s power cord 2 Remove the PC s cover see page 44 3 Remove internal power connectors from all internal devices 4 Reconnect the PC s power cord 5 Reconnect the power connectors one by one to the...

Page 30: ...he PC s power cord 2 Remove the PC s cover see page 44 3 Remove the expansion card see page 60 4 Reconnect the PC s power cord and start up the PC You might have made changes to the PC s Setup program 1 Enter the Setup program by pressing F2 when prompted during startup 2 Reload the factory settings by pressing F9 3 Press F10 to exit the Setup program saving changes When you start the PC you get a...

Page 31: ...the monitor 2 Disconnect the monitor cable and reconnect it as described on page 3 3 Switch on the monitor and see if it works More Advanced Troubleshooting The monitor settings in your PC are incompatible with your monitor Windows NT 4 0 Enter VGA mode when prompted during start up then reset the resolution Windows 95 98 Restart the PC The Hewlett Packard screen is displayed When you hear a beep ...

Page 32: ...e program to see if it is working normally 4 If it does not work normally restart the PC and try again The PC keeps locking up 1 Run DiagTools refer to page 18 2 If the problem persists try removing any added memory or expansion cards Problem To try and fix this You have forgotten the password that has been set in the Setup program to prevent unauthorized users from starting your PC see page 20 1 ...

Page 33: ...ged from the power too long and the battery is discharged To change the date and time select Settings Control Panel Date Time from the Start menu or use the Setup program see page 20 If necessary install a new battery see page 62 Your PC often hangs becomes unusable when running applications under Windows NT 4 0 Install more memory if required It is recommended that you install at least 64MB of RA...

Page 34: ... and check that the PC boots starts The PC s memory modules are not working 1 Disconnect the power cord 2 Remove the PC s cover refer to page 44 3 Replace the memory modules by known working memory modules from the same model of PC refer to page 59 4 Close the PC reconnect the power cord and check that the PC boots starts Run DiagTools Refer to page 18 More Advanced Troubleshooting You may need to...

Page 35: ...m BIOS Create a floppy to update your PC s BIOS Refer to page 20 The keyboard is not working 1 Switch off the PC 2 Replace the keyboard by a known working unit 3 Switch on the PC and check it works More Advanced Troubleshooting The system board is not working 1 Disconnect the power cord 2 Remove the PC s cover refer to page 44 3 Replace the system board by a known working board from the same model...

Page 36: ... data cables are correctly connected refer to page 49 and page 52 4 Close the PC then switch it on and check it works The drive cable is not working 1 Disconnect the power cord 2 Remove the PC s cover refer to page 44 3 Replace the floppy drive cable by a known working cable from the same model of PC 4 Close the PC then switch it on and check it works The drive is not working 1 Disconnect the powe...

Page 37: ...C s cover refer to page 44 3 Replace the drive cable by a known working cable from the same model of PC 4 Close the PC then switch it on and check it works The drive is not working 1 Disconnect the power cord 2 Remove the PC s cover refer to page 44 3 Replace the drive by a known working drive from the same model of PC refer to page 54 or page 56 4 Close the PC then switch it on and check it works...

Page 38: ...the system board 1 Disconnect the power cord 2 Remove the PC s cover refer to page 44 3 Check the power connector is correctly attached to the system board 4 Close the PC reconnect the power cord and check that the PC boots starts You may need to restore the default configuration settings 1 Switch the PC OFF then ON 2 When the message Press F2 to Enter Setup appears press the F2 key 3 Press F9 to ...

Page 39: ...ck of the PC 3 Switch on the PC and the external devices Incorrect device drivers may be installed Refer to the documentation for your serial or parallel device Run DiagTools Refer to page 18 You may need to update your PC s Basic Input Output System BIOS Create a floppy to update your PC s BIOS Refer to page 20 More Advanced Troubleshooting The system board is not working 1 Disconnect the power c...

Page 40: ...ppears press the F2 key 3 Press F9 to restore default values 4 Press F10 to exit the Setup program saving changes You may need to update your PC s Basic Input Output System BIOS Create a floppy to update your PC s BIOS Refer to page 20 You think you may have a problem with the audio or LAN features Download the latest drivers from HP Support Web www hp com go briosupport Your hard disk may be frag...

Page 41: ... Windows 95 Windows 98 and Windows NT 4 0 select Control Panel from the S S S St t t ta a a art rt rt rt menu then click on Multimedia Advanced Click on the Audio Device icon then select the Do not use audio features on this device radio button No output from the 8 bit or 16 bit digitized sounds This might be due to the DMA channel selected or to an interrupt conflict Use your operating system s a...

Page 42: ...hown on page 49 6 Run DiagTools to see if it detects a problem with the floppy drive refer to page 18 Checklist 1 If you receive a S M A R T alert at any time this indicates that your hard disk drive is defective Carry out an immediate data backup then contact HP Support at www hp com go briosupport to ask for a replacement hard disk drive 2 Check that the disk power and data cables are correctly ...

Page 43: ... to boot on CD ROM place C C C CD D D D R R R RO O O OM M M M before H H H HD D D DD D D D in Setup refer to the B B B Bo o o oo o o ot t t t D D D De e e ev v v viiiic c c ce e e e P P P Pr r r riiiio o o or r r riiiit t t ty y y y submenu in the B B B Bo o o oo o o ot t t t menu group of the HP Setup program Refer to page 20 6 Run DiagTools to see if it detects a problem with the drive Refer to ...

Page 44: ... from the CD ROM or DVD drive during a power failure for example you can use the manual eject button For example to eject a CD ROM using the manual eject button With a thin solid rod such as the end of a paper clip push the CD ROM drive s manual eject button 2 The CD ROM drive door will be released opening slightly Carefully pull it open fully and retrieve the CD 3 To close the CD ROM drive door p...

Page 45: ...ersion is used The BIOS version is displayed in the Setup program Main menu accessed by pressing F2 during start up Any BIOS parameter changes Did the problem occur after changes were made to the BIOS using the Setup program Make a list of slots and interrupts used by additional cards for example LAN sound and SCSI This is to check for interrupt conflicts Your PC needs to give separate interrupt r...

Page 46: ...40 Support and Information Services ...

Page 47: ... page 42 Inside the Computer page 43 Removing and Replacing the Cover page 44 Accessing or Replacing the System Board page 46 Cables and Connectors in Your PC page 49 Replacing a Celeron Processor BA400 PCs page 50 Replacing a Pentium Processor BA600 PCs page 51 Replacing the Floppy Drive page 52 Replacing the Hard Drive page 54 Installing an Expansion Bay Drive page 56 Installing a Memory Module ...

Page 48: ...r outlet and any connection to a telecommunications network Always replace the cover before switching the PC on again Caution Static electricity can damage electronic components Turn all equipment OFF Don t let your clothes touch the accessory To equalize the static electricity rest the accessory bag on top of the PC while you are removing the accessory from the bag Handle the accessory as little ...

Page 49: ...Processor One or Two Free Front Access Device Shelves CD ROM drive already fitted in some models DVD Zip or Tape drive Brio BA600 Models Main memory modules 100 MHz SDRAM 32 MB kit 64 MB kit 128 MB kit 256MB kit Hard drive Floppy drive One or Two Free Front Access Device Shelves CD ROM drive already fitted in some models DVD Zip or Tape drive Power supply Pentium Processor Up to Four Expansion Car...

Page 50: ...nd stand behind it 2 Disconnect all cables from the rear of the PC 3 Loosen the three thumb screws from the rear of the PC 4 Slide the cover back by about 1cm 0 3 inches 5 Pulling the bottom edges of the cover apart slightly lift it up and off the PC Caution For your safety disconnect the power cord and all external cables ...

Page 51: ... Lower the cover onto the PC leaving a gap of about 1cm 0 3 inches between the cover and the front of the PC 3 Check that the cover is correctly held in place with the metal tabs positioned inside the guide rails 4 Slide the cover towards the front of the PC 5 Tighten the three screws on the back of the computer ...

Page 52: ...to the components To do this 1 Remove the PC s cover Refer to page 44 2 Free the two cables held in place by the plastic clip 3 Remove any cards from the expansion slots see page 60 4 Remove the two screws in the PC s side panel 5 Slide the panel towards the front of the PC until it is free of its retaining tabs 6 Rotate the top of the panel out slightly and lift it up and out of the PC taking car...

Page 53: ...the system board off the side panel 5 Remove any components you want to reuse such as the processor or memory modules Refer to the appropriate section for instructions on removing the individual components 6 Make sure that the replacement board has the same jumper or switch settings as the old system board 7 Install any components removed from the old system board in the new board Refer to the app...

Page 54: ...ab and engage the lower retaining tabs 2 Rotate the top of the panel towards the PC 3 Slide the panel towards the rear of the PC until all the retaining tabs are engaged 4 Replace the two screws that hold the panel in place 5 Reattach the cables with the plastic clip 6 Replace the cover Refer to Replacing the Cover on page 45 metal positioning tab ...

Page 55: ...fitted to the system board Power connector CD ROM DVD Tape or Zip drive Hard drive Floppy drive CD audio connector Status panel connector Brio BA400 Models Serial COM 2 connector used with an additional serial port card WOL Wake on LAN connector with certain LAN network cards allows the PC to be started from a network Brio BA600 Models CD audio connector Status panel connector Power connector CD R...

Page 56: ... of the socket to release the old processor then lift it out 5 Install the new processor in the socket with its corner marker facing the corner marker on the socket then lower the lever to lock it in place 6 Replace the heatsink and fasten the retention clip 7 Refer to page 48 for instructions on reinstalling the system board in your PC 8 Replace the PC s cover Refer to page 45 Caution For your sa...

Page 57: ...l pull the retaining tab on one side of the socket outwards to release the processor on one side b Open the retaining tab on the other side and lift the processor out 4 Install the new processor Align the processor carefully above the slot then push the processor down firmly until it clicks into place 5 Refer to page 48 for instructions on reinstalling the system board in your PC 6 Replace the PC ...

Page 58: ...y Drive 1 Remove the cover Refer to page 44 2 Remove the floppy drive tray fixing screw 3 Slide the floppy drive tray towards the back of the computer until it is released from its mountings then lift it free 4 Remove the floppy drive s two connectors ...

Page 59: ...ors on the rear of the drive are at the back of the bay 8 Replace the three screws You must fit these screws in the holes that have 1 engraved alongside 9 Replace the floppy drive connectors 10 Place the drive tray against the positioning tab then slide it towards the front of the PC until the tray is engaged on the mounting tabs 11 Replace the floppy drive bay fixing screw 12 Replace the PC s cov...

Page 60: ...page 44 2 Remove the hard drive tray fixing screw 3 Slide the drive tray towards the rear of the PC until the tray is released from its mountings Pull the drive tray out of the computer casing 4 Disconnect the power and data cables from the hard drive 5 Undo the four screws and slide the old drive out of the tray Warning For your safety disconnect the power cord and all external cables ...

Page 61: ...r and data cables Refer to Cables and Connectors in Your PC on page 49 if you are unsure of which cable to use 9 Replace the drive tray in the computer aligning it with the positioning tab and making sure that the tags are correctly engaged in their holes 10 Replace the tray fixing screw 11 Replace the PC s cover Refer to page 45 Caution Take care when handling the hard drive A one quarter inch dr...

Page 62: ...ightly until you are able to lift it out 4 Slide the new drive in from the rear 5 Replace the three screws You must fit these screws in the holes that have 1 engraved alongside Warning To avoid electrical shock and harm to your eyes by laser do not open the laser module The laser module should be serviced by service personnel only Do not attempt to make any adjustment to the laser unit Refer to th...

Page 63: ...t of the panel gently upwards until the whole panel can be lifted off 4 Lay the front panel on a flat surface beside the PC 5 Remove the plastic masking plate from the front panel by prising the retaining tabs open by hand 6 If the bay has a metal blanking plate then break it off using a screwdriver 7 Slide the drive in from the front of the computer 8 Tighten the three screws that fasten the driv...

Page 64: ...Connect the data and power cables If this is the second device installed in the expansion bays fit the data connector marked CD Slave If this is the only device fit the end CD connector marked CD Master 10 Replace the cover Refer to page 45 ...

Page 65: ...Easy Access to System Board Components on page 46 4 Either remove the module you want to replace or locate an empty memory module socket 5 Make sure that the socket s clips are open 6 Align the grooves on the bottom of the module with the corresponding marks on the socket and push it firmly into place The clips close automatically 7 Replace the system board if you removed it earlier Refer to Repla...

Page 66: ...fitting a card in an empty slot unscrew the slot cover facing the slot you want to use and lift it out If replacing a card in an expansion slot undo the screw holding the card in place and lift it out 3 Aligning the new card carefully press it firmly into the socket and tighten the retaining screw 4 Replace the PC s cover Refer to page 45 ...

Page 67: ...t of the PC 5 Place the new power supply unit inside the computer and tighten the three screws on the rear of the PC 6 Reconnect all the power cables to the drives and the system board 7 Replace the cover Refer to page 45 8 Check that the voltage switch is set correctly for your country the voltage is set during manufacturing and should already be correct Warning To avoid electrical shock do not o...

Page 68: ... is incorrectly installed For your safety never attempt to recharge disassemble or burn the old battery Replace the battery only with the same or equivalent type recommended by the manufacturer The battery in this PC is a lithium battery which does not contain heavy metals nevertheless in order to protect the environment do not dispose of batteries in household waste Please return used batteries t...

Page 69: ...at have been associated with repetitive strain injury RSI to soft tissues in the hands and arms If you experience discomfort or pain while using any computing equipment discontinue use immediately and consult your physician as soon as possible In addition to the information on RSI given in this chapter you may also consult the online version of Working in Comfort accessible from the HP Brio Center...

Page 70: ...dons become irritated or inflamed RSI has been a reported problem for those who perform repetitive tasks such as assembly line work meat packing sewing playing musical instruments and computer work RSI also has been observed in those who frequently engage in activities such as carpentry knitting housework gardening tennis windsurfing and lifting children What causes RSI The specific causes of RSI ...

Page 71: ...m is diagnosed and treated the easier it is to resolve Preparing Your Work Environment When using HP computing equipment it is important that your work environment contribute to your comfort and productivity Your Chair It s very important that your chair provides a comfortable sitting position and offers the following features A stable base such as five legs with casters Make sure the casters are ...

Page 72: ...backrest correctly supports the lower part or lumbar curve of the back A freely rotating swivel so you can move easily from side to side Fully adjustable and padded armrests The chair arms should not interfere with adjusting the chair or moving it close to your work surface Your Work Surface Ideally you should be able to adjust the height of your work surface A simple way to ensure your work surfa...

Page 73: ...oximately parallel to the floor Wrists Your wrists should be as straight as possible while using the keyboard mouse or trackball They should not be bent sideways or more than 10 degrees up or down Legs Your thighs should be horizontal or angled slightly downward Your lower legs should be near a right angle to your thighs Your feet should rest flat on the floor If necessary use a footrest but doubl...

Page 74: ...t is straight on To avoid glare or reflection try to position the monitor so the screen is at a right angle to your window rather than in front of it If reflection or glare persists tilting the screen forward may help Maintain a comfortable viewing distance to the screen Most people prefer a viewing distance of approximately 46 to 76 cm 18 to 30 inches depending on monitor size Character size and ...

Page 75: ...hould be observed when using a document holder The document holder should be at approximately the same height and distance from your eyes as the screen and as close to the monitor as possible to prevent neck twisting Some users prefer a document holder mounted to the monitor while others prefer the document holder positioned between the screen and keyboard If the primary task is to view documents ...

Page 76: ...h your elbows at about the same level as the work surface you may not need to use it However if your elbows are below the work surface you may wish to use the kickstand to raise the back of the keyboard An adjustable keyboard tray may be useful if you cannot adjust your chair or work surface to the proper height for typing It should adjust in height from 64 to 76 cm 25 to 30 inches above the floor...

Page 77: ...ut devices may increase your risk of discomfort or injury Observing the following recommendations may reduce that risk As with the keyboard try to keep your hand wrist and forearm in a neutral position while using your mouse or other input device When using a stylus or light pen with a graphics tablet don t grip the stylus tightly Keep your hand and fingers relaxed and try to maintain a neutral po...

Page 78: ...Be sure to keep your mouse and trackball clean Regular removal of accumulated dust and dirt helps ensure proper tracking and reduces unnecessary hand and wrist motions Headphones and Speakers Listening to loud sounds for prolonged periods may permanently damage your hearing To avoid discomfort from unexpected noise always turn down the volume before connecting headphones or speakers to your HP equ...

Page 79: ...r slightly below eye level up to 15 degrees Head Do not tilt your head forward by more than 15 degrees and try not to turn your head toward the side Back While sitting at your work surface make sure your back is supported by the chair s backrest in an erect position or angled slightly backwards Arms Make sure your arms and elbows are relaxed and loose with your upper arm perpendicular to the floor...

Page 80: ...iods of time without a break may be more prone to injury Changing tasks frequently will help prevent muscle stiffness Examples alternating between keyboarding reading writing filing and moving around in your work environment helps you maintain a relaxed posture Occasionally stretch the muscles in your hands arms shoulders neck and back You should stretch at least as often as you take brief task br...

Page 81: ...n This chapter provides technical information on your PC For more detailed information refer to the PC s datasheet in the library on HP s web site www hp com desktops Technical Characteristics page 76 Clearing Your PC s CMOS BIOS Settings page 77 ...

Page 82: ...hes by 14 13 inches Footprint 0 068 m2 0 73 sq ft Acoustic noise emission ISO 7779 Operating idle Sound Power LwA 39 dBA Sound Pressure LpA 28 dBA Power consumption Windows 98 Suspend 115V 60Hz 25W 230V 50Hz 25W Storage Humidity 8 85 Characteristics models BA600 Description Weight configuration with 1 CD ROM drive excluding keyboard and display 9 8 kilograms 21 6 pounds Dimensions 34 9cm Depth by ...

Page 83: ...hen the message Press F2 to enter Setup appears on screen Refer to page 20 2 From within the Setup program press F9 to load Setup defaults 3 Press F10 to exit Setup saving changes Notes Operating temperature and humidity ranges may vary depending on the mass storage devices installed High humidity levels can cause improper operation of disk drives Low humidity ranges can aggravate static electrici...

Page 84: ...sswords only set switch 2 to ON 4 Replace the cover and reconnect the power cord 5 Switch on the PC 6 Shut down the PC and set switch 1 to OFF Set switch 2 to OFF if you reset it earlier instead of 1 7 Restart the PC and press F2 to enter the Setup program when prompted You now have full access to the Setup program For more information on Setup refer to page 20 Switch block B B B Br r r ri ii io o...

Page 85: ...the cover and reconnect the power cord 6 Switch on the PC The error Checksum is invalid or the PC has suffered an error may appear This is normal as you have just erased the previous settings 7 Press F2 to enter the Setup program The PC will restart with the new configuration You now have full access to the Setup program For more information on Setup refer to page 20 B B B Br r r ri ii io o o o B ...

Page 86: ...80 Clearing Your PC s CMOS BIOS Settings ...

Page 87: ...Regulatory and Software License Information Regulatory and Software License Information Regulatory Information page 82 Recycling your PC page 87 HP Software License Agreement page 87 ...

Page 88: ...03 Issue 2 VCCI 2 1 AS NZ 3548 1992 Supplementary Information The product herewith complies with the requirements of the following Directives and carries the CE marking accordingly the EMC directive 89 336 EEC the Low Voltage Directive 73 23 EEC both amended by the directive 93 68 EEC 1 The product was tested in a typical configuration with Hewlett Packard Personal Computer Systems 2 This Device c...

Page 89: ...removing the power cord and any connection to a telecommunication network Always replace the cover before switching on again Si le cordon secteur n est pas livré avec votre ordinateur utiliser un cordon secteur en accord avec votre code electrique national USA utiliser un cordon secteur UL listed de type SVT Canada utiliser un cordon secteur certifié CSA Pour votre sécurité ne jamais retirer le ca...

Page 90: ...ect operation Notice for Korea Part 15 FCC Compliance Statement This device complies with Part 15 of FCC rules Operation is subject to the following two conditions 1 This device may not cause harmful interference and 2 This device must accept any interference received including interference that may cause undesired operation Operation environment For Home and Office use Notice This equipment has b...

Page 91: ... operations or procedures that could affect the operation of the equipment If this happens the telephone company will provide advance notice in order for you to make the necessary modifications in order to maintain uninterrupted service In the event this equipment should fail to operate properly disconnect the unit from the telephone line Try using another FCC approved telephone in the same teleph...

Page 92: ...ces subject only to the requirement that the sum of the Ringer Equivalence Numbers of all devices does not exceed 5 PAN European Regulatory Note The equipment has been approved under CTR21 For such products the following statement is required This equipment has been designed to work with all countries telephone networks in Europe Network compatibility is dependent on internal software settings Con...

Page 93: ...ct is designed to interwork with the Public Switched Telecommunication Networks in UK Ireland Netherlands Sweden Denmark Finland Switzerland Luxembourg Belgium France Germany Spain Portugal Iceland Greece Italy Norway and Austria Recycling your PC HP has a strong commitment toward the environment Your HP Personal Computer has been designed to respect the environment as much as possible HP can also...

Page 94: ... only be used for restoring the hard disk of the HP computer with which the HP Brio Assist CD ROM was originally provided ii The use of any operating system software by Microsoft contained in any such HP Brio Assist CD ROM shall be governed by the Microsoft End User License Agreement EULA TRANSFER OF RIGHTS IN SOFTWARE Customer may transfer rights in the software to a third party only as part of t...

Page 95: ...er 4 scanner 4 to a network 4 to the Internet 11 USB devices 4 connectors in the PC 49 cover removing 44 replacing 45 D D D D DiagTools features 18 finding information on 13 running 18 driver updates 13 drivers reinstalling 18 DVD installing 56 recommended configuration 37 troubleshooting 37 E E E E errors at startup 28 expansion cards installing 60 F F F F Fix a Problem 13 floppy drive replacing ...

Page 96: ...ystem 18 replacing battery 62 CD ROM 56 floppy drive 52 hard drive 54 power supply 61 processor 50 51 system board 46 restoring factory configuration 18 S S S S setting up your PC 1 software problems 27 starting the PC 5 support before you call 39 Web site i system board replacing 46 T T T T technical information 75 Troubeshooting Help Zone 22 troubleshooting HP Brio Center 13 quick reference 17 w...

Page 97: ......

Page 98: ... nt t t te e e er r r rn n n ne e e et t t t a a a an n n nd d d d a a a acc cc cc cce e e es s s ss s s s u u u us s s se e e ef f f fu u u ul l l l i ii in n n nf f f fo o o or r r rm m m ma a a at t t ti ii io o o on n n n f f f fo o o or r r r y y y yo o o ou u u ur r r r s s s sm m m ma a a al l l ll l l l b b b bu u u us s s si ii in n n ne e e es s s ss s s s o o o on n n nl l l ly y y y i ...

Reviews: