background image


15 

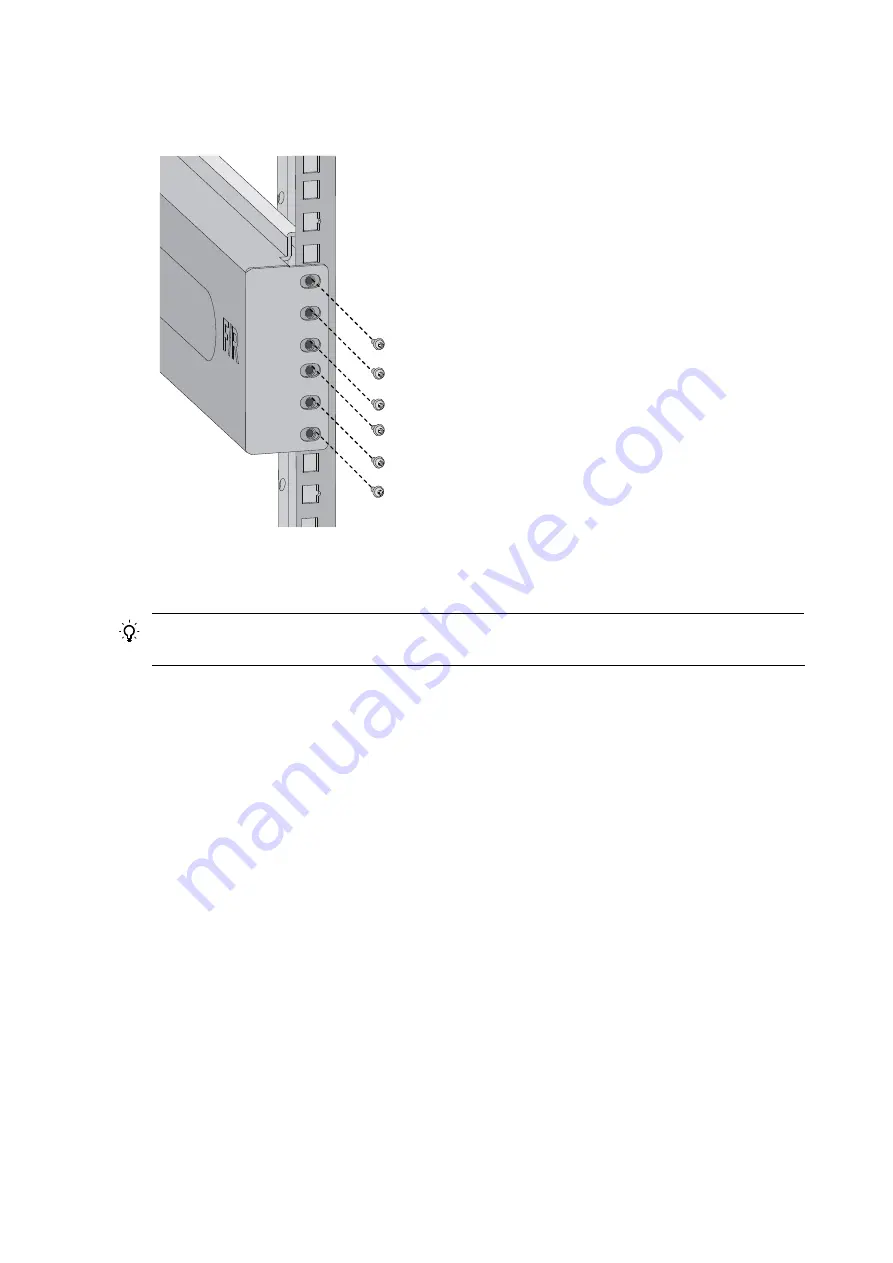
Figure 8 Fix the slide rail to the cage nuts with screws 


5.

Keep the slide rail horizontally and adjust its length until the installation holes on the rear end of the 
slide rail touch the cage nuts on the rear rack post. Then fix them with screws.  


TIP: 

Fix all installation holes of the slide rail with screws to ensure its weight bearing capacity. 


6.

Repeat 

4

 and 

5

 to install the other slide rail. Make sure the two slide rails are at the same height 

so that the device can be placed on them horizontally. 

Summary of Contents for A10500 Series

Page 1: ...s 12 Installing cage nuts for mounting brackets 16 Installing accessories to the chassis 17 Installing mounting brackets and cable management brackets 17 Mounting the switch to the rack 20 Grounding the switch 21 Grounding the switch with a grounding strip 21 Grounding the switch through the PE wire of an AC power supply 22 Installing modules 23 Attaching an ESD preventive wrist strap 23 Installin...

Page 2: ...witch to the network through optical fibers 43 Testing the connectivity 44 Troubleshooting 45 Troubleshooting methods 45 Troubleshooting the system 45 Configuration terminal problems 45 Troubleshooting the switch during the operation 46 Power supply system failure 46 Fan failure 47 MPU failure 47 LPU and switching fabric module failure 47 Interface failure 48 Replacement procedures 50 Replacing a ...

Page 3: ...rnet twisted pair cable 80 Optical fiber 80 Overview 81 Precautions 82 SFP cable 82 Appendix E Cabling recommendations 84 General cabling requirements 84 Correct use of labels 84 Cable management requirements 84 Appendix F Repackaging the switch 88 Removing cables from the switch 88 Removing the power cable 88 Removing the console cable 88 Removing the grounding cable 88 Removing the twisted pair ...

Page 4: ...ription JC611A BJNGA AC0003 HP A10508 V Switch Chassis JC612A BJNGA AC0004 HP A10508 Switch Chassis JC613A BJNGA AC0005 HP A10504 Switch Chassis Chassis overview The HP A10500 Switch Series includes these models A10504 A10508 and A10508 V This chapter describes the chassis views of the A10500 switches Every A10500 switch chassis has a main processing unit MPU section line processing unit LPU secti...

Page 5: ...our switching modules and one of them must be installed in one of the two lowest numbered switching fabric module slots x For the A10504 you must at least install one switching fabric module in slot 6 or slot 7 x For the A10508 or A10508 V you must at least install one switching fabric module in slot 10 or slot 1 1 NOTE x The installation procedures for LPUs MPUs and switching fabric modules are s...

Page 6: ...SE0 JC618A HP A10500 48 port Gig T SE Module LSU1GT48SE0 JC619A HP A10500 48 port GbE SFP SE Module LSU1GP48SE0 JC617A HP A10500 16 port GbE SFP 8 port GbE Combo 2 port 10 GbE XFP SE Module LSU1GP24TXSE0 JC620A HP A10500 4 port 10 GbE XFP SE Module LSU1TGX4SE0 JC630A HP A10500 8 port 10 GbE SFP EA Module LSU1TGS8EA0 JC623A HP A10500 48 port Gig T EA Module LSU1GT48EA0 JC622A HP A10500 48 port GbE ...

Page 7: ...ting accessories Product code Description Alias JC665A HP X421 A Series Chassis Universal 4 Post Rack Mounting Kit Rack Mounting Kit Table 8 Fan assembly models Product code Description Alias JC632A HP A10504 Spare Fan Assembly A10504 FAN JC633A HP A10508 Spare Fan Assembly A10508 FAN JC634A HP A10508 V Spare Fan Assembly A10508 V FAN ...

Page 8: ... x Locate the emergency power off switch in the room before installation so you can quickly shut power off when an electrical accident occurs x Unplug all external cables including power cords before moving the chassis x Do not work alone when the switch has power x Never assume that power has been disconnected from a circuit Always check Handling safety When you move an HP A10500 switch follow th...

Page 9: ...the total weight of the rack chassis cards power supplies and all other components Additionally the floor loading plan must also consider system expansion such as adding more cards For more information see the chapter Appendix A Technical specifications Temperature To ensure the normal operation of the switch ensure that the room temperature meets the requirements in Table 9 Table 9 Temperature re...

Page 10: ...ponents as shown in Table 12 Table 12 Harmful gas limits in an equipment room Gas Max mg m3 SO2 0 2 H2S 0 006 NH3 0 05 Cl2 0 01 EMI All electromagnetic interference EMI sources from outside or inside of the switch and application system adversely affect the switch in a conduction pattern of capacitance coupling inductance coupling electromagnetic wave radiation or common impedance including the gr...

Page 11: ... supplies and identity the number of power supplies The total maximum output power of all power supplies must be higher than the system power consumption For more information about available power supplies see the chapter Appendix B FRUs and compatibility matrixes 3 Check that the power system at the installation site meets the requirements of the power supplies including the input method and rate...

Page 12: ... air vents for the chassis Figure 3 Airflow through other A10500 switch chassis 1 2 3 3 4 4 1 Inlet air vents for the power supplies 2 Outlet air vents for the power supplies 3 Inlet air vents for the chassis 4 Outlet air vents for the chassis Space For easy maintenance follow these guidelines x Reserve at least 1 m 3 28 ft of clearance between the rack and walls or other devices ...

Page 13: ...l electric drill and several auxiliary drill bits Fastening tools Flat blade screwdriver P4 75 mm Phillips screwdriver P1 100 mm P2 150 mm and P3 250 mm Socket wrench M5 Socket wrench M6 Small tools Needle nose pliers diagonal pliers combination pliers wire stripping pliers crimping pliers RJ 45 crimping pliers file and handsaw Auxiliary tools ESD preventive wrist strap hair brush tweezers paper k...

Page 14: ...ore installation Preparations before installation Installing slide rails and cage nuts to the rack x For how to install slide rails see Installing slide rails x For how to install cage nuts see Installing cage nuts for mounting brackets Installing accessories to the chassis Accessories to be installed on the chassis For how to mount brackets and cable management brackets see Installing mounting br...

Page 15: ...ing slide rails Before installing the switch to the rack install slide rails to the rack If the rack has slide rails skip this section NOTE x Before installing the slide rails check that the slide rails can support the weight of the switch For the weights of the A10500 Switch Series see the chapter Appendix A Technical specifications x Position the chassis of the A10500 Switch Series according to ...

Page 16: ...of the narrower metal area between holes as shown in Figure 6 x Each rack post requires six screws to fix the slide rail You only need to mark the uppermost square hole and lowermost square hole for installation x Mark the square holes at the same height on the other three rack posts NOTE One rack unit has three holes the middle of which is an auxiliary installation hole and the other two are stan...

Page 17: ...rower metal area between holes 3 Install six cage nuts on the square holes on each rack post as shown in Figure 7 Figure 7 Install a cage nut 4 Align the installation holes on the front end of the slide rail with the cage nuts on the front rack post and fix them with screws as shown in Figure 8 ...

Page 18: ...he rear end of the slide rail touch the cage nuts on the rear rack post Then fix them with screws TIP Fix all installation holes of the slide rail with screws to ensure its weight bearing capacity 6 Repeat 4 and 5 to install the other slide rail Make sure the two slide rails are at the same height so that the device can be placed on them horizontally ...

Page 19: ... the heaviest switch at the bottom of the rack Installing cage nuts for mounting brackets 1 Before mounting the chassis to the rack install cage nuts to the front square holed brackets of the rack As shown in Figure 10 determine the positions of the cage nuts according to the holes on the mounting brackets and positions of the slide rails 2 Install cage nuts on the square holes on each rack post a...

Page 20: ...ling the switch to the rack install the cable management brackets and mounting brackets shipped with the switch Cable management brackets signal cable and power cable management brackets are used for cabling the switch and mounting brackets are used for fixing the chassis to the rack Installing the cable management brackets You must install the signal cable management brackets separately for the A...

Page 21: ...ructure and installed in a similar procedure For more information see Figure 12 To install a cable management bracket 1 Unpack the cable management brackets 2 Attach the cable management bracket to the chassis and align the screws with the screw holes on the chassis 3 Fasten the screws Figure 11 Install cable management brackets on an A10508 V 1 Attach the cable management bracket to the chassis 2...

Page 22: ...ckets Before installing the switch to the rack install the mounting brackets to the chassis Marks L and R are printed inside the mounting brackets to distinguish between the left and right mounting brackets To install the mounting brackets face the front of the switch and mount the left and right mounting brackets to the two sides of the switch as shown in Figure 13 Figure 13 Install the mounting ...

Page 23: ...Place the switch on the slide rails and slide the switch along the slide rails until the mounting brackets on the switch touch the front rack posts as shown in callout 1 on Figure 14 CAUTION After placing the switch on the slide rails do not leave go of your hands immediately because this may tip the switch damaging the switch or even causing bodily injury 4 Fix the chassis to the rack with mounti...

Page 24: ...ding cable to the earthing system in the equipment room Do not connect it to a fire main or lightning rod To connect the grounding cable 1 Take out the grounding cable from the package 2 Remove the grounding screws from the grounding holes on the switch chassis the grounding holes are located at the rear of the chassis as shown in callout 2 on Figure 15 NOTE The grounding cable provided with the A...

Page 25: ... is available at the installation site you can ground the switch through the PE wire of the AC power supply as shown in Figure 16 CAUTION Make sure that the AC power supply uses a three wire cable with a protection wire and the PE wire of the AC power supply is well grounded at the power distribution room or AC power supply transformer side In addition make sure that the PE connector on the switch...

Page 26: ...d when installing modules To use an ESD preventive wrist strap 1 Make sure the switch is well grounded For how to ground your switch see the chapter Installing the switch 2 Put on the wrist strap 3 Tighten the wrist strap to keep good skin contact 4 As shown in Figure 17 insert the ESD preventive wrist strap into the ESD port on the switch chassis or attach it to the grounding screw of the chassis...

Page 27: ...ing fabric modules which can be installed in horizontal or vertical slots x Horizontal slot with the PCB board on the card facing up x Vertical slot with the PCB board on the card facing left All the cards of the A10500 Switch Series are hot swappable and the installation procedures are similar The following takes a card installed in a horizontal slot as an example To install a card 1 Wear an ESD ...

Page 28: ...on the card 8 When the switch is powered on check the running status of the card NOTE x You can check the running status of a card by referring to the card status LED SLOT on the MPU of the switch If the RUN LED blinks the card in the slot operates properly For more information about card status LED SLOT see the chapter Appendix C LEDs x To ensure ventilation of the switch install a blank panel on...

Page 29: ... To install the power supply 1 Wear an ESD preventive wrist strap and make sure it makes good skin contact and is well grounded For more information see Attaching an ESD preventive wrist strap 2 Use a Phillips screwdriver to loosen the captive screws on the blank panel if any to remove the blank panel 3 Unpack the power supply 4 Follow the installation graph printed on the blank panel of the power...

Page 30: ...27 Figure 20 Install a power supply in a vertical slot 1 Install the power supply to the chassis 2 Fasten the captive screw ...

Page 31: ... cable tie to secure the power cable to the cable management bracket a Figure 22 shows how to connect the power cable for a vertical slot switch A10508 and A10508 V b Figure 23 shows how to connect the power cable for a horizontal slot switch A10504 3 Plug the other end of the power cable to the AC power receptacle of the power source and switch on the circuit breaker 4 Check the power supply inpu...

Page 32: ...void component damage caused by mis operation read this section carefully before installing an XFP SFP SFP module To install an XFP SFP SFP module 1 Wear an ESD preventive wrist strap and make sure it makes good skin contact and is well grounded For more information see Attaching an ESD preventive wrist strap 2 Unpack the XFP SFP SFP module Do not touch the golden finger of the module ...

Page 33: ...ottom spring tab so that you can insert the SFP module horizontally x For how to connect a fiber see the chapter Connecting your switch to the network CAUTION x Do not remove the protection cover from the XFP SFP SFP module before connecting an optical fiber x Remove the optical fiber if any from the XFP SFP SFP module before installing it Connecting an SFP cable To connect an SFP cable to an SFP ...

Page 34: ...guration Guide IRF fabric setup flowchart Figure 25 IRF fabric setup flowchart Start Plan IRF fabric setup Install IRF member switches Power on the switches Access the IRF fabric to verify the configuration End Configure basic IRF settings Connect physical IRF ports NOTE For the actual procedure see HP A10500 Switch Series IRF Configuration Guide for the software release you are using Planning IRF...

Page 35: ...er switch Determine which switch you want to use as the master for managing all member switches in the IRF fabric An IRF fabric has only one master switch You configure and manage all member switches in the IRF fabric at the command line interface of the master NOTE IRF member switches will automatically elect a master You can affect the election result by assigning a high member priority to the i...

Page 36: ...r switch x Bind physical ports to IRF port 1 on one switch and to IRF port 2 on the other switch x Execute the display irf configuration command to verify the basic IRF settings For more information about configuring basic IRF settings see HP A10500 Switch Series IRF Configuration Guide Connecting the physical IRF ports Connect the physical IRF ports of switches x Use XFP transceiver modules and f...

Page 37: ...eck that you can manage all member switches as if they were one node 5 Display the running status of the IRF fabric by using the commands in Table 16 Table 16 Display and maintain IRF configuration and running status To do Use the command Display information about the IRF fabric display irf Display topology information about the IRF fabric display irf topology NOTE x An IRF link failure can cause ...

Page 38: ...e total number of AUX users that an IRF fabric supports equals the number of MPUs in the IRF fabric x All A10500 switches support up to 16 concurrent VTY users Accessing the switch for the first time The first time you access the switch you must use a console cable see Figure 27 to connect a console terminal for example a PC to the console port on the switch A console cable is an 8 core shielded c...

Page 39: ...h you must run a terminal emulator program on the console terminal NOTE If your PC runs Windows 2003 Server add the HyperTerminal component before performing the following steps to log in to and manage the switch If your PC runs Windows 2008 server Windows 7 Windows Vista or any other operating system prepare third party terminal control software and follow the software user guide or help to confi...

Page 40: ...the new connection in the Name field and click OK Figure 29 Connection description 3 Select the serial port to be used from the Connect using list and click OK Figure 30 Set the serial port used by the HyperTerminal connection 4 Set Bits per second to 9600 Data bits to 8 Parity to None Stop bits to 1 and Flow control to None and click OK ...

Page 41: ...38 Figure 31 Set the serial port parameters 5 Select File Properties in the HyperTerminal window Figure 32 HyperTerminal window 6 On the Settings tab set the emulation to VT100 and click OK ...

Page 42: ...iller panels x All the network cables fibers power cables and grounding cables have been correctly connected x The input power voltage meets the requirement of the switch x The console cable is properly connected the terminal or PC used for configuration has started and the configuration parameters have been set Powering on the switch Turn on the power source of the switch to power on the switch T...

Page 43: ...ng Done System application is starting Starting to get the main application file flash A10500 bin The main application file is self decompressing Done System application is starting User interface aux0 is available Press ENTER to get started Press Enter at the prompt When the prompt Sysname appears you can configure the switch NOTE After powering on the switch check the following items x The cooli...

Page 44: ...Password Easy to configure secure and flat user management Environments that do not need granular privilege management Username and password Complex to configure secure and hierarchical user management Environments where multiple operators cooperate to manage the switch NOTE For more information about login methods see HP A10500 Switch Series Fundamentals Configuration Guide Configuring the basic ...

Page 45: ...e Vlan interface1 quit x Configure static routes Configure a static route with the destination IP address 172 16 1 0 and the next hop IP address 192 168 0 2 Sysname ip route static 172 16 1 0 255 255 255 0 192 168 0 2 x Configure VLANs Create VLAN 10 and enter its view Sysname vlan 10 Sysname vlan10 Assign port GigabitEthernet 1 0 1 to VLAN 10 Sysname vlan10 port gigabitethernet 1 0 1 Sysname vlan...

Page 46: ...s You can use category 5 or above twisted pair cables to connect the 10 100Base TX and 1000Base T ports on your switch to the network These ports use RJ 45 connectors and support MDI MDI X auto sensing For more information about twisted pair cables see the chapter Appendix D Cables To connect a 10 100Base TX or 1000Base T port to a peer device 1 Plug one end of a twisted pair cable into the port 2...

Page 47: ...tion For more information about the LED status see the chapter Appendix C LEDs WARNING To avoid injury to your eyes do not stare at the optical interfaces and optical fiber connectors when connecting optical fibers Figure 34 Use LC optical fiber connectors to connect transceiver modules LC plug SFP module Testing the connectivity After you plug the switch into the network use the ping or tracert c...

Page 48: ...ically because the noncompliant operating environments of switches may cause switch failures At the same time check the installation environments against the requirements in the chapter Preparing for installation Make sure the switch operates in a proper environment Additionally periodically perform the power on test for the spare switches Troubleshooting the system Configuration terminal problems...

Page 49: ...ge the power supply is over temperature and enters the self protection state Make sure the switch is well ventilated and operates in a proper environment 2 When the DC LED is red the power supply may encounter output short circuit output over current output over voltage input under voltage or remote disconnection and enters the self protection state Remove the failures mentioned above The DC LED i...

Page 50: ...ilure The status LEDs on the MPU show the status of a card in the corresponding slot According to the slot number of an MPU you can check the corresponding LEDs for the MPU When the MPU works properly the RUN LED flashes and the ALM LED is off When the RUN LED is off the MPU fails To troubleshoot the MPU 1 Check that the power supply works properly For more information see Power supply system fail...

Page 51: ...d to the network is off the interface or the connecting cable may fail To troubleshoot the interface 1 Check that the MPU or LPU where the interface resides works properly For more information see MPU failure or LPU and switching fabric module failure 2 Check the cable connection of the interface For how to correctly connect the cable to an Ethernet interface with an RJ 45 connector or an optical ...

Page 52: ... the other port is disabled automatically x If a port is brought down by the shutdown command use the undo shutdown command to bring up the interface x After an interface fails if the switch has an idle interface of the same type you can plug the cable into the idle interface 7 Check that the speed and duplex settings of the interfaces of a link are the same Make sure that two interfaces can work ...

Page 53: ...e replacement to avoid damage to the switch x Make sure each power supply has a separate circuit breaker Before replacing a power supply turn off the circuit breaker on the power supply To replace a power supply 1 Prepare an antistatic mat to place the removed power supply 2 Wear an ESD preventive wrist strap and make sure it makes good skin contact and is well grounded For more information see th...

Page 54: ...ter the status LED on it is off x The power supply may be of high temperature Remove it with caution Figure 37 Remove the power supply 1 Loosen the captive screw 2 Pull the power supply out CAUTION After removing the power supply if you do not install a new power supply install a blank panel Replacing a card NOTE Remove the cables on an MPU or LPU before removing the MPU or LPU ...

Page 55: ...twards to separate the card from the backplane as shown in callout 2 on Figure 38 5 Use one hand to slowly move the card outwards Supporting the bottom of the card with the other hand pull the card out of the slot along slide rails as shown in callout 3 on Figure 38 6 Put the removed card on the antistatic mat 7 Install a new card For the installation procedures see the chapter Installing modules ...

Page 56: ...tray within five minutes after removing the old one To remove a fan tray 1 Prepare an antistatic mat to place the fan tray to be removed 2 Put on an ESD preventive wrist strap and make sure the wrist strap makes good skin contact and is well grounded For more information see the chapter Installing modules 3 Loosen the captive screws on the fan tray as shown in callout 1 on Figure 39 4 Hold the han...

Page 57: ... the handle of the fan tray with one hand and supporting bottom with the other gently slide the fan tray along the guide rails into the slot until it is firmly seated in the slot 4 Fasten the captive screws on the fan tray Replacing a transceiver module NOTE Make sure the optical transceiver modules at the two ends of an optical fiber are of the same model Replacing an XFP SFP SFP module To replac...

Page 58: ... module do not touch the golden finger of the module Replacing an SFP cable To replace an SFP cable 1 Wear an ESD preventive wrist strap and make sure it makes good skin contact and is well grounded For more information see the chapter Installing modules 2 Gently press the SFP cable plug in and then pull the handle on the SFP cable outward to pull out the SFP cable plug 3 Install a new SFP cable F...

Page 59: ...wwalerts After registering you will receive email notification of product enhancements new driver versions firmware updates and other product resources Related information Documents To find related documents browse to the Manuals page of the HP Business Support Center website http www hp com support manuals x For related documentation navigate to the Networking section and select a networking cate...

Page 60: ...parated by vertical bars from which you select one choice multiple choices or none 1 n The argument or keyword and argument combination before the ampersand sign can be entered 1 to n times A line that starts with a pound sign is comments GUI conventions Convention Description Boldface Window names button names field names and menu items are in bold text For example the New User window appears cli...

Page 61: ...ing capable device such as a router or Layer 3 switch Represents a generic switch such as a Layer 2 or Layer 3 switch or a router that supports Layer 2 forwarding and other Layer 2 features Port numbering in examples The port numbers in this document are for illustration only and might be unavailable on your device ...

Page 62: ...SE0 3 25 kg 7 16 lb 40 mm 1 57 in 399 mm 15 71 in 352 mm 13 86 in LSU1GP24TXSE0 3 08 kg 6 79 lb 40 mm 1 57 in 399 mm 15 71 in 352 mm 13 86 in LSU1TGX4SE0 2 93 kg 6 46 lb 40 mm 1 57 in 399 mm 15 71 in 352 mm 13 86 in LSU1TGS8EA0 3 43 kg 7 56 lb 40 mm 1 57 in 399 mm 15 71 in 352 mm 13 86 in LSU1GT48EA0 3 31 kg 7 30 lb 40 mm 1 57 in 399 mm 15 71 in 352 mm 13 86 in LSU1GP48EA0 3 25 kg 7 16 lb 40 mm 1 ...

Page 63: ...m 25 39 in A10508 V fan tray 8 3 kg 18 30 lb 80 mm 3 15 in 440 mm 17 32 in 654 mm 25 75 in Module power consumption and system power consumption Card power consumption The power consumption of the cards of the HP A10500 Switch Series depends on the card model and state Table 23 shows the power consumption for different card models x The static power consumption of a card refers to the power consum...

Page 64: ...y power consumption Model Minimum fan tray power consumption Maximum fan tray power consumption A10504 12 W 240 W A10508 11 W 234 W A10508 V 13 W 329 W System power consumption The system power consumption of an A10500 switch depends on the type and number of cards and the fan tray power consumption x The minimum system power consumption is the total static power consumption of all cards plus the ...

Page 65: ...tions for the HP A10500 Switch Series Description Operating Non operating Temperature 0 C to 45 C 32 F to 113 F 40 C to 70 C 40 F to 158 F Relative humidity 10 to 95 non condensing 5 to 95 non condensing Altitude 60 m to 4 km 196 85 ft to 2 49 miles When the altitude is 4 km the highest operating temperature is 31 8 C 89 24 F The maximum operating temperature increases 0 33 C 0 59 F 100 m 328 08 f...

Page 66: ...hronous serial interface cable x 10 100 1000BASE T interface 100 m 328 08 ft over Category 5 twisted pairs MPUs are ordered separately An A10500 switch requires one MPU to operate normally You can also install two MPUs in an A10500 switch for redundancy LPUs The LPUs in Table 28 apply to all the A10500 switches Table 28 LPU specifications LPU model Description Connector Number of interfaces Interf...

Page 67: ...0 Gigabit XFP module LSU1TGS8 EA0 8 port 10 Gigabit SFP optical Ethernet interface card LC 8 10 Gbps 1 Gbps x 10 Gigabit SFP module x 10 Gigabit SFP cable x Gigabit SFP module LSU1GT48 EA0 48 port 10 100 1000Ba se T Gigabit Ethernet interface card RJ 45 48 10 100 1000 Mbps half full duplex N A LSU1GP48 EA0 48 port Gigabit 100 Mbp s SFP Ethernet interface card LC 48 1000 100 Mbps full duplex x Giga...

Page 68: ...interface card RJ 45 8 10 100 1000 Mbps half full duplex N A LSU1TGX4 EB0 4 port 10 Gigabit XFP optical Ethernet interface card LC 4 10 Gbps 10 Gigabit XFP module NOTE x For the transceiver modules that each LPU supports see Transceiver modules x A combo interface is a logical port that comprises an SFP port and an RJ 45 Ethernet port Only one of them can be activated at a time Switching fabric mo...

Page 69: ...rements Storage temperature 40 C to 85 C 40 F to 185 F You can select a certain number of power supplies according to the actual power consumption requirements of your A10500 switch Make sure that the total maximum output power of the ordered power supplies is greater than the system power consumption HP recommends that you reserve 20 of the maximum output power Fan trays Table 31 shows the fan tr...

Page 70: ...ording to the transceiver modules supported by the LPU interfaces For more information see Table 28 The HP A10500 Switch Series supports the following transceiver modules x 10 Gigabit XFP modules listed in Table 32 x 10 Gigabit SFP modules listed in Table 33 x 10 Gigabit SFP cables listed in Table 34 x Gigabit SFP modules listed in Table 35 x 100 Mbps SFP modules listed in Table 36 Table 32 XFP mo...

Page 71: ...es JG232A HP X180 10G XFP LC LH 80km 1559 79nm DWDM Transceiver 1559 79 9 125 N A 80 km 49 71 miles JG233A HP X180 10G XFP LC LH 80km 1560 61nm DWDM Transceiver 1560 61 9 125 N A 80 km 49 71 miles NOTE The 9 125 m single mode fibers used by modules JG226A through JG233A must conform to ITU T G 655 and those used by other modules must conform to ITU T G 652 Table 33 SFP module specifications Produc...

Page 72: ...Used for connecting SFP ports Table 35 Gigabit SFP module specifications Product Code Description Central wavelength nm Fiber diameter m Multimode fiber modal bandwidth MHz km Maximum transmission distance JD089B HP X120 1G SFP RJ45 T Transceiver N A Category 5 twisted pair N A 100 m 328 08 ft 500 550 m 1804 46 ft 50 125 400 500 m 1640 42 ft 200 275 m 902 23 ft JD118B HP X120 1G SFP LC SX Transcei...

Page 73: ...3 50 miles JD116A HP X170 1G SFP LC LH70 1530 Transceiver 1530 9 125 N A 70 km 43 50 miles JD109A HP X170 1G SFP LC LH70 1550 Transceiver 1550 9 125 N A 70 km 43 50 miles JD110A HP X170 1G SFP LC LH70 1570 Transceiver 1570 9 125 N A 70 km 43 50 miles JD111A HP X170 1G SFP LC LH70 1590 Transceiver 1590 9 125 N A 70 km 43 50 miles JD112A HP X170 1G SFP LC LH70 1610 Transceiver 1610 9 125 N A 70 km 4...

Page 74: ...istance JD091A HP X110 100M SFP LC LH80 Transceiver 1550 9 125 80 km 49 71 miles JD100A HP X115 100M SFP LC BX 10 U Transceiver TX 1310 RX 1550 9 125 15 km 9 32 miles JD101A HP X115 100M SFP LC BX 10 D Transceiver The two modules must be used in pairs TX 1550 RX 1310 9 125 15 km 9 32 miles ...

Page 75: ...Power supply LEDs MPU LEDs Figure 40 shows the LEDs available on the LSU1SUPA0 MPU for the A10500 switches Figure 40 LEDs on an LSU1SUPA0 MPU 1 Management Ethernet port LEDs 2 Fan LEDs 3 Card status LEDs 4 MPU active standby status LED Management Ethernet port LEDs The LSU1SUPA0 MPU has one LINK LED and one ACT LED to indicate the link status and data forwarding status of the management Ethernet p...

Page 76: ...ndby MPU LPUs and switching fabric modules in the slots Table 40 shows the LED description NOTE Slot numbers are marked on top of the slots on the A10508 V switch and on the right of the slots on other A10500 switches Table 40 Card LED description RUN ALM Description Blinking Off The card is working properly Off On The card is faulty Off Off x The card is not in position x The card is not started ...

Page 77: ...The Ethernet interface is receiving or sending data On A link is present RJ 45 Ethernet port LED Off No link is present SFP port LED The LPUs provide one SFP port LED for each SFP port to indicate the link status and data receiving forwarding status of the SFP ports Table 43 SFP port LED description LED LED status Description Flashing The SFP port is receiving or sending data On A link is present ...

Page 78: ...escription RUN LED ALM LED Description Flashing 0 5 Hz Off The switching fabric module is working properly Off On The switching fabric module is faulty Flashing 0 5 Hz On The temperature of the switching fabric module has exceeded the upper or lower limit Off Off The switching fabric module has not started On Off The switching fabric module is up Fan tray status LEDs The fan trays for the A10500 s...

Page 79: ...een The power input is normal Green The power supply is outputting power normally Red The power supply is experiencing an output problem including output short circuit output overcurrent output overvoltage input under voltage or remote power off and has entered the self protection state DC Orange The power supply is in an over temperature condition and has entered the self protection state ...

Page 80: ...nd is advantageous in transmitting data over shorter distances The maximum transmission distance is 100 m 328 08 ft RJ 45 connector An Ethernet twisted pair cable connects network devices through the RJ 45 connectors at the two ends Figure 41 shows the pinouts of an RJ 45 connector Figure 41 RJ 45 connector pinout diagram Cable pinouts EIA TIA cabling specifications define two standards 568A and 5...

Page 81: ...00 Mbps with a bandwidth of 100 MHz Category 6 Transmits data at a speed higher than 1 Gbps with a bandwidth of 250 MHz NOTE The RJ 45 Ethernet interfaces of the HP A10500 Switch Series use category 5 or higher Ethernet twisted pair cables for connection Based on pinouts Ethernet twisted pair cables can be classified into straight through and crossover cables based on their pinouts x Straight thro...

Page 82: ...d PCs or MDIX for switches For the pinouts of RJ 45 Ethernet interfaces see Table 51 and Table 52 Table 51 RJ 45 MDI interface pinouts 10Base T 100Base TX 1000Base T Pin Signal Function Signal Function 1 Tx Send data BIDA Bi directional data cable A 2 Tx Send data BIDA Bi directional data cable A 3 Rx Receive data BIDB Bi directional data cable B 4 Reserved N A BIDC Bi directional data cable C 5 R...

Page 83: ... MDIX autosensing enabled can automatically negotiate pin roles The A10500 RJ 45 Ethernet interfaces support MDI MDIX By default MDI MDIX is enabled on a port Making an Ethernet twisted pair cable To make an Ethernet twisted pair cable 1 Cut the cable to length with the crimping pliers 2 Strip off an appropriate length of the cable sheath The length is typically that of the RJ 45 connector 3 Untwi...

Page 84: ...ors at both ends is called a patch cord A patch cord connects one optical device to another for signal routing Patch cords fall into single mode and multi mode patch cords x Single mode patch cord The jacket is yellow It permits transmission over longer distances x Multi mode patch cord The jacket is orange It permits transmission over shorter distances Patch cords are classified into SC LC FC and...

Page 85: ...y in one direction You also need to brush the end face of the fiber port x Never bend or curve a fiber when connecting it After a fiber is installed well the bend radius must be not less than 40 mm the minimum dynamic bend radius is 20 D and the minimum static bend radius is 10 D D indicates the outer diameter of dust caps x If the fiber has to pass through a metallic board hole the hole must have...

Page 86: ...rovides five types of SFP cables with various lengths Table 54 SFP cable description Model Length Description LSWM1STK 0 65 m 2 13 ft LSWM2STK 1 2 m 3 94 ft LSWM3STK 3 m 9 84 ft LSTM1STK 5 m 16 40 ft LSWM4STK 10 m 32 81 ft Dedicated to interconnecting SFP interfaces ...

Page 87: ... If the coaxial cable is frequently bent plugged and unplugged the curvature radius should be at least 10 times the cable s outer diameter x The curvature radius of a high speed cable for example SFP cable should be at least five times of the cable s outer diameter If the coaxial cable is frequently bent plugged and unplugged the curvature radius should be at least 10 times the cable s outer diame...

Page 88: ... have a smooth and fully rounded surface or wear an insulating bush x Use the right type of ties to bind the cables Do not bind cables with joined ties The following types of ties are available currently 100 2 5 mm 3 94 0 10 in 150 3 6 mm 5 91 0 14 in 300 3 6 mm 1 1 81 0 14 in 530 9 mm 20 87 0 35 in and 580 13 mm 22 83 0 51 in x Cut the extra parts of the ties neatly after binding the cables leavi...

Page 89: ...art should be installed in such a way that the extra cable segments will not contact the heat source sharp points or edges Use high temperature cables against the heat sources x For the cable terminals fixed using screw threads the screws or nuts should be securely fastened and prevented from loosing See the following figure Figure 50 Cable fixing example 1 1 2 3 1 1 2 3 1 Flat washer 2 Spring was...

Page 90: ... bundle diameter mm Space between bundles mm 10 80 to 150 10 to 30 150 to 200 30 200 to 300 x No cable or bundle can tie a knot x The metal parts of the crimped cold pressed terminal blocks such as air switch cannot stretch beyond the blocks ...

Page 91: ... power cable and then pull out the plug 5 Put the power cable into the bag Removing the console cable To remove a console cable 1 Prepare the packing bag of the console cable Make sure that the bag is clean dry and not damaged 2 Pull the RJ 45 connector of the console cable out from the console port of the switch 3 Pull the DB 9 connector of the console cable out from the serial port of the PC 4 P...

Page 92: ...power supply CAUTION Before removing a power supply switch off the circuit breakers at the input end of all power cables and remove all the power cables to avoid device damage and bodily injury To repackage a power supply 1 Prepare the packing bag and box of the power supply Make sure that the bag is clean dry and not damaged 2 Remove all power supplies from the chassis and then install blank pane...

Page 93: ...the power supply cannot be completely seated into the foam cushion Repackaging the switch chassis Removing the chassis from the rack To remove the chassis from the rack 1 Prepare the wooden carton and packing bag of the chassis Make sure that the carton and bag are clean dry and not damaged 2 Remove the top cap and side panels from the wooden carton and put the pallet base to a proper place 3 As s...

Page 94: ...t brackets and mounting brackets Before repackaging the switch chassis remove the cable management brackets and mounting brackets from the chassis Removing the mounting brackets To remove the mounting brackets 1 Prepare the packing box of the mounting brackets Make sure that the box is clean dry and not damaged 2 As shown in Figure 53 use a Phillips screwdriver to loosen the screws that fix the mo...

Page 95: ...provide a cable management bracket at the chassis bottom to route power cables The procedure for removing the cable management bracket is similar to that of the A10508 V To remove the cable management brackets 1 Prepare the packing bag of the cable management brackets Make sure that the bag is clean dry and not damaged 2 Use a Phillips screwdriver to loosen the screws that fix the cable management...

Page 96: ...ssis 2 Remove the cable management brackets Repackaging the switch chassis To repackage the switch chassis 1 As shown in Figure 55 align the screw holes on the two sides of the chassis bottom to the L type brackets on the pallet base of the wooden carton 2 Fix the screws shipped with your switch to the chassis through the L type brackets ...

Page 97: ...ooden carton at the clearance between the chassis and the wooden panel 6 Cover the foam cushion to the chassis top and make sure that the surface of the foam cushion aligns to the upper rims of the wooden carton Cover the foam cushion in a correct direction otherwise the foam cushion cannot be completely placed in the wooden carton 7 Cover the top cap to the wooden carton and then connect the pane...

Page 98: ...configuring the switch 41 Installing a card 24 Installing a power supply 25 Installing a transceiver module optional 29 Installing accessories to the chassis 17 Installing IRF member switches 33 Installing slide rails and cage nuts to the rack 12 Interface failure 48 IRF fabric setup flowchart 31 L LPU and switching fabric module failure 47 LPU LEDs 74 LPUs 63 M Module power consumption and system...

Page 99: ...witch and FRU aliases 2 Switching fabric module LEDs 75 Switching fabric modules 65 T Testing the connectivity 44 Tools and equipment 10 Transceiver modules 67 Troubleshooting methods 45 Troubleshooting the system 45 W Weights and dimensions 59 ...

Reviews: