12
Mounting the switch to the rack
CAUTION:
•
Do not hold the handle of the fan tray, power supply, or the back cover of the chassis, or the air vents
of chassis. Any attempt to carry the switch with these parts may cause equipment damage or even
bodily injury.
•
After placing the switch on the slide rails, do not let go immediately because this may tip the switch,
and damage the switch or even cause bodily injury.
To mount the switch to the rack:
1.
Move the chassis to face the rear of the chassis towards the front of the rack.
2.
Use at least two people to lift the switch by using the handles or supporting the bottom of the
chassis until the bottom of the switch is a little higher than the slide rails on the rack. HP
recommends using a mechanical lift for moving your switch.
3.
Place the switch on the slide rails and slide the switch along the slide rails until the mounting
brackets on the switch touch the front rack posts, as shown in callout 1 on
Figure 13
.
4.
Attach the chassis to the rack with mounting screws.
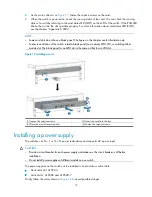
Figure 11
Installing the chassis to the rack (A10508)
(1) Slide the chassis into the rack
(2) Mounting brackets
(3) Screws for attaching the mounting brackets to the rack
NOTE:
If the screw holes on the mounting brackets cannot align with the cage nuts on the rack, check that the
bottom edge of the slide rail aligns with the middle of the narrower metal area between holes and that
the cage nuts are installed in the correct holes.


