background image

31

4 214 864 / 02

COMMISSIOnInG

NOTICE

The activation of the screed function must only be made by a specialist trained by Hoval or by Hoval cus-

tomer service.

Description of function

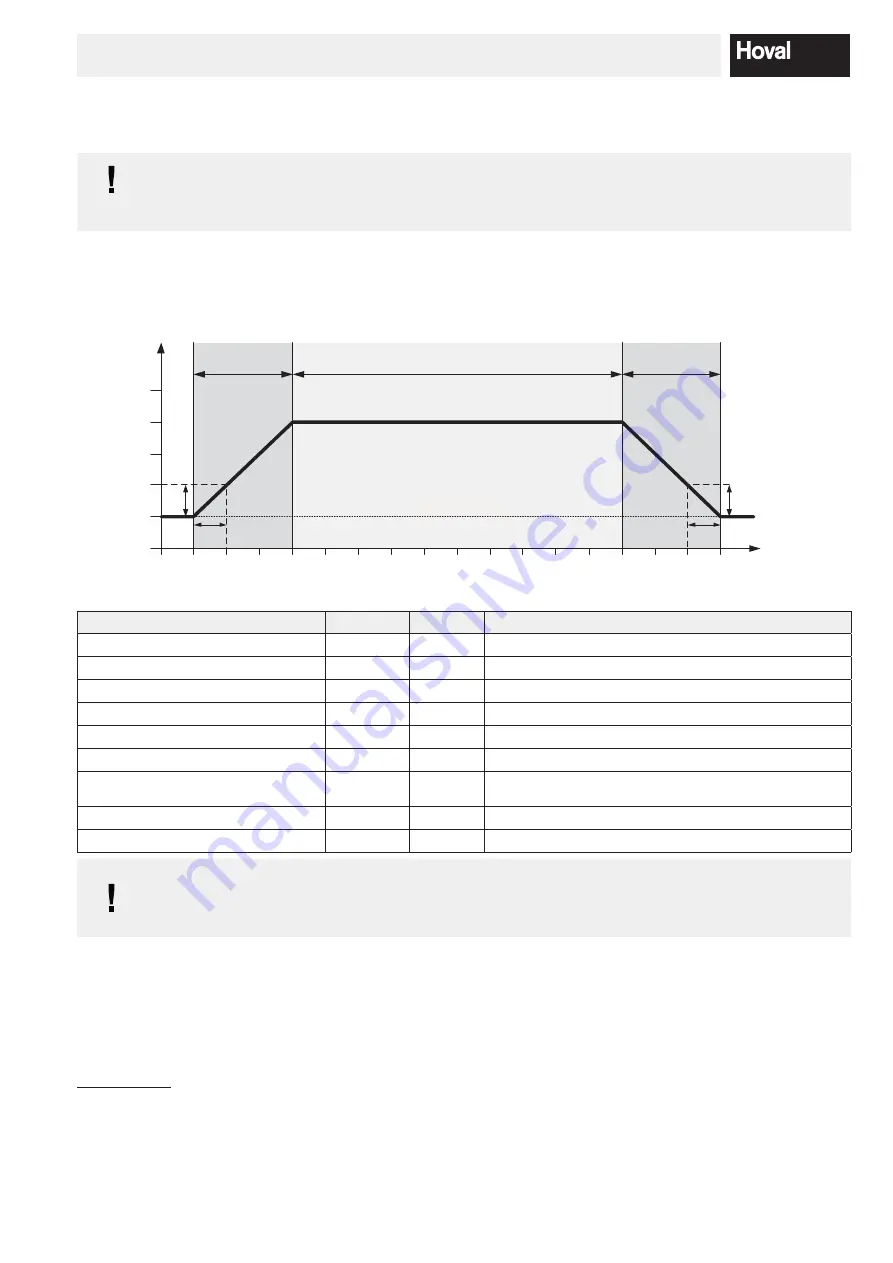
The control module of the TopTronic

®

 E contains a functional sequence used for drying out screed fl oors. To start the 

screed drying, it is necessary for the individual functions to be set accordingly.

Flow temperature

Start

Days

0

1

2

3

4

10

11

12

13

5

6

7

8

9

40°C

45°C

35°C

30°C

25°C

20°C

14

15

16

5K

1 d

Heating-up phase

( 04-061)

Inerta phase

( 04-064)

Cool-down phase

( 04-062)

Starttemperatur

( 04-075)

End

-5K

1 d

Start temperature

(04-075)

Function

Parameters Value

Description

Start temp. screed drying

04-075

25.0°C

Start temperature (from SW 2.09.xxx)

Heating-up phase

04-061

5 K/d

Kelvin per day (rising)

Stabilisation temperature

04-063

40.0 °C

Inertia phase fl ow setpoint

Inertia phase

04-064

10

Number of days in stabilisation temperature

Cooling off  phase

04-062

-5 K/d

Kelvin per day (falling)

Activate screed function

04-060

1 (ON)

Start and stop screed drying

Max. temp. diff . ramp increase screed func-

tion (from SW 2.03.xxx onwards)

04-069

10 K

Kelvin (FL act/set)

Information

Remaining run time screed function 

02-019

… days

Forecast in days

NOTICE

The graphic/table shows the factory settings. The time profi le and the maximum fl ow temperature must be 

discussed with the screed layer, otherwise there could be damage to the screen – and in particular, cracks.

REACTION

 screed function

•  Start/stop: Switch parameter 04-060 ON (1) or OFF (0) 

•  Power failure in heating-up phase: program restart

•  Failure in the steady-state phase: Retain maximum temperature and add the failure time to the steady-state phase

• 

Power failure in the cooling off  phase: Measurement of actual fl ow value and continue cooling until start value reached

•  Program end: Previous basic program active again

Additional info: 

When the screed function starts, the heating circuit pump is switched on and the screed function starts after 1 minutes. 

The FL set value must be reached in each case so the controller continuously increases the fl ow temperature according 

to the set ramp. With HC parameter “04-069 Maximum temperature diff erence ramp increase (factory setting: 10 K)” 

it possible to set by how much the FL set value calculation is allowed to increase without the actual value reaching the 

set value.

5.6 

Record - Activation of screed function

Summary of Contents for CompactGas

Page 1: ... and natural gas 42 CompactGas 700 250 700 kW 42 CompactGas 1000 300 1000 kW 42 CompactGas 1400 420 1400 kW 42 CompactGas 1800 540 1800 kW 42 CompactGas 2200 660 2200 kW 42 CompactGas 2800 840 2800 kW 42 CompactGas 3500 1050 3500 kW 42 CompactGas 4200 1260 4200 kW CompactGas 700 4200 for natural gas and liquid gas The gas boiler series CompactGas is suitable and approved for use as heat generator ...

Page 2: ...ters 13 3 Technical details 3 1 Description of the boiler 14 3 2 Technical data 15 3 2 1 Meaning of the data on the data plate 15 3 2 2 CompactGas 700 1800 16 3 2 3 CompactGas 2200 4200 17 3 3 Dimensions Space required 18 3 3 1 Dimensions 18 3 3 2 Base size 19 3 4 Flue gas and output diagrams 20 3 4 1 Flue gas output diagram 20 3 4 2 Flue gas resistance 20 4 Installation 4 1 Safety notices 21 4 2 ...

Page 3: ...heating systems 28 5 4 Venting the gas pipes 30 5 5 Handing over the plant to the operator 30 5 6 Record Activation of screed function 31 6 Maintenance 6 1 Information for combustion controller chimney sweep regarding emission monitor key 33 6 2 Safety notices 34 6 3 Venting 34 6 4 Replenishing water 34 6 5 Cleaning 35 ...

Page 4: ...ted to the flue gas pipeline at the chimney or flue Burner preset WARNING The heat generator can only be de energised by disconnection from the mains e g all pole switch WARNING All electric power supply circuits must be switched off before accessing the terminals 1 3 Explanation of the symbols 1 3 1 Warnings DANGER indicates a situation of immediate danger which will lead to serious or fatal inju...

Page 5: ...elivery contract The respective risk carrier bears the cost of repairs 1 5 Guarantee The warranty does not cover defects attributable to Failure to comply with these instructions Failure to comply with the operating instructions Incorrect installation Impermissible modifications Incorrect handling Contaminated operating materials gas water com bustion air Corrosion by halogen compounds e g paints ...

Page 6: ...ons of the gas supply companies Worksheet DWA A 251 Condensate from condensing boilers The regulations of the local water authorities could deviate from the rules in this worksheet Accident prevention regulations DGUV Regulation 1 Accident prevention regulations Guidelines for prevention DGUV Regulation 4 Accident prevention regulations Electrical installations and equipment Austria ÖNORM EN 12828...

Page 7: ...opens to the right However the boiler door hinges can be changed over to enable the door to be opened to the left This can be use ful when space is limited NOTICE Boiler door hinges may only be changed over by Hoval Service The boiler door must be closed when changing over the hinges procedure 1 For types 1800 2200 2800 3500 4200 only Dismantle support for door positioning 5 Fig 02 2 Tighten the t...

Page 8: ...t with sharp edges 1 Wrap the insulating mats 1 1 1 2 Fig 06 around the boiler body Place the insulating mat 1 2 so that the black side is on the outside and the large notch 1 2a is on the back 2 Fit tension springs 2 to hold the ends of the insulat ing mats 1 1 1 2 together 3 Fasten plastic straps 3 and strap fasteners 4 Do not overtighten the straps reduced insulating value 4 Place insulating ma...

Page 9: ...9 4 214 864 02 Assembly Divide insulating mat 8 1 8 2 if necessary 3 2 1 2a 4 1 2 1 1 5 1 5 1 6 9 7 8 1 8 2 8 3 Fig 06 ...

Page 10: ...1 17 2 to prevent ver tical circulation of air longitudinally on the left and right 8 Mount cladding covers 18 1 18 2 18 3 note the or der 9 Attach C clips 19 to the top of the front side walls 10 1 11 1 10 Installing cladding covers 20 Position cladding covers Secure cladding cover with 2 self tapping screws Ø 4 8 x 50 see detail B Align the cladding cover using the height adjustable bracket 21 1...

Page 11: ...11 4 214 864 02 Assembly A 23 1 22 24 22 C 10 1 A 21 14b 14a 24 15 16 10 1 10 2 14 18 2 18 3 18 1 11 2 11 1 17 2 17 1 23 1 23 2 B 12 13 1 13 2 19 19 4 20 23 3 25 CompactGas 1800 4200 2 part C Fig 07 ...

Page 12: ...16a Fig 10 5 Plug in the burner plug 6 Close the boiler controller and screw on 15c Fig 08 Continue fitting the cladding 2 4 1 2 Boiler controller T0 2 T2 2 15b 15c 15a 15 Fig 11 WARNING Capillaries must not be folded or kinked 1 Mount the special screws with nuts 15a Fig 11 on the side wall Fig 12 2 Hook the boiler controller 15 to the special screws 3 Fasten boiler controller with the self tappi...

Page 13: ... 29 each Secure the Phillips screw 28 by means of two countered hexagon nuts 30 to prevent it from be ing pulled out Do not clamp hinges A 26 28 29 30 45 facets on boiler side Fig 15 45 facets on boiler side 26 28 29 30 27 B Fig 16 3 Install one magnet 31 each on the top and bottom hole of the movable side shutter using a hexagon nut 32 washer 33 and hexagon screw 34 M4 x 10 see detail C 34 33 32 ...

Page 14: ...n energy saving gas boiler The CompactGas has a horizontal combustion chamber as primary heating area and a secondary heat ing area consisting of aluFer composite tubing The CompactGas is designed for operation using natural gas and liquid gas The construction principles are dis played in the following diagram Fig 19 ...

Page 15: ...s burner type plate Elektroanschluss Raccordement électrique Collegamento elettrico Electrical Connection NOx Klasse Gas Classe NOx Gaz Classe NOx Gas NOx class Gas NOx Klasse Heizöl Classe NOx mazout Classe NOx olio NOx class Oil EU qualification approval PED CE 0036 B23 B23P CE Nr N CE Numero CE CE No CE 0085BT0376 SVGW Nr SVGW No Nº SVGW N SVGW 11 039 4 230V 50Hz 10A IP20 max 10 W PMS bar 540 1...

Page 16: ...boiler 3 z value 0 012 0 012 0 003 0 003 Water flow resistance at 20 K mbar 10 8 22 0 10 8 17 9 Water flow volume at 20 K m h 30 0 42 9 60 0 77 1 Boiler water content litres 670 1130 1580 2020 Insulation thickness boiler body mm 80 80 80 80 Weight incl cladding kg 1390 2100 2794 3500 Weight without cladding kg 1250 1960 2654 3200 Heating surface m 36 52 44 23 68 49 89 51 Combustion chamber dimensi...

Page 17: ... boiler 3 z value 0 003 0 002 0 002 0 002 Water flow resistance at 20 K mbar 27 29 45 65 Water flow volume at 20 K m h 94 120 150 180 Boiler water content litres 2534 2844 3553 3628 Insulation thickness boiler body mm 80 80 80 80 Weight incl cladding kg 4455 5702 7980 8200 Weight without cladding kg 4105 5302 7580 7800 Heating surface m 117 26 142 34 178 33 217 21 Combustion chamber dimensions Ø i...

Page 18: ...7 3430 638 2100 187 3500 1850 1928 1995 1018 360 400 450 6xM16 15 553 2398 3905 337 3510 668 2123 236 4200 1850 1928 1995 1018 360 400 450 6xM16 15 603 2398 4205 337 3810 668 2423 236 1 Flow 700 DN 125 PN 6 1000 DN 125 PN 6 1400 DN 150 PN 6 1800 DN 150 PN 6 2200 DN 150 PN 6 2800 DN 200 PN 10 3500 DN 200 PN 10 4200 DN 200 PN 10 2 Return 700 DN 125 PN 6 1000 DN 125 PN 6 1400 DN 150 PN 6 1800 DN 150 ...

Page 19: ...38 1210 96 1487 180 125 1400 1480 1886 1563 810 330 400 450 403 80 2593 209 2300 438 1350 112 1708 200 150 1800 1580 2038 1663 860 360 400 450 453 80 2731 209 2438 438 1350 112 1808 200 150 2200 1580 2038 1663 860 360 400 450 453 80 3506 209 3213 438 2125 112 1808 200 150 2800 1680 2188 1763 910 360 400 450 503 80 3723 209 3430 638 2100 112 1908 200 200 3500 1850 2398 1973 1018 360 400 450 553 80 ...

Page 20: ... gas temperature of approx 6 8 K A modification of lambda λ of 0 09 causes a modification of the flue gas temperature of 8 K Values calculated without liability Values calculated without liability Flue gas temperature C Nominal output kW 70 75 80 85 90 95 100 105 200 400 600 800 1000 1200 1400 1600 1800 2000 2200 2400 2600 2800 3000 3200 3400 3600 3800 4000 4200 700 1000 1400 1800 2200 2800 3500 4...

Page 21: ...at the partial vacuum in the boiler room must not exceed 3 N m2 To comply with this requirement an air supply cross section of 500 cm2 is to be provided up to a nominal heat output of 1000 kW With rectangular apertures the side ratio is not to exceed 1 5 1 and an ap propriate supplement is to be made with grilles to ensure that the free cross section reaches the above values In Austria the ÖNORM H...

Page 22: ...n Switzerland take note of SIA Recommendation 384 4 In Austria the calculation is carried out according to ÖNORM M 7515 The values for calculation can be obtained from the table in chapter 3 2 Technical data page 15 ref a Chimneys according to EN 13384 part 1 2 execution types I and II are appropriate for modern firing systems advice from the chimney specialist is necessary Pay attention to the fl...

Page 23: ...n be covered with a noise damping hood It is recommended to incorporate a noise damper downstream of the boiler in the flue gas pipe 4 5 Hydraulic connection In accordance with EN 12828 2003 the following safety devices are integrated in the boiler temperature regulator temperature measuring device TBmax 20 safety temperature limiter A complete failure of the water circuit must be taken into accou...

Page 24: ...see technical data 4 6 Gas connection DANGER Danger of explosion if there are leaks in the gas fittings After installing the boiler check all gas pipes and fittings for leaks For gas connection see diagrams in chapter 3 3 1 Lead the gas connection straight towards the rear After installation check for leaks TTE WEZ TopTronic E basic module heat generator installed VF1 Flow temperature sensor 1 B1 ...

Page 25: ...ead laterally along the boiler into a cable channel forward towards the control box A removable narrow covering is located on the con trol box The cables may be lead through the cover open ing into the control box Important A main switch must be installed on site in the supply line which performs an all poles cut out and has a clearance of at least 3 mm between the open contacts For Switzerland Th...

Page 26: ...ures must be taken in the building and on electri cal equipment to protect the units against overvoltage caused by lightning strikes The mains connection for the heating system must be designed as an independent electrical circuit Neither fluorescent lamps nor any other equipment which might cause interference may be connected nor may it be possible to connect such equipment Wärmeerzeuger Heizraum...

Page 27: ...e CO2 value is correctly set 5 1 Safety notices CAUTION Risk of injury for non expert personnel Initial start up maintenance and cleaning work are only allowed to be performed by trained specialist personnel or by Hoval cus tomer service Damage to the system by filling unauthorised liquids The filled water must be of drinking water quality see chapter 5 3 5 2 Charging with water Only authorised pe...

Page 28: ... μS cm pH value of the heating water for systems without aluminium alloy as water side material 8 2 to 10 0 measurement 10 weeks after commissioning at the earliest The sum of the chloride nitrate and sulphate contents in the heating water must not exceed 50 mg l in total Additional notices Hoval boilers and calorifiers are suitable for heating systems without significant oxygen intake System type...

Page 29: ...llowing systems must be equipped with separate circuits Systems with continual oxygen intake e g underfloor heating without diffusion proof plastic piping Systems with intermittent oxygen intake e g requir ing frequent topping up In the case of bivalent heating systems the values of the heat generator with the strictest requirement for wa ter quality must be complied with If only the boiler is rep...

Page 30: ...he plant installer is responsible for providing instruction covering the entire plant The following steps must be carried out when handing over the plant Instruction in the operation and upkeep of the plant Handing over of all instructions and documents Providing notice to the operator that these instructions must always be kept available near the plant Written confirmation of the instruction Comp...

Page 31: ...rom SW 2 03 xxx onwards 04 069 10 K Kelvin FL act set Information Remaining run time screed function 02 019 days Forecast in days NOTICE The graphic table shows the factory settings The time profile and the maximum flow temperature must be discussed with the screed layer otherwise there could be damage to the screen and in particular cracks REACTION screed function Start stop Switch parameter 04 0...

Page 32: ...well Prioritisation of the screed func tion means the settings are only ac tive at the end of the function 2 Information remaining run time Request of the active function phase the ACT temperature as well as the remaining run time Logging Please cut out the log and attach it to the controller during active screed function NOTICE The time profile and the maximum flow temperature must be discussed w...

Page 33: ...information see operating instructions Emission chapter Power limitation with 2 stage burner 0 to 50 1st stage 51 to 100 2nd stage REACTION to emission metering Go back after expiry of the time unit time specification of return to the main menu Setpoint temperature Maximum temperature limit Forced energy is used in an attempt to keep the corresponding heat generator temperature to 60 C Regulate he...

Page 34: ...nel 6 3 Venting 1 Open all radiator valves 2 Heat up plant for at least 12 hours with a high flow temperature 3 Switch off boiler and wait for 5 minutes 4 Thoroughly vent the plant 6 4 Replenishing water The European Standard EN 14868 and the Directive VDI 2035 must be observed see chapter 5 3 Replacement water has to be refilled if the pressure falls below the minimum plant pres sure 1 Connect ho...

Page 35: ...etection of degree of pipe contami nation 51 Fig 27 6 The pipes 51 Fig 27 must be cleaned even if minor contamination resp incrustation has been detected 7 Thoroughly clean combustion chamber 50 Fig 27 using a brush or spray 8 The second compartment 51 Fig 27 must be cleaned by means of a high pressure cleaner e g Kärcher Fig 28 with a special nozzle point jet noz zle Fig 29 and hot water 9 Close ...

Page 36: ...36 4 214 864 02 ...

Page 37: ...37 4 214 864 02 ...

Page 38: ...Type Serial number Year of manufacture Place Date System installer System user Confirmation The user owner of the system herewith confirms that he has received adequate instruction in the operating and maintenance of the installation received and taken note of the operating and maintenance instructions and where applicable other documents con cerning the installation and any further components and ...

Reviews: